woensdag 31 juli 2019

My Favorite Things Guest Designer - Wednesday Sketch Challenge

Hallo allemaal / Hello everyone,

Another Wednesday has arrived that means a new Sketch Challenge is up on the blog of My Favorite Things. This week we have a very interesting sketch if you ask me. You can make anything with it. But i really struggled with this sketch, but luckily it worked out great!. So here is my take on this weeks sketch.


For my card i first made the background. On my Tim Holtz platform i smooched some Satly Ocean Distress ink and then sprayed some water onto it. I dragged my paper true it and heat set it. I repeated this step until i was happy with the outcome.

Die cut the glasses and colored them in with my Copic Markers so they would look like some colorful cocktails. 


On the left side of the panel i cut a strip of black and white paper. And to follow the sketch i heat embost three sentiments on to black cardstock. 


Have a lovely day!

Greets, Marieke

Stamps: A toast to you
Dies: Let's toast, Birthday cocktail, blueprint 27 (sentiment strip),
Ink: Salty Ocean Distress inkt, Tsukineko Versamark
Paper: Black Licorice, Black and white striped paperpack
Extra: Ultra fine white embossing powder.

zaterdag 27 juli 2019

Kraftin' Kimmie Saturday Challenge - Stitching

Hallo allemaal / Hello everybody!

Today it's Saturday wich means a new challenge started over at Kraftin Kimmie Stamps Blog, today the theme is Stitching. You can go every route with this theme so get your stamps, ink and stencils out and play along.


We always enjoy your creations so be sure to submit them so you can have a chance to WIN a $40 gift card to the Shop!! Show us your stuff!! In keeping in line with the rest of our challenges (our Krafty Scrappy Challenge), we will be drawing one winner per month from all Saturday Challenge entries to win a $40 gift card!! You can enter as many times per month as you'd like!!


First of i made a background using two different inks and a snowflake stamp. Die cut the rest of the parts and gave it some texture using my Copic Markers, gesso and acrylic paint markers.

Stamped the penguin and trees and colored them up using my Copic markers. Fussy cut them out and place them on the card.


The sentiment i stamped on to black paper and heat embost is. Die cut it afterwards and placed it on the card.

Have a lovely day!

Greets, Marieke

Dies: Single stitched lines Circle, Snow Drifts, Slanted sentiment strips, Stitched Mountain range die-namics
Ink: Tsukineko Versamark, Wicked Black, Bubbly Blue, Mermaid Melody
Extra: White Gesso, Molotow White and Black acrylic paint marker


You are invited to the Inlinkz link party!
Click here to enter

woensdag 24 juli 2019

My Favorite Things Guest Designer - Wednesday Sketch Challenge

Hallo allemaal / Hello everyone,

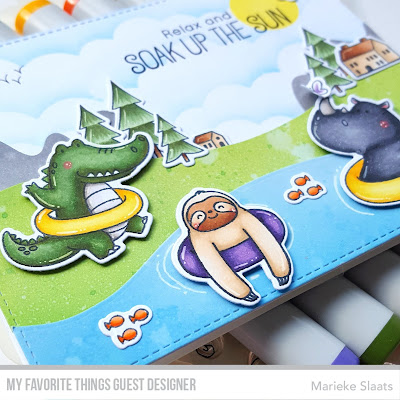
Another Wednesday has arrived that means a new Sketch Challenge is up on the blog of My Favorite Things. This week we have a very versatile sketch if you ask me. You can make anything with it. But as most people know i like to create scene's. So here is my take on this weeks sketch.


First i made the background. I die cut a panel and masked a circle, then use the cloud stencil and some distress ink to make the clouds. I removed the circle and colored in the sun. Splattered everything with water to give it some interest. Stamped the sentiment and used a black fineliner to make some birds in the background.

With two different colors of green i made the grass en splattered some water en green mixed with water on the panel. Die cut it using the same rectangle die and i made the swirl using another die. I did exactly the same for the water except i used two colors of blue distress ink.


For the hills i used another Die-Namcis, colored it in using some grey Distress ink and glued them behind the grass. The are even straight so they would be high enough i knew i would cover the gaps up using the buildings and trees.


Stamped all the images using my Copic friendly ink and colored everything in using my Copic Markers. Die cut everything using the matching Die-Namics and finished of the scene placing them all in the appropriate place. 


Have a lovely evening!

Greets, Marieke

Stamps: Sunshine & Friends, Beast Friends, Ready set Snow, Purrfect Friends.
Dies: Sunshine & Friends, Beast Friends, Ready set Snow, Purrfect Friends, Ocean Waves, A2 Stitched Rectangle staxx, Mountain High Die-Namics.
Ink: Twisted Citron, Mowed Lawn, Salty Ocean, Tumbled Glass, Squeezed Lemonade, Weathered Wood Distress ink, Memento Tuxedo Black.
Extra: Mini Cloud Edges Stencil

donderdag 18 juli 2019

As you like it challenge guest designer - Bird or Beast

Hallo allemaal,

Daar was ik weer eens ditmaal voor een nieuwe challenge by As you like it challenge blog. Deze week is het een keuze week. De keuze is bird or beast, ik vind beide leuk om iets mee te doen, echter koos ik deze keer voor bird omdat de zomer me erg doet denken aan tropische vogels met mooie kleuren.


Als basis stanste ik een stuk wit cardstock dat ik bewerkte met distress inkt en bespetterde met water. Plakte dit op een witte topfold kaart en legde het aan de kant. Uit goud cardstock stanste ik de onderkant van de taart. 


Op Copic papier stempelde ik de flamingo's, cocktails, paraplu's en de taart. Op de taart stempelde ik allemaal tropische bladeren en kleurde deze in met mijn Copic markers. Plakte dit vast aan de standaard en stanste het ovaaltje om de taart compleet te maken.


Kleurde de flamingo's, paraplu's en cocktails in met mijn Copic markers en stanste ze uit met bijbehorende stansen. Plakte dit op de taart als toppers. Heat emboste de tekst op zwart cardstock en plakte dit als laatste op de kaart met 3-d tape.

Fijne dag allemaal!

Groet, Marieke

Met de kaart wil ik graag meedoen met de volgende challenge's:
Simon says Monday Challenge - Animal Magic
Simon Says Wednesday Challenge - Make your own background
Dies R Us - Birthday
Penny Black and more - Summer colors

Stempels: Sassy pants birthday greetings 2. Let's Flamingle, Sunshine & Friendship.
Stansen: Let's Flamingle, A2 rectangle stax, Celebrate with cake Die-Namics.
Inkt: Salty Ocean Distress inkt, Memento Tuxedo black, Tsukineko Versamark
Papier: Black Licorice, Smooth white, Copic paper, Goud cardstock
Extra: Ultra fine white embossing powder.

woensdag 17 juli 2019

My Favorite Things Guest Designer - Wednesday Sketch Challenge

Hallo allemaal / Hello everyone,

It's another Wednesday that means a new Sketch Challenge starts on the My Favorite Things blog. As you all know the new release is available as we speak, did you buy anything yet? Well it was fun to play with the new release already and for this weeks card i played with the new release products also.


For this weeks sketch i started making the background using two different colors of distress inks. I blended them together and used the star stencil i wanted the stars on the bottom so it would sparkle at the animals but at the end you did not see any of the stars... I splattered some white paint splatters to break the background a bit.

I die- cut the panel out of white cardstock and cut away one vertical line so it would match this weeks sketch. I glued it on the base using thicker 3-d tape.


Die cut the word Celebrate three times out of white cardstock and once out of blue cardstock and glued them on to each other. Stamped the sentiment and die cut it with a banner die. 


Stamped all the images and colored them up using my Copic markers. I die cut them using the matching Die-Namics and glued them on the card.

Have a beautiful day!

Greets, Marieke

With the card i would like to enter:
Dies R Us - Birthday
Simon says Monday challenge - Animal Magic

Stamp: Sending Sweet Celebration Wishes, Bitty Birthday Wishes
Dies: Sending Sweet Celebration Wishes, Blueprint 27, Gift box Cover-up, Celebrate Die-Namics
Ink: Versafine Onix black, Memento Tuxedo black, Mustard Seed and Squeezed Lemonade distress ink.
Paper: Summer Splash and Smooth White
Extra: white Molotow acrylic paint marker

Kraftin' Kimmie - Inspirational Wednesday

Hello everyone / Hallo allemaal,

Today it's my turn to inspire you for the inspirational Wednesday post over at the Kraftin' Kimmie blog, and as it is July i thought it would be fun to inspire you with a Christmas card.


Like most know i tend to make two to three cards a month so i don't have to rush at the end of the year. For this weeks inspirational Wednesday i used Mr & Mrs Claus stamp.


First of for my background i used Enchanting Emerald en Charming Chartreuse hybride inks. I blended them together and with the Charming Chartreuse i lifted my blending tool at the end so it would fade out on my paper. With some silver glitter paper i die cut the some snowflakes and placed them on the panel so i would know were i wanted what. I always make a photo of it so i know were to place when i'm done again. Before i glued the snowflakes i splattered some white paint splatters on the base to give it a bit more interest. Glued the snowflakes and die cut it using a rectangle stitched die panel. 


I used Mrs Claus and stamped here using Wicked Black. I Colored her up using my Copic markers and ended up fussy cutting here. The Christmas sentiment comes from the Shake it up stamp

Used Copic Colors:
Red - R59, R29, R27, R24
Green - YG67, YG63, YG03
White - C3,  C1, C00
Brown - E37, E35, E33
Skin - E000, E00, E04, E11, E21, R20

Have a lovely day!

Greets, Marieke

With the card i would like to enter:
Papercraft Challenge - Sparkles
Ally's Angels - Anything Goes
Kreative Scrapping - Christmas in July
Tuesday Throwdown - Add some bling

Stamp: Mr & Mrs Claus, Shake it up
Dies: Polaroid shaker Frame, Layered Snowflakes, Merry Christmas, A2 stitched rectangle stax Die-Namics.
Ink: Wicked Black, Charming Chartreuse, Enchanting Emerald, Tsukineko Versamark
Extra: Ultra fine white embossing powder, gold rhinestones. 

zondag 14 juli 2019

July release and krafty hop!

Hello everyone!

And the day has come that the July Release by Kraftin' Kimmie stamps is available! Go quickly to the shop and make sure to buy all our new goodies!


So to recap again what awesome goodies we had this release you can hop along the designer blogs and see even more inspiration using one or more of the July release products!

I kept my card really CAS this time around. Die cut a white frame and i die cut a heart out of it. On the base of the card i made some clouds using the scenery stencil. 

Behind the panel i attached some leaves and i made a swing using twine and a piece of kraft cardstock.


Stamped the image using wicked black and colored it up using my Copic markers. I adhered it to the swing and placed the swing behind the leaves. Stamped the sentiment using Raspberry Rose and adhered the panel to the base of the card.

Happy Hopping!

Greets, Marieke

Stamps: My Gnomies
Dies: Interactive swing, A2 rectangle stax Die-namics, Marianne Design craftable hearts (CR1351)
Ink: Wicked Black, Raspberry Rose, Salty Ocean distress ink.
Extra: Twine, Krafty Sceney stencil


You are invited to the Inlinkz link party!
Click here to enter

zaterdag 13 juli 2019

Krafty Peek day 3: My Gnomies + a challenge

Hello all,

Welcome to day three of the July Krafty peeks by Kraftin' Kimmie stamps. It's the last day because of tonight all the goodies will be available in store. Today we have a really versatile set by artist Melisa! 


The set is a really fun a cut set with different types of gnomes and offcourse a couple of matching sentiments.


For my card i used a topfold card wich i covered using some designpaper. Die cut the frame five times and glued them on top of each other so i would create some depth.


For my card i used the new color ink to make a background. Added some bird with a fine liner and added some clouds wich i also gave a bit of orange color. 

Die cut some grass out of green cardstock and added some Charming Chartreuse ink to it. Die cut the mushroom twice out of Copic paper and colored them up using my Copic markers. Gave the mushroom some extra with  some liquid applicator.


Stamped the sentiment and the images using Wicked black and colored them in using my Copic markers. Fussy cut the images and place them inside the frame.

Have a lovely day everyone!

Greets, Marieke

Stamps: My Gnomies
Dies: grassy fields, Puffy clouds, A2 rectangle frame Die-Namics, Noor! Design mushroom border (6002/0970) 
Paper: Tiny check paperpack
Extra: Liquid applicator


You are invited to the Inlinkz link party!
Click here to enter

vrijdag 12 juli 2019

Krafty Peeks day 2: Just one more page

Hello all,

Welcome back to Day TWo of our July Krafty Peeks at Kraftin' Kimmie Stamps! Today we are sharing an awesome Teen set by artist Emily Goulet called Just one more page!
It's a single image set with three fun and quirky sentiments to go with the set.


For my card i decided to keep it simple. Stamped the image with our hybride ink and colored here up using my Copic Markers. Fussy cut here out and set her aside. 
Cut a topfold card and masked the card two cm from the bottom. Inked some Salty Ocean and then took the Starburst stencil and inked again. Stamped the sentiment on the card and placed the image on the card using 3-d tape.
Have a lovely day!

Greets, Marieke

Stamps: Just one more page
Ink: Wicked Black, Salty Ocean
Extra: Starburst Stencil

You are invited to the Inlinkz link party!
Click here to enter

donderdag 11 juli 2019

Krafty Peeks day 1: Life is a joy!

Hello all / hallo allemaal,

Welcome to dat one of the July release peeks by Kraftin' Kimmie stamps. Today we are sharing a awesome love stamp set from artist Cheryl Grant! It's called Life is a  Joy!


It's a two image set combined with six sentiments to compliment the images. 


For my card i started making the background panel. I used the krafty Scenery stencil to make the clouds and die cut it using a rectangle die. Glued the panel to a top fold red card base.


I die cut the grass and road out of cardstock and glued them together so it would look like a road all together. Die cut some red flowers to compliment the card.


Die cut the trees in two different colors of cardstock and glued them together. Die cut the leaves out of green cardstock and flued those on the trees.

Heat embost the sentiment on to a strip of red cardstock and die cut it using a banner die.


Stamped the image using wicked black and colored here up using my Copic markers. Fussy cut her out and glued her on to the card. 


Have a lovely day!


Greets, Marieke


Stamps: Life is a joy
Dies: Birch trees, Birch Trees (straight), stitched snow hills, rectangle staxx a2, Grassy Fields, Slanted sentiment strips, Tree branch Die-Namics, Marianne Design flowers CR1394
Ink: Tsukineko Versamark, Wicked BlackMossy MeadowMarvellous Mocha, Charming Chartreuse 
Paper: Wild Cherry, Sour Apple, Green Room, White and Kraft cardstock
Extra: Krafty Scenery Stencil, Ultrafine white embossing powder


You are invited to the Inlinkz link party!
Click here to enter

woensdag 10 juli 2019

My Favorite Things Guest Designer - Wednesday Sketch Challenge

Hallo allemaal / Hello everyone,

It's another Wednesday that means a new Sketch Challenge starts on the My Favorite Things blog. As you all know the new release is available as we speak, did you buy anything yet? Well it was fun to play with the new release already and for this weeks card i played with the new release products also.


For this weeks sketch i again choose to make a card using the images to be the focal point of my card. First of i made a background using Distress inks and my White Sharpie. I made a sandy beach and with the Swimming Pool Die-Namics it completes the scene. 

The Swimming pool i die cut twice. Once for the inside wich i made using Distress inks and one out of white cardstock and i cut the border of the swimming pool to glue it on top.


Stamped all the images out of the set Sunshine & Friendship set and colored them in using my Copic Markers. I Die cut them using the matching Die-Namics and glued them on the card. I heat embost the sentiment on some black paper.

Have a lovely day!

Greets, Marieke

Stamps: Sunshine & Friendship, 
Dies: A2 rectangle stax, Swimming Pool Die-Namics, Sunshine & Friendship Die-Namics
Ink: Salty Ocean, Tumbled Glass, Tea Dye and Scattered Straw Distress ink, Memento Tuxedo black, Tsukineko Versamark
Paper: Smooth White and Black Licorice
Extra: White Sharpie, Ultra fine white embossing powder

dinsdag 9 juli 2019

My Favorite Things and Friends July release

Hello all / hallo allemaal,

The July release by My Favorite Things is available as we speak! I made several cards with the amazing new products so have a sit back and enjoy them! If you wanne see what all the other girls made go have a look over here!


First off i made a card using the Cocktail hour Die-Namics combined with the sassy pants birthday greetings 2. Masked the bottom part and gave a smooch with salty ocean. Splattered some water and stamped the sentiment. 

Die cut the cart from gold paper and the wheels from steel grey and glued them together. Out of Copic paper i die cut the bottles, shaker and glasses and colored them in using my Copic markers. Glued everything on the card and finished of with some clear droplets.


For my second card i went drunk again ;). I die cut the Birthday Cocktail Die-Namics out of Copic paper and  Black Licorice cardstock. The cocktail glasses i colored again using my Copic markers. On to the small banner i stamped the age "40" using the Fabulous at Any Age stamp and glued the bow and banner on to the glasses.

Out of white and Pineapple cardstock i die cut the Simple Cheers Die-Namics and glued them onto each other. I heat embost the sentiment on some Black Licorice cardstock and die cut it using the small banner from Blueprint 27 Die-Namics.


For the background i heat embost the Happy Birthday background stamp and colored it in using three different colors of Distress Oxide inks. Die cut the panel using the scalloped frame from the Blueprint 27 Die-Namics. 

I measured the middle of the panel and die cut the Square Trio Shaker window Die-Namics. I glued the three squares that dropped out on to a panel of white cardstock. Filled the Square trio Shaker Pouches with an as sortie of orange sequins and glued the panel on to the Shaker pouch. I cloud now safely glue the Shaker Pouch on to my card. 


So for my last card i went interactive, i could not resist the Twist & Turn Die-Namics. So i played with them combining them with Mermaid for each other stamp. First of i made the interactive panel using the Youtube video of Laura. 


Then i made the background panel of the card using three different colors of Distress inks. I splattered some water, water mixed with distress inks and some white acrylic paint on the background. Cut the panel using the largest die from the A2 Rectangle Die-namics. 


I die cut some pieces out of the Under the sea Die-Namics and also used some images from the stamp that i colored up using my Copic Markers. Stamped the two mermaids and colored them up also and die cut them using the matching Die-Namics. I glued everything on the panel except for the mermaids. Glued the interactive panel to a topfold card and on to the interactive panel i placed the ocean panel. to finish my interactive card i placed the mermaids on the right spots and was pleased to see my card worked!


Have fun hopping around. Thanks for visiting my blog, hope to see you again soon!

Greets, Marieke

donderdag 4 juli 2019

As you like it challenge guest designer - Baby

Hallo allemaal,

July is een drukke maand zoals jullie wel zullen merken, ik ben bij verschillende challenge blogs en merken gastdesigner en daarnaast heb ik dan mijn "normale" post. Ik blijf het een hele eer vinden om met mijn hobby dit te kunnen doen en te mogen maken.


Vandaag dus een post voor As you like it Challenge blog. Daar gaat vandaag een challenge van start met het thema "Baby" alles mag zolang je maar vertelt wat je hebt gemaakt.


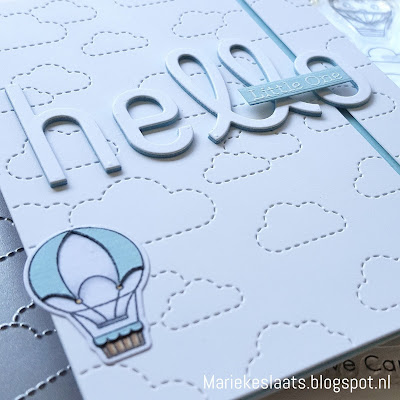
Ik maakte een set kaarten, ik probeer waar mogelijk twee babykaarten te maken zodat ik er altijd wel wat in mijn voorraad heb. Nu merk ik zelf dat ik vaak geneigd ben om voor een jongens kaart te gaan maar deze keer werden het er dus twee.


Uit wit cardstock stanste ik twee keer de achtergrond en sneed deze op twee cm van rechts los. Maakte een topfold basis kaart en plakte daar een stuk roze en een stuk blauw cardstock op. Daarop ging met 3-d tape de achtergrond maar zo dat er een stuk gekleurd cardstock zichtbaar is. 


Uit wit cardstock haalde ik twee keer het woord hello en herhaalde dit nog zes keer uit blauw en roze cardstock. Plakte dit alles op elkaar en eindige met wit cardstock. Plakte het woord op de kaart.


Op roze en blauw cardstock heat emboste ik de tekst en stanste dit uit to een kleine banner. Dit ging met 3-d tape op het woord hello.


De luchtballon stempelde ik twee keer op Copic papier en één keer op het roze en blauwe cardstock. Kleurde de luchtballonen in met mijn Copics en stanste deze. Uit de blauw en roze luchtballon knipte ik drie onderdelen en plakte deze op de gekleurde luchtballonnen en plakte deze op de basiskaart.

Fijne dag allemaal!

Groet, Marieke

Stempels: Up in the Air, Hello, little one
Stansen: Stitched cloud backdrop Lawn Fawn, simple hello, Up in the air, Blueprint 33 Die-Namics
Inkt: Tsukineko Versamark
Papier: Smooth White, Cotton Candy, Sno Cone