zondag 27 februari 2022

My Favorite Things - Tweet Greetings Card Kit

Hello all,

Did you shop it yet? The newest Card Kit by My Favorite Things? Buy it quick because gone means gone for ever! En hebben jullie de nieuwste Card Kit van My Favorite Things al gekocht? Zorg dat je er snel bij bent want weg is weg!
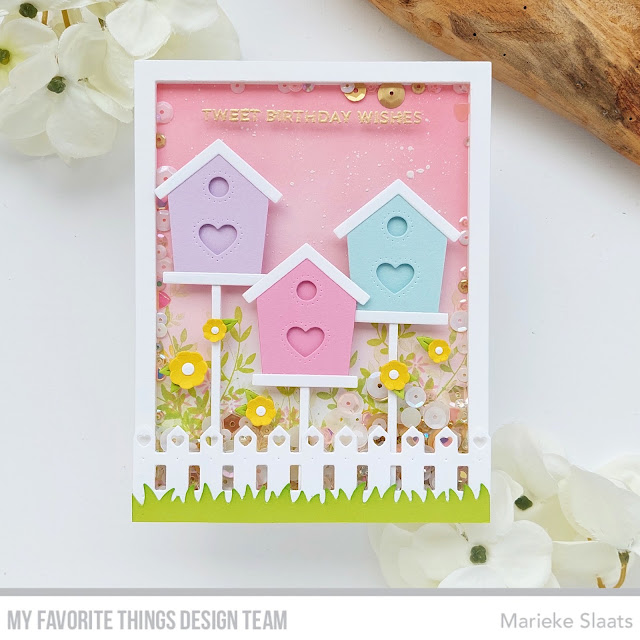
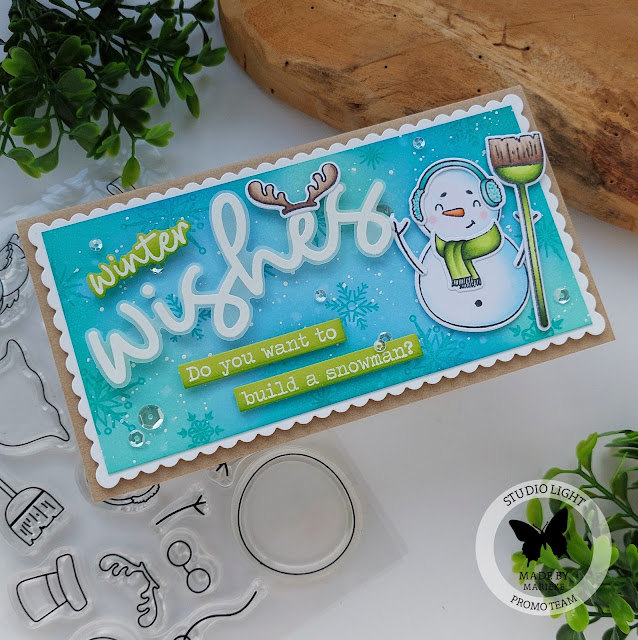
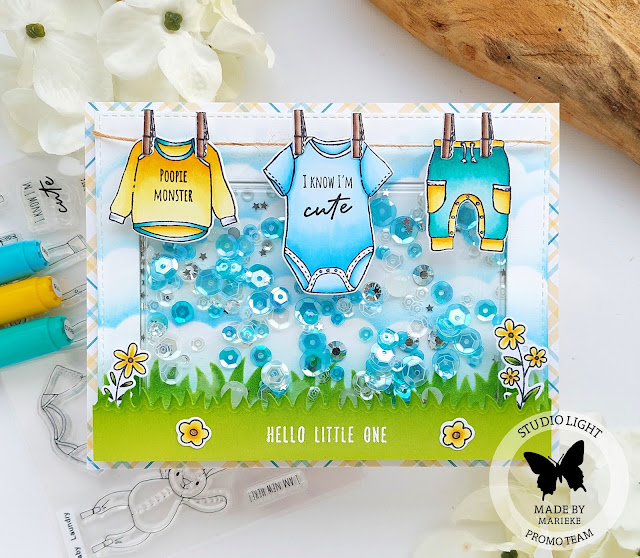
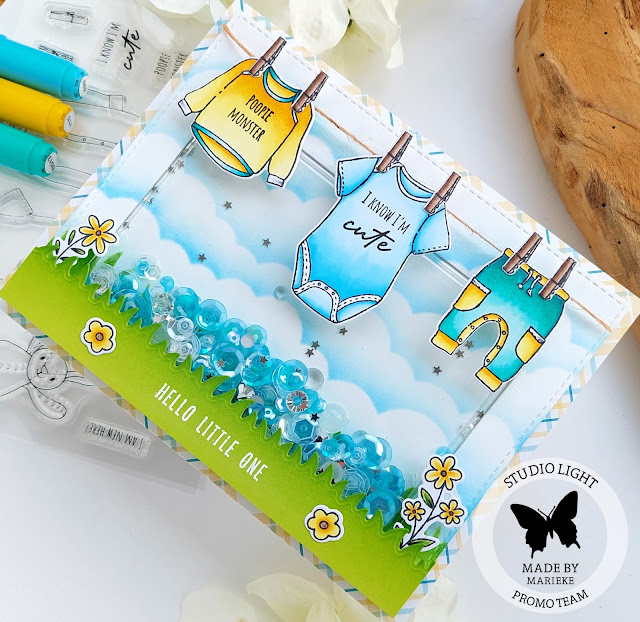
I made another inspiration card for you using the products release with this Card Kit. This time I decided to turn it into a shaker card.
Ik maakte nog een inspiratie kaart voor jullie met de nieuwste producten uit de Card Kit. Deze keer besloot ik om een shaker kaart te maken.
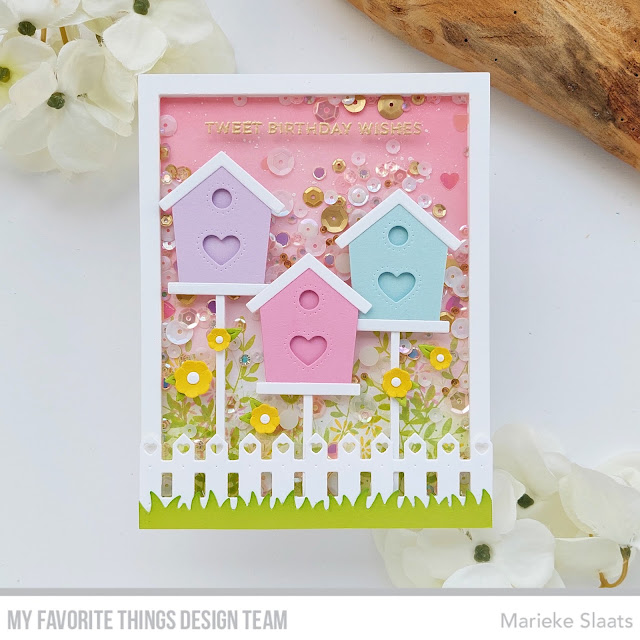
I started with the background. Inkblended some Spun Sugar and Worn Lipstick on the top of a white rectangle. Inkblended some Twisted Citron on the bottom and started stamping the leaves and flowers out of the Dandelion Greenery stamp using Limelight, Lemon Drop and Cotton Candy. Ik maakte eerste de achtergrond. Inktblende wat Spun Sugar en Worn Lipstick aan de bovenkant van een witte rechthoek. Inktblende wat Twisted Citron op de onderkant en begon met stempelen van de bladeren en bloemen uit de Dandelion Greenery stempel met Limelight, Lemon Drop en Cotton Candy.

Die cut the two A2 Rectangle Frames and adhered a sheet of acetate behind one. Heat set the sentiment out of the Tweet Greetings onto it and filled up the shaker. Closed the shaker and adhered it onto a Smooth White basecard. Stanste twee A2 Rectangle Frames en plakte achter een een acetate rechthoek. Heat emboste de tekst uit de Tweet Greetings, vulde de shaker en plakte hem dicht.
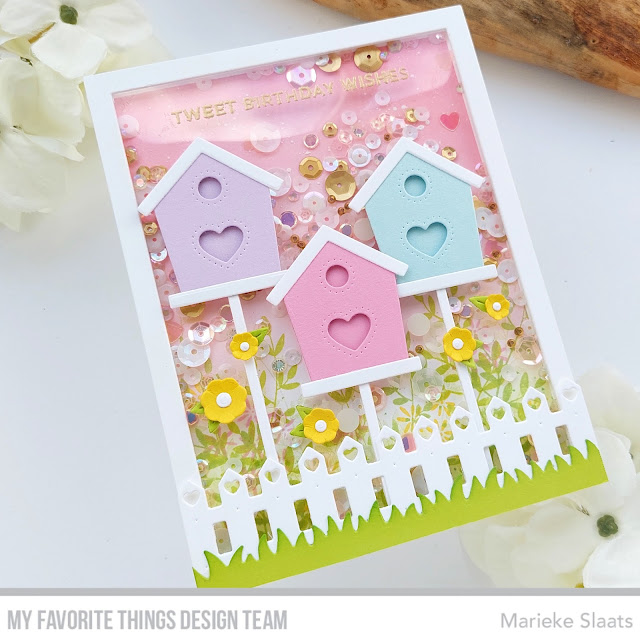
Die cut the birdhouse out of the Home Tweet Home Die-Namics out of Cotton Candy, Grapesicle, Sno Cone and Smooth White. Adhered them together and onto the card, added some flowers out of the Birds of a Feather Die-namics. Die cut the Heartfelt Fence Die-Namics out of Smooth White and added some Limelight grass on top of it. Stanste de vogelhuisjes uit de Home Tweet Home Die-namcis uit Cotton Candy, Sno Cone, Grapesicle en Smooth White. Plakte alles op de kaart en plakte wat gele bloemen uit de Birds of a Feather Die-Namics. Stanste de Heartfelt Fence Die-Namics uit Smooth White en voegde wat Limelight grass toe.

If you need to be even more inspired after this post make sure to have a look over at My Favorite Things Youtube ChannelWanneer je na deze post nog wat meer ideeën nodig heb neem dan even een kijkje op het Youtube kanaal van My Favorite Things.

Have a wonderful day!
Greets, Marieke

zaterdag 26 februari 2022

Good Luck

Hallo Allemaal,

Vandaag kwamen mijn nieuwe Lawn Fawn spullen binnen en ik maakte er meteen een kaart mee. Ik was helemaal weg van de klaver producten van de nieuwste release, daarom besloot ik alles te kopen en maakte voor de nieuwe Lawnfanatics challenge deze kaart. Today my new Lawn Fawn products arrived and I made a card straight away. I totally loved all the clover products so I ordered all of them and decided to make a card with them for the new Lawnfanatics Challenge.
Sneed een witte rechthoek en plakte de helft af met masking tape. Inktblende wat Old Paper aan de rechter zijde en daarna inktblende ik de klavers met het nieuwe klaver stencil in de kleuren Twisted Citron en Peeled Paint.

Cut a white rectangle, masked of half of the rectangle using masking tape. Inkblended some Old Paper on the right side, after that I inkblended the clovers using the clover stencil and the colors Twisted Citron and Peeled Paint.
Spetterde water, witte verf en zwarte verf op de rechter zijde en verwijderde de masking tape. Stanste de klavers uit groen cardstock. Inktblende ze met Peeled Paint and spetterde Peeled Paint gemengd met water op de klavers.

Splattered some water, white and black paint and removed the masking tape. Die cut the clovers out of green cardstock and inkblended some Peeled Paint and splattered some Peeled Paint mixed with water onto the clovers.
Plakte de klaveren op verschillende hoogtes op de kaart en heat emboste de tekst. Stanste het uit en plakte het op de kaart. Werkte het geheel af met gouden sequins. Glued the clovers on to the card in different heights and heat set the sentiment. Die cut the sentiment and added it onto the card. Finished of the card using some gold sequins.

Heb een heerlijke dag!
Groet, Marieke

Stempels: My Lucky Charm (Lawn Fawn)
Stansen: Lucky Clovers (Lawn Fawn), Essential Slanted Sentiment Strips Die-Namics (MFT).
Inkt: Tsukineko Versamark, Old Paper/ Twisted Citron/ Peeled Paint Distress inkt.
Papier: Black Licorice, Sour Apple, Smooth White
Extra: Ultrafine goud embossing poeder, gouden sequins, zwarte en witte verfmarker, Clover Background Stencil.

vrijdag 25 februari 2022

Studio Light - Winter Wishes

Hallo allemaal,

Hier is dan mijn wekelijkse post voor Studio Light! Ik blijf deze maand in een winter thema, maar het zijn geen kerstkaarten dus vind ik dat het prima kan (kerstkaarten kunnen ook het hele jaar door, vind ik!). I'm back again with my weekly Studio Light post! For this month the theme will stick with a winter theme but so far I did not make Christmas cards, so I think I'm still allouwed to make them. (Christmas cards are fine to make the whole year round also!)
Vandaag pakte ik de Sweet Stories Sneeuwman erbij en combineerde deze met de leuke Sweet Stories Quotes Large Winter Wishes.

Today I played with the Sweet Stories Snowman and combined them with the fun bold Sweet Stories Quotes Large Winter Wishes.
Maakte eerst de achtergrond met Cracked Pistashio, Peacock Feathers, Tumbled Glass en Salty Ocean Distress inkt. Spetterde water en witte verf en liet het drogen. Sneed een topfold Kraft basiskaart en een witte geschulpte rand. Stempelde de sneeuwvlokken met Peacock Feathers en plakte alles op elkaar.

First I made the background using Cracked Pistashio, Peacock Feathers, Tumbled Glass en Salty Ocean Distress ink. Splattered some water and white paint and let it dry. In the meanwhile I cut a topfold Kraft basecard and a white scalloped rectangle. Stamped the snowflakes on to the background using Peacok Feathers and added everything together.
Stempelde de afbeeldingen, kleurde ze in met mijn Copic markers en stanste ze uit met de bijpassende stansen. Heat emboste alle teksten op groen cardstock of vellum en stanste / knipte ze uit. Op de groene teksten inktblende ik nog wat Mowed Lawn. Plakte alles op de kaart en werkte het geheel af met transparante sequins. Stamped all the images, colored them up using my Copic markers and cut them using the matching dies. Heat set all the sentiments on some green cardstock or vellum and cut the sentiment with dies or my sciccors. Inkblended some depth into the green sentiments using Mowed Lawn. Added everything on to the card and finsihed of using some clear sequins.

Gebruikte Copic kleuren:
Sneeuwman - B02, B00, B000, B0000, 0; R20; YR09, YR04, YR02
Teal - BG15, BG13, BG11, BG10
Groen - YG67, YG63, YG03, YG01
Bruin - E47, E44, E43, E42

Heb een heerlijke dag!
Groet, Marieke

Stempels: SS Snowman, SS Quotes Large Winter Wishes, SS Quotes Small Winter Season
Stansen: SS Snowy Fun
Inkt: Mowed Lawn / Cracked Pistashio/ Peacock Feathers / Tumbled Glass / Salty Ocean Distress inkt, Memento Tuxedo Black, Tsukineko Versamark.
Papier: Smooth White, Kraft, Vellum, Limelight
Extra: Transparante sequins, wit embossing poeder.

donderdag 24 februari 2022

My Favorite Things - Color Challenge #184

 Hello all!

Today i'm here with a new Color Challenge by My Favorite Things. This challlenge i decided to make a card using plants because the color sceme is perfect for that!. Vandaag ben ik er met een nieuwe kleuren challenge van My Favorite Things. Voor deze challenge maakte ik een kaart me planten omdat het kleurenschema zich hier perfect voor leende.
So plants is the main theme on my card today, when I decided on plants the rest was easy peasy to figure out. It happens that the blue color combo was in the Festive Celebration Paper Pad so I could use that aswell! 
Met planten als hoofdthema van de kaart is was de rest niet heel moeilijk te bedenken. Nu was het toeval dat er in het Festive Celebration Paper Pad ook nog dezelfde kleur combo zat dus die kon ik mooi combineren.
Die cut a Smooth White rectangle, added some brick using the English Brick Wall Stencil and Cement Gray ink. Added a strip of Cement Gray cardstock, glued the panel onto a Smooth White topfold card, were I added the pattern paper onto. Stanste een Smooth White rechthoek, voegde wat stenen toe met het English Brick Wall Stencil en Cement Gray inkt. Plakte een strip Cement Gray cardstoc, op de onderkant van de witte rechthoek. Plakte alles op een topfold basiskaart die ik beplakt heb met het designpapier.

Stamped the sentiment out of the Heap of Hellos before glueing the panel onto the cardbase. Die cut all the elements of the Cat & Plant Perches and the Houseplants Die-Namics using Sour Apple, Blue Beyond, Blue Yonder and Smooth White. Stempelde de tekst uit de Heap of Hellos voordat ik hem op de kaart plakte. Stanste alle onderdelen van de Cat & Plant Perches en de Houseplants Die-Namics met Sour Apple, Blue Beyond, Blue Yonder en Smooth White.
Inkblended some green into the leaves and plants to give them a bit more depth. Assembled all the loose parts into for plants and glued them on to the base card using foam tape. Inktblende wat groene inkt op de bladeren en stelen zodat er wat meer diepte ontstond. Plakte alle losse onderdelen aan elkaar en plakte het op de basiskaart met foamtape.

If you need to be even more inspired after this post make sure to have a look over at My Favorite Things Youtube ChannelWanneer je na deze post nog wat meer ideeën nodig heb neem dan even een kijkje op het Youtube kanaal van My Favorite Things.


Have a wonderful day!
Greets, Marieke

woensdag 23 februari 2022

Create a Smile Stamps - Guestdesigner

Hello all,

Today i'm pleased to be guestdesigning for the Create a Smile Stamps challenge blog. Two weeks ago i was picked as a featured designer and i was asked to be a guest designer for this challenge. I always say yes so did i for this one. Vandaag mag ik guestdesigner zijn voor Create a Smile Stamps challenge blog. Twee weken geleden was ik als featured designer uitgekozen en werd ik gevraagd als gastdesigner. Ik zeg nooit nee dus ook deze keer niet.
This week we challenge you to create a card with a moodboard. You have to use atleast one Create a Smile product as a focal point and you can play along! If you do not own anything you can always try to create something with one of there Freebies.
Deze week dagen we je uit om een project te maken met bovenstaande moodboard. Je kunt meedoen zolang je er maar voor zorgt dat een Create a Smile product de hoofdrol heeft. Ben je nu nog niet in het bezit van een van deze leuke producten dan kun je altijd kijken of je iets kunt maken met een van deze Freebies.
So for this challenge I decided on making a card using the Light up the dark and make a light mechanisme behind the lantern. First I made the background using Speckled Egg, Evergreen Bough and Black Soot Distress ink. Splattered some water and white paint and cut it using a stitched rectangle die.

Voor deze challenge besloot ik een kaart te maken met de Light up the dark en dan een licht mechanisme achter het lantaarntje te maken. Ik maakte eerst de achtergrond met Speckled Egg, Evergreen Bough en Black Soot Distress inkt. Spetterde water en witte verf en stanste het geheel uit met een gestikte rechthoek stans.
Die cut a border of grass and stamped the flowers on the background, colored them up using my Copic markers. Heat set the sentiment on to the background. Stamped the images, colored them up using my Copic markers and cut them by hand.

Stanste een border met gras en stempelde de bloemen op de achtergrond. Kleurde de bloemen in met mijn Copic markers en heat emboste de tekst op de achtergrond. Stempelde de afbeeldingen, kleurde ze in met mijn Copic markers en knipte ze daarna uit.
Decided were I wanted the lights to be and punched three small holes in the background. Adhered the mechanisme on the back of the card and heat set the sentiment on the grass were the light switch is. Assembled the card and adhered it onto a topfold Neutral cardbase.
Besloot waar de lampjes moesten en maakte drie kleine gaatjes in de achtergrond. Plakte het mechanisme op de achterkant van de achtergrond en heat emboste de tekst op het gras waar het druk mechanisme onder komt. Plakte alles op de kaart en het geheel ging op een topfold Neutral basiskaart.


Used Copic Colors:
Mole - W8, W6, W5, W4, W3, W1,W00, R20
Lantern - Y17, Y15, Y13, Y11
Light - Y02, Y00, Y000
Black - N8, N6, N4

Have a wonderful day!
Greets, Marieke

Stamps: Light up the dark (Create a Smile Stamps), Interactive Labels, Spring Gnomes (My Favorite Things)
Dies: Grassy Fields, Stitched Mini Slimline STAX Die-Namics
Ink: Memento Tuxedo Black, Tsukineko Versamark, Speckled Egg/ Evergreen Bough and Black Soot Distress ink.
Paper: Smooth White, Black Licorice, Neutral
Extra: Pearblossom Press Lights, Gold embossing powder, white embossing powder, white paint marker.

dinsdag 22 februari 2022

My Favorite Things Tweet Greetings Card Kit Release.

 Hello all,

The day is here that the Tweet Greetings card kit release by My Favorite Things is avaible! What do you think is it beautiful or what? So what is ending up in your shopping cart? Watch your budget but have fun shopping! De dag is aangebroken dat de Tweet Greetings card kit release van My Favorite Things verkrijgbaar is! En wat vond je ervan schitterend toch? Welke producten belanden bij jou in het mandje? Let op je budget maar heb vooral plezier met winkelen!
So for todays inspiration I have made a cheerful girlie card using the Home Tweet Home Die-Namics together with the free for $60 Beautiful Branch Die-Namics.
Voor mijn inspiratie kaart van vandaag maakte ik een vrolijke meiden kaart met de Home Tweet Home Die-Namics samen met de free for $60 Beautiful Branch Die-Namics.
Cut a Princess Pink rectangle and glued it onto a topfold Smooth White base card. Die cut the Beautiful Branch Die-Namics out of Kraft and Limelight cardstock and made it into two branches. Sneed een Princess Pink recthoek en plakte dit op een topfold Smooth White basiskaart. Stanste de Beautiful Branch Die-Namics uit Kraft en Limelight cardstock en maakte er twee complete takken van.

Die cut the Home Tweet Home Die-Namics out of Grape Jelly, Poppin' Pink, Summer Splash, Cement Gray and Smooth White. Assembled them into the bird houses and added the colors Grapesicle, Cotton Candy and Sno Cone on the back of the matching color birdhouses. Stanste de Home Tweet Home Die-Namics uit Grape Jelly, Poppin' Pink, Summer Splash, Cement Gray en Smooth White. Plakte de vogelhuisjes in elkaar en plakte achter de huisjes de kleuren Grapesicle, Cotton Candy en Sno Cone cardstock passend bij het kleur huisje.
Die cut the flowers out of the Birds of a Feather Die-Namics out of the colors Orange Zest, Lemon Drop, Summer Splash, Poppin' Pink and Grape Jelly and added them on to the houses. Stamped the sentiment out of the Tweet Greetings directly on to the card and finished it of using clear sequins. Stanste de bloemen uit de Birds of a Feather Die-Namics in de kleuren Orange Zest, Lemon Drop, Summer Splash, Poppin' Pink en Grape Jelly en plakte ze op de huizen. stempelde de tekst uit de Tweet Greetings stempel direct op de kaart en werkte het geheel af met verschillende maten sequins.

If you need to be even more inspired after this post make sure to have a look over at My Favorite Things Youtube ChannelWanneer je na deze post nog wat meer ideeën nodig heb neem dan even een kijkje op het Youtube kanaal van My Favorite Things.

Have a wonderful day!
Greets, Marieke 

maandag 21 februari 2022

My Favorite Things - Tweet Greetings Card Kit Release Countdown Day 1

 Hello all,

Welcome to day one of the February Card kit Release countdown by My Favorite Things.   Lucky the wait on the Card kit Release is only short and you can have a shopping spree already tommorow Tuesday February 22nd at 10:00 am EST. Welkom bij dag een van de februari Card Kit Release countdown van My Favorite Things. Gelukkig hoef je maar even te wachten want morgen is de card kit al beschikbaar om 16:00!
The Card Kit contains the Tweet Greetings stamp set, Birds of a Feather Die-Namics, Home Tweet Home Die-Namics, Happy Patterns Paper pad, Two sheets of Smooth White cardstock and one sheet of the following colors; Kraft, Black Licorice, Cotton Candy, Ripe Raspberry, Morroccon Spice, Orange Zest, Lemon Drop, Limelight, Sour Apple, Sno Cone, Summer Splash, Something BlueDe Card Kit bestaat uit de Tweet Greetings stempel, Birds of a Feather Die-Namics, Home Tweet Home Die-Namics, Happy Paterns Paper pad, twee vellen Smooth White cardstock en één vel cardstock van de volgende kleuren; Kraft, Black Licorice, Cotton Candy, Ripe Raspberry, Morroccon Spice, Orange Zest, Lemon Drop, Limelight, Sour Apple, Sno Cone, Summer Splash, Something Blue
Offourse the supplies are sold separately, if you are only interested in a specific item. Beside the Kit there are also one seperate item sold with this set the Heartfelt Fence Die-Namics. As always My Favorite Things is offering a new free for $60 that comes with this kit; Beautiful Branch Die-Namics. Uiteraard zijn de producten ook los te koop, wanneer je alleen geïnteresseerd bent in één van de producten. Naast de Kit zelf biedt MFT de bijpassende Heartfelt Fence Die-Namics aan. Zoals iedere nieuwe release biedt My Favorite Things een nieuwe free for $60 en dat is ditmaal de Beautiful Branch Die-Namics.
So for my first card I made a mini slimline seize. I cut a watercolor rectangle and inkblended some Cracked Pistashio and Peacock Feathers onto it. Splattered some water and water mixed with Peacock Feathers and cut it using the Double Stitched Mini Slimline Rectangle Die-Namics. Voor mijn eerste kaart maakte in een mini slimline model. Sneed een aquarel rechthoek en inktblended Cracked Pistashio en Peacock Feathers. Spetterde water en water gemengd met Peacock Feather en stanste het uit met de Double Stitched Mini Slimline Rectangle Die-Namics

Glued it onto a topfold Smooth White base card. Die cut the Branch and leaves out of Vintage Timber and Limelight. Inkblended the leaves and assembled them. Die cut the Birds of a Feather Die-Namics out of Poppin' Pink, Princess Pink, Cotton Candy, Orange Zest, Smooth White, Kraft and Black Licorice and glued them together. Plakte het op een topfold Smooth White basiskaart. Stanste de takken en bladeren uit Vintage Timber en Limelight. Inktblende de bladeren en plakte ze tot een geheel. Stanste de Birds of a Feather Die-Namics uit Poppin' Pink, Cotton Candy, Princess Pink, Orange Zest, Smooth White, Kraft en Black Licorice cardstock.
Glued everything on to the card and added some white gelpen details. Heat set the sentiment out of the Tweet Greetings set on some Black Licorice and cut it using the Itty Bitty Strips Die-Namics. Finished the card of adding some music notes. Plakte alles aan elkaar tot vier vogels en voegde wat witte gelpen details toe. Heat emboste de tekst van de Tweet Greetings set op Black Licorice cardstock en stanste het uit met de Itty Bitty Srtips Die-Namics. Werkte de kaart af door wat muzieknoten toe te voegen.

If you need to be even more inspired after this post make sure to have a look over at My Favorite Things Youtube ChannelWanneer je na deze post nog wat meer ideeën nodig heb neem dan even een kijkje op het Youtube kanaal van My Favorite Things.

Have a wonderful day!
Greets, Marieke

zondag 20 februari 2022

Gastdesigner - Dutch Card Lovers

Hallo allemaal,

Vandaag heb ik een kaart die ik maakte voor de Dutch Card Lovers Challenge. Een aantal weken geleden was ik daar de winnaar en als prijs mocht ik gastdesigner zijn.
Today I have a card that I made for the Dutch Card Lovers Challenge. A few weeks back I won a challenge and the price was to be a guestdesigner for a challenge.
De opdracht is maak een voornamelijk witte kaart met één accentkleur. Dit was wel even een breinbreker voor me maar uiteindelijk ben ik er in geslaagd al zeg ik het zelf. The challenge this time around is to make a card using the color white mainly but you can add one accent color. Well this was kinda a brain teaser for me but I think I succeded.

Doen jullie gezellig mee? Are you playing with us?
Sneed een Smooth White rechthoek en droog emboste het Lots of Hearts stencil, sneed het schuin af en spetterde er wat gouden spetters op. Stanste het frame uit de Trendy Tag Die-Namics en bevestigde dit op de kaart met wat witte twine en een mini wasknijper.

Cut a Smooth White rectangle and dry embost the Lots of Hearts Stencil onto it. Trimmed down the bottom and splattered some gold splatters. Die cut the frame out of the Trendy Tag Die-Namics and added the frame to the card using white twine and a mini clothespin.
Heat emboste de tekst You op wit cardstock en stempelde de bijpassende tekst ook op wit cardstock, stanste beide uit met bijpassende stansen en plakte het op de kaart. Stanste wat hartjes uit goud cardstock en plakte deze als laatste op. Heat set the You sentiment on some white cardstock and stamped the other sentiment using black ink. Die cut both using matching dies and added them onto the card. Finished the card of using some different seizes of gold hearts.

Wanneer je na deze post nog wat meer ideeën nodig heb neem dan even een kijkje op het Youtube kanaal van My Favorite Things. If you need to be even more inspired after this post make sure to have a look over at My Favorite Things Youtube Channel.

Heb een heerlijke dag!
Groet, Marieke

vrijdag 18 februari 2022

Studio Light - Hello Little One

Hallo Allemaal,

Hier is mijn wekelijkse post voor Studio Light weer. Deze keer maakte ik een baby shaker met de nieuwe shaker producten en één van de nieuwe baby / kinder sets. 
I'm back with my weekly post for Studio Light. This time around I made a bab card using the new shaker products combined with one of the new baby sets.
Voor mijn inspiratie kaart van vandaag gebruikte ik de SL Essentials Baby Laundry samen met de Essentials Shaker Rectangle stans en bijpassende Blisters.

For my inspiration card of today I used the SL Essentials Baby Laundry set together with the Essential Shaker Rectangle die with the matching Blister.
Stanste een rechthoek en bewerkte dit met een wolken en gras stencil en Distress inkten. Stanste het gras, bewerkte dit ook met inkt en heat emboste de tekst op het gras.

Die cut a rectangle and added the clouds and grass using a stencil and Distress inks. Die cut the grass, added some ink and heat set the sentiment onto it.
Besloot waar ik de shaker wilde hebben en stanste deze uit. Stanste een rechthoek kleiner dan de voorkant en plakte deze tijdelijk op elkaar. Trok de rechthoek over op de voorzijde van de kleine rechthoek en plakte hier de uitgestanste wolken rechthoek op. Decided were I wanted the shaker to go and cut it out of the rectangle. Die cut a slightly smaller rectangle and temporaraly placed it behind the larger one. Traced the front "gap" onto the small one and glued the die cut panel onto it. 

Plakte de Blister aan de achterzijde van de geinkte rechthoek en vulde de shaker met shaker materiaal. Plakte de shaker dicht. Het geheel ging op een topfold witte basiskaart die ik beplakte met designpapier. Added the blister on the back of the inked background and filled the shaker up. Closed it using the smaller rectangle. I added the whole base onto a white topfold card were I added some pattern paper onto.
Stempelde de stempels, kleurde ze in met mijn Copic markers en stanste ze uit met de bijpassende stansen. Plakte een stuk twine achter de babykleertjes en het geheel op de kaart. Stamped the images, colored them up using my Copic markers and die cut them using the matching dies. Added a piece of twine behind it and glued the laundy line onto my card base.

Gebruikte Copic Kleuren:
Geel - Y17, Y15, Y13, Y11
Teal - BG18, BG15, BG13, BG11, BG10
Blauw - B02, B00, B000, B0000
Wit - C5, C3, C1, 0
Groen - YG67, YG63, YG03

Heb een heerlijke dag!
Groet, Marieke

Stempel: Essentials Baby Laundry, Essentials Air Message
Stansen: Essentials Baby Laundy, Essentials Shaker Rectangle CD180
Inkt: Mowed Lawn / Salty Ocean Distress inkt, Memento Tuxedo Black, Tsukineko Versamark
Papier: Smooth White, Limelight, Party Plaid Pattern Paper (MFT)
Extra: Wit Embossing poeder, Shaker Window Blister Rectangle, Grassy Hills/ mini cloud edges Stencil, Shaker Materiaal.

donderdag 17 februari 2022

My Favorite Things - Slimline Challenge

 Hello all,

Today I'm back again with the new Slimline Challenge by My Favorite Things. Each month we challenge you to create a project in a slimline seize. This month we challenge you to create a project in the birthday theme! Easy Peasy right? Vandaag start een nieuwe Slimline Challenge van My Favorite Things. Iedere maand dagen we je uit om een project te maken in een slimline maat. Deze maand dagen we je uit om een kaart te maken in het thema verjaardag, makkelijk toch?
So for this months slimline challenge I decided to create a slimline shaker card using the Let's Stick Together combined with the Slimline Stitched Circle Trio Die-Namics.
Voor de uitdaging van deze maand maakte ik een slimline shaker card met de Let's Stick Together gecombineerd met de Slimline Stitched Circle Trio Die-Namics.
First off I made the background, I inkblended some Spun Sugar and Kitsch Flamingo for the background and splattered some Picked Raspberry. On some white paper I inkblended Tea Dye and Vintage Photo Distress ink and cut them using the Slimline Stitched Snowdrifts Die-Namics. Ik maakte eerst de achtergrond, inktblende Spun Sugar en Kitsch Flamingo en spetterde Picked Raspberry. Op wit papier inktblende ik Tea Dye en Vintage Photo Distress inkt en stanste ze uit met de Slimline Stitched Snowfrifts Die-Namics

Glued the highest sand border on the card and die cut the cirkels using the Slimline Stiched Circle Trio Die-Namics. Adhered the die cut circles on another white rectangle, added some acetate on the back of the inked panel and filled the shaker before closing it. The whole shaker went onto a Lemon Drop topfold basecard. Plakte de hoogste zand rand op de rechthoek en stanste het uit met de Slimline Stitched Circle Trio Die-Namics. Plakte de uitgestanste cirkels op een witte rechthoek, plakte wat acetate op de achterkant van de geinkte achtergrond en vulde de shaker voordat ik hem dichtplakte. De gehele shaker ging op een Lemon Drop topfold basiskaart.
Stamped all the images, colored them upo using my Copic marker and die cut them using the matching dies. Heat set the sentiments on some Gravel Gray cardstock. Die cut the word "point" using the In Stitches Alphabet Die-Namics in the colors Grape Jelly, Princess Pink, Poppin' Pink, Orange Zest and Lemon Drop. Stempelde alle afbeeldingen, kleurde ze in met mijn Copic markers en stanste ze uit met de bijpassende Die-Namics. Heat emboste de tekst op Gravel Gray cardstock. Stanste het woord "point" uit met de In Stitches Alphabet Die-Namics in de kleuren Grape Jelly, Princess Pink, Poppin Pink, Orange Zest en Lemon Drop.

Used Copic Colors:
Green - YG67, YG63, YG03, YG01
Purple - V17, V15, V12
Soft Pink - R02, R000, R0000
Pink - RV17, RV13, RV11
Orange - YR09, YR04, YR02
Yellow - Y17, Y15, Y13, Y11
Black - N8, N6, N4


If you need to be even more inspired after this post make sure to have a look over at My Favorite Things Youtube ChannelWanneer je na deze post nog wat meer ideeen nodig heb neem dan even een kijkje op het Youtube kanaal van My Favorite Things.

Have a wonderful day!
Greets, Marieke