Posts tonen met het label Mini Slimline. Alle posts tonen

dinsdag 14 april 2026

Sunny Studio Stamps - Puddle Jumpers

Hello all,

I'm back again with my weekly post for Sunny Studio Stamps. Today I hope to inspire you with a card that I made using the Puddle JumpersDaar ben ik weer met mijn wekelijkse post voor Sunny Studio Stamps. Vandaag hoop ik jullie te inspireren met een kaart die ik maakte met de Puddle Jumpers.
For today's card I decided to create a mini slimline card, it has been ages since I made one of these. So I cut a topfold white base card and added a piece of yellow pattern paper out of the Sleek Striped Paper Pack. Voor mijn kaart van vandaag besloot ik een mini slimline kaart te maken, het was al weer een hele tijd geleden dat ik er zo eentje maakte. Sneed een witte basiskaart en plakte hier een stuk geel designpapier op uit het Sleek Striped Paper Pack.

On a piece of watercolor paper I inkblended the background using Blueprint Sketch and splattered some water. Die cut the background and adhered it directly on to the card. Op een stuk aquarel papier inktblende ik de achtergrond met Blueprint Sketch en spetterde wat water. Stanste de achtergrond en plakte het rechtstreeks op de kaart.
Die cut the "Splash" sentiment using the new Sydney Alphabet Dies. Stamped the other sentiments out of the Puddle Jumpers and Kiddie Pool stamps on some white cardstock using a yellow ink. Trimmed them down to some small banners and added some white gelpen details to the die cut letters.

Stanste de "Splash" tekst uit geel cardstock met de nieuwe Sydney Alphabet Snijmallen. Stempelde de andere teksten van Puddle Jumpers en de Kiddie Pool Stempels op wit cardstock met een gele inkt. Stanste deze tot kleine banners en bewerkte de gele letters met een witte gelpen.
Stamped the images out of Puddle Jumpers and Foxy Friends (top part of the umbrella) on some Copic friendly paper and colored them up using my Copic markers. Cut the images by hand and added all the elements to the card. Finished the card of by adding some raindrops using Blueprint Sketch Distress Oxide ink. Stempelde de afbeeldingen van de Puddle Jumpers en Foxy Friends (bovenkant van de paraplu) op Copic vriendelijk papier en kleurde ze in met mijn Copic markers. Knipte alle afbeeldingen uit en plakte daarna alles op de kaart. Werkte de kaart af door met Blueprint Sketch Distress Oxide inkt de regendruppels te stempelen.

Used Copic Colors:
Yellow - Y17, Y15, Y13, Y11
White - C5, C3, C1, C00, 0
Orange - YR09, YR16, YR12
Hair - E37, E35, E33
Skin - E000, E00, E04, E11, E21 / R20
Blue - B29, b28, B26, B24, B23

Have a wonderful day!
Greets, Marieke

zondag 13 april 2025

Sunny Studio Stamps - Guest Desiger

Hello all,

Today I'm back with a project that I created as a guest designer for Sunny Studio Stamps. The lovely Mendi asked me to be a guest this month and I could not resist saying yes. So for my first project I created a series Artist Trading cards. Vandaag heb ik project voor jullie als gastdesigner voor Sunny Studio Stamps. Mendi vroeg mij of ik voor de maand april gastdesigner wilde zijn en uiteraard kon ik geen nee zeggen. Voor mijn eerste project maakte ik een serie Artist Trading Cards.
For my Project I die cut four rectangle panels using the Polka Dot Parade 6x6 Paper. Die cut a slightly smaller rectangle, and inkblended some different colors of ink onto them. Used the same colors of ink and a stencil to create the conffeti. Splattered some water and adhered them together. 

Voor mijn kaartjes stanste ik vier rechthoeken met het Polka Dot Parade 6x6 Paper. Stanste vier kleinere rechthoeken en ik beinkte deze met verschillende kleuren inkten. Gebruikte dezelfde kleuren inkt en een stencil om de confetti te maken. Spetterde wat water en plakte ze op elkaar.
Stamped the images out of Party Pets Stamp, colored them up using my Copic markers and cut them using the Party Pets Dies. Adhered the images on the cards and added some Glossy Accents to the balloons. Stamped and heat embost the sentiments. Finished the cards of by adding some Citrine, Peridot, Aquamarine and Pink Spinel Juwels. Stempelde de afbeeldingen uit de Party Pets Stamp, kleurde ze in met mijn Copic markers en stanste ze uit met de bijpassende Party Pets Dies. Plakte de afbeeldingen op de kaartjes en bewerkte de ballonen met Glossy Accents. Werkte de kaarten af door op de kaarten Citrine, Peridot, Aquamarine en Pink Spinel Juwels te plakken.

Used Copic Colors:
Green - YG67, YG63, YG03, YG01
Brown Dog - E57, E55, E53, E51, E50/ C5,C3, C1, C00, 0/ R24, R22, R20, R00
Teal - BG15, BG13, BG11, BG10
Grey Dog - C6, C4, C2, C1 / C5, C3,C1, C00, 0/ R24, R22, R20, R00
Yellow - Y17, Y15, Y13, Y11
Black Cat - N6, N4, N3, N2 / C5, C3,C1, C00, 0 / R22, R20, R00
Pink - RV17, RV14, RV13, RV11, RV10
White Cat - C5, C3, C1, C00, 0 / R22, R20, R00


For my second project I created a shaker card using the adorable Cat Antics Stamp. So first I cut a white rectangle. Using the Window Trio Heart Portrait I partially die cut the top and bottom heart. Stamped the sentiment using two different colors of pink inks. Then used the lighest color again for the hearts out of Wedded Bliss. Voor mijn tweede kaart maakte ik een shaker kaart met de super leuke Cat Antics Stempel. Sneed een witte rechthoek. Met de Window Trio Heart Portrait stans, stanste ik het bovenste en onderste hart. Stempelde de teksten met twee verschillende kleuren roze inkt en met de lichtste kleure stempelde ik de hartjes uit Wedded Bliss.
 Added a strip of acetate behind the white rectangle. Cut a sidefold white base card and adhered the Sleek Stripes Paper onto it. Cut a white rectangle and inkblended some Kitsch Flamingo and Picked Raspberry Distress Oxide inks onto it. Filled the shaker and closed it.

Plakte een strook acetate achter de witter rechthoek. Sneed een sidefold basis kaart en plakte hier een strook Sleek Stripes Paper op. Sneed een witte rechthoek en beinkte dit met Kitsch Flamingo en Picked Raspberry Distress Oxide inkt. Vulde de shaker en plakte hem dicht.
Stamped the cats out of Cat Antics and colored them using my Copic markers. Cut them by using the matching Cat Antics Dies and adhered on to the card. Stempelde de katten uit de Cat Antics Stempel en kleurde ze in met mijn Copic markers. Stanste ze daarna uit met de bijpassende Cat Antics Dies en plakte ze op de kaart.

Used Copic Colors:
Black - N6, N4, N3, N2
Pink - R24, R22, R20, R00
White - C5, C3, C1, C00, 0

Have a wonderful day!
Greetz, Marieke

donderdag 14 juli 2022

Sunny Studio - Ocean View

 Hello all,

I'm back again with my weekly post for Sunny Studio Stamps. Today I hope to inspire you with a card using the Ocean View. Daar ben ik weer met mijn wekelijkse post voor Sunny Studio Stamps. Vandaag hoop ik jullie te inspireren met een kaart met de Ocean View Stempel.

This time around I started with stamping the images out of the Ocean View, Kiddie Pool and Fabulous Flamingo's. Colored them up using my Copic markers and cut them using the matching dies. Added a few white gelpen details and using a paint marker I added the seafoam.

Deze keer begon ik met het stempelen van de afbeeldingen uit Ocean View, Kiddie Pool en Fabulous Flamingo's. Kleurde ze in met mijn Copic markers en stanste ze uit met de bijpassende stansen. Voegde wat witte gelpen details toe en met een verf marker voegde ik het zeeschuim toe.
Cut a white rectangle and added Salty Ocean and Tumbled Glass Distress Oxide ink on it. Heat set the sentiment out of Fabulous Flamingo's and Heartfelt Wishes. Added the inkblended panel on to a topfold white base card.

Sneed een witte rechthoek en inktblende Salty Ocean en Tumbled Glass Distress Oxide inkt erop aan. Heat emboste de teksten uit Fabulous Flamingo's en Heartfelt Wishes met wit embossingpoeder. Plakte daarna de rechthoek op een topfold witte basiskaart.

Added the Ocean View image on the card using foam tape. Adhered the leaves and the boy on the card and the crab got a bit of foam tape aswell. Plakte de Ocean View afbeelding met foam tape op de kaart. Plakte de bladeren en de jongen met lijm op de kaart en als laatste de krab met ook een beetje foamtape.

Used Copic Colors:
Water - B18, B16, BG15, BG13, BG11
Sand - E43, E42, E41, E40
Hair / Treetrunk - E59, E57, E55, E53
Crab - R29, R24, R22, R20
Pink RV17, RV14, RV13
Yellow - Y17, Y15, Y13
Orange - YR09, YR68, YR04
Green - YG67, YG63, YG03, YG01
Coconuts - E47, E44, E43 / E81
Skin - E000, E00, E04, E11, E21
Chair - E37, E35, E33, E31
Gray / White - C5, C3, C1

Have a wonderful day!
Greets, Marieke

dinsdag 12 juli 2022

My Favorite Things - July Product Launch

 Hello all,

It’s time for the My Favorite Things July product launch! All new products are available right now! The MFT design team is sharing projects created with the new stuff. You can find a lot of inspiration! Het is tijd voor de My Favorite Things juli product lancering. Alle nieuwe producten zijn vanaf nu verkrijgbaar! Het MFT design team deelt ook vandaag weer een lading aan inspiratie!

And what are you buying? For more inspiration I decided on making a mini slimline card using the Joyfull Giraffes combined with the Frosted Alphabet Die-Namics.

En wat ga jij halen? Voor nog meer inspiratie maakte ik een mini slimline kaart met de Joyfull Giraffes gecombineerd met de Frosted Alphabet Die-Namics.
Cut a Smooth White rectangle using the Stitched Mini Slimline STAX Die-Namics. Inkblended the colors Cracked Pistashio, Peacock Feathers, Peeled Paint and Bundled Sage. Splattered water and Peacock Feathers on the sky and heat set the sentiment out of the Bitty Birthday Wishes on the base. Sneed een Smooth White rechthoek met de Stitched Mini slimline STAX Die-Namics. Inkt blende de kleuren Cracked Pistashio, Peacock Feathers, Peeled Paint en Bundled Sage. Spetterde water en Peacock Feathers in de lucht en heat emboste de tekst uit Bitty Birthday Wishes op de basis.

Out of Chantilly Cream and Kraft cardstock I die cut the words "Go Wild" and inkblended the Chantilly Cream ones with Vintage Photo and the Kraft once with Ground Espresso. Glued them together. Uit Chantilly Cream en Kraft cardstock stanste ik de woorden "Go Wild" en inktblende de Chantilly Cream letters met Vintage Photo en de Kraft stukken met Ground Espresso.
Stamped the grass with Peeled Paint and adhered the panel on a Smooth White base card. Stamped the images, colored them up using my Copic markers and cut the using the Joyfull Giraffe Die-Namics. Adhered all the images on the card using foam tape. Stempelde het gras met Peeled Paint en plakte het geheel op een Smooth White basis kaart. Stempelde de afbeeldingen, kleurde ze in met mijn Copic markers en stanste ze uit met de Joyfull Giraffe Die-Namics. Plakte alle afbeeldingen op de kaart met foam tape.

Used Copic Colors:
Giraffe - E44, E43, E42, E41, E40/ W6, W4, W3/ E35, E33, E31, E30 / R22, R20, R00 / N6, N4, N2
Yellow - Y17, Y15, Y13, Y11
Red - R29, R24, R22
Green - YG67, YG63, YG03
Brown - E49, E47, E44
Teal - BG18, BG15, BG13
White - C5, C3, C1
Clouds - B00, B000, 0

If you need to be even more inspired after this post make sure to have a look over at My Favorite Things Youtube ChannelWanneer je na deze post nog wat meer ideeen nodig heb neem dan even een kijkje op het Youtube kanaal van My Favorite Things.

Have a wonderful Day!
Greets, Marieke

vrijdag 3 juni 2022

Studio Light - Unicorns & Glitter

Hallo Allemaal,

Hier is mijn wekelijkse post voor Studio Light weer. Deze keer maakte ik een mini slimline kaart met de nieuwste unicorn stempel met bijpassende stansen van Creative Craftlab. I'm back with my weekly post for Studio Light. This time around I made a mini slimline card using the newest unciron stamp and the matching dies by Creative Craftlab.

Zoals vaak startte ik met de achtergrond. Stanste de rechthoek van de mini slimline uit en inkte de wolken met een stencil en de kleuren Picked Raspberry, Dried Marigold, Ripe Persimmon en Wild Honey. Spetterde water, witte verf en witte glimmermist. As always I started with the background. Die cut the rectangle out of the mini slimline and inked up the clouds using a stencil and the colors Picked Raspberry, Dried Marigold, Ripe Persimmon and Wild Honey Distress ink. Splattered some water, white paint and white glimmermist.

Stanste de regenboog en de wolken uit cardstock en vellum. Plakte de regenboog in elkaar en tussen de wolken. Heat emboste de tekst en met een sterrenstencil en gouden glitter pasta maakte ik de sterren. Die cut the rainbow and clouds out of cardstock and vellum. Assembled the rainbow and glued it in between the clouds. Heat set the sentiment, using a star stencil and some golden glitter paste I added the stars.

Sneed een topfold witte basiskaart die even groot was als de rechthoek aan de binnenzijde. Stanste de geschupte rand uit en plakte de geschubte rand vast aan de uitgestanste rechthoek. Dit ging op de basiskaart, hierop ging de gemaakte achtergrond.

Cut a topfold white basecard just as big as the rectangle from the inside. Die cut the scallop border die and adhered it to the inside rectangle. Glued the base card behing it and adhered the cloud rectangle on top of it.

Stempelde de afbeelding, kleurde deze in met mijn Copic markers en stanste hem uit met de bijpassende stans. Bracht wat goud glitters aan op de hoorn en plakte alles op de kaart. Stamped the image, colored it up using my Copic marker and die cut it using the matching die. Added some gold glitters to the horn and adhered the image on to the card.

Gebruikte Copic Kleuren:
Unicorn - E53, E51, E50, 0 / RV17, RV14, RV13, RV11 / Y17, Y15, Y13, Y11 / YR07, YR04, YR02 / W5, W3, W1 / R20 / B00, B000, B0000, 0

Heb een heerlijke dag!
Groet, Marieke

Stempels: CCL MFR SCD42, CCL MFR STAMP220
Stansen: CCL MFR SC42, CCL ES233
Inkt: Memento Tuxedo Black, Tsukineko Versamark, Ripe Raspberry/ Dried Marigold/ Ripe Persimmon/ Wild Honey Distress inkt.
Papier: Smooth White, Vellum, Poppin' Pink, Cotton Candy, Princess Pink, Lemon Drop, Lemon Chiffon, Peach Bellini.
Extra: Wit embossing poeder, Goud Glitter pasta, Witte verfpen, SS MASK120

donderdag 19 mei 2022

Sunny Studio - Wonky Windows

 Hello all,

I'm back again with my weekly post for Sunny Studio Stamps. Today I hope to inspire you with a card that I made using the Wonky Window dies together with Fabulous Flamingo'sDaar ben ik weer met mijn wekelijkse post voor Sunny Studio Stamps. Vandaag hoop ik jullie te inspireren met een kaart die ik maakte met de Wonky Window stans samen met de Fabulous Flamingo's stempel.
So for today's card I decided on making a mini slimline shaker Mothers day card. On May the 8th in the Netherlands we celebrated Mothers day and this card I gave to my mom. On a 6 3/4 x 2 3/4 inch rectangle I inkblended Cracked Pistashio and Peacock Feathers Distress ink. Splattered some water, Peacock Feathers and white paint onto it and cut the Wonky Window die out of it. Voor mijn kaart van vandaag besloot ik een mini slimline shaker Moederdag kaart te maken. Zondag de 8ste was het Moederdag en deze kaart mocht mijn moeder ontvangen van mij. Ik sneed een rechthoek 6 3/4 x 2 3/4 inch en inktblende Cracked Pistashio en Peacock Feathers Distress inkt. Spetterde water, Peacock Feather en witte verf er op en stanste de Wonky Window stans uit de rechthoek.

Cut a white rectangle in the same seize and temporarly added the outside frame onto it. Adhered the die cut parts onto the white rectangle and glued a piece of acetate behind the frame. Filled up the shaker using Crystal Clear Jewels. Sneed een witte rechthoek in dezelfde maat en en plakte het frame hier tijdelijk op. Plakte de uitgestanste onderdelen op de witte rechthoek en achter het frame plakte ik een strook acetate. Vulde de shaker met Crystal Clear Jewels en sloot de shaker.
Stamped the images out of the Fabulous Flamingo and Sending Sunshine stamps. Colored them up and cut them using my sciccors. Die cut the word mom out of yellow cardstock and added some white gelpen details on to the letters and images.

Stempelde de afbeeldingen uit Fabulous Flamingo en Sending Sunshine stempels. Kleurde ze in met mijn Copic markers en knipte ze daarna uit met mijn schaar. Stanste het woord mom uit geel cardstock en bewerkte de letters en de afbeeldingen met een witte gelpen.
Stamped the sentiment on some white cardstock, trimmed it down to a small banner. Heat set the sentiment on some black cardstock and cut it using my sciccors. Adhered all the images onto the card using foam tape. Stempelde de tekst op wit cardstock en sneed er een banner van. Heat emboste de tekst op zwart cardstock en knipte het uit met mijn schaar. Plakte alle teksten en afbeeldingen op de kaart met foam tape.

Used Copic Colors:
Flamingo - RV13, RV42, R01, R00 / C5,C3,C1,0 / Y13, Y11
Green - YG67, YG63, YG03, YG01
Yellow - Y17, Y15, Y13, Y11
Brown - E47, E44, E43, E42

Have a wonderful day!
Greets, Marieke

donderdag 28 april 2022

Sunny Studio - Wedded Bliss

 Hello all,

I'm very excited to share today's post because as of this month I will be joining in with the Sunny Studio Stamps Design Team! So from now on every week I will share a new project using there fabulous products! Ja, zo'n leuk nieuws in mijn blogpost van vandaag! Vanaf deze maand zal ik deelnemen aan het designteam van Sunny Studio Stamps! Vanaf vandaag zal ik jullie dus iedere week inspireren met hun leuke producten!
To kick everything off I'm sharing my first card that is a mini slimline wedding card using the Wedded Bliss.

Om dan maar meteen de starten laat ik jullie vandaag een mini slimline kaart zien met de super leuke Wedded Bliss.
So first off I cut a white panel, die cut it and embost the panel using the Moroccan Circles Embossing Folder. Cut a rectangle out of pattern paper and glued that on top of the embossed panel.

Sneed een witte rechthoek en stanste deze uit, bewerkte het daarna met de Moroccan Circles Embossing folder. Stanste een rechthoek uit design papier en plakte het op de ge-emboste achtergrond.
Using the same outer die I cut a small piece of white cardstock and some pattern paper from the same paperpad and adhered them together. Added some twine for some interest. Die cut the heart out of the Cupcake Shape dies twice out of cardstock and pattern paper and glued the onto the twine.

Stanste met dezelfde stans een stuk designpapier en wit cardstock en plakte dit op elkaar. Voegde wat twine toe voor wat meer diepte. Stanste uit cardstock en design papier het hartje van de Cupcake Shape Dies en plakte dit op het twine.
Stamped the image, colored it up using my Copic markers and cut them using the Wedded Bliss Die. Die cut a heart out of cardstock and another one out of white cardstock and dry embost the smallest heart. Adhered them together. Heat set all the sentiments using gold embossing powder and cut them. Adhered eveything onto a light grey base card. Stempelde de afbeeldingen, kleurde hem in met mijn Copic markers en stanste hem uit met de Wedded Bliss stans. Stanste het grote hart uit licht grijs cardstock en een slag kleiner uit wit cardstock en emboste deze. Heat emboste de teksten met goud embossing poeder op wit cardstock en stanste en knipte deze uit. plakte alles op een licht grijze basiskaart.

Used Copic Colors:
Penguins - N6, N4, N3, N2 / YR04, YR02, YR00 / E53, E51, E50, 0 / R20
Suit - W4, W2, W1, W00
Pink - RV02, RV00, RV000, RV0000
Crown - C3, C1, C00
Rose - YG13, YG11 / R24, R22, R20

Have a wonderful Day!
Greets, Marieke

donderdag 14 april 2022

Studio Light - Welcome Baby

Hallo Allemaal,

Hier is mijn wekelijkse post voor Studio Light weer. Deze keer maakte ik een babykaart met de SS Chicken & Eggs. Naast dat het mijn wekelijkse post is, heb je ook nog (6x) kans om de complete collectie van de Spring Sweet Stories te winnen op mijn InstagramI'm back with my weekly post for Studio Light. This time around I made a baby card using the SS Chicken & Eggs. Beside that it is my weekly post, this card is part of a Instagram Hop also. With this hop you have six chances on winning the whole new Sweet Stories Spring Collection!
Ik maakte eerst de kaart en daarna de tag maar eigenlijk deed ik bijna hetzelfde. Sneed een witte rechthoek en kleurde daar het gras op. Stempelde de afbeeldingen, kleurde ze in en stanste ze uit.

First I made the card, but I made the tag almost the same. Cut a white rectangle and colored the grass. Stamped all the images, colored them up and die cut them using the matching dies.
Stanste de geschupte rand en plakte daar de rechthoek op. Stempelde beide teksten op de rechthoek. Sneed een topfold basiskaart en beplakte dit met designpapier. Plakte hier de rechthoek op en werkte het geheel af met enemal dots.

Die cut the scalloped rectangle and added the grass rectangle. Stamped both of the sentiments directly onto the card. Cut a topfold white base card and added a layer of pattern paper. Glued everything on the base card and finished of using enemal dots.
Voor de tags deed ik hetzelfde alleen stanste ik de tag uit designpapier en wit cardstock. Voor de tag gebruikte ik wat zwarte twine. For the tag I did the same except I die cut the tag out of pattern paper and white cardstock, I also added some black twine.

Gebruikte Copic kleuren:
Gras - YG17, YG13, YG11
Kuiken - Y17, Y15, Y13, Y11/ YR04, YR02, YR00
Schaal - BG15, BG15, BG11, BG10


Heb een heerlijke dag!
Groet, Marieke

Stempels: SS-SCD36, SS-STAMP215, SS-STAMP214, CCL-FR-STAMP164
Stansen: SS SCD36, CCL-ES-CD209
Inkt: Memento Tuxedo Black, Versafine Onix Black, Lemon Drop
Papier: Neenah Classic Crest, Echo Park - Hello Baby, it's a boy.
Extra: enemal dots, witte gelpen, wink of stella.

donderdag 7 april 2022

My Favorite Things April Release Countdown Day 5

 Hello all,

It’s time for the My FavoriteThings  April release countdown! During the countdown, the MFT Design Team is sharing lots of projects featuring all of the new products. The new release will officially be available on April 5th at 10:00 am EST (= Europe: April 5th at 4:00 pm CET). Het is tijd voor de My Favorite Things april release countdown! Nog 5 dagen en dan is de nieuwe release verkrijgbaar. Tijdens de countdown, laat het MFT Design Team verschillende projecten zien met alle nieuwe producten. De release zal verkrijgbaar zijn op 5 april om 10:00 am EST (in Nederland op 5 april om 16:00).
For the first release countdown day I decided on making two of the same cards but still a abit different by using different colors. For both of my cards the new Winged Wonders are the focal point of my cards.
Voor de eerste release countdown dag besloot ik een set van twee dezelfde kaarten te maken maar dan toch even anders door gebruik te maken van verschillende kleuren. Voor beide van mijn kaarten staat de nieuwe Winged Wonders in de hoofdrol.
For my both of my cards I die cut a Smooth White rectangle using the Double Stitched Mini Slimline Die-Namics and stamped some leaves using the Dandelion Greenery onto them. Glued the rectangles on some Cement Gray side fold base cards. Stamped and heat set the butterflies on some Smooth white and die cut them using the matching Winged Wonders Die-Namics.

Voor beide kaarten stanste ik een Smooth White rechthoek met de Double Stitched Mini Slimline Die-Namics en stempelde de bladeren van de Dandelion Greenery erop. Plakte de rechthoeken op een sidefold Cement Gray basiskaart. Stempelde en heat emboste de vlinders op Smooth White en stanste ze uit met de Winged Wonders Die-Namics.
Inkblended the butterflies using Speckled Egg, Evergreen Bough, Stormy Sky, Chipped Sapphire and Black Soot Distress Oxide inks. Splattered some water and glued them onto the base. Heat set the sentiment on some Eiffel Tower and trimmed it down. 

Inktblende de vlinders met Speckled Egg, Evergreen Bough, Stormy Sky, Chipped Sapphire and Black Soot Distress Oxide inkten. Spetterde water en plakte ze op de kaart. Heat emboste de tekst op Eiffel Tower en sneed het tot een banner.
For my second card I inkblended some Squeezed Lemonade, Spiced Marmelade, Picked Raspberry, Mustard Seed, Peacock Feathers, Twisted Citron en Mowed Lawn Distress Ink. Splattered some water and glued them onto the card. Heat set the sentiment on some Black Licorice, trimmed it down and finished both cards off using clear sequins.

Voor mijn tweede kaart inktblende ik Squeezed Lemonade, Spiced Marmelade, Picked Raspberry, Mustard Seed, Peacock Feathers, Twisted Citron en Mowed Lawn Distress Inkt. Spetterde water en plakte ze op de kaart. Heat emboste de tekst op Black Licorice en sneed het tot een banner. Werkte beide kaarten af met transparante sequins.

If you need to be even more inspired after this post make sure to have a look over at My Favorite Things Youtube ChannelWanneer je na deze post nog wat meer ideeën nodig heb neem dan even een kijkje op het Youtube kanaal van My Favorite Things.

Have a wonderful day!
Greets, Marieke

vrijdag 11 maart 2022

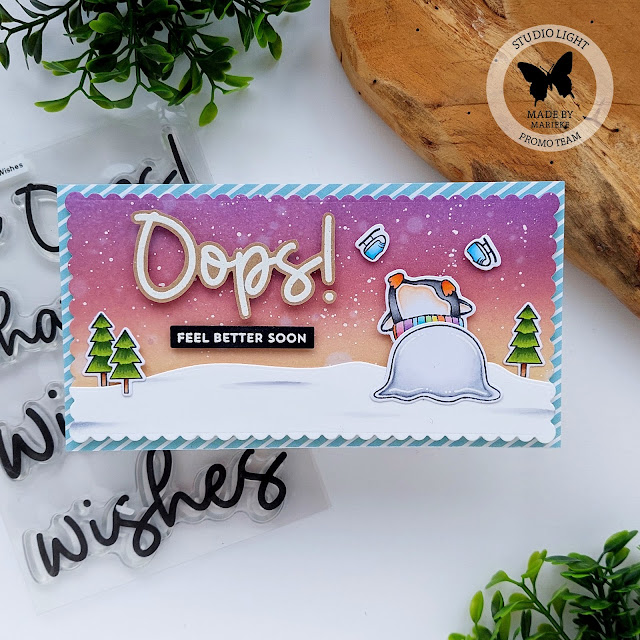
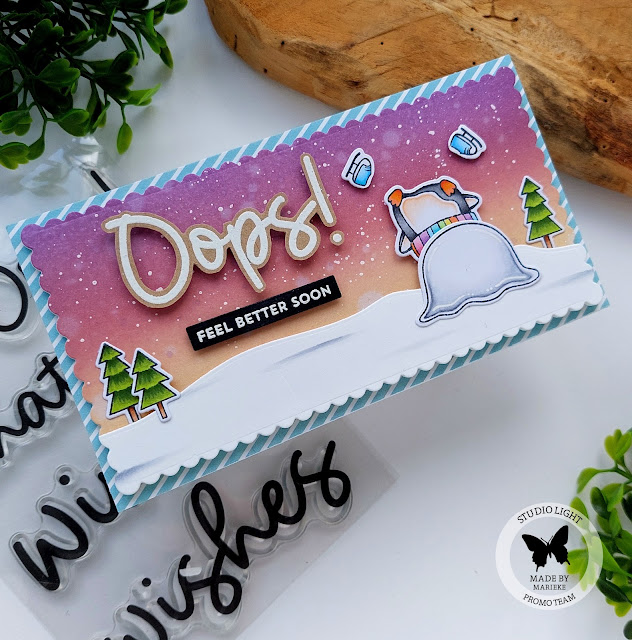
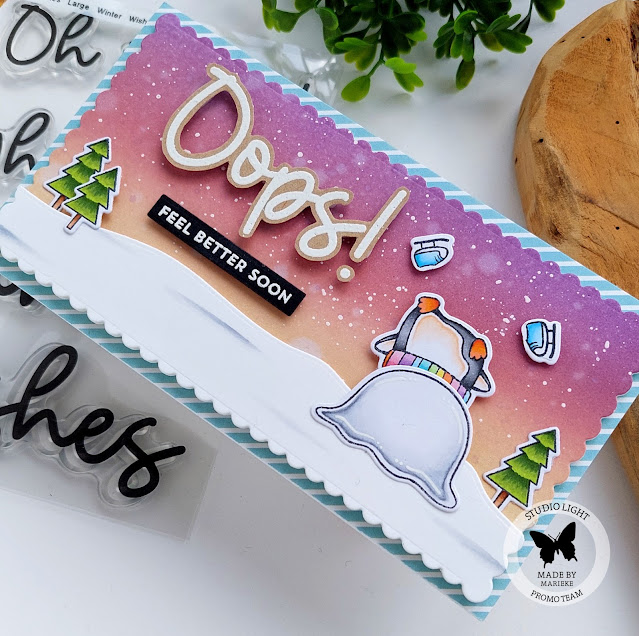
Studio light - Oops! Feel Better Soon

Hallo Allemaal,

Daar ben ik weer met mijn wekelijkse inspiratie kaart voor Studio Light! Ditmaal besloot ik om met de winterse stempels een beterschap kaart te maken.
Today i'm back again to inspire you with some Studio Light products! This time I decided onmaking a get well soon card.
Voor deze kaart gebruikte ik Sweet Stories Penguin, Snowman en de Quotes Large Winter Wishes. For my inspiration card I combined the Sweet Stories Pengun, Snowman and the Quotes Large Winter.
Maakte eerst de achtergrond met Antique Linen, Victorian Velvet en Wilted Violet. Spetterde water en witte verf en stanste het uit met een geschupte rechthoek. Stanste de sneeuw met de rechthoek en een sneeuw stans en bracht met Copics wat details aan.

First I made the background using Antique Linen, Victorian Velvet and Wilted Violet Distress ink. Splatterd some water and white paint and die cut it using a scalloped rectangle. Die cut the snow out of white cardstock using a snow die and the scalloped rectangle die. Added some details using my Copic markers.
Stempelde alle afbeeldingen, kleurde ze in met mijn Copic markers en stanste ze uit met de bijpassende stansen. Knipte de schaatsen los van de penguin en werkte de stempel lijn weg met een witte gelpen. Heat emboste alle teksten op zwart en kraft cardstock en stanste knipte het uit. Plakte alles op de kaart en het geheel ging op een witte topfold kaart die ik beplakte met designpapier. Stamped all the images, colored them up using my Copic markers and die cut them using the matching dies. Cut the skates from the images and removed the stamping lines using a white gelpen. Heat set the sentiments on some kraft and black cardstock en cut them by hand or with a die. Added everything on the card and onto a topfold white base card, wich I added some pattern paper onto.

Gebruikte Copic Kleuren:

 Zwart - N6, N4, N3, N2
Buik / armen penguin - E53, E51, E50
Roze - R85, R83, R81
Oranje - Yr04, YR02, YR00
Geel - Y15, Y13, Y11
Groen - YG17, YG13, YG11
Teal - BG15, BG13, BG11
Blauw - B02, B00, B000
Paard - V17, V15, V12
White - C5, C3, C1, C00, 0
Bomen - YG67, YG63, YG03; E37, E35, E33

Heb een heerlijke dag!
Groet, Marieke

Stempels: SS Penguin, SS Snowman, SS Quotes Large Winter Wishes
Stansen: SS Penguin, SS Snowman, SS Snowy Fun
Inkt: Antique Linen/ Victorian Velvet/ Wilted Violet Distress inkt, Memento Tuxedo Black, Tsukineko Versamark.
Papier: Smooth White, Kraft, Black Licorice
Extra: Witte acryl verf, witte embossing poeder, witte gelpen.