vrijdag 30 september 2022

Studio Light - Sending You Christmas Wishes.

Hallo Allemaal,

Hier is mijn wekelijkse post voor Studio Light weer. Deze keer maakte ik met de nieuwe Sweet Stories Kerst release een shaker kaart. I'm back with my weekly post for Studio Light. This time around I decided to making a shaker card using the new Sweet Stories Christmas release.
Zoals altijd maakte ik eerst de achtergrond. Inktblende de kleuren Wilted Violet, Blueprint Sketch, Chipped Sapphire en Black Soot Distress inkt. Spetterde water en witte inkt. Stanste de bomen rand uit groen, kraft en wit cardstock, maakte het tot een geheel en plakte het op de achtergrond.

As always I made the background first. Inktblended the colors Wilted Violet, Blueprint Sketch, Chipped Sapphire en Black Soot Distress ink. Splattered some white paint and water. Die cut the tree border out of green, kraft and white cardstock and made it into one, before glueing it onto the background.
Maakte het shaker element en plakte het geheel op een zwarte topfold basiskaart. Stanste de sneeuw uit en bewerkte dit met mijn Copic markers. Heat emboste de teksten. De kleine op cardstock de grote tekst op vellum. Stanste en knipte dit uit en plakte op de kaart.

Made the shaker element and glued the background onto a black topfold basecard. Die cut the snow and added some Copic colors for some details. Heat set the sentiments, de smaller ones on cardstock the big one on vellum. Die cut and cut them using my scissors.
Stempelde alle afbeeldingen, kleurde ze in met mijn Copic markers en stanste ze uit met de bijpassende stansen. Plakte alle afbeeldingen en de teksten op de kaart en deze was helemaal klaar. Stamped all the images, colored them up using my Copic markers and cut them using the matching dies. Adhered them on the card together with the sentiments and my card was done.


Gebruikte Copic Kleuren:
Rendieren - E59, E57, E55, E53, E51, E50 / N8, N6, N4 / E44, E43, E42 / R20, R00 / W5, W3
Rood - R29, R27, R24
Groen - YG25, YG23, YG21
Wit - C5,C3,C1, C00, 0
Paars - BV17, BV04, BV13, BV02, BV00
Goud - YR27, YR24, YR23
Roze - R85, R83, R81

Heb een heerlijke dag!
Groet, Marieke

Stempels: SL-SS-SCD51, SL-SS-STAMP294, SL-SS-STAMP295
Stansen: SL-SS-SCD51,SL-SS-CD429, SL-ES-CD180, SL-SS-CD394
Inkt: Memento Tuxedo Black, Tsukineko Versamark, Wilted Violet/ Blueprint Sketch/ Chipped Sapphire/ Black Soot Distress inkt.
Papier: Smooth White, Black Licorice, Kraft, Sour Apple, Blueberry, Vellum.
Extra: Wit embossing poeder, witte verf marker, SL-ES-BLISS04

donderdag 29 september 2022

Altenew Sticky Essentials Blog Hop + Giveaway ($300 in Total Prizes!)

 Hello all,

This month I have the honors to be guesting for Altenew! Today we are celebrating all the adhesive products that Altenew have in stock you can have a look here! There is a fun inspirational bloghop hosted the starting point can be found hereDeze maand heb ik de eer om gastdesigner te zijn bij Altenew! Vandaag staan alle lijm producten van Altenew in de spotlight. Mocht je benieuwd zijn wat ze allemaal hebben, je kunt ze hier vinden. Vandaag is er een bloghop om deze producten in de spotlight te zetten en die kun je hier vinden.
For my card I cut a White rectangle and stamped the Candystripe Cosmos outline stamped on different spots onto the card using a black ink. Adhered the panel onto a white basecard using the Gluetape runner
Voor mijn kaart sneed ik een witte rechthoek en stempelde de outline stempel van de Candystripe Cosmos met zwarte inkt op de rechthoek. Plakte daarna het paneel op een witte basiskaart met de Gluetape runner.
Stamped the inner stamps of the Candystrip Cosmos and the leaves using Two pink, two yellow and a green ink. Die cut them using the matching dies. Die cut a white circle and adhered the circle and flowers onto the cars using the Ultra Sticky Double Sided Tape.

Stempelde de drie inner stempels van de Candystripe Cosmos en de bladeren met twee kleuren roze, twee gele en een groene inkt. Stanste daarna alles met de bijpassende stansen. Stanste een witte cirkel en plakte daarna de cirkel en bloemen op de kaart met de Ultra Sticky Double Sided Tape.
Stamped the birthday sentiment cut it to a banner and die cut the word die using gold cardstock. Adhered both of them onto the card again using the Ultra Sticky Double Sided Tape. Stempelde de tekst op wit cardstock en sneed het tot een banner. Stanste het woord uit goud cardstock. Plakte beide op de kaart met de Ultra Sticky Double Sided Tape.

Have a wonderful day!
Greets, Marieke

Giveaway Prizes
$300 in total prizes! To celebrate this special blog hop, Altenew is giving away a $50 gift certificate to 2 lucky winners and a $25 gift certificate to 8 winners! Please leave a comment on the Altenew Card Blog and/or each designer’s blog post on the blog hop list below by 10/05/2022 for a chance to win. Altenew will draw 10 random winners from the comments left on each stop of this blog hop and announce the winners on the Altenew Winners Page on 10/06/2022.
 
Blog Hop Order

zondag 25 september 2022

Welkom Kleine Meid

Hallo allemaal,

Vandaag een kaart die ik wederom op bestelling maakte. Ditmaal was de opdracht lekker roze met veel glitters. Nou ik denk dat, dat prima gelukt is! Today I made yet another other, this time around they asked me to use pink and loads of glitter. Well I think I accomplished that.
Met een ouder Dutch Doobadoo Stencil maakte ik het rompertje uit wit cardstock. Daarna maakte ik zelf het "designpapier" met roze cardstock een stencil en goud glitterpasta. Plakte dit op het witte cardstock en plaatste een magneetje aan de onderzijde van het rompertje zodat het open kan.

White a older Dutch Doobadoo Mask I made the romper out of white cardstock. After that I made my own pattern paper using pink cardstock, a mask and some gold glitterpaste. Adhered the pattern paper onto the romper and added some magnets to the bottom for the closing mechanisme.
Op wit cardstock printte ik de tekst en stanste het uit met een cirkel stans. Bewerkte dit met een roze inkt en een wolkenstencil. Stanste een witte cirkel iets groter en plakte dit achter de tekst.

On some white cardstock I printed the sentiments and die cut it using a circle die. Added some pink clouds to it using Spun Sugar and a mask. Die cut a slightly larger white circle and adhered them together.

Stempelde alle afbeeldingen, kleurde ze in met mijn Copic markers en knipte ze uit. Plakte alles op de kaart met verschillende hoogtes foam tape en bewerkte de speen en rammelaar met gouden glitterlijm. Stamped all the images, colored them up using my Copic markers and cut them using my sciccors. Adhered everything on to the card using different heights of foam tape and added some gold sparkle to the rattle and pacifier.

Gebruikte Copic kleuren;
Hout - E37, E35, E33, E31
Groen - YG67, YG63, YG03, YG01
Roze - R59, R85, R83, R81
Wit - C5, C3, C1, 0
Jaguar - E27, E25, YR24, YR23, YR21 / E44, E43, E41 / N8, N6, N4

Heb een heerlijke dag!
Groet, Marieke


Stempels: Toecan do it (Lawn Fawn), Baby Panda (Carlijn Design)
Stansen: CCL-ES-CD415
Inkt: Memento Tuxedo Black, Spun Sugar
Papier: Smooth White, SL-ES-PP05
Extra: Gold Glitz Gel (Gina K), DDBD card art mal (470.713.595), Gold stickles, Animal Adventures Stencil ( Kraftin' Kimmie Stamps), Mini Cloud Edges Stencil (MFT).

vrijdag 23 september 2022

Studio Light - Sending You Sweet Christmas Wishes

Hallo Allemaal,

Hier is mijn wekelijkse post voor Studio Light weer. Deze keer maakte ik met de nieuwe Sweet Stories Kerst release een slimline kaart. I'm back with my weekly post for Studio Light. This time around I decided to making a slimline card using the new Sweet Stories Christmas release.
Zoals altijd begon ik met de achtergrond, stanste hem uit en inktblende de kleuren Peacock Feathers, Cracked Pistashio en Scattered Straw. Spetterde witte verf en voegde daarna met glitter pasta de sneeuw aan met een stencil.

As Always I started with the background, die cut it and inkblended it using the colors Peacock Feathers, Cracked Pistashio and Scattered Straw Distress ink. Splattered some white paint and added some snowflakes using a mask and glitter paste.
Stanste de bomenrand uit wit, groen en kraft cardstock en maakte er een geheel van. Stanste daarna het huisje uit verschillende kleuren cardstock en plakte het tot een geheel. Stanste daarna de losse onderdelen van het snoephuisjes addon en maakte het tot een geheel.

Die cut the treeborder using white, green and kraft cardstock and added it into a whole. Die cut the house out off different colors of cardstock and made it into a whole house. Added the elements from the candy addon and made it into a candy house.
Stempelde de peperkoek mannetjes uit, kleurde ze in met mijn Copic makers en stanste ze uit met de bijpassende stansen. Plakte alles op de kaart en stempelde/ heat emboste alle teksten. Knipte of stanste ze uit en plakte ze op. Het geheel ging op een kraft sidefold basiskaart. Stamped the gingerbread people, colored them up using my Copic markers en die cut them using the matching dies. Added all the images on to the card and heat set or stamped all the sentiments. Die cut of cut them by hand and added them. Glued the rectangle on a sidefold kraft basecard.

Gebruikte Copic Kleuren:
Poppetjes - E37, E35, E33, E31, E30 / R24, R20 / C5, C3, C1
Groen - YG67, YG13, YG01

Heb een heerlijke dag!
Groet, Marieke

Stempels: SS- SCD50, SS-STAMP294, SS-STAMP295
Stansen: SS-SCD50, SS-CD426, SS-CD248, SS, CD249
Inkt: Memento Tuxedo Black, Tsukineko Versamark, Versafine Onix Black, Peacock Feathers/ Cracked Pistashio/ Scattered Straw Distress inkt.
Papier: Smooth White, Black Licorice, Kraft, Lemon Drop, Chantilly Cream, Vintage Timber, Summer Splash, Limelight, Fire Coral, Cotton Candy, Poppin' Pink
Extra: Wit embossing poeder, witte verf marker,Glitter Pasta, SS-MASK14

dinsdag 20 september 2022

Studio Light - Happy New Year!

 Hallo Allemaal,

Hier is mijn wekelijkse post voor Studio Light weer. Deze keer maakte ik met verschillende Sweet Stories releases een nieuwjaars slimline kaart. I'm back with my weekly post for Studio Light. This time around I decided to making a slimline card using all different Sweet Stories releases.
Stanste een rechthoek uit zwart cardstock en maskeerde 2 cm aan de onderzijde. Met het stenen stencil en witte inkt, inktblende ik de muur en spetterde witte verf. Sneed een topfold witte basiskaart en uit wit, zwart en goud glittercardstock sneed ik stroken en maakte mijn eigen designpapier.

Die cut a black rectangle and masked off 2 cm of the bottom of the rectangle. Using the brick stencil and white ink, I inkblended the wall and splattered some white paint. Cut a topfold white base card, some strips of paper out of black, white and gold glitter cardstock and made my own pattern paper. 
Uit wit en goud glittercardstock stanste ik 2023 en plakte zo op elkaar en op de kaart. Heat emboste de tekst op zwart cardstock en sneed dit tot een banner, plakte het daarna op de kaart met foam tape.

Out of white and gold glitter cardstock I die cut the numbers 2023 en adhered them together and onto the card. Heat set the sentiment on some black cardstock and trimmed it into a banner, after that I adhered it on the card using foam tape.
Stempelde alle afbeeldingen, kleurde ze in met mijn Copic markers en stanste ze uit met de bijpassende stansen. Plakte alles op elkaar en daarna op de kaart met lijm of verschillende hoogtes foam tape. Stamped all the images, colored them up using my Copic markers and cut them using the matching dies. Adhered everything together and onto the card using glue and different heaights of foamtape.

Gebruikte Copic Kleuren:
Rendier - E59, E57, E55, E53, E51, E50 / N8, N6, N4 / E44, E43, E42 / R22, R20, R00 / W5, W3
Aap - E59, E57, E55, E53, E51, E50 / R22, R20, R00
Nijlpaard - W6, W5, W4, W2, W1, W0, W00 / R22, R20, R00
Vos - E09, E07, YR24, YR21 / W5, W3, W1, W00 / R22, R20, R00
Bij - N8, N6, N4, N3 / Y17, Y15, Y13, Y11 / B02, B00, B000, B0000
Champagne - Y26, Y23, Y21
Blauw - B02, B00, B000
Wit - C5, C3, C1, C00, 0
Zwart - N8, N6, N4, N3
Goud - E27, Y26, Y15, Y11
Oliebollen - E37, E35, E33, E31

Heb een heerlijke dag!
Groet, Marieke

Stempels: SL-SS-SCD37, SL-SS-SCD48, SL-SS-SCD47, SL-SS-SCD46, SS-SL-SCD49, SL-SS-SCD19, SS-SL-SCD50, SL-SS-SCD51, SL-ES-SCD43
Stansen: SL-SS-SCD37, SL-SS-SCD48, SL-SS-SCD47, SL-SS-SCD46, SS-SL-SCD49, SL-SS-SCD19, SS-SL-SCD50, SL-SS-SCD51, SL-SS-CD153, SL-ES-CD378
Inkt: Memento Tuxedo Black, Tsukineko Versamark, Versafine Onix Black, Unicorn white
Papier: Smooth White, Black Licorice, SL-ES-PP50
Extra: Goud embossing poeder, witte verf marker, SL-ES-MASK152

maandag 19 september 2022

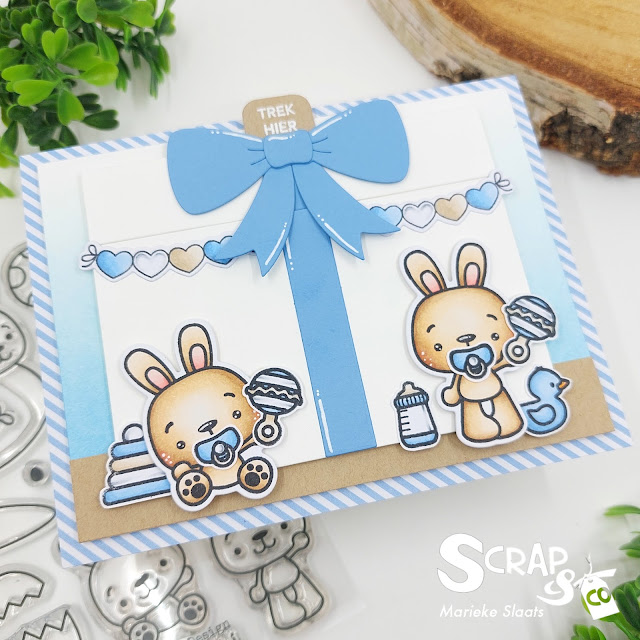
Hoera het is een jongen

Hallo allemaal,

Hier ben ik weer ditmaal maakte ik wederom een baby kaartje op bestelling. Ditmaal voor een neef van Alexander die binnenkort vader wordt van een zoon. Alexander zijn tante woont in Amerika en is nu 4 weken hier, ze vroeg me een kaart te maken voor de aanstaande ouders. This time around I made a baby card for a aunt of Alexander. Alexander his nephew is becoming a dad any time now, his aunt lives in America and she asked me to make a card for the soon to be parents.
Sneed een topfold Smooth White basis kaart en beplakte dit met designpapier. Sneed een kleiner witte rechthoek en beinkte dit met Lazy Day inkt. Plakte een strook kraft cardstock op de onderkant. Stanste alle onderdelen van de Perfect Present Die-Namics en plakte het aan elkaar.

Cut a Smooth White topfold base card and added some pattern paper on the front of is. Cut a smaller rectangle and inked it up with Lazy Day. Glued a stripe of Kraft cardstock on the bottom. Die cut all the elements of the Perfect Present Die-Namics and adhered them together.
Sneed een stuk wit cardstock en stempelde hier de tekst op. Plakte dit aan de bovenkant van het cadeau. Heat emboste de tekst op een Kraft slider tab en bepaalde waar het slider slot kwam op de kaart. Stanste dit en plakte alles de kaart met foam tape zodat de slider ruimte had om te bewegen.

Cut a Smooth White rectangle and stamped the sentiment. Adhered it onto the lid of the present. Heat set the sentiment on a Kraft pull tab and adhered it on the back of the lid. Decided were the slider slot needed to go and die cut it. Assembled the slider by glueing it onto the card using foam tape.
Stempelde alle afbeeldingen, kleurde ze in met mijn Copic markers en stanste of knipte ze uit. Plakte daarna alles op de kaart en werkte het af met witte gelpen details. Stamped all the images, colored them up using my Copic markers and die cut them of cut them by hand. Adhered everything onto the card and finished it adding some details using a white gelpen.

Gebruikte Copic kleuren:
Konijnen - E57, E55, E53, E51, E50 / R22, R20, R00
Blauw - B34, B32, B21
Bruin - E43, E42, E41
Wit - C5, C3, C1, 0

Heb een heerlijke dag!
Groet, Marieke

Stempels: Baby Panda, Hippity hop, Geboorte, Interacties (Carlijn Design), Up in the Air (My Favorite Things)
Stansen: Hippity Hop (Carlijn Design), Up in the Air, Spin & Slide Channels, Perfect Present, Volcano Die-Namics (My Favorite Things)
Papier: Smooth White, Kraft, Lazy Day, Stripe Splash (My Favorite Things)
Extra: Slider Elements, Ultrafine white embossing powder.

vrijdag 16 september 2022

Studio Light - Merry Christmas

Hallo Allemaal,

Hier is mijn wekelijkse post voor Studio Light weer. Deze keer maakte ik met de nieuwe Sweet Stories Kerst release een slimline kaart. I'm back with my weekly post for Studio Light. This time around I decided to making a slimline card using the new Sweet Stories Christmas release.

Eerst maakte ik de achtergrond, ik stanste deze en inktblende hem met de kleuren Black Soot, Evergreen Bough and Speckled Egg. Spetterde water en witte verf en bewerkte het daarna nog met een Mask en pasta.

First I made the background, I die cut the rectangle and inktblende the colors Black Soot, Evergreen Bough and Speckled Egg. Splattered some water and white paint and added some snowflakes using the mask and white paste.

Stanste de losse onderdelen van de boom en inktblende het, spetterde nog wat verf op de boom. Stempelde alle afbeeldingen en kleurde ze in met mijn Copic markers. Stanste ze daarna uit met de bijpassende stansen. 

Die cut the elements of the tree and inkblende them, also splattered some white paint on to the tree. Stamped all the images and colored them using my Copic markers. Die cut them using the matching dies.

Plakte de boom op de achtergrond en bepaalde waar de lichtjes kwamen. Maakte een gaatje met een prikpen en maakte het lichtmechanisme achter de kaart. Stempelde de tekst op de voorkant waar de schakelaar zit en plakte het geheel op een sidefold Kraft basis kaart.

Glued the tree on the background and decided were the lights were going to be. Added some small holes using a pricker and added the lights on the back of the rectangle. Stamped the sentiment were the mechanisme is going to be and added the rectangle onto a kraft sidefold basecard.

Plakte alle losse stempels op de kaart. Stempelde de tekst "Merry" en knipte deze uit. Heat emboste "Christmas" op rood cardstock en stanste deze uit. Plakte beide op de kaart met foam tape. Added the images on the card. Stamped "Merry" and cut it by hand. Heat set the "Christmas" on red cardstock and cut it usign a die. Added them both on the card using foam tape.

Gebruikte Copic Kleuren:
Rendieren - E59, E57, E55, E53, E51, E50 / N8, N6, N4 / E44, E43, E42 / R20, R00 / W5, W3
Rood - R59, R39, R37, E35
Donker Geel - YR24, YR23, YR21
Licht Geel - Y26, Y23, Y21
Groen - BG99, BG96, BG93
Oranje - R05, R02, R00


Heb een heerlijke dag!
Groet, Marieke

Stempels: SL-SS-SCD51, SS- SCD50, SS-STAMP294, SS-STAMP295, ES-STAMP276
Stansen: SS-SCD51,SS-SCD50, SS-CD427, SS-CD426
Inkt: Memento Tuxedo Black, Tsukineko Versamark, Versafine Onix Black, Black Soot/ Evergreen Bough and Speckled Egg Distress inkt.
Papier: Smooth White, Black Licorice, Kraft, Vintage Timber, Jellybean Green, Red Hot.
Extra: Wit embossing poeder, witte verf marker, ES-LED02, SS-MASK140

dinsdag 13 september 2022

Vik

Hallo allemaal,

Vandaag een geboorte kaart die ik maakte op bestelling. Nu was de opdracht best lastig, doordat de ouders zelf erg van de naturel kleuren zijn en zo ook het geboortekaartje en het babykamertje eruit zag. Hierop heb ik dus uiteindelijk mijn kaart geinspireerd.
Today I want to show you a card that I made for a order. The order was quite a challenge, because the parents love natural colors. The birth card was in that style just like the nursery. So that's what inpspired me to create this card.
Sneed een witte achtergrond en inktblende Naturel en Kraft MFT inkt. Spetterde Kraft en gouden verf spetters. Stanste de afbeeldingen en kleurde deze in naturel tinten in. 

Cut a white background and inkblended Naturel and Kraft MFT inkt. Splattered some Kraft and golden ink / paint. Stamped the images and colored them up using naturel tones.
Stanste of knipte de afbeeldingen uit en plakte ze op de kaart met foam tape. Stanste de naam uit goud cardstock en de geboortedatum uit bruin cardstock en plakte beide op de kaart.

Die cut or cut the image by hand and adhered them onto the card using foam tape. Die cut the name out of gold cardstock and the date of birth out of brown cardstock and adhered both onto the card.
Het geheel ging op een witte topfold basiskaart met foamtape. Adhered the whole panel onto a topfold Smooth White base card using foam tape.

Gebruikte Copic kleuren:
Bruin - E47, E44, E43, E42, E41, E40
koala - W6, W4, W2, W0 / N7, N5, N3 / R20, R00

Heb een heerlijke dag!
Groet, Marieke

Stempels: Koala Hugs (Mama Elephant), Tropical Scenes (Sunny Studio)
Stansen: Tropical Scenes, Modern Serif Alphabet Die-Namics (MFT), Slimline Kaart 6 (Carlijn Design).
Inkt: Naturel, Kraft, Memento Tuxedo Black
Papier: Smooth White, Vintage Timber (MFT), Goud cardstock.
Extra: Kuretake - Gansai Tambi Starry Colors.

vrijdag 9 september 2022

Studio Light - Too Cute To Spook

Hallo Allemaal,

Hier is mijn wekelijkse post voor Studio Light weer. Deze keer maakte ik met de nieuwe Sweet Stories Halloween / Herfst release een slimline kaart. I'm back with my weekly post for Studio Light. This time around I decided to making a slimline card using the new Sweet Stories Halloween / Herfst release.
Eerst maakte ik de achtergrond, ik stanste een rechthoek en inktblende deze met Shaded Liliac, Wilted Violet en Black Soot Distress inkt. Spetterde water, witte en zwart verf en liet het drogen. Sneed een sidefold witte basiskaart en plakte hier de rechthoek op.

First off I made the background, die cut the rectangle and inkblended it using Shaded Lilac, Wilted Violet and Black Soot Distress ink. Splattered some water, white and black paint. Cut a white sidefold basecard and added the rectangle.
Stanste de maan en losse onderdelen uit licht geel cardstock en beinkte ze met gele inkt. Stanste het hek uit bruin cardstock, het gras uit groen cardstock en inkte het grass met Peeled Paint. Plakte het allemaal op de kaart.

Die cut the moon and the loose elements out of light yellow cardstock and inked it up using a yellow ink. Die cut the fence out of brown cardstock and the grass out of green cardstock. Inked up the grass using Peeled Paint and adhered everything on the base card.
Stempelde de afbeeldingen, kleurde ze in met mijn Copic markers en stanste ze uit met de bijpassende stansen. Heat emboste de teksten op zwart cardstock stanste ze uit tot kleine tekstjes en plakte alles op de basiskaart. Stamped all the images, colored them up using my Copic markers en cut them using the matching dies. Heat set the setiments on black cardstock and cut them into small sentiments. Added all the sentiments and images on the card using foam tape.

Gebruikte Copic Kleuren:
Vleermuizen - N6, N4, N3, N2, N1 / R22, R20, R00
Takken - E37, E35, E31 / YG17, YG13, YG01

Heb een heerlijke dag!
Groet, Marieke

Stempels: SL-SS-SCD37, SL-SS-STAMP215, SL-SS-SCD49, SL-SS-STAMP272
Stansen: SL-SS-SCD37, SL-SS-CD207, SL-SS-SCD49, SL-SS-CD399
Inkt: Memento Tuxedo Black, Tsukineko Versamark, Wilted Violet, Shaded Lilac, Peeled Paint en Black Soot Distress inkt, Lemon Drop.
Papier: Smooth White, Black Licorice, Vintage Timber, Prickly Pear, Lemon Chiffon.
Extra: Wit embossing poeder, witte en zwarte verf marker.

zaterdag 3 september 2022

My Favorite Things - Bestie's Birthday

Hello all,

Today I want to show you a project that I made for one of my besties here birthday. I used products by My Favorite Things to create this card.
Vandaag laat ik jullie een kaart zien die ik maakte voor een van mijn beste vriendinnen haar verjaardag. Voor de kaart gebruikte ik de leuke producten van My Favorite Things.
So I made a really personal card because I incorporate a picture of myself into the card. Cut a topfold Smooth White base card and adhered a piece of DBD Wildflowers Pattern Paper onto the base. Add a strip of Cement Gray and a strip of Smooth White to create the floor.

Deze keer maakte ik een hele persoonlijke kaart, ik verwerkte namelijk een foto van mezelf in de kaart. Sneed een Smooth White topfold basiskaart en plakte hier een stuk DBD Wildflowers Design Papier op. Sneed een strook Cement Gray en Smooth White en maakte hier de vloer mee.
Stamped the sentiment out of Sassy Pants Birthday Greetings 3 directly onto the card. Printed a image of myself and stamped the speechbubble onto it. Cut it and stamped the speech bubble again on Smooth White and die cut it using the matching die and adhered them together.

Stempelde de tekst uit Sassy Pant Birthday Greetings 3 rechtstreeks op de kaart. Printte een foto van mezelf en stempelde hier de tekstwolk op. Knipte hem uit en stempelde de tekstwolk nog een keer op Smooth White. Stanste het uit met de bijpassende stans en plakte ze op elkaar.
Stamped the images out of the Knead You, Mice Day to Celebrate and Happy Hippos sets. Colored them up using my Copic markers and cut them using the matching dies. Adhered all the images onto the card usign different heights. Stempelde alle afbeeldingen uit de Knead You, Mice Day to Celebrate en Happy Hippos sets. Kleurde ze in met mijn Copic markers en stanste ze uit met de bijpassende stansen. Plakte alle afbeeldingen op de kaart met verschillende hoogtes foamtape.

Used Copic Colors:
Crates - E37, E35, E33, E31, E30
Cat - E09, E19, E15, E13, E11 / W5, W3, W1, W0
Yellow - Y15, Y13, Y11, Y00
Pink - R24, R22, R20, R00
Teal - BG15, BG13, BG11, BG10
Cupcakes - E44, E43, E42
Gray / White - C5, C3, C1, 0

If you need to be even more inspired after this post make sure to have a look over at My Favorite Things Youtube ChannelWanneer je na deze post nog wat meer ideeën nodig heb neem dan even een kijkje op het Youtube kanaal van My Favorite Things.

Have a wonderful day!
Greets, Marieke