vrijdag 27 mei 2022

Studio Light - met Pensioen

Hallo Allemaal,

Hier is mijn wekelijkse post voor Studio Light weer. Deze keer maakte ik een pensioen kaart met beide stempels uit de Sweet Stories Spring collectie. I'm back with my weekly post for Studio Light. This time around I retirement card using both of the stamps out of the Sweet Stories Spring Collection.
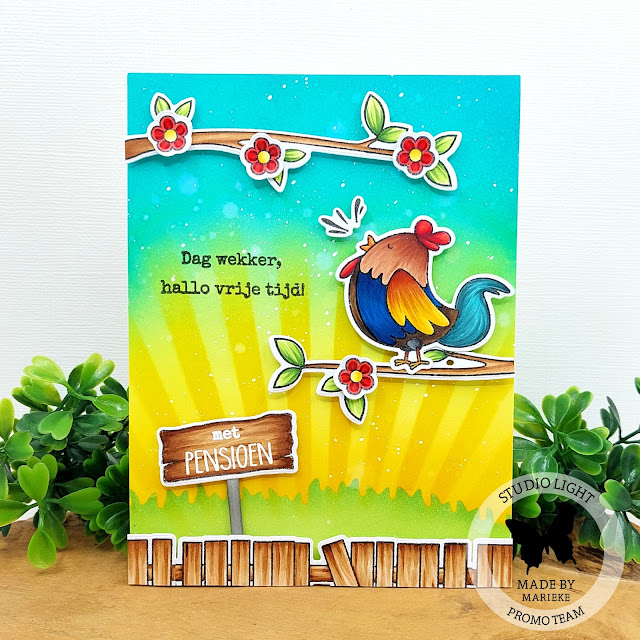
Sneed een rechthoek van 4 x 5 1/4 inch en inktblende het gras met Mowed Lawn en Twisted Citron. Daarna inktblende ik de lucht met Mustard Seed, Squeezed Lemonade, Cracked Pistashio en Peacock Feathers. Inktblende de licht stralen met Mustard Seed en spetterde water en witte verf.

Cut a white rectangle 4 x 51/4 inch and inkblended the grass using Mowed Lawn and Twisted Citron. After that I inkblended the sky using Mustard Seed, Squeezed Lemonade, Cracked Pistashio and Peacock Feathers. Inkblended the ray of lights using a stencil and Mustard Seed. Splattered some white paint and water.

Stempelde alle afbeeldingen uit de set, kleurde ze in met mijn Copic markers en stanste ze uit met de bijpassende stansen. Heat emboste de tekst met Pensioen op het houten bordje en stanste de brievenbus uit de wintercollectie uit grijs cardstock en plakte dit achter het bordje.

Stamped all the images, colored them up using my Copic markers en die cut them using the matching dies. Heat set the sentiment "met Pensioen" on the wooden sign en die cut the mailbox out of the winter collection out of gray cardstock, adhered it behind the sign.
Plakte alles op de kaart met foam tape. Stempelde de andere losse teksten rechtstreeks op de kaart. Plakte het geheel op een topfold witte basiskaart. Glued everything on to the card using foam tape. Stamped the sentiments directly on the card and glued the panel on a topfold white basecard.

Gebruikte Copic Kleuren:
Hout - E37, E35, E33, E31, E30
Groen - YG67, YG03, YG01
Rood - R59, R29, R27, R24
Geel - Y17, Y15, Y13
Blauw - B39, B37, B28, B26
Kippenvleugel - E09, E07, YR27, YR23, Y17, Y15
Snavel - YR09, YR07, YR02
Poten - E09, YR27, YR23
Bruin Kip - E49, E47, E44 / E18, E17, E15, E13
Staart Kip - BG78, BG75, BG18, BG15
Zwart - N8, N6, N4

Heb een heerlijke dag!
Groet, Marieke

Stempels: SS SCD37, SS SCD36
Stansen: SS SCD37, SS SCD36, SS SCD18
Inkt: Memento Tuxedo Black, Tsukineko Versamark, Versafine onix black, Squeezed Lemonade/ Mustard Seed/ Mowed Lawn/ Twisted Citron/ Cracked Pistashio en Peacock Feathers Distress inkt.
Papier: Smooth White
Extra: Wit embossing poeder, witte verfmarker, SS MASK119

donderdag 26 mei 2022

Sunny Studio - Fintastic Friends

 Hello all,

I'm back again with my weekly post for Sunny Studio Stamps. Today I hope to inspire you with a card that I made using the Fintasic Friends. Daar ben ik weer met mijn wekelijkse post voor Sunny Studio Stamps. Vandaag hoop ik jullie te inspireren met een kaart die ik maakte met de  Fintastic Friends
This time I decided to create a Clean and Simple card using the fun shark that comes in the Fintastic Friends stamp. First off I cut a white rectangle and inkblended the colors Tumbled Glass, Mermaid Lagoon, Blueprint Sketch and Chipped Sapphire. Splattered some water and let it dry.

Deze keer maakte ik een Clean en Simple kaart met de leuke haar die in de Fintastic Friends stempel zit. Eerst sneed ik een witte rechthoek en inktblende de kleuren Tumbled Glass, Mermaid Lagoon, Bleuprint Sketch en Chipped Sapphire. Spetterde water en liet het geheel drogen.

Out of white cardstock I cut a photo frame and stamped the sentiment out of the Snail Mail Stamp. Stamped the shark and mirror stamped the same shark and colored it up using my Copic markers. Die cut the left shark using the Fintastic Friends dies and cut the other one with my siccors. Stamped the hearts, colored them up with my Copics and cut them with my siccors.

Uit wit cardstock sneed ik het foto frame en stempelde de tekst uit de Snail Mail stempel erop. Stempelde de haai en de haai met de spiegel techniek en kleurde ze beide in met mijn Copic markers. Stanste de linker haai met de Fintastic Friends stans en de andere knipte ik uit. Stempelde de hartjes, kleurde deze ook in met mijn Copics en knipte ze uit.
Stamped the seaweed and fish using Chipped Sapphire and adhered the panel on a white basecard. Glued the frame and the images on the card using foamtape. Finished of the card adding some Glossy Accent on to the hearts. Stempelde het zeewier en de vissen met Chipped Sapphire en plakte het geheel op een witte topfold basiskaart. Plakte de afbeeldingen met foam tape op de kaart en werkte het geheel af door wat Glossy Accent aan te brengen op de hartjes.

Used Copic Colors:
Sharks - BV17, BV04, BV13, BV02 / R24, R22, R20/ W5, W3, W1, W00, 0
Hearts - R59, R29, R27, R24

Have a wonderful day!
Greets, Marieke

dinsdag 24 mei 2022

Winterse Card Swap

Hallo allemaal,

Vandaag een kaart die ik maakte voor een Card Swap met Ellen Haxelmans. Na de laatste Magische Card Swap besloten we er nog eentje te doen. Naast de kaart zouden we ook een klein cadeau toevoegen. Today I have a card specially made for a Card Swap with Ellen Haxelmans. After the Magical Card Swap we had in the summer we decided on doing another cardswap. Beside the card we also send eachother a small present.
Ik vind slimline kaarten helemaal leuk en shaker kaarten ook dus ik maakte een slimline shakerkaart! Op aquarel papier inktblende ik Antique Linen, Victorian Velvet en Wilter Violet. Spetterde er water en witte verf op en stanste het uit. Stanste twee randen en plakte deze tijdelijk op. You know by know I love Slimline and Shakercards so I decided to combine both and make a Slimline Shaker Card. On some watercolor paper I inkblended some Antique Linen, Victorian Velver and Wilted Violet. Splattered some water and white paint and die cut the panel. Die cut two borders of snow and temporarly added them.

Stempelde alle afbeeldingen, kleurde ze in met mijn Copic markers en stanste of knipte ze uit. Plaatste de afbeeldingen waar ik ze wilde hebben en plakte ze tijdelijk vast. Zodra ik wist hoe ik ze wilde plakte ik de sneeuw en bomen die in de "ramen" komen vast. Stanste de "ramen" uit de achtergrond en nam ze over op een stuk wit cardstock. Stamped all the images, colored them up using my Copic markers and cut them using matching dies or my sciccors. Added the images were  I wanted them and glued the ones that would be in the "window frames". Die cut the "window frames" and traced the windows on a piece of white cardstock.
Plakte de uitgestanste ramen op de witte rechthoek. Plakte wat acetate achter de geinkte achtergrond en plakte er foamtape op. Vulde de shaker met shakermateriaal en plakte het dicht met een geschubte Kraft achtergrond. Deze stanste ik nog een keer en plakte ik op de achterkant van de andere om er zo een dubbele kaart van te maken.

Added the die cut frames onto the white rectangle and glued some acetate behind the inkblended panel. Added some foamtape and filled up the shaker. Closed the shaker using a scalloped Kraft base. Die cut another Kraft Scalloped base and glued them together so it would turn into a topfold basecard.
Plakte daarna alle andere afbeeldingen op en bewerkte ze met een witte gelpen. Heat emboste de teksten op gekleurd cardstock en stanste ze uit. Glued all the images onto the card and added some white gelpen details to them. Heat set the sentiments onto some colored cardstock and die cut them.

Gebruikte Copic kleuren:
Penguin - N6, N4, N3, N2; E53, E51, E50, 0; YR09, YR04, YR02; R20
Pink - R85, R83, R81
Orange - YR04, YR02, YR00
Yellow - Y15, Y13, Y11
Green - YG17, YG13, YG11
Blue green - BG15, BG13, BG11
Blue - B02, B00, B000, B0000, 0
Purple - V17, V15, V12
White - C5, C3, C1
Trees - YG67, YG63, YG03; E35, E33

Heb een heerlijke dag!
Groet, Marieke

Stempels: Warm Hugs and Frosty Kisses (My Favorite Things), Leuke Post, Penguin Puck (Carlijn Design)
Stansen: Warm Hugs and Frosy Kisses, Itty Bitty Strips Die-Namics (My Favorite Things), Leuke Post (Carlijn Design), (Mama Elephant) Slim Card Basics
Inkt: Antique Linen/ Victorian Velvet/ Wilter Violet Distress Inkt, Tsukineko VersamarkMemento Tuxedo Black.
Papier: Kraft, Smooth White, Ripe Raspberry, Grape Jelly 
Extra: Acetate, Witte Gelpen, Witte Verfmarker, Shakermateriaal, Zwarte Fineliner, Witte Embossingpoeder.

zaterdag 21 mei 2022

Pawsome Stamps - 1 Year Anniversary!

Hello all,

A year ago I was lucky to help Julianne Foyil to introduce her own stamping brand Pawsome Stamps to the crafting business and today i'm honored to be celebrating her one year business anniversary!  Een jaar geleden mocht ik Julianne Foyil helpen met het introduceren van haar eigen stempel merk Pawsome Stamps in de kraft wereld. Vandaag mag ik het samen met haar en nog een aantal krafters haar één jarige jubileum vieren.
With a celebration comes a celebration card. I made a fun interactive card using the Picture Perfect Pals together with the Puffy Birthday Greetings. Cut a Smooth White topfold base card and stamped the sentiments using three different colors of blue / teal inks.

Met een viering komt natuurlijk een kaart waarmee je iets viert. Ik maakte daarom een interactieve kaart met de Picture Perfect Pals samen met de Puffy Birthday Greetings. Sneed een Smooth White topfold basis kaart en stempelde de teksten in drie verschillende kleuren blauw / teal.
On top of one of the images I glued a Scratch of sticker. Heat set the sentiment and a arrow on to some Black Licorice and die cut it into a speech bubble. Stamped all the images, colored them up using my Copic markers and cut them by hand.

Op één van de gestempelde afbeeldingen plakte ik een Scratch sticker. Heat emboste de tekst en pijl op zwart cardstock en stanste het tot een spreekwolk. Stempelde alle afbeeldingen, kleurde ze in met mijn Copic markers en knipte alle afbeeldingen uit.
Adhered all the images on to the card using foam tape or glue. Added some details to the images using a white gelpen en finished the card of adding some different colors of enemal dots. Plakte alle afbeeldingen op de kaart met lijm of foam tape. Voegde met een witte gelpen wat details toe. Om de kaart af te maken plakte ik nog verschillende kleuren enemal dots op.

Used Copic Colors:
Llama - W5, W3, W1, W00 / R22, R20, R00 / E000, E00, E04, E11, E21
Teal - BG15, BG13, BG11, BG10
White - C5, C3, C1, C00, 0

Have a wonderful day!
Greets, Marieke

Stamps: Picture Pals, Puffy Birthday Greetings (Pawsome Stamps), Yeti or Not (Lawn Fawn), Somebunny (MFT).
Dies: Speech Bubble Die-Namics.
Ink: Memento Tuxedo Black, Tsukineko Versamark, Sno Cone, Summer Splash, Berrylicious.
Paper: Smooth White, Black Licorice
Extra: Black / White / Teal enemal dots, White embossingpowder, White gelpen, Scratch Stickers.

vrijdag 20 mei 2022

Studio Light - Happy BEE Day

 Hallo Allemaal,

Hier is mijn wekelijkse post voor Studio Light weer. Deze keer maakte ik een verjaardagskaart met de Sweet Stories Bijen. I'm back with my weekly post for Studio Light. This time around I made a birthday card using the Sweet Stories Bees.
Stanste een rechthoek uit geel cardstock en inktblende dit met Rustic Hinge en Black Soot Distress inkt. Met twee verschillende stencils en Black Soot bracht ik wat detail aan de achtergrond en spetterde daarna met goud mouse gemengd met water.

Die cut a rectangle out of yellow cardstock and inkblended it using Rustic Hinge and Black Soot Distress ink. Using two different stencils and Black Soot I added some details onto the card. Splattered the background using some gold mouse mixed with water.

Stanste de BEE uit hetzelfde gele, grijs en wit cardstock en maakte ze tot een geheel. Stempelde daarna alle afbeeldingen, kleurde ze in met mijn Copic markers en stanste ze uit. Legde alles op de kaart en bepaalde waar ik de zeshoeken wilde hebben. Stanste deze uit de rechthoek en heat emboste de teksten Happy en Day met wit embossingpoeder. 

Die cut the word BEE out of yellow, gray and white cardstock and made them into a whole. Stamped the images, colored them up using my Copic markers en die cut them. Placed everything on to the card and decided were I wanted the hexagons to go. Die cut them and heat set the sentiments Happy and Day using white embossing powder.
Plakte de rechthoek op een gele topfold basiskaart die ik beplakte met vellum. Voordat ik alles op de kaart plakte stempelde ik hier en daar de stippellijn. Plakte daarna alles op de kaart met foamtape of lijm. Glued the rectangle on to a topfold yellow basecard, I added a layer of vellum onto it. Stamped the striped lines here and there on the card and adhered all the images on the card using foamtape or glue.

Gebruikte Copic Kleuren:
Bijen - N8, N6, N4, N2/ YR27, YR23, YR21, YR31/ BG73, BG70
Bloemen en blaadjes - C3, C1, C00 / YG67, YG63, YG61

Heb een heerlijke dag!
Groet, Marieke

Stempels: SS SCD37, SS Stamp215
Stansen: SS SCD37, SS CD206, CCL-ES-CD174
Inkt: Memento Tuxedo Black, Tsukineko Versamark, versafine onix black, Rustic Hinge en Black Soot Distress inkt.
Papier: Smooth White, Eiffel Tower, Pineapple, Vellum.
Extra: Wit embossing poeder, goudkleurige nuvo mouse.

donderdag 19 mei 2022

Sunny Studio - Wonky Windows

 Hello all,

I'm back again with my weekly post for Sunny Studio Stamps. Today I hope to inspire you with a card that I made using the Wonky Window dies together with Fabulous Flamingo'sDaar ben ik weer met mijn wekelijkse post voor Sunny Studio Stamps. Vandaag hoop ik jullie te inspireren met een kaart die ik maakte met de Wonky Window stans samen met de Fabulous Flamingo's stempel.
So for today's card I decided on making a mini slimline shaker Mothers day card. On May the 8th in the Netherlands we celebrated Mothers day and this card I gave to my mom. On a 6 3/4 x 2 3/4 inch rectangle I inkblended Cracked Pistashio and Peacock Feathers Distress ink. Splattered some water, Peacock Feathers and white paint onto it and cut the Wonky Window die out of it. Voor mijn kaart van vandaag besloot ik een mini slimline shaker Moederdag kaart te maken. Zondag de 8ste was het Moederdag en deze kaart mocht mijn moeder ontvangen van mij. Ik sneed een rechthoek 6 3/4 x 2 3/4 inch en inktblende Cracked Pistashio en Peacock Feathers Distress inkt. Spetterde water, Peacock Feather en witte verf er op en stanste de Wonky Window stans uit de rechthoek.

Cut a white rectangle in the same seize and temporarly added the outside frame onto it. Adhered the die cut parts onto the white rectangle and glued a piece of acetate behind the frame. Filled up the shaker using Crystal Clear Jewels. Sneed een witte rechthoek in dezelfde maat en en plakte het frame hier tijdelijk op. Plakte de uitgestanste onderdelen op de witte rechthoek en achter het frame plakte ik een strook acetate. Vulde de shaker met Crystal Clear Jewels en sloot de shaker.
Stamped the images out of the Fabulous Flamingo and Sending Sunshine stamps. Colored them up and cut them using my sciccors. Die cut the word mom out of yellow cardstock and added some white gelpen details on to the letters and images.

Stempelde de afbeeldingen uit Fabulous Flamingo en Sending Sunshine stempels. Kleurde ze in met mijn Copic markers en knipte ze daarna uit met mijn schaar. Stanste het woord mom uit geel cardstock en bewerkte de letters en de afbeeldingen met een witte gelpen.
Stamped the sentiment on some white cardstock, trimmed it down to a small banner. Heat set the sentiment on some black cardstock and cut it using my sciccors. Adhered all the images onto the card using foam tape. Stempelde de tekst op wit cardstock en sneed er een banner van. Heat emboste de tekst op zwart cardstock en knipte het uit met mijn schaar. Plakte alle teksten en afbeeldingen op de kaart met foam tape.

Used Copic Colors:
Flamingo - RV13, RV42, R01, R00 / C5,C3,C1,0 / Y13, Y11
Green - YG67, YG63, YG03, YG01
Yellow - Y17, Y15, Y13, Y11
Brown - E47, E44, E43, E42

Have a wonderful day!
Greets, Marieke

dinsdag 17 mei 2022

My Favorite Things - Vault Release

 Hello all,

As of now the Vault release by My Favorite Things is avaible! What's on your wishlist? Hop over to the shop and start shopping, don't forget to hop along the designteam members their Social media channels for even more inspiration! De Vault release van My Favorite Things is verkrijgbaar vanaf nu! Wat staat er op je verlanglijst? Ga snel naar shop en ga lekker winkelen, vergeet je niet langs de andere designteam leden te hoppen voor nog meer inspiratie!
So what is going to be in your shopping card this time? For my latest card I decided on going for a Clean and Simple card using the Abstract Art together with the Paint Brushes Die-Namics.

En wat ga jij halen van deze vault release? Ik maakte voor mijn inspiratie kaart van vandaag een Clean en Simple kaart met de Abstract Art en de Paint Brushes Die-Namics
Cut a Smooth White topfold base card and stamped the paint stripe out of the Abstract Art stamp in the colors Poppin' Pink, Orange Zest, Lemon Drop, Limelight, Summer Splash and Grape Jelly. Stamped the sentiment under it using a black ink.

Sneed een Smooth White topfold basiskaart en stempelde een verf streep uit de Abstract Art stempel in de kleuren Poppin' Pink, Orange Zest, Lemon Drop, Limelight, Summer Splash en Grape Jelly. Stempelde daarna de tekst met zwarte inkt.
Stamped the image out of the Unicorns and Glitter stamp, colored it up using my Copic marker and cut it using the matching Die-Namics. Die cut the paint brush out of Kraft, Silver cardstock and Grape Jelly. Asembled it and glued it onto the dog. Adhered the image on the card using foamtape. Stempelde de afbeelding uit de Unicorn en Glitter stempel, kleurde hem in met mijn Copic markers en stanste hem uit met de bijpassende Die-Namics. Stanste de kwast uit Kraft, Zilver Cardstock en Grape Jelly. Plakte de kwast in elkaar en op de hond. Plakte daarna de afbeelding op de kaart met foamtape.

Used Copic Colors:
Dog - E59, E57, E55, E53, E51, E50, 0 / R20, R01, R000, R0000
Black - N8, N6, N4, N2
Blue - B02, B00, B000, B0000
Green - YG17, YG13, YG01
Purple - BV04, BV02
Pink - RV17, RV14, RV11
Orange - YR07
Yellow - Y17, Y15, Y11

If you need to be even more inspired after this post make sure to have a look over at My Favorite Things Youtube ChannelWanneer je na deze post nog wat meer ideeen nodig heb neem dan even een kijkje op het Youtube kanaal van My Favorite Things.

Have a wonderful Day!
Greets, Marieke

maandag 16 mei 2022

My Favorite Things - Vault Release Countdown day 1

 Hello all,

One more day to go and then all the Vault Release products by My Favorite Things will be for sale! So set your alarm clocks and make sure you are on time! Nog een dag te gaan en dan zijn de Vault Release producten van My Favorite Things verkrijgbaar! Dus zet je wekker en zorg dat je niet te laat bent!

For today I decided to make a duo of cards using the same products but then slightly different. Love the 80's vibe you getting with the Ride the Wave and Headphones Die-Namics.

Voor vandaag besloot ik een kaarten duo te maken door gebruik te maken van dezelfde producten maar dan toch net even anders. Ik vind de 80's vibe die je van de Ride the Wave en Headphones Die-Namics krijgt helemaal leuk.
Cut a Smooth White sidefold base card, cut a Gravel Gray rectangle slightly smaller. Die cut the Ride the Wave Die-Namics out of Lemon Drop, Orange Zest, Poppin' Pink, Grape Jelly and Boysenberry cardstock and adhered it together.

Cut a Smooth White sidefold base card, cut a Gravel Gray rectangle slightly smaller. Die cut the Ride the Wave Die-Namics out of  Lemon Drop, Orange Zest, Poppin' Pink, Grape Jelly en Boysenberry cardstock en plakte het aan elkaar.
Placed the Ride the Wave Die cut on the Gravel Gray and decided were I wanted the sentiment out of the Wavy Greetings to go and heat set it. Adhered the Gravel Gray and the Ride the Wave die onto the card using foam tape. Die cut the Headphones Die-Namics out of Smooth White cardstock and assembled it. Added it to the card using foam tape and finished it of using white twine.

Legde de Ride the Wave die cut op de Gravel Gray rechthoek en besloot waar ik de tekst uit de Wavy Greetings wilde hebben. Heat emboste de tekst en plakte de grijze recthoek evenals de Ride the Wave die cut op de basiskaart met foam tape. Stanste de Headphones Die-Namics uit Smooth White cardstock. Plakte het in elkaar en op de kaart. Werkte de kaart af met een stukje wit twine.
For the second card I cut the Ride the Wave Die-Namics out of Sno Cone, Summer Splash, Cornflower, Sour Apple and Jalepeno Popper Cardstock. Instead of heat setting the sentiment I stamped the sentiment using a black ink.

Voor de tweede kaart stanste ik de Ride the Wave Die-Namics uit Sno Cone, Summer Splash, Cornflower, Sour Apple en Jalepeno Popper Cardstock. In plaats van de tekst te heat embossen stempelde ik dit keer de tekst op de rechthoek met zwarte inkt.
Die cut the Headphones Die-Namics out of Black Licorice cardstock and finished it off adding some black twine. Stanste de Headphones Die-Namics uit Black Licorice cardstock, plakte het in elkaar en op de kaart. Ditmaal werkte ik de kaart af met een stukje zwart twine.

If you need to be even more inspired after this post make sure to have a look over at My Favorite Things Youtube ChannelWanneer je na deze post nog wat meer ideeën nodig heb neem dan even een kijkje op het Youtube kanaal van My Favorite Things.

Have a wonderful day!
Greets, Marieke

vrijdag 13 mei 2022

Studio Light - Flying By To Say You Are Special

Hallo Allemaal,

Hier is mijn wekelijkse post voor Studio Light weer. Deze keer maakte ik een voorjaarskaartje met de Sweet Stories Bijen. I'm back with my weekly post for Studio Light. This time around I made a spring card using the Sweet Stories Bees.
Wanneer je de nieuwsbrief van Kippers Hobby ontvangt heb je wellicht de foto tutorial van deze kaart al voorbij zien komen. Ik maakte namelijk voor hen twee foto tutorial's, die laten zien hoe je deze en de kaart van volgende week maakt.

If you are subscirbed on the Kippers Hobby newsletter you might have spotted this cards already. I made it for there photo tutorial. They asked me to make two photo tutorials using the newest Sweet Stories collection.
Startte met de witte achtergrond, stanste deze uit en uit de rechthoek stanste ik de drie zeshoeken die in dezelfde set zitten. Stanste een gele rechthoek in dezelfde maar, spetterde er witte verf op en liet het drogen. Sneed een zwarte rechthoek van 9 x 19,5 en een witte dubbele basiskaart in dezelfde maat. Plakte alles op elkaar.

Started with the white background. I die cut the rectangle and then I die cut the three hexagons that are in the same set. Die cut a yellow rectangle in the same seize and splattered some white paint. Cut a black rectangle 9 x 19,5 cm and a white basecard in the same seize. Glued everything together.
Stempelde alle afbeeldingen, kleurde ze in en stanste ze uit met de bijpassende stansen. Bepaalde waar ik alles wilde hebben en stempelde de streepjes. Plakte alles op de kaart met foamtape of lijm. Stamped all the images, colored them up using my Copic markers and cut them using the matching dies. Decided were I wanted the images to be and stamped the stripes. Added everything onto the card using foamtape or glue.

Gebruikte Copic Kleuren:
Takken - E37, E35, E33 / YG67, YG63, YG03
Bijen - Y17, Y15, Y13, Y11 / N8, N6, N4, N3 / B02, B00, B000, B0000
Verf emmers - C5, C3, C1, C00, 0
Harten / verf -  R59, R29, R27, R24

Heb een heerlijke dag!
Groet, Marieke

Stempels: SS SCD37, SS Stamp215
Stansen: SS SCD37, SS CD206
Inkt: Memento Tuxedo Black, Tsukineko Versamark, versafine onix black.
Papier: Smooth White, Black Licorice, Kraft, Essentials Brights SS-ES-PP04
Extra: Wit embossing poeder, witte verfmarker.

donderdag 12 mei 2022

Sunny Studio - Baby Elephants

 Hello all,

I'm back again with my weekly post for Sunny Studio Stamps. Today I hope to inspire you with a card that I made using the Baby Elephants. Daar ben ik weer met mijn wekelijkse post voor Sunny Studio Stamps. Vandaag hoop ik jullie te inspireren met een kaart die ik maakte met de  Baby Elephants.
So first off I Cut a rectangle and inkblended some Twisted Citron, Mowed Lawn and Rustic Wilderness onto it. Splattered some water and Rustic Wilderness mixed with water and adhered it onto a white base card.

Eerst sneed ik een rechthoek en inktblende Twisted Citron, Mowed Lawn en Rustic Wilderness op de rechthoek. Spetterde wat water en Rustic Wilderness gemengd met water op de rechthoek en plakte hem op een dubbele topfold witte basiskaart.
Stamped the images out of the Baby Elephants, Fabulous FlamingoTropical Scenes and Snail Mail stamp sets and colored them up. Die cut them using the matching dies or cut them using my sciccors. Cut a strip of kraft cardstock and inkblended some Walnut Stain onto it.

Stempelde de afbeeldingen uit de Baby Elephants, Fabulous Flamingo, Tropical Scenes en Snail Mail stempel set, kleurde ze in en stanste of knipte ze uit. Sneed een strook kraft cardstock en inktblende wat Walnut Stain Distress inkt.
Heat set the sentiment out of the Snail Mail stamp on some kraft cardstock. Trimmed it down to a small banner and dry embost it using the Woodgrain Embossing folder. Adhered some twine behind it and adhered it to the card. Glued all the other elements onto the card and finished the card of adding some glossy accent to the hearts. Heat emboste de tekst uit de Snail Mail Stempel op kraft cardstock, sneed het tot een banner en droog emboste hem met de Woodgrain Embossing Folder. Plakte wat twine erachter en plakte het op de kaart, net als alle andere elementen. Werkte de kaart af met wat glossy accent op de hartjes.

Used Copic Colors:
Elephants - C5, C3, C1, C0, C00 / R20, R00, R000, R0000/ W5, W3, W1
Light green - YG67, YG63, YG03
Dark Green - G28, G09, G07
Flowers - R85, R81
Hearts - R59, R29, R24
Brown - E47, E44, E43

Have a wonderful day!
Greets, Marieke

dinsdag 10 mei 2022

My Favorite Things - May Product Launch

 Hello all,

It’s time for the My Favorite Things May product launch! All new products are available right now! The MFT design team is sharing projects created with the new stuff. You can find a lot of inspiration! Het is tijd voor de My Favorite Things mei product lancering. Alle nieuwe producten zijn vanaf nu verkrijgbaar! Het MFT design team deelt ook vandaag weer een lading aan inspiratie!
Today I decided to play with the We're the Picture of Best Friends. I totally think this is a fun set that you can use in many ways!

Vandaag maakte ik een kaart met de We're the Picture Best of Friends. Een super leuke set die je op verschillende manieren kunt gebruiken.
For my card I cut a topfold Smooth White base card and adhered a strip of the Rainbow Love pattern paper. Cut a Smooth White rectangle slightly smaller and inkblended the English Brick Wall Stencil onto it using Stormy Sky Distress ink. Voor mijn kaart sneed ik een Smooth White basiskaart en plakte er een strip designpapier op uit de Rainbow Love paper pad. Sneed een Smooth White rechthoek iets kleiner en inktblende hier het English Brick Wall Stencil op met Stormy Sky Distress inkt.

Stamped all the images colored them up and die cut them using the matching dies. Decided were I wanted them to go. Stamped the images out of the set and some inkblobs of the Distressed Patterns onto it. Adhered a small strip of Black Licorice on the bottom of the rectangle. Stempelde alle afbeeldingen, kleurde ze in met mijn Copics en stanste ze uit met de bijpassende Die-Namics. Besloot waar ik de afbeeldingen wilde hebben en stempelde de andere afbeeldingen uit de set en wat inktblobs uit de Distressed Patterns set op de rechthoek.
Heat set the sentiment on some Black Licorice and trimmed it down into a small banner. Added everything onto the card using glue or different heights of foamtape. Heat emboste de tekst op Black Licorice cardstock en sneed het tot een banner. Plakte alles op de kaart met lijm en verschillende hoogtes foamtape.

Used Copic Colors:
Pink -  R85, R83, R81
Orange - YR09, YR04, YR02
Yellow - Y17, Y15, Y13, Y11
Green - YG17, YG13, YG11
BlueGreen - BG15, BG13, BG11
Blue - B04, B02, B00
Purple - BV08, BV04, BV02
Black - N8, N6, N4, N2
White - C5, C1, C1, 0
Bear - E57, E55, E53, E51, E50

If you need to be even more inspired after this post make sure to have a look over at My Favorite Things Youtube ChannelWanneer je na deze post nog wat meer ideeen nodig heb neem dan even een kijkje op het Youtube kanaal van My Favorite Things.

Have a wonderful Day!
Greets, Marieke