vrijdag 29 juli 2022

Studio Light - Happy Summer Birthday

Hallo Allemaal,

Daar ben ik weer met mijn wekelijkse inspiratie kaart voor Studio Light! Ditmaal besloot ik om met de Sweet Stories een vrolijke shaker kaart te maken. 
Today i'm back again to inspire you with some Studio Light products! This time I decided on making a colorfull shaker card using the latest Sweet Stories Products.
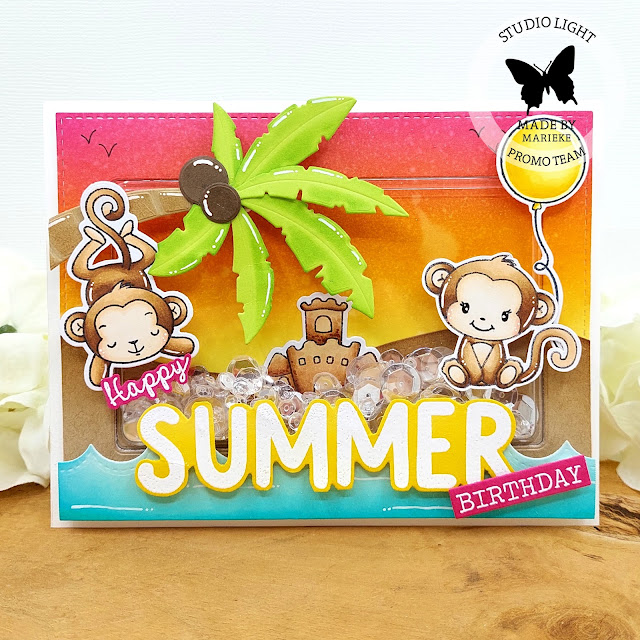
Ik maakte eerst de achtergrond met de kleuren Picked Raspberry, Spiced Marmelade en Squeezed Lemonade. Stanste het zand en inkte dit met Walnut Stain. Plakte alles tot een rechthoek en stanste het shaker gedeelte uit het midden.

First I made the background using Picked Raspberry, Spiced Marmelade and Squeezed Lemonade. Die cut the sand and inked it up using Walnut Stain. Added all into a rectangle and cut the shaker rectangle out of the middle.
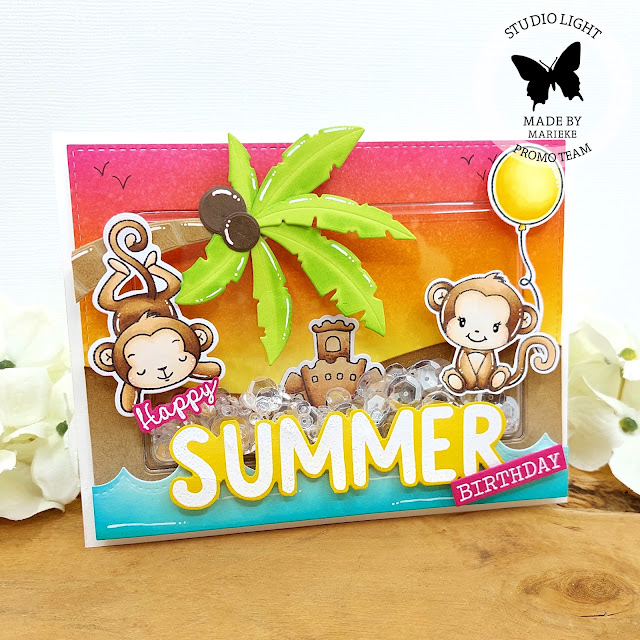
Plakte de blister aan de achterzijde van de rechthoek. Stanste alle afbeeldingen, kleurde ze in met mijn Copic markers en stanste ze uit met de bijpassende stansen. Plakte het kasteel op het zand, vulde de shaker en plakte hem dicht. Glued the blister behind the rectangle. Stamped all the images, colored them up and cut them using the matching dies. Added the sandcastle onto the sand, filled the shaker and closed it.

Inkte Cracked Pistashio en Peacock Feathers en stanste het uit. Stanste alle onderdelen van de palmboom en inkte de bladeren met Mowed Lawn en de stam met Walnut Stain. Plakte alle onderdelen op de kaart. Inked up some Cracked Pistashio and Peacock Feathers and die cut it using the waves die. Die cut all the elements of the palmtree and inked up the leaves using some Mowed Lawn and the trunk with Walnut Stain. Added all the elements onto the card.

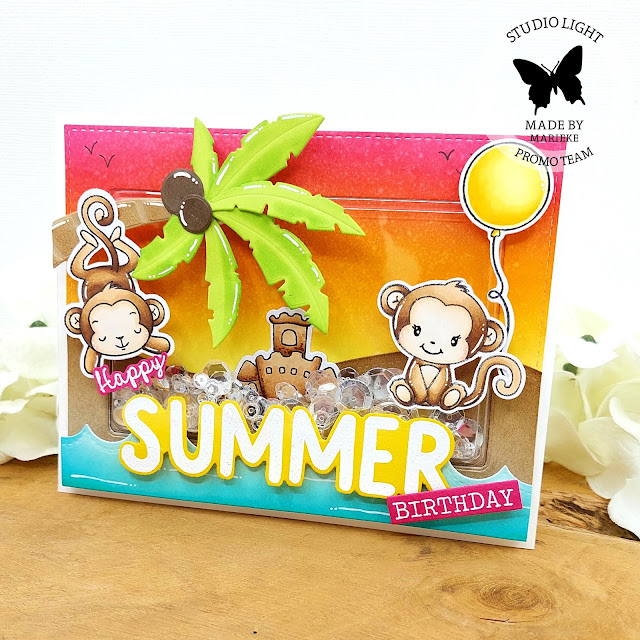
Heat emboste de teksten op roze en geel cardstock, stanste en knipte ze uit. Plakte alles op de kaart en bracht hier en daar wat witte gelpen details aan. Heat set the sentiments on some yellow and pink cardstock. Die cut and cut them using my sciccors and added them on the cardbase. Added some white gelpen details to finish the card.

Gebruikte Copic kleuren:
Aapjes - E59, E57, E55, E53, E51, E50 / R20
Zandkasteel - E37, E35, E33, E31
Ballon - Y17, Y15, Y13, Y11

Heb een heerlijke dag!
Groet, Marieke

Stempels: SS SCD47, SS Stamp270, SS Stamp269, SS Stamp 163, SS SCD19
Stansen: SS SCD47, SS CD394, ES CD180, SS SCD19
Inkt: Picked Raspberry/ Squeezed Lemonade/ Spiced Marmelade/ Walnut Stain/ Cracked Pistashio en Peacock Feathers Distress inkt, Memento Tuxedo Black, Tsukineko Versamark.
Papier: Smooth White, Kraft, Poppin' Pink, Lemon Drop, Limelight, Vintage Timber
Extra: Zwarte Fineliner, witte embossing poeder, witte gelpen, ES Blis04

donderdag 28 juli 2022

Sunny Studio - Fintastic Friends

Hello all,

I'm back again with my weekly post for Sunny Studio Stamps. Today I hope to inspire you with a with a shaker card using the Fintastic FriendsDaar ben ik weer met mijn wekelijkse post voor Sunny Studio Stamps. Vandaag hoop ik jullie te inspireren met een shaker kaart die ik maakte met de Fintastic Friends.
As always I started with the background. I inkblended the colors Tumbled Glass, Broken China, Blue Sapphire and Villainous Potion. Splattered water and some Villainous Potion and die cut the heart out of it. 

Zoals altijd begon ik met de achtergrond. Ik inktblende de kleuren Tumbled Glass, Broken China, Blue Sapphire en Villainaous Potion. Spetterde water en Villainous Potion en stanste het hart uit de achtergrond.
Heat set the sentiment out of the Sending Sunshine and die cut the word love out of white cardstock and glued it onto the die cut heart. Adhered a sheet of acetate behind the border. Added a layer of foam tape on to the basecard and filled up the shaker. Closed it using the border.

Heat emboste de tekst uit Sending Sunshine en stanste het woord love uit wit cardstock en plakte het op het hart. Plakte een sheet acetate achter de border. Voegde een layer foam tape toe op de basiskaart om het hart en vulde de shaker met shakermateriaal. Plakte de border op de kaart.
Stamped all the images out of Fintastic FriendsSnail Mail and Tropical Scenes stamps. Colored them up using my Copic markers and die cut them using the Fintastic Friends, Snail Mail and Tropical Scenes dies. Added some die cuts in the animals so I could fit in the envelopes. 

Stempelde all afbeeldingen uit Fintastic Friends, Snail Mail en Tropical Scenes stempels. Kleurde ze in met mijn Copic markers en stanste ze uit met de Fintastic Friends, Snail Mail en Tropical Scenes stansen. Sneed hier en daar wat losse onderdelen zodat ik de enveloppen er onder kon plakken.

Adhered all the images on the card using glue or foamtape and added some white gelpen details to the octopus to give him something extra to stand out. Plakte alle afbeeldingen op de kaart met lijm of foam tape. Voegde wat witte gelpen details toe aan de octopus zodat hij wat meer uitstak.

Used Copic Colors:
Purple - V06, V04, V01, V00
Red - R24, R22, R20
Green - G05, G02, G00
Yellow - Y17, Y15, Y13, Y11
White - W6, W4, W2, W00
Blueish purple - BV17, BV04, BV13, BV02
Sand - E55, E53, E51, E50
Envelop - E43, E41, E40


Have a wonderful Day!
Greets, Marieke

vrijdag 22 juli 2022

Studio Light - Summer Time

Hallo Allemaal,

Daar ben ik weer met mijn wekelijkse inspiratie kaart voor Studio Light! Ditmaal besloot ik om met de zomerse Sweet Stories een Slimline kaart te maken. 
Today i'm back again to inspire you with some Studio Light products! This time I decided on making a slimline card using the summer Sweet Stories products.
Eerst stanste ik een rechthoek, inktblende daar de wolken op met een stencil en Salty Ocean Distress inkt. Sneed nog een rechthoek en inkte de onderkant op met Antique Linen en Vintage Photo Distress Oxide inkt en de onderzijde met Peacock Feathers en Mermaid Lagoon Distress inkt. Stanste ze daarna uit.

So first I cut a white rectangle. I added some clouds onto it using Salty Ocean Distress ink and a stencil. Die cut the rectangle another time and this time I inkblended some Antique Linen and Vintage Photo Distress Oxide on one side and some Peacock Feathers and Mermaid Lagoon on the other side and die cut both of them.
Stempelde alle afbeeldingen, kleurde ze in met mijn Copic markers en stanste ze uit met de bijpassende stansen. Stanste de wolken, zon en het dak van de tikihut en inkte ze met Mowed Lawn, Salty Ocean Distress inkt en Butterscotch. Sneed alle onderdelen van de bar van de tikihut uit kraft houtprofiel cardstock en inkte het met Walnut Stain.

Stamped all the images, colored them up using my Copic markers and cut them using the matching dies. Die cut the clouds and the sun, the roof of the tiki hut and inkblended them using Mowed Lawn, Salty Ocean Distress ink and Butterscotch. Cut all the seperate parts of the bar out of Kraft woodgrain cardstock and inked it up using Walnut Stain.
 Heat emboste alle teksten op cardstock en stanste of knipte ze uit. Maakte een bordje van de "beach bar" met twine. Plakte alle losse onderdelen op de kaart en werkte het geheel af met witte gelpen details. Heat set the sentiments on some cardstock and cut the using my sciccors or a die. Made a sign out of the "beach bar" using twine. Glued all the loose elements onto the card and finished of the card using a white gelpen.

Gebruikte Copic kleuren:
Neushoorn - W8, W5, W3, W1, W00
Tijger - YR27, YR24, YR23, YR21 / C5,C3,C1, C00,0/ N6, N4, N2
Groen - YG67, YG63, YG03, YG01
Rood - R59, R29, R24, R22, R20
Roze - RV17, RV14, RV13, Rv11
Paars - V09, V17, V15, V12
Wit - C5, C3, C1, C00, 0
Teal - BG15, BG13, BG11
Geel - Y17, Y15, Y13
Schelpen - E44, E43, E42, E41
Blauw - B02, B00, B000, B0000
Kokosnoot - E55, E53, E51 / E41, E44

Heb een heerlijke dag!
Groet, Marieke

Stempels: SS SCD46, SS SCD47, SS Stamp269, SS Stamp270
Stansen: SS SCD46, SS SCD47, SS CD153, SS CD393
Inkt: Peacock Feathers/ Mermaid Lagoon/ Mowed Lawn/ Walnut Stain en Salty Ocean Distress inkt, Antique Linen en Vintage Photo Distress Oxide inkt, Memento Tuxedo Black, Tsukineko Versamark, Butterscotch.
Papier: Smooth White, Kraft, Black Licorice, Poppin'Pink, Grapesicle, Lemon Drop, Limelight, Kraft Woodgrain
Extra: Wit embossing poeder, witte gelpen.

donderdag 21 juli 2022

Sunny Studio - Tropical Scenes

Hello all,

I'm back again with my weekly post for Sunny Studio Stamps. Today I hope to inspire you with a with a CAS birthday card using the Tropical Scenes. Daar ben ik weer met mijn wekelijkse post voor Sunny Studio Stamps. Vandaag hoop ik jullie te inspireren met een CAS verjaardag kaart met de Tropical Scenes.
This time I decided to create a Clean and Simple card using Tropical Scenes, Fintastic Friends and Kiddie Pool. First off I cut a white topfold base card and inkblended the colors Tumbled Glass, Mermaid Lagoon and Blueprint Sketch. Splattered some water and let it dry.

Deze keer besloot ik een Clean en Simple kaart te maken met de Tropical Scenes, Fintastic Friends en de Kiddie Pool. Eerst sneed ik een witte topfold basis kaart en inktblende de kleuren Tumbled Glass, Mermaid Lagoon en Blueprint Sketch. Spetterde water en liet het drogen.

Stamped the images out of the Tropical Scenes, Kiddie Pool and Fintastic Friends and colored them up using my Copic markers. Cut them using the matching dies and adhered them on to the card using foam tape.

Stempelde de afbeeldingen uit de Tropical Scenes, Kiddie Pool en Fintastic Friends en kleurde ze in met mijn Copic markers. Stanste ze daarna allemaal uit met de bijpassende stansen en plakte ze op de kaart met foam tape.
Stamped the sentiments using a black ink directly on to the base. Finished the card off adding some glossy accent on to the goggles. Stempelde de tekst rechtstreeks op de kaart met zwarte inkt. Werkte de kaart af door wat glossy accent op de bril te doen.

Used Copic Colors:
Sand - E44, E43, E42, E41, E40
Light Green - G07, G05, G03
Dark Green - YG67, YG63, YG03
Yellow - Y17, Y15, Y13, Y11
Pink - RV17, RV14, RV13, RV11
Orange - YR07, YR04, YR12
Stones / Black - N6, N5, N4, N3, N2 / White gelpen
Dark Blue - B26, B24, B21
Light Blue - B02, B00, B000
Purple - BV17, BV04, BV13, BV02
White - C5, C3, C1, 0
Teal - BG18, BG15, BG13, BG11, BG10
Hair - E37, E35, E33, E31
Skin - E000, E00, E04, E21, E11

Have a wonderful day!
Greets, Marieke

dinsdag 19 juli 2022

My Favorite Things - Vault Release

Hello all,

As of now the Vault release by My Favorite Things is avaible! What's on your wishlist? Hop over to the shop and start shopping, don't forget to hop along the designteam members their Social media channels for even more inspiration! De Vault release van My Favorite Things is verkrijgbaar vanaf nu! Wat staat er op je verlanglijst? Ga snel naar shop en ga lekker winkelen, vergeet je niet langs de andere designteam leden te hoppen voor nog meer inspiratie!

So what is going to be in your shopping card this time? For my latest card I decided on going for a Clean and Simple card using the Celebrate Speech Bubble Die-Namics together with the Looped Border Die-Namics.

En wat ga jij halen van deze vault release? Ik maakte voor mijn inspiratie kaart van vandaag een Clean en Simple kaart met de Celebrate Speech Bubble Die-Namics samen met de Looped Border Die-Namics.
Cut a Smooth White topfold card and added a piece of pattern paper using the Rainbow Love Paper Pad. Die cut the Looped Border Die-Namics out of the following five colors of MFT cardstock; Lemon Drop, Poppin' Pink, Grape Jelly, Summer Splash and Limelight. Glued those on the basecard.

Sneed een Smooth White topfold card en plakte er een stuk designpapier uit de Rainbow Love Paper Pad op. Stanste de Looped Border Die-Namics uit de volgende kleuren MFT cardstockLemon Drop, Poppin' Pink, Grape Jelly, Summer Splash en Limelight. Plakte ze allemaal op de basiskaart.
Die cut the Celebrate Speech Bubble Die-Namics out of Smooth White cardstock and turned it into a shaker with three shaker slots. Adhered it on the base card and heat set the sentiment out of the Bitty Birthday Wishes on Black Licorice cardstock. Cut it using the Itty Bitty Strips Die-Namics and added it to the card. Stanste de Celebrate Speech Bubble Die-Namics uit Smooth White cardstock en maakte er een shaker met drie vakken van. Plakte het op de basiskaart en heat emboste de tekst uit de Bitty Birthday Wishes op Black Licorice cardstock. Stanste het uit met de Itty Bitty Strips Die-Namics en plakte het op de kaart.

If you need to be even more inspired after this post make sure to have a look over at My Favorite Things Youtube ChannelWanneer je na deze post nog wat meer ideeen nodig heb neem dan even een kijkje op het Youtube kanaal van My Favorite Things.

Have a wonderful Day!
Greets, Marieke

maandag 18 juli 2022

My Favorite Things - Vault Release Countdown day 1

 Hello all,

One more day to go and then all the Vault Release products by My Favorite Things will be for sale! So set your alarm clocks and make sure you are on time! Nog een dag te gaan en dan zijn de Vault Release producten van My Favorite Things verkrijgbaar! Dus zet je wekker en zorg dat je niet te laat bent!
For today I decided on making a Clean and Simple card using the Happy Birthday Candles stamp. I love that it is just one stamp and such a fun simple card!

Voor vandaag maakte ik een Clean en Simple kaart met de Happy Birthday Candles stempel. Ik vind het helemaal tof dat je met één stempel zo'n simpele kaart kunt maken!
Cut a topfold Smooth White base card. Stamped the Candles using the following MFT Dye Ink colors: Cotton Candy, Orange Zest, Lemon Drop, Limelight, Field Day, Summer Splash, Caribbean Sea, Grape Jelly. 

Sneed een Smooth White topfold basiskaart. Stempelde de kaarsen met de vlgende kleuren MFT Dye InktenCotton Candy, Orange Zest, Lemon Drop, Limelight, Field Day, Summer Splash, Caribbean Sea, Grape Jelly.

Stamped the fuse using Cement Gray and the fire with Butterscotch. Then I took the sentiments and stamped those with a black ink. To give the card a bit more spice I added some details using my colored pencils. Stempelde het lont met Cement Gray en het vlammetje met Butterscotch. Stempelde daarna allebei de teksten met een zwarte inkt. Om de kaart wat meer detail te geven kleurde ik de kaarsen en vlammen in met mijn kleurpotloden.

If you need to be even more inspired after this post make sure to have a look over at My Favorite Things Youtube ChannelWanneer je na deze post nog wat meer ideeën nodig heb neem dan even een kijkje op het Youtube kanaal van My Favorite Things.

Have a wonderful day!
Greets, Marieke

zondag 17 juli 2022

My Favorite Things - Vault Release Countdown day 2

 Hello all,

Today i'm back back with a new Vault release for My Favorite Things! For the people who don't know what it means; My Favorite Things is bringing back older products but then they are updated to here and now. So if you missed out on them back then, here is your change to scoop them up! Vandaag ben ik er met een nieuwe Vault release van My Favorite Things! Voor de mensen die het niet kennen; My Favorite Things brengt oudere producten opnieuw uit alleen dan in een nieuw jasje. Mocht je deze eerder gemist hebben is het nu je kans om te halen.
Today we have some really fun products that are comming back out of the vault! For my card I decided to use the Peek-a-Boo Polka Dots Die-Namics, the Essential Speech Bubbles Die-Namics and the Essential Birthday Messages.

Vandaag hebben we een aantal hele leuke producten die terug komen uit de vault! Voor mijn kaart van vandaag gebruikte ik de Peek-a-Boo Polka Dots Die-Namics, Essential Speech Bubbles Die-Namics en de Essential Birthday Messages.
Cut a Eiffel Tower rectangle and cut the Peek-a-Boo Polka Dots Die-Namics out of it. Adhered it on a Smooth White rectangle were I adhered a Eiffel Tower rectangle on to. Heat set the sentiments out of the Essential Birthday Messages on Poppin' Pink, Lemon Drop, Orange Zest, Limelight, Summer Splash, Grapesicle cardstock and cut them using the Essential Speech Bubbles Die-Namics.

Sneed een Eiffel Tower rechthoek en stanste hier de Peek-a-boo Polka Dots Die-Namics uit. Plakte dit op een Smooth White topfold basiskaart, waar ik eerst een Eiffel Tower rechthoek op plakte. Heat emboste de teksten van de Essential Birthday Messages op Poppin' Pink, Lemon Drop, Orange Zest, Limelight, Summer Splash, Grapesicle cardstock en stanste ze uit met de Essential Speech Bubbles Die-Namics.

Adhered the speech bubble on the card using different heights. Die cut some circles using the Peek-a-boo Polka Dots Die-Namics out of the matching colors cardstock and Smooth White. Glued the circles on the basecard for a extra pop of colors. Plakte de speech bubbles op de kaart op verschillende ogen. Stanste de cirkels met de Peek-a-boo Polka Dots Die-Namics uit de bijpassende kleuren cardstock en Smooth White. Plakte deze cirkels op rechtstreeks op de basiskaart.

If you need to be even more inspired after this post make sure to have a look over at My Favorite Things Youtube Channel
Wanneer je na deze post nog wat meer ideeën nodig heb neem dan even een kijkje op het Youtube kanaal van My Favorite Things.

Have a wonderful day!
Greets, Marieke

vrijdag 15 juli 2022

Studio Light - Welkom Baby

Hallo Allemaal,

Daar ben ik weer met mijn wekelijkse inspiratie kaart voor Studio Light! Ditmaal besloot ik om wederom met de nieuwe Sweet Stories een kaart te maken alleen combineerde ik hem ditmaal met de Magic Iris stans van Lawn Fawn en wat stempels van Sunny Studio.. 
Today i'm back again to inspire you with some Studio Light products! This time I decided on making yet another card using the new Sweet Stories. This time around I decided on combined the Sweet Stories with the Magic Iris fie by Lawn Fawn and stamps by Sunny Studio.

Voor mijn kaart startte ik met de achtergrond, ik inkte de kleuren Twisted Citron, Mowed Lawn en Rustic Wilderness. Spetterde water en Rustic Wilderness op de kaart en stanste het uit met de Magic Iris Add-on stans.

For my card I started with the background, inkblende the colors Twisted Citron, Mowed Lawn and Rustic Wilderness and die cut it using the Magic Iris Add-on die. Splattered some water and Rustic Wilderness and let it dry.
Stanste alle onderdelen van de Magic Iris en plakte het mechanisme in elkaar. Printte de tekst uit en inkte het net zoals de rest. Plakte het aan de achterzijde van het Iris mechanisme. Het geheel ging op een kraft rechthoek en dat ging op een topfold witte basiskaart.

Die cut all the elements of the Magic Iris die and adhered the mechanisme together. Print the sentiments and inked it up like the rest. Adhered the panel on the back of the Iris mechanisme. Adhered everything on a kraft rectangle and on to a white topfold basecard.
Stempelde alle afbeeldingen, kleurde ze in met mijn Copic markers en stanste ze met de bijpassende stansen of knipte ze uit met de hand. Plakte alles op de kaart met lijm of foamtape. Stanste een strook Kraft papier en plakte dit aan de onderkant.

Stamped all the images, colored them up using my Copic markers. Die cut them using the matching dies or cut them using my sciccors. Adhered everything on the card using glue or foam tape. Die cut a border of Kraft cardstock and adhered it to the bottom so it would be the ground.
Stempelde de baby en kleurde het daarna zelf in met mijn Copic markers. Voegde wat zwarte en witte strepen toe zodat ze op de tijgers lijken. Knipte ze uit en plakte ze op de kaart. Heat emboste de tekst "welkom" op zwart cardstock en stanste tot een banner. Stamped the Baby sentiment and colored it up using my Copic markers. Added some white and black stripes so it would look like tigers. Cut the sentiment by hand and added it on to the card. Heat set the sentiment on some black cardstock, cut it using a die and added it on the card.


Gebruikte Copic kleuren:
Tijgers - YR27, YR24, YR23, YR21 / W4,W2,W00, 0/ N6, N4, N2 / R20, R00, R000
Licht groen - YG67, YG63, YG03
Donker Groen - G28, G09, G07
Bruin - E47, E44, E43

Heb een heerlijke dag!
Groet, Marieke

Stempels: SS SCD47, SS Stamp214, Geboorte (Carlijn Design), Tropical Scenes, Fabulous Flamingo's (Sunny Studio).
Stansen: SS SCD47, Magic Iris, Magic Iris Add-on
Inkt: Rustic Wilderness/ Walnut Stain/ Twisted Citron en Mowed Lawn Distress inkt, Memento Tuxedo Black, Tsukineko Versamark.
Papier: Smooth White, Kraft, Black Licorice.
Extra: Wit embossing poeder, witte gelpen, zwarte fineliner.

donderdag 14 juli 2022

Sunny Studio - Ocean View

 Hello all,

I'm back again with my weekly post for Sunny Studio Stamps. Today I hope to inspire you with a card using the Ocean View. Daar ben ik weer met mijn wekelijkse post voor Sunny Studio Stamps. Vandaag hoop ik jullie te inspireren met een kaart met de Ocean View Stempel.

This time around I started with stamping the images out of the Ocean View, Kiddie Pool and Fabulous Flamingo's. Colored them up using my Copic markers and cut them using the matching dies. Added a few white gelpen details and using a paint marker I added the seafoam.

Deze keer begon ik met het stempelen van de afbeeldingen uit Ocean View, Kiddie Pool en Fabulous Flamingo's. Kleurde ze in met mijn Copic markers en stanste ze uit met de bijpassende stansen. Voegde wat witte gelpen details toe en met een verf marker voegde ik het zeeschuim toe.
Cut a white rectangle and added Salty Ocean and Tumbled Glass Distress Oxide ink on it. Heat set the sentiment out of Fabulous Flamingo's and Heartfelt Wishes. Added the inkblended panel on to a topfold white base card.

Sneed een witte rechthoek en inktblende Salty Ocean en Tumbled Glass Distress Oxide inkt erop aan. Heat emboste de teksten uit Fabulous Flamingo's en Heartfelt Wishes met wit embossingpoeder. Plakte daarna de rechthoek op een topfold witte basiskaart.

Added the Ocean View image on the card using foam tape. Adhered the leaves and the boy on the card and the crab got a bit of foam tape aswell. Plakte de Ocean View afbeelding met foam tape op de kaart. Plakte de bladeren en de jongen met lijm op de kaart en als laatste de krab met ook een beetje foamtape.

Used Copic Colors:
Water - B18, B16, BG15, BG13, BG11
Sand - E43, E42, E41, E40
Hair / Treetrunk - E59, E57, E55, E53
Crab - R29, R24, R22, R20
Pink RV17, RV14, RV13
Yellow - Y17, Y15, Y13
Orange - YR09, YR68, YR04
Green - YG67, YG63, YG03, YG01
Coconuts - E47, E44, E43 / E81
Skin - E000, E00, E04, E11, E21
Chair - E37, E35, E33, E31
Gray / White - C5, C3, C1

Have a wonderful day!
Greets, Marieke

dinsdag 12 juli 2022

My Favorite Things - July Product Launch

 Hello all,

It’s time for the My Favorite Things July product launch! All new products are available right now! The MFT design team is sharing projects created with the new stuff. You can find a lot of inspiration! Het is tijd voor de My Favorite Things juli product lancering. Alle nieuwe producten zijn vanaf nu verkrijgbaar! Het MFT design team deelt ook vandaag weer een lading aan inspiratie!

And what are you buying? For more inspiration I decided on making a mini slimline card using the Joyfull Giraffes combined with the Frosted Alphabet Die-Namics.

En wat ga jij halen? Voor nog meer inspiratie maakte ik een mini slimline kaart met de Joyfull Giraffes gecombineerd met de Frosted Alphabet Die-Namics.
Cut a Smooth White rectangle using the Stitched Mini Slimline STAX Die-Namics. Inkblended the colors Cracked Pistashio, Peacock Feathers, Peeled Paint and Bundled Sage. Splattered water and Peacock Feathers on the sky and heat set the sentiment out of the Bitty Birthday Wishes on the base. Sneed een Smooth White rechthoek met de Stitched Mini slimline STAX Die-Namics. Inkt blende de kleuren Cracked Pistashio, Peacock Feathers, Peeled Paint en Bundled Sage. Spetterde water en Peacock Feathers in de lucht en heat emboste de tekst uit Bitty Birthday Wishes op de basis.

Out of Chantilly Cream and Kraft cardstock I die cut the words "Go Wild" and inkblended the Chantilly Cream ones with Vintage Photo and the Kraft once with Ground Espresso. Glued them together. Uit Chantilly Cream en Kraft cardstock stanste ik de woorden "Go Wild" en inktblende de Chantilly Cream letters met Vintage Photo en de Kraft stukken met Ground Espresso.
Stamped the grass with Peeled Paint and adhered the panel on a Smooth White base card. Stamped the images, colored them up using my Copic markers and cut the using the Joyfull Giraffe Die-Namics. Adhered all the images on the card using foam tape. Stempelde het gras met Peeled Paint en plakte het geheel op een Smooth White basis kaart. Stempelde de afbeeldingen, kleurde ze in met mijn Copic markers en stanste ze uit met de Joyfull Giraffe Die-Namics. Plakte alle afbeeldingen op de kaart met foam tape.

Used Copic Colors:
Giraffe - E44, E43, E42, E41, E40/ W6, W4, W3/ E35, E33, E31, E30 / R22, R20, R00 / N6, N4, N2
Yellow - Y17, Y15, Y13, Y11
Red - R29, R24, R22
Green - YG67, YG63, YG03
Brown - E49, E47, E44
Teal - BG18, BG15, BG13
White - C5, C3, C1
Clouds - B00, B000, 0

If you need to be even more inspired after this post make sure to have a look over at My Favorite Things Youtube ChannelWanneer je na deze post nog wat meer ideeen nodig heb neem dan even een kijkje op het Youtube kanaal van My Favorite Things.

Have a wonderful Day!
Greets, Marieke

maandag 11 juli 2022

My Favorite Things July Release Countdown Day 1

 Hello all,

Today is the last day of the July release countdown of My Favorite Things and you know what that means right? Tommorow all the new products will be avaible! Did you decide on what you are going to get? Luckly you have one more night to think about it! Vandaag is de laatste dag van de juli release countdown van My Favorite Things en je weet wat dat betekend! Morgen zullen alle nieuwe producten beschikbaar zijn. Heb je al besloten wat je zou willen hebben? Gelukkig kun je er nog een dag over nadenken!
For today I decided to make a Clean and Simple card using the Chill Friends and there matching Chill Friends Die-Namics.


Voor mijn inspiratie kaart van vandaag besloot ik een Clean en Simple kaart te maken met de Chill Friends en de bijpassende Chill Friends Die-Namics.
Cut a topfold Smooth White base card and inkblended the beach scene using Fossilized Amber, Vintage Photo, Cracked Pistashio, Peacock Feathers, Tumbled Glass and Salty Ocean Distress ink. Splattered water, water mixed with Walnut Stain and Mermaid Lagoon.

Sneed een Smooth White topfold basis kaart en inktblende de strand scene met Fossilized Amber, Vintage Photo, Cracked Pistashio, Peacock Feathers, Tumbled Glass en Salty Ocean Distress ink. Spetterde water, water gemixt met Walnut Stain en Mermaid Lagoon.
Stamped the images, colored them up and cut them using the matching dies. Adhered the images on the card and stamped the sentiment on some Smooth White cardstock. Trimmed it down and finished off adding some enamel dots. Stempelde de afbeeldingen, kleurde ze in met mijn Copic markers en stanste ze uit met de bijpassende Die-Namics. Plakte de afbeeldingen op de kaart. Stempelde de tekst op Smooth White cardstock en sneed het tot een banner, werkte het geheel af met wat enamel dots.

Used Copic Colors:
Tree - YG67, YG63, YG03, YG01 / E47, E44, E43
Koala - W6, W4, W2, W1, W0 / N6, N4 / R85, R83, R81, R00
Penguin - N6, N4, N3 / E53, E51, E50, 0/ YR09, YR04/ B02, B00, B000
Wood / icecone - E44, E43, E41
White - C5, C3, C1
Yellow - C15, C13, C11

If you need to be even more inspired after this post make sure to have a look over at My Favorite Things Youtube ChannelWanneer je na deze post nog wat meer ideeën nodig heb neem dan even een kijkje op het Youtube kanaal van My Favorite Things.

Have a wonderful Day!
Greets, Marieke