donderdag 30 september 2021

My Favorite Things October Release Countdown Day 5

 Hello all,

It’s time for the My FavoriteThings October release countdown! During the countdown, the MFT Design Team is sharing lots of projects featuring all of the new products. The new release will officially be available on October 5th at 10:00 am EST (= Europe: october 5th at 4:00 pm CET). Het is tijd voor de My Favorite Things oktober release countdown! Nog 5 dagen en dan is de nieuwe release verkrijgbaar. Tijdens de countdown, laat het MFT Design Team verschillende projecten zien met alle nieuwe producten. De release zal verkrijgbaar zijn op 5 oktober om 10:00 am EST (in Nederland op 5 oktober om 16:00).
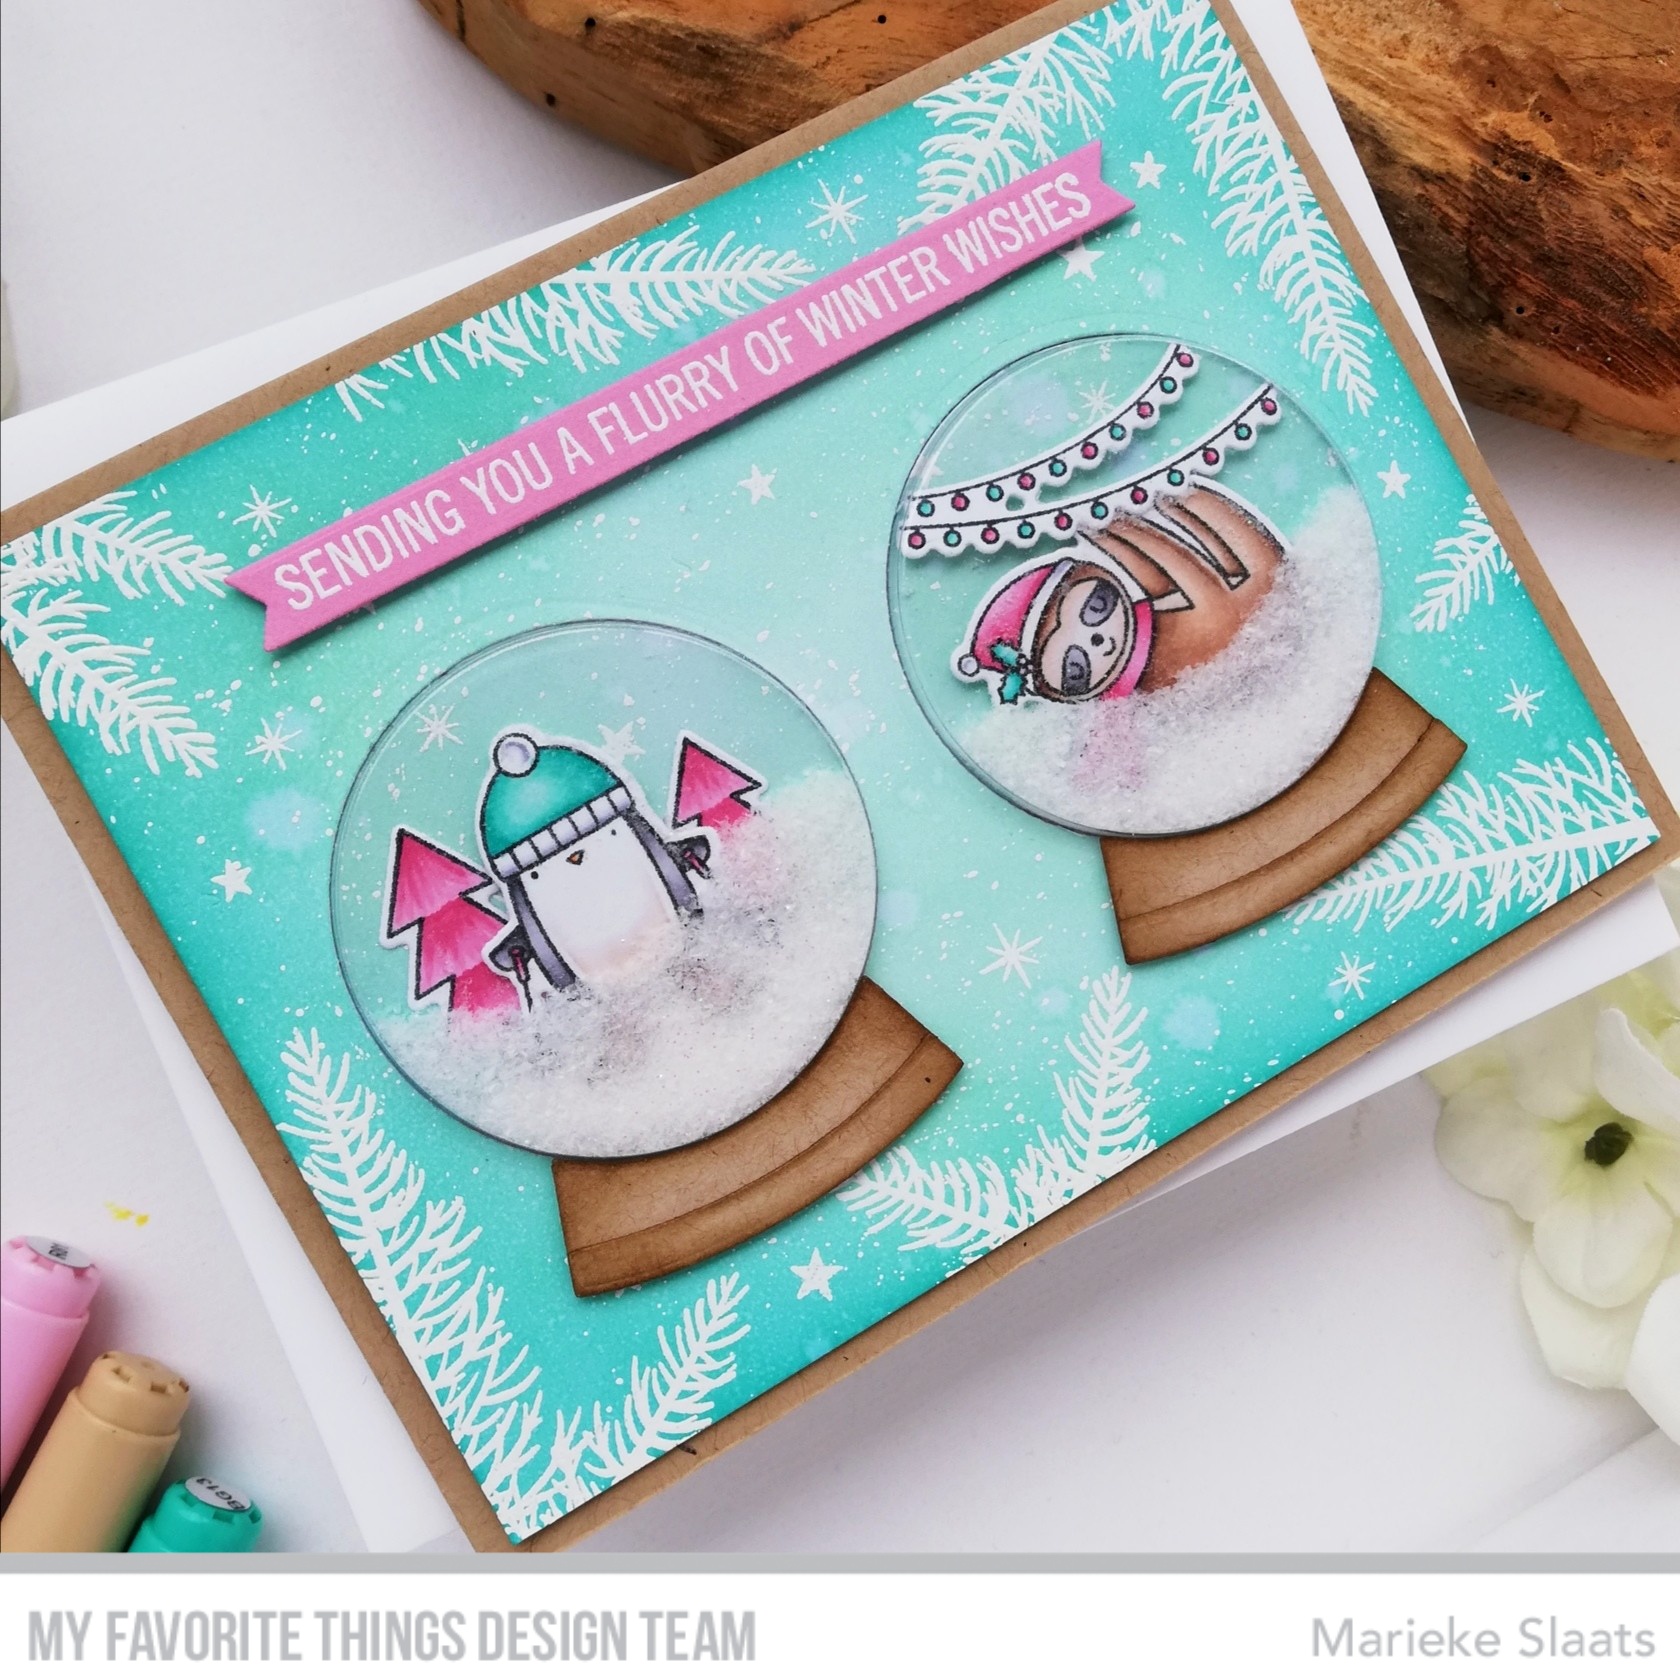
Yay the new release countdown starts today! And you know what this release will be all about Christmas / Winter! So buckle up and enjoy all the new products. For today's inspiration card I decided on making a card using the new It's Penguining to Look a Lot Like Christmas together with the new Cool Collab Pattern Paper.
Yay de nieuwe release countdown starts vandaag! En het leuke aan deze release is dat het allemaal draait om kerst / winter! Dus zet je schrap en laat je inspireren door de nieuwe producten. Voor mijn kaart van vandaag besloot ik een kaart te maken met de Penguining to Look a Lot Like Christmas samen met de nieuwe Cool Collab design papier.
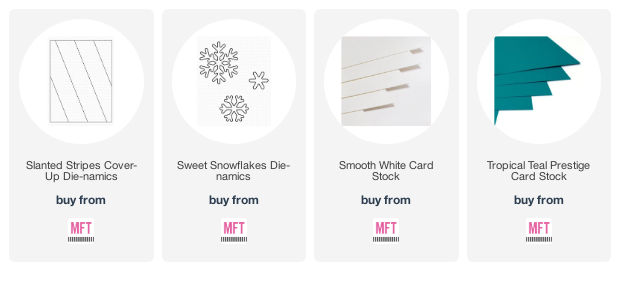
First off i cut the Slanted Stripes Cover Up Die-Namics out of Smooth White and flipped it over. Inkblended some Candied Apple on the top of each stripe. Splattered some water and white paint and glued it together. Cut a Smooth White sidefold cardbase and added a piece of Pattern Paper.

Stanste de Slanted Stripes Cover-Up Die-Namics uit Smooth White en draaide hem om. Inktblende de bovenkanten van de strippen met Candied Apple, spetterde water en witte verf. Plakte het geheel aan elkaar. Sneed een sidefold Smooth White basiskaart en plakte er een stuk designpapier op.
Stamped all the images, colored them up using my Copic markers and cut them using the matching Die-Namics. Heat embost the sentiment on some Tropical Teal and cut it. Die cut the snowflakes out of Smooth White and finished of with a gem. Stempelde alle afbeeldingen, kleurde ze in met mijn Copic markers en stanste ze uit met de bijpassende Die-Namics. Heat emboste de tekst op Tropical Teal en sneed het uit. Stanste de sneeuwvlokken uit Smooth White, plakte ze op de kaart en werkte ze af met een gem.

Used Copic Colors:
Penguin - N8, N6, N4, N3, E53, E52, E51, YR09, YR04, YR02
Teal - BG09, BG07, BG05
Blue - BG02, BG01, BG000, BG0000
White - C5, C3, C1, C00, 0

Have a lovely day!
Greets, Marieke

woensdag 29 september 2021

My Favorite Things - Wednesday Sketch Challenge #561

 Hello all!

Today I am back again with a new Sketch Challenge by My Favorite Things. This week I decided to make a Spooky card that can be used for Halloween or for a Birthday! Vandaag ben ik er weer met een nieuwe schets challenge van My Favorite Things. Deze week maakte ik een spookachtige kaart, die je zowel voor Halloween als voor een verjaardag kunt gebruiken.
For the sketch of this week I decided to stick with the current style and did not add, flipped or swapped anything.
Voor de schets van deze week besloot ik trouw te blijven aan zoals hij is en voegde dus niets toe, draaide of verplaatste niets.
Cut a Black Licorice rectangle and added that onto a Smooth White topfold base card. Cut a watercolor rectangle and inkblended some Shaded Lilac, Wilted Violet and Black Soot Distress ink. Splattered some water and black paint and cut a strip of pattern paper that went behind it. Cut a vellum cirkle and glued that on to the inkblended cardbase.

Sneed een Black Licorice rechthoek en plakte deze op een Smooth White topfold basiskaart. Sneed een aquarel rechthoek en inktblende hierop Shaded Lilac, Wilted Violet en Black Soot Distress inkt. Spetterde water en zwarte verf. Sneed een strip designpapier en plakte dit erachter. Stanste een vellum cirkel en plakte alles op de kaart.

Stamped the sentiment on some Smooth White and cut it into a banner. Stamped the images, colored them up using my Copic markers and cut them using the matching Die-Namics. Added both to the card and finished of using some orange enamel dots. Stempelde de tekst op Smooth White en stanste het tot een banner. Stempelde de afbeeldingen, kleurde ze in met mijn Copic markers en stanste ze uit met de bijpassende Die-Namics. Plakte alles op de kaart en werkte het geheel af met oranje enamel dots.


Used Copic Colors:
Black - N8, N6, N4, N3
White - C3, C1, C00, 0
Bandage - W5, W3, W1, W00, 0
Pink - R20

Have a lovely day!
Greets, Marieke

maandag 27 september 2021

Carlijn Design - Wauw! je zwemdiploma

Hallo allemaal,

Vandaag weer een kaart die ik maakte als gastdesigner voor Carlijn Design. Ditmaal maakte ik een kaart voor mijn kleine grote vriend die moest afzwemmen voor zijn B diploma. Aangezien hij nu al wat ouder begint te worden dacht ik dat het wel leuk was om de kaart wat stoerder te maken. Today i'm back again with a card as a Guest Designer for Carlijn Design. I made a card for my little big friend who had his swimming exam. He is getting a bit older now i figured it would be fun to make a more cooler looking card for him.
Ik maakte een slimline kaart want tja daar kun je lekker veel op kwijt! Ik maakte als eerste de haai, daar ontstond namelijk het idee om het een rapper haai te maken. Stanste alle onderdelen en plakte het in elkaar. Het Petje kleurde ik in en ik bracht er het Knolpower (van Enzo Knol de Youtuber voor misschien de oudere lezer ;)) logo.

I decided to make a slimline card because well I can fit alot on to it! First off i made the shark, because I decided to make a rapper shark. Die cut all the parts en glued them together. Colored the cap and added the Knolpower logo )it´s the logo of a Dutch Youtuber)
Maakte de achtergrond met Blueprint Sketch, Mermaid Lagoon en Tumbled Glass Distress Oxide. Het zand met Scattered Straw en Vintage photo Distress inkt. Stempelde daarna alle losse stempels en kleurde ze in met mijn Copic markers. Stanste ze uit met de bijpassende stansen en besloot waar ik ze wilde hebben. 

Inkblended the background using Blueprint Sketch, Mermaid Lagoon and Tumbled Glass Distress Oxide. The sand was made using Scattered Straw and Vintage Photo Distress ink. Stamped all the images, colored them up using my Copic markers and cut them using the mathching dies.
Stanste het woord Wauw uit aquarel papier en inktblende de kleuren Blueprint Sketch en Mermaid Lagoon. Stanste de outline met zwart en plakte het op elkaar. Heat emboste de losse teksten op zwart cardstock en als laatste stempelde ik de tekst op de basis. Die cut the word Wauw out of watercolor paper and inkblended the colors Blueprint Sketch and Mermaid Lagoon. Die cut the outline out of black cardstock and glued together. Heat set the loose sentiments and cut them using a speech bubble die. Last but not least stamped the sentiment straight on to the basecard.

Gebruikte Copic kleuren:
Groen - YG67, YG63, YG03
Rood - R59, R29, R27, R24
Oranje - YR09, YR04, YR00
Geel - Y17, Y15, Y13, Y11
Blauw - B28, B26, B24, B23
Paars - V17, V15, V12 
Roze - RV17, RV14, RV13, RV11
Teal - BG15, BG13, BG11, BG10
Wit - C3, C1, C00, 0
Zwart - N8, N6, N4

Heb een heerlijke dag!
Groet, Marieke

Stempels: Geslaagd en Succes, Wauw joepie jeej (Carlijn Design), Best Fins (My Favorite Things)
Stansen: Wauw joepie jeej (Carlijn Design), Stitched Snowdrifts, Babyshark, Impact Alphabet, Slimline starter, Tag Builder Blueprints 5 (ketting)(My Favorite Things)
Inkt: Blueprint Sketch/ Mermaid Lagoon/ Tumbled Glass Distress Oxide, Scattered Straw/ Vintage Photo Distress inkt, Memento Tuxedo Black, Tsukineko Versamark, Versafine Onix Black.
Papier: Red Hot, Smooth White, Black Licorice, Cement Gray, Gravel Grey, Goud
Extra: Super fine wit embossingpoeder, witte gelpen, zwarte fineliner.

zaterdag 25 september 2021

Stamp Anniething - Kawaii Cuties

 Hello all,

Here is day three of the Stamp Anniething Kawaii Cuties release countdown! Today we are going for a winter / Christmas mood, with another set of what else? Cuties! Dag drie van de Stamp Anniething Kawaii Cuties release countdown! Vandaag zijn we een een winter/ kerst mood, met wederom een set met wat denk je? Juist ja Cuties!
Yesterday I showed you a Fall themed card today Winter is here! I made a mini slimline card using the Shaken not Stired and The Holidays are here stamps together to make a indoor scene.
Gisteren liet ik een herfst kaart zien en vandaag de winter is gearriveerd! Ik maakte een mini slimline kaart met de Shaken not Stired en The Holidays are here stempels samen en maakte met hen een scene binnenhuis.
The base is a Smooth White topfold card and added a piece of Pattern Paper. Cut the scalloped white base and a watercolor rectangle. Inkblended Spun Sugar, Worn Lipstick and Candied Apple on to the top, splattered some water and water mixed with Candied Apple. The bottom I inkblended Gathered Twigs and Vintage Photo.

The basis is een Smooth White topfold basiskaart, plakte hier een stuk design papier op. Stanste de geschubte witte basis en een aquarel rechthoek. Inktblende de laatste met Spun Sugar, Worn Lipstick en Candied Apple op de bovenzijde. Spetterde water en water gemengd met Candied Apple. De onderkant is geinktblend met Gathered Twigs en Vintage Photo.
Stamped all the images, colored them up using my Copic and cut them using my Brother Scan & Cut. Die cut all the elements from the fireplace and assembled it. Stamp the sentiment and cut it using a banner die. Stempelde alle afbeeldingen, kleurde ze in met mijn Copic markers en sneed ze uit met mijn Brother Scan & Cut. Stanste alle onderdelen van de haard en maakte er een geheel van. Stempelde de teskt en stanste het uit tot een banner.

Used Copic Colors:
Bear - E37, E35, E33, E31, E30
Deers - E57, E55, E53, E51, E50
Antlers - E47, E44, E43
Dog - N8, N6, N4, N3
Redish Pink - R24, R22, R20
Pink - R85, R83, R81
Christmas Green - G28, G24, G21, G20
Light Green - YG67, YG63, YG03, YG01
Teal - BG15, BG13, BG11
Yellow - Y17, Y15, Y13, Y11
White - C, C3, C1, C00, 0

Have a wonderful day!
Greets, Marieke

Stamps: Shaken not Stired, The Holidays are here (Stamp Anniething)
Dies: Fireplace, Itty Bitty Banner (My Favorite Things), Mini Slimlijn Snijmallen (Carlijn Design)
Ink: Spun Sugar/ Worn Lipstick/ Candied Apple/ Gathered Twigs/ Vintage Photo Distress ink, Memento Tuxedo Black.
Paper: Smooth White/ Eiffel Tower, Cement Gray, Black Licorice, Vintage Timber, Candy Land Pattern Paper.

vrijdag 24 september 2021

Stamp Anniething - Kawaii Cuties

 Hello all,

Here is day two of the Stamp Anniething Kawaii Cuties release countdown! Today we are going for a fall mood, with another set of what else? Cuties! Dag twee van de Stamp Anniething Kawaii Cuties release countdown! Vandaag zijn we een een herfst mood, met wederom een set met wat denk je? Juist ja Cuties!
So I figured it would be fun not to make a classic Autumn Scene but a fun and vibrant one! So i stamped up the cuties and colored them up!
Ik dacht dat het wel leuk zou zijn om eens een keer niet een klassieke herfst scene te maken maar een vrolijke kleurrijke variant. Stempelde daarom de stempels en kleurde ze in!
Cut a standard seize card and added a layer of Pattern paper. Die cut the frame out of Brown cardstock and inkblended the inside using Antique Linen, Bundled Sage and Peeled Paint. Splattered some water and some Peeled Paint and added it on to the card.

Sneed een standaard maat kaart en plakte er een laag design papier op. Stanste het frame uit bruin cardstock en inktblende de binnenkant met Antique linen, Bundled Sage en Peeled Paint. Spetterde water en Peeled Paint en plakte het op de kaart.
Cut the images by hand and added some white gelpen details on to them. Glued the images inside the frame and stamped the little stripes. Stamped the sentiment on some white paper and cut it using a banner die. Knipte de afbeeldingen uit met een schaar en bewerkte ze met een witte gelpen. Plakte de afbeeldingen in het frame en stempelde de swirl. Stempelde de tekst op wit cardstock en stanste het uit met een banner stans.

Used Copic Colors:
Pink - RV17, RV14, RV13, RV11, RV10
Green - YG67, YG63, YG03, YG01
Dark Brown - E49, E47, E44
Soft Brown (wood) - E37, E35, E33, E31
Squirrel - E09, E07, E53, E51, E50 / E00, E11, E13
Turkey - E57, E55, E53, E51, E50
Fox - E09, E08, YR14, YR12 / W3, W1, W00, 0
Racoon - N8, N6, N4, N3 / C3, C1, C00, 0
White - C3, C1, C00, 0
Blue - BG49, BG13, BG45, BG11
Yellow - Y17, Y15, Y13, Y11
Acorn - E79, E77, E74 / E44, E43, E42
Soft Pink - R20, R00

Have a lovely day!
Greets, Marieke

Stamps: Let's Gather (Stamp Anniething), Hanging with my Gnomies (My Favorite Things)
Dies: Stitched Rectangle Scallop Frames, Itty Bitty Strips (My Favorite Things)
Ink: Versafine Vintage Sepia, Antique Linen / Bundled Sage/ Peeled Paint Distress ink.
Paper: Kraft, Smooth White, Vintage Timber, Watercolor paper, Copic paper, Woodgrain Whimsy Paper pad (My Favorite Things)
Extra: White gelpen

donderdag 23 september 2021

Stamp Anniething - Kawaii Cuties

 Hello all,

If I wasn't busy enough I also said yes to a guest design term for a new stampline by Stamp Anniething called Kawaii Cuties. And we are introducing the new products to you in the upcomming few days, so make sure to come back for more projects! Of ik nog niet druk genoeg was zei ik ook nog ja tegen een gastdesign termijn voor een nieuwe stempellijn van Stamp Anniething genaamd Kawaii Cuties. De aankomende dagen zullen in het teken staan van deze producten dus vergeet vooral niet terug te komen!
So on day one of the countdown we are showcasing you the Halloween stamps that will be avaible on september 25th! For my project today I decided on using the Zombody to love, zombies that are to cute not to love ;)
Voor dag één van de countdown dagen voor de release laten we vandaag een aantal Halloween thema stempels zien. Voor mijn kaart gebruikte ik de Zombody to love stempel. Te lieve zombies om gewoon niet lief te kunnen vinden!
First of I inkblended the background using Twisted Citron, Mowed Lawn, Hickory Smoke and Black Soot Distress ink. Splattered some water and white paint. Die cut the word "Coffee", grass and the coffee cup out of black cardstock and decided were i wanted the shaker part to be. Die cut the shape, glued the pouch on the back of the rectangle, filled the shaker and closed it.

Eerst maakte ik de achtergrond met Twisted Citron, Mowed Lawn, Hickory Smoke en Black Soot Distress inkt. Spetterde water en witte verf. Stanste het woord coffee, gras en de bovenkant van de koffiebeker uit zwart cardstock en besloot waar ik de beker wilde hebben. Stanste de beker uit, plakte de shakerpouch aan de achterzijde van de rechthoek, vulde de shaker en plakte het daarna dicht.
Stamped the images, colored them up and cut them by hand, did the same with the three and completly colored it black. Stamped the sentiment cut it using a banner die and added it in the middle of the card. For a fun detail I glued a wobbly eye on the coffee cup. Stempelde alle afbeeldingen, kleurde ze in met mijn Copic markers en knipte ze uit met de hand. Deed hetzelfde met de boom alleen kleurde ik deze volledig. Stempelde de tekst en stanste ze uit met een banner stans en plakte deze in het midden van de kaart. Voor een grappig detail plakte ik een wiebel oog op de koffiebeker.

Have a lovely day!
Greets, Marieke

Stamps: Zombody to love (Stamp Anniething)
Dies: In Stitches Alphabet, Grassy Fields, Café all Day (My Favorite Things)
Ink: Memento Tuxedo Black, Twisted Citron/ Mowed Lawn/ Hickory Smoke/ Black Soot Distress ink.
Paper: Black Licorice, watercolor paper, Copic paper.
Extra: White paint marker, Wobbly eye, Shaker Pouch, Shaker material.

My Favorite Things - Color Challenge #174

 Hello all!

Today i'm here with a new Color Challenge by My Favorite Things. This challlenge i decided to make a birthday card for one of my besties her birthday was in the beginning of the month and she is all into cats and plants so well I just had to use them! Vandaag ben ik er met een nieuwe kleuren challenge van My Favorite Things. Voor deze challenge maakte ik verjaardagkaart  voor een van mijn besties. Ze was jarig in het begin van deze maand en ze is helemaal weg van katten en planten.
So as my friend loves cats and plants I used the adorable Housecats stamp combined with a few other stamps and created a indoor scene.
Zoals ik al zei is mijn vriendin helemaal weg van katten en planten ik gebruikte daarom ook de Housecats stempel gecombineerd met een aantal andere stempels en maakte er een huiskamer scene van.
Die cut a Sno Cone rectangle en added the wall using a stencil and white ink. Cut a strip of Smooth white and a strip of Black Licorice for the floor. Added it to the Sno Cone panel, that went on a Smooth White rectangle and everything i glued on to a Fire Coral sidefold cardbase.

Stanste een Sno Cone rechthoek en bewerkte dit met een stencil en witte inkt. Sneed een Strook Smooth White en een strookje Black Licorice voor de vloer. Plakte het geheel op een Smooth White rechthoek en dat ging weer op een sidefold Fire Coral basiskaart.
Stamped all the images, colored them up using my Copic markers and cut them using the matching Die-Namics. Added everything to the cardbase and heat set the three sentiments on Black Licorice cardstock, cut them out and adhered them to the cardbase. Stempelde alle afbeeldingen, kleurde ze in met mijn Copic markers en stanste ze uit met de bijpassende Die-Namics. plakte alles op de basiskaart en heat emboste de drie teksten op Black Licorice cardstock, stanste / sneed ze uit en plakte ze op de kaart.


Used Copic Colors:
Green - YG67, YG63, YG03
Black - N8, N6, N5, N4
Pink - R24, R22, R20
Teal - BG15, BG13, BG11
Grey Cat - C5, C3, C1, C0, C00
White Cat / white - C3, C1, C00, 0
Brown cat - E57, E55, E53, E51, E50

Have a lovely day!
Greets, Marieke

dinsdag 21 september 2021

MFT Holiday Snow Globe Card Kit Release

 Hello all,

The day is here that the Holiday Snow Globe card kit release by My Favorite Things is avaible! What do you think is it beautiful or what? So what is ending up in your shopping cart? Watch your budget but have fun shopping! De dag is aangebroken dat de Holiday Snow Globe card kit release van My Favorite Things verkrijgbaar is! En wat vond je ervan schitterend toch? Welke producten belanden bij jou in het mandje? Let op je budget maar heb vooral plezier met winkelen!
For today's card i decided to go Clean and Simple and this time it was again a shakercard! 
Voor mijn kaart van vandaag besloot ik om Clean en Simple te gaan, ook deze keer maakte ik een shakerkaart.
Cut a Smooth White rectangle and die cut the cirkel of the snowglobe out the top. Die cut the accessoires out of Smooth White and the background out of the pattern paper. Cut a Lazy Day rectangle traced the circle and glued the pattern paper on top of it.

Sneed een Smooth White rechthoek en stanste de cirkel van de snowglobe uit de bovenkant. Stanste de accessoires met Smooth White en de achtergrond van designpapier. Stanste een Lazy Day rechoek en traceerde de cirkel plakte er het designpapier op.
Stamped the sentiments and glued the shaker pouch bedin the white rectangle, filled the shaker and glued the accessoires on the pattern paper. Closed the shaker and glued the white rectangle on top a Lazy Day topfold card. Stempelde de teksten, plakte de shaker pouch aan de binnenkant van de witte rechthoek en vulde de shaker. Plakte de accessoires op het designpapier en sloot de shaker. Plakte de witte rechthoek op een Lazy Day topfold basiskaart.

Have a lovely day!
Greets, Marieke

maandag 20 september 2021

MFT Holiday Snow Globe Card Kit Release Countdown day 1

 Hello all,

Welcome back today for day one of the September Card kit Release countdown by My Favorite Things. Lucky the wait on the Card kit Release is only short and you can have a shopping spree already tommorow Tuesday August 21st at 10:00 am EST. Welkom terug bij dag twee van de september card kit Release countdown by My Favorite Things. Gelukkig hoef je maar even te wachten want morgen zijn ze al beschikbaar om 16:00!
Yesterday i had a more traditional card for you, today i went for a some more cheerful and bright colored card.
Gisteren had ik een wat meer traditionele kaart voor jullie, vandaag maakte ik een totaal andere met vrolijke kleuren.
So first of made the background, i cut rectangle out of watercolor paper and inkblended Cracked Pistashio and Peacock Feathers Distress ink on to it. Splattered with some water and prepped the base for some heat embossing. Heat embost the trees and stars and splattered some white paint. Eerst maakte ik de achtergrond, sneed een rechthoek uit aquarel papier en inktblende Cracked Pistashio en Peacock Feathers Distress inkt op de rechthoek. Spetterde met water en bewerkte de achtergrond voor het heat embosen. Heat emboste de bomen en de sterren en spetterde witte verf op de rechthoek.

Decided were the globes were going and die cut the circles. Added a border of snow to the die cut circles and cut the bottom of the globes out of Kraft. Added some color using Walnut Stain. Heat set the sentiment on some Cotton Candy and die cut it. Besloot waar ik de globes wilde hebben en stanste de cirkels uit. Stanste twee randjes sneeuw en plakte die op de cirkels. Stanste de onderkanten van de globes uit Kraft. Bewerkte het met wat Walnut Stain. Heat emboste de tekst en stanste het uit.
Stamped the images, colored them up and cut them using the matching Die-Namics. Placed them onto the circles, glued the pouches on the back of the inkblended background. Filled the shaker pouches with snow and closed the card. Glued the panel onto a kraft sidefold basecard. Stempelde de afbeeldingen, kleurde ze in met mijn Copic markers en stanste ze uit met de bijpassende Die-Namics. Plakte ze op de losse cirkels, plakte de pouches aan de achterkant van de inkblende rechthoek. Vulde de shakerpouches en plakte de kaart dicht. Plakte het geheel op een kraft sidefold basiskaart.

Used Copic Colors:
Black - N6, N4, N3, N2
Brown - E47, E44, E43, E42, E41, E40
Pink - R85, R83, R81
Teal - BG15, BG13, BG11, BG10
Orange - YR00, YR04

Have a lovely day!
Greets, Marieke

zondag 19 september 2021

MFT Holiday Snow Globe Card Kit Release Countdown day 2

 Hello all,

Today we are kicking of with a amazing Card kit release countdown by My Favorite Things! With Christmas getting close this kit should get you in the mood for Christmas crafting! This release will be avaible Tuesday September 21st at 10:00 am EST. Vandaag starten we met een super leuke cardkit release countdown van My Favorite Things! Wanneer je van alles leuk vind wat met kerst te maken heeft dan is deze kit helemaal wat voor jou! De release zal beschikbaar zijn op dinsdag 21 september om 16:00.
The cardkit contains the Snow Globe Singles stamp set with matching Die-Namics, Snow Globe Die-Namics, Holly jolly Paperpad, Cirkle Shaker Pouches, Five sheets of Smooth White cardstock and one sheet of the following colors; Cotton Candy, Poppin' Pink, Black Licorice, Red Hot, Limelight, Blue Beyond and Lazy DayDe cardkit bestaat uit de Snow Globe Singles stempel met bijpassende Die-Namics, Snow Globe Die-Namics, Holly Holly Paperpad, Cirkel Shaker Pouches, vijf vellen Smooth White cardstock en één vel cardstock van de volgende kleuren; Cotton Candy, Poppin' Pink, Red Hot, Limelight, Lazy day, Blue Beyond, Black Licorice.
Offourse the supplies are sold separately, if you are only interested in a specific item. As always My Favorite is offering a new free for $60 that comes with this kit; Snow Globe Accessoires Die-Namics. Uiteraard zijn de producten ook los te koop, wanneer je alleen geïnteresseerd bent in één van de producten. Zoals iedere nieuwe release biedt My Favorite Things een nieuwe free for $60 en dat is ditmaal de Snow Globe Accessoires Die-Namics.
For my card I cut a rectangle out of Pattern Paper and cut a border of snow. Added some details using Cement Gray ink and the Drifts & Hills Stencil. Glued them together and decided were i wanted the globe to be. Cut the Circle and traced the circle on a piece of scrap paper. Voor mijn kaart stanste ik een rechthoek uit Design papier en stanste een rand sneeuw. Inktblende wat details op de sneeuw met het Drifts & Hills stencil en Cement Gray. Plakte het op elkaar en besloot waar ik de snow globe wilde hebben. Stanste de cirkel en trok daarna de cirkel over op een stuk rechthoek die er achter geplakt gaat worden.

Cut a piece of Pattern Paper and inkblended some Lazy Day onto it. Cut a strip of Smooth White and glued it onto the pattern paper. Adhered the shaker pouch behind the large rectangle and filled it up with snow. Sneed een stuk Designpapier en inktblende wat Lazy Day op het papier. Stanste een randje sneeuw met Smooth White en plakte het op het designpapier. Plakte de pouch achter de grote rechthoek en vulde de shaker met sneeuw.
Stamped the images, colored them up and cut them using the matching Die-Namics. Placed them on the small pattern paper and closed the shaker. Die cut the two parts that come with the snow globe out of Red Hot and Amarana Cherry and glued them together. Glued the whole front on to a Smooth White topfold basecard. Stempelde de afbeeldingen, kleurde ze in met mijn Copic markers en stanste ze uit met de bijpassende Die-Namics. Plakte alles op het kleine stuk Design papier en plakte de shaker dicht. Stanste de twee losse onderdelen van de snow globe uit Red Hot en Amerana Cherry. Plakte ze op elkaar en bewerkte met een witte gelpen. Plakte het geheel op ee topfold Smooth White basiskaart.

Used Copic Colors:
Red - R59, R29, R27, R24
Skin - E000, E00, E11, E21
Grey - C3, C1, C00
Green - YG67, YG63, YG03
Brown - E37, E35, E33
Black - N8, N6, N4
Yellow - YR24, YR21

Have a lovely day!
Greets, Marieke

zaterdag 18 september 2021

Carlijn Design - Gefeliciteerd met jullie huwelijk

Hallo allemaal,

Vandaag een kaart die ik maakte als gastdesigner voor Carlijn Design en als "opdracht" voor mijn vader. Een vriend van mijn vader trouwde en vroeg mij of ik een kaart voor hem wilde maken. Natuurlijk doe ik dat er zo ontstond deze peren kaart. Today a card that I made as a guestdesigner for Carlijn Design and as a "commission" for my dad. A friend of my dad was getting married and so he asked me to make a card for him, so that were this card originated.
De basis is een Smooth White rechthoek die ik stanste met een scalloped rechthoek. Stempelde met Grout Grey de achtergrond op en stanste het hart uit de bovenzijde. Heat emboste de teksten op de voorkant met goud embossingpoeder. Plakte wat acetate achter de rechthoek En vulde de shaker. Plakte het geheel op een topfold Kraft basiskaart.

De base of the card is a Smooth White rectangle that i die cut using a scalloped rectangle die. Stamped the background using Grout Grey ink and die cut the heart out of the top part. Heat set the sentiments using gold embossingpowder. Added some acetate behind the panel and turned it into a shaker. Added the panel onto a topfold Kraft basecard.
Stanste de peren uit en maakte de peertjes ik op kleur met Squeezed Lemonade, Crushed Olive en Peeled Paint Distress inkt en spetterde ten slotte wat water. Stanste de losse onderdelen uit Vintage Timber cardstock, de blaadjes uit Limelight en bewerkte dit met Peeled Paint. Maakte de peren compleet en bracht wat detail aan met een gelpen, stempelde de gezichten en kleurde wangen.

Die cut the pears and added some color using the colors Squeezed Lemonade, Crushed Olive en Peeled Paint Distress ink and splattered some water. Die cut the lose parts out of Vintage Timber cardstock de leaves out of Limelight and added some Peeled Paint. Finished of the pears giving them some details using a white gelpen, stamped the faces and some cheeks.
Om de peertjes te laten "trouwen" stanste ik een strik voor de man uit Black Licorice cardstock. Voor de vrouw maakte ik een bloemenkrans en aan de achterkant plakte ik wat doorschijnend wit lint als "sluier". Heat emboste de teksten op Kraft cardstock en stanste ze uit met een spreekwolk stans. To make the pears "wedding" ready I die cut the bow out of Black Licorice cardstock. For the female I die cut a flowercrown and on the back I added some white translucent ribbon that looks like the "veil". Heat set the sentiments yes on to some Kraft cardstock and die cut them using the speech bubbles die.

Heb een heerlijke dag!
Groet, Marieke

Stempels: Advocado & Peer, Huwelijk (Carlijn Design), Scattered Hearts Background (My Favorite Things)
Stansen: Advocado & Peer, Advocado & Peer Groot, Outline Hartjes, Bloemetje (Carlijn Design), Blueprints 27 Die-Namics (My favorite Things), Cool Cuts Speech Bubbles (Create a Smile stamps)
Inkten: Squeezed Lemonade, Crushed Olive en Peeled Paint Distress inkt, Grout Grey (My Favorite Things), Tsukineko Versamark, Versafine Onix Black.
Papier: Smooth White, Kraft, Vintage Timber, Lemon Drop, Limelight, Black Licorice (My Favorite Things), JEJE acetate.
Extra: Shaker materiaal, lint, witte gelpen, ultra fine wit en goud embossingpoeder.