woensdag 26 december 2018

My Favorite Things Sketch Challenge - 417

Hello allemaal / Hello Everyone,

Today it's my last day as a guest designer for My Favorite Things. Did you see the awesome card kit release we had last week, what went into your cart? It's Wednesday again so that means there is another weekly sketch challenge starting and as always it's a really fun one!

Used Products: Tweet Friends stamp and die, Die-Namics blueprint 29, Cement gray cardstock, Peacock Feathers / Squeezed lemonade distress ink, Liquid Applicators


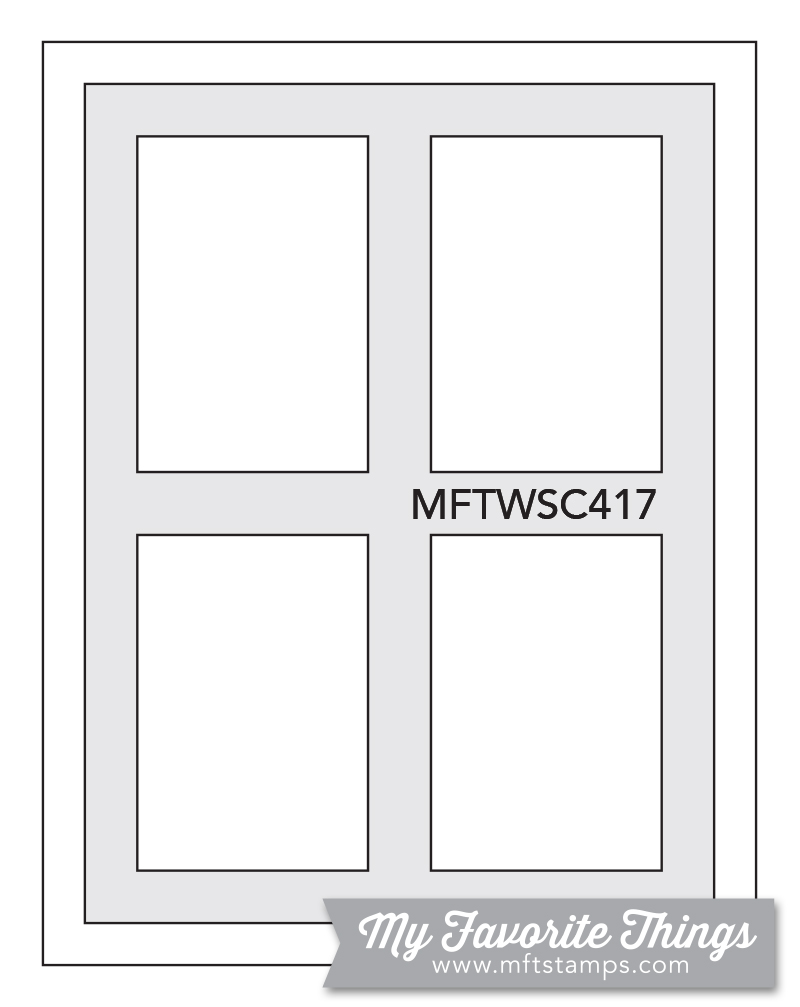
Out cement grey cardstock i die cut the frame from blueprint 29 four times, i glued them onto each other but i before i cut them i cut a piece of cardstock from the part that makes two section and adhered it to the other side so it would be just ast thick. 

On some paper i made two lanes with distress ink Peacock Feathers and Squeezed Lemonade and die cut those with the same die from Blueprint 29. I splattered some white splatters to give it some texture. I Adhered everything on to a top fold white card.


Stamped the images and colored them in using my Copic Markers, except for the music-notes those i just stamped. Then i die cut everything using the right dies and gave the mushrooms some texture using the Liquid applicator. Stamped the sentiment and cut it into a banner, adhered everything on to the card using different seizes of 3-d tape.

Used Copic Markers:

Purple - BV08, BV04, BV02, BV00
Orange - YR07, YR04, YR02
Yellow - Y17, Y15, Y13
Green - G05, G03, G00
Turquoise - BG18, BG15, BG13, BG11
Cheeks - R20, 0
Mushroom - W3, W1, W0, 0
Belly birds - C3, C1, C0, 0


Have a beautiful Christmas day!

Greets, Marieke

woensdag 19 december 2018

My Favorite Things Sketch Challenge - 416

Hello allemaal / Hello Everyone,

Today i'm back again as a guest designer for My Favorite Things. Did you see the awesome release we had yesterday, what went into your cart? It's Wednesday again so that means there is another weekly sketch challenge starting and as always it's a really fun one!

Used products: Die-Namics blueprint 33, Die-Namics Mountain high, Die-Namics, Die-Namics filled with joy, Fox & Friends stamp and Die-Namics, Beautiful Blessings 2, Chipped Saphire / Broken china / Peacock Feathers and  Cracked pistachio distress ink, Smooth White and cement gray cardstock


First off i made the night background using Chipped Saphire and broken China and die cut it using the middle die from the Blueprint 33. I made the letters JOY using Cracked Pistachio and Peacock Feathers distress ink and they die cut them.

Heat embosst the sentiment and made some splatters using some Opaque white mixed with water. I Die cut the mountains from cement gray cardstock, made some snow using white gesso and die cut them so they would fit into the "sky blueprint"


Stamped the images and die cut the trees and colored them in using my Copic Markers. Fussy cut the images and set them aside so i could make the snow border, using the  surf & turf die-namics. Also colored some stripes using my Copic Markers. 

Used Copic Markers:
Fox - E09, E08, YR24, YR21, W5, W3, W1, W0
Mouse - W5, W3, W1, W0, R20, 0
Trees - YG99, G94, G21

Have a beautiful day!

Greets, Marieke

woensdag 12 december 2018

Kraftin' Kimmie 12 days of Krafty Christmas

Hallo allemaal / Hello everyone,

Today is the last day of the 12 Krafty Christmas days of Kraftin' Kimmie stamps and today we are all showcasing one of our favorite stamps released during the year. One of my favorite stamps is Holiday Village! I totally love the small images and the cards you can make with it.

Used products: Sweater Weather stencil, Holiday Village, Wicked Black hybrid ink Die-Namics surf & Turf, Peeled Paint distress ink.


First i masked a piece of the card so i could make the background using the stencil and the Peeled Paint distress ink. Then i took my tombow marker and lifted some splatters on to it.


Stamped the imsges using Wicked Black and colored them in using my Copic Markers. Then i fussy cut all the images. I die cut a piece of white cardstock and cut it in the right seize for the card and adhered the cut images behind and on top of them. Also stamped the reindeer stamp using Wicked Black. Lastly i heat embost the sentiment.

Have a great day!

Greets, Marieke

My Favorite Things Sketch Challenge - 415

Hello allemaal / Hello Everyone,

Today i'm back again as a guest designer for My Favorite Things. Did you see the awesome release we had yesterday, what went into your cart? It's wednesday again so that means there is another weekly sketch challenge starting and as always it's a really fun one!

Used products: I'm over the moon for ewe stamp and die, Die-Namics slanted sentiment strips, Die-Namics leaping slider channels, Die-Namics a2 stitched rectangle staxx, Die-Namics surf & turf, slider elements, Chipped Saphire / Broken China / Black Soot / Twisted Citron and Mowed Lawn distress ink


So to make the base of the card i die cut a panel with the largest rectangle die from the a2 rectangle staxx. I took some masking tape and made a rectangle with it. Also i die cut the piece of hill that comes with the set out of a piece of masking tape and glue the bottom part to the base.

Using Broken China / Chipped Saphire and Black Soot distress ink to make the background. I stamped the moon so i would now were it was going to be so i could leave the place around the moon lighter. Made some water splatters and some splatters of Opaque white mixed with some water onto the distress ink.


Replaced the bottom part of the hill with the top part and made the grass using Mowed Lawn and Twisted Citron distress ink. Then i stamped the images and colored them up using my Copic Markers (colors can be found at the bottom of this post). Then i die cut the images and placed them were i wanted them to be so i could decided were i want my sheep and the slider to be. 

When i figured that out i die cut the slider using Die-Namics leaping slider channels. Then i placed the whole frame on to a top fold using 3-d tape. Then i placed the die cut slider piece on the right place on the base.

Die cut the small cirkles from the Die-Namics surf & turf die and made a sandwich using a slider element. Pushed that in the slider channel and adhered the sheep on to it using some 3-d tape. Lastly i heat embost the sentiment on some Black Licorice cardstock and die cut it using the Die-Namics essential sentiment strips. 

For this weeks sketch i swapped the sketch 180 degrees so the circle would be on te top. In my case the circle turned out to be a moon and stars.

Used Copic Colors:

Sheep - E000, E00, E21, E11, E04, R20, W5, W3, W1, 0
Moon and stars - YR16, Y38, Y35, Y32
Fence - E37, E35, E33, E31

Have a lovely day!

Greets, Marieke

dinsdag 11 december 2018

New release is available and My Favorite Things & Friends

Hello all / Hallo allemaal,

The new release for December by My Favorite Things will be available today! Jippie and if you did not have enough inspiration already hop along to see even more beautiful inspiring cards and projects by the Designteam & Friends.


Used products: Friends at first sip stamp and die, Die-Namics spring scene builder, Die-Namics stitched A2 rectangle stax, Salty ocean, Tumbled glass, Mowed lawn, Twisted Citron and Walnut stain distress ink.


Using the distress inks and the Die-Namics spring scene builder i made the grass and the leaves of the trees. Die cut the path, tree trunk and clouds using kraft, brown and white cardstock. 
Using Salty Ocean and Tumbled glass i made the blue background and splattered some water onto it. Then i stamped the sentiment using some black ink. 


Temporarily adhered the scene so i could die cut it as a whole using the Die-Namics stitched A2 stax. Separate everything again and glued it onto a white top fold card. This time i glued everything on to the base using different sizes of 3-d tape so there would be some height difference.


Stamped all the images for the Friends at first sip stamp and colored them in using my Copic Markers. I die cut everything using the matching dies and at some places i removed some extra white spaces so the background would be visible. Adhered the images on the base card using different seizes of 3-d tape and finished of the hearts with some glossy accent.

Have a beautiful day!

Greets, Marieke

zaterdag 8 december 2018

Kraftin' Kimmie Saturday Challenge - Stencils

Hallo allemaal / Hello everybody!

Today it's saturday wich means a new challenge started over at Kraftin Kimmie Stamps Blog, today the theme is stencils!. You can go every route with this theme so get your stamps and stencils out and play along.


We always enjoy your creations so be sure to submit them so you can have a chance to WIN a $40 gift card to the Shop!! Show us your stuff!! In keeping in line with the rest of our challenges (our Krafty Scrappy Challenge), we will be drawing one winner per month from all Saturday Challenge entries to win a $40 gift card!! You can enter as many times per month as you'd like!!

Used products: Holly Jolly Ornaments, Holiday Village (snowflakes on the ornaments), Shake it up (snowflakes on the base), Furry Holiday wishes, Mermaid MelodyRaspberry Rose / Lovely Lagoon / Pumpkin Patch / Purple Pansy / Yummy Yellow / Wicked Black  and Granite Grey hybrid ink, Scenery Stencil, Die-Namics slanted sentiment strip and Die-Namics stitched A2 stax


First of i made the cirkles using the six different colours hybride inks. Then i stamped the lines of the ornaments using Granite Grey ink. When that was done i die cut the panel. I stamped some snowflakes in the ornaments using the same colors hybride ink. Then i took two different snowflakes and stamped them onto the base panel. 

Heat embossed the sentiment and die cut it using the slanted sentiment die-namics. Stamped bright using wicked black and glued the bases card onto a top fold white card base. I finished of giving the ornaments some shine with my clear wink of stella.

Have a lovely day!

Greets, Marieke

woensdag 5 december 2018

My Favorite Things guest designer for the month December

Hallo allemaal / hello everyone,

I'm so thrilled to be guest designing for My Favorite Things, and this time around i'm asked to be guesting for the weekly sketch challenge's. I was so thrilled to be asked again!  

So for the people who never heard of the My Favorite Things card challenge's, every week there is a sketch challenge, a bi-weekly colour challenge and once a month there is a birthday themed challenge.

Used products: Deck the howls stamp and dies, Our story stamp, In Paris stamp, Puppy Kisses stamp, Ready, set, snow stamp (hat and tree), Friends in the forest stamp (hat), Happy Hippos stamp (hat), Lucky Dog (ball), Interactive Labels stamp, Balloon strings Background stamp, Peek a boo wheel die-namics, Cement Grey Hybrid ink, Smooth white, Black licorice cardstock and ultra fine white embossing powder.


First off i made the turning wheel. Die cut it from smooth white cardstock and then stamped the turn onto it. I cut another piece of cardstock 4 x 5 1/4 inch and made the corner in it. Then stamped all the images and die cut and fussy cut the images. I always do that so i can determine were i want my images to go.

Made two pencil lines for the floor and the floor skirting and masked it off. I stamped the background on the top piece of the card using the Cement grey hybrid ink. You can find a tutorial here on my You Tube channel, you have to skip forward until 6:48 min how i did the rest of the background.


When i decided were i wanted my images i also decided were my thought bubble would be. I die cut it and took over the shape on my wheel. My original idea was to let the dog think about a new hat, but i only had three single hats i made him think of dogs wearing the hats so i included the In Paris one as well! I then masked and stamped the images and colored them in using my Copic markers. I heat embossed the sentiment on some Black Licorice cardstock and glued it on the base. The base is finished and i glued it onto a top fold white cardbase.

Finally i could glue everything on the card using some 3-d tape. I made some small circles using a black fineliner for the thought bubble. On the ball i made a bow so it would look like a present. The ornaments in the tree are the same as on the dogs headpiece.

Have a lovely day!

Greets, Marieke

zondag 2 december 2018

Kraftin' Kimmie 12 days of Christmas - Welcome to the world (February)

Hallo allemaal / Hello everybody,

Today it's my turn to show you a card i made for the 12 days of Kraftin' Kimmie Christmas, My month was February and boy did we had some fun stamp sets in that month, they were all baby themed and i totally loved all off them! I used Welcome to the world and baby love for my card today.

Used products: Welcome to the world, Baby Love, Marianne Design paper pad craftdates, Marianne Design embossing folder trendy hearts, Marianne Design Eline's hand lettering - light, Els Brigé 't is je verjaardag, enamel dots, black twine, sewing machine, corner chopper


First off cut a top fold kraft card and corner chopped two corners then i cut the design papers in the right size. I took my sewing machine and made a sewing border on the biggest size design papers. 

With the embossing folder i dry embossed a white piece of paper. I cut a piece of kraft cardstock and glue a piece of design paper on to it. Took my sewing machine again and sewed the borders of the design papers. I stamped the month and year on the design paper.


Out of the Baby Love set i stamped the "special delivery" sentiment and made two separate sentiment strips. With the black twine i made some lines in the middle of the biggest design paper and i made a bow. On top of the bow i put a heart enamel dot.

Stamped the stork on some Copic paper and colored it in using my Copic Markers. Then i fussy cut him and put him on the card using 3-d tape. I finished of the card using some black enamel dots. 

Have a lovely day!

Greets, Marieke 

zaterdag 1 december 2018

Kraftin' Kimmie Saturday Challenge - Snow / The Sketchy challenge - Christmas

Hallo allemaal / Hello everybody!

Today it's saturday wich means a new challenge started over at Kraftin Kimmie Stamps Blog, today the theme is snow!. You can go every route with this theme so get your stamps out and play along.


We always enjoy your creations so be sure to submit them so you can have a chance to WIN a $40 gift card to the Shop!! Show us your stuff!! In keeping in line with the rest of our challenges (our Krafty Scrappy Challenge), we will be drawing one winner per month from all Saturday Challenge entries to win a $40 gift card!! You can enter as many times per month as you'd like!!

Used products: Cool Critters, Holiday Village's, Shake it up - polar bears, Raspberry Rose and Wicked Black hybride ink, Die-Namics blueprint 27, Die-Namics stitched snow drifts, Die-Namics mountain high


First off i made the red background using the Raspberry Rose hybride ink. Then i die cut the frame using Blueprint 27. Stamped the greeting from the shake it up polar set in the middle. 

Die cut the mountains and the snowdrifts. Colored up the snow and made snow using some white gesso. Die cut everything with the frame from Blueprint 27.


Stamped the trees (holiday village) and the squirrel with Wicked Black and Colored them up using my Copic Marker. I fussy cut everything leaving a white border and glued it onto the card. 

Have a lovely day!

Greets, Marieke

Met het kaartje doe ik graag mee met de volgende challenge's:
Crafty Calander Challenge - Christmas Time
Sweet Stampin Challenge - Snowman/ ladies (and squirrel?)
Card Mania - Christmas

Copic Colourstock - How to color light reflection with Copic Markers

Hallo Copic fans,


Vandaag heb ik voor jullie een video tutorial waarin ik laat zien hoe je lichtreflectie kunt aanbrengen op je afbeelding. In de video laat ik het zien met een kaars maar het kan uiteraard met allerlei lichtbronnen zoals een lamp, vuurwerk of zelfs de zon en de maan.

De digitale stempel die ik gebruikt heb heet Turtle birthday cake van Bugaboo stamps.


Hierbij de volledige uitwerking van de kaart, afhankelijk hoe fel het licht is kun je er altijd voor kiezen om lichtere kleuren Copic kleuren te gebruiken.


Hopelijk vonden jullie de video tutorial leerzaam en zie ik op de Colourstock Facebookpagina snel jullie verschillende lichtreflecties voorbij komen, tot de volgende tutorial!


Met het kaartje doe ik graag mee met de volgende challenge's:


zondag 25 november 2018

Wish, i hope your day is all kinds of happy.

Hallo allemaal,

Dit weekend twee workshops verzorgd bij Scrap & Co en daarnaast was manlief een heel weekend de deur uit voor een "game weekend". Zo besloot ik vrijdag avond nog even een kaartje te maken met de huidige schets van My Favorite Things.

Gebruikte Producten: Happy Hippo's stempel en stans, Adorable Elephant stempel en stans, Bundle of balloons stempel en stans, Die-Namics Grassy Field, Die-Namics Balloon alphabet, Stencil mini cloud edges. 


De basis kaart maakte sneed ik op maat en sneed een kraft strook van 0,7 mm, daar stempelde ik de tekst op. Uit groen cardstock stanste ik het gras en bewerkte dit met mowed lawn distress inkt.

Met mermaid lagoon en het mini cloud edge stencil maakte ik de wolken.


De alfabet ballonnen stanste ik uit vier kleuren cardstock en ook de losse ballonnen stante ik vier keer uit cardstock en plakte ze op elkaar. Uit wit cardstock stanste ik de vier letter ballonnen en gebruikte alleen de letter en plakte die in de gekleurde ballon. Uit zwart cardstock stanste ik de "touwtjes" en plakte die aan de ballon.


Stempelde het nijlpaard en de olifant en kleurde deze in met mijn Copic markers. Stanste ze beide uit omdat ik graag de regenboog kleuren wilde gebruiken koos ik ervoor om het strikje en de muts ook te stempelen en in te kleuren. Stanste deze ook uit en plakte ze op de dieren.

Gebruikte Copic kleuren:

Nijlpaard - W7, W5, W3, W1, W0, W00, 0, R20
Strik - YR07, YR04, YR02
Olifant - C5, C3, C1, C0, C00, 0, R20, W1
Feestmuts - V09, V06, V05, V04

Fijne dag allemaal!

Groet, Marieke

Met het kaartje doe ik graag mee met de volgende challenge's:

My Favorite Things - Sketch Challenge
My Favorite Things - Birthday Challenge
Papercraft challenge - lots of dimension
As you like it - Rubber or digital, because i like to just crab a stamp and start coloring. It's easier then to turn on my computer, seize the stamp and then print it.
Hobbyvision - Feest

dinsdag 20 november 2018

I have snow much fun with you

Hallo allemaal,

Met de schets van deze week verschillende keren opnieuw begonnen omdat ik niet helemaal tot een idee kwam. Uiteindelijk vanochtend last minute... toch nog met een idee gekomen en deze kaart gemaakt. 

Gebruikte producten: Ready, set, go stempel en stans, Die-Namics stitched snow drifts, Peacock feather distress inkt.


Bepaalde de grootte van de kaart en sneed dit af. Op een rest stuk stempelde ik de tekst en bewerkte de bovenzijde met de Die-Namics snowdrift. Sneed een rechthoek en bewerkte dit met een andere snowdrift uit de set.

Plakte op de basis een rechthoek af en bewerkte dit met Peacock Feathers distress inkt en Copic opaque white gemengd met water. Plakte daar het grote rechthoek op met 3-d tape.


Stempelde bomen en de bear en kleurde ze in met mijn Copic Markers. Daarna stanste ik ze uit met bijbehorende stansen en bewerkte de bril met Glossy Accents. Plakte alles op de kaart en als laatste ging het sentiment op de kaart,

Gebruikte Copic Kleuren:
Groen - YG09, YG07, YG05, YG03
Beer - E43, E42, E41, E40, 0
Paars - BV04, BV02, BV00
Bril - YG05, YG03, BG13, BG11, 0

Fijne dag allemaal!

Groet, Marieke

Met het kaartje doe ik graag mee met de volgende challenge's:

My Favorite Things - Sketch Challenge
Penny Black all sorts - Bring a smile
That's Crafty challenge - Winter wonderland
AAA Cards - On the move

donderdag 15 november 2018

The Sketchy Challenge - Half way reminder

Hallo allemaal/ Hello Everybody,

We are half way this months sketch on The Sketchy challenge. This month it's a theme month, as the theme is - anything goes, easier then that it can't be!

Used products: Dutch Doobadoo shape art mal (470.713.165), Marianne Design dies, Marianne Design paper, My favorite things text stamp, Make it Crafty - Geeky love new parents and i'm roses flowers 


Knipte de basis uit een wit cardstock als een top fold kaart en knipte daarna enkel het designpapier uit. Stanste uit wit cardstock de cirkel stans en trok de binnenkant over op het papier van mijn stempel en knipte dit uit.

Maakte de bloementoef en stanste de die cuts. Plakte alles op elkaar en op de kaart. Stempelde de tekst en maakte en sneed het uit aan de binnenkant stempelde ik ook nog een tekst uit dezelfde set.


Kleurde het plaatje in met mijn Copic Markers en plakte het daarna op de kaart.

Gebruikte Copic Kleuren:
Huidskleur - E000, E00, E04, E11, E21, R20
Haren - BV29, BV25, BV25, E37, E35, E33
Blauw - B99, B97, B95, B93, B91, BG01, BG00 en 0
Luier / vloer - W5, W3, W1, W0
Roze - R89, R85, R83, R81
Groen - YG25, YG23, YG03

Fijne dag allemaal!

Groet, Marieke

Met de kaart doe ik graag mee met de volgende challenge's:
I'm Roses - Anything Goes (T30, LY3, D1)

maandag 12 november 2018

Tweet Greetings

Hallo allemaal,

Daar zat ik dan met een snothoofd terug komend van een midweekje Centeparcs en ik wilde heel graag een kaartje maken, nou ja dan maar met snothoofd, veelzakdoekjes en liters thee op mijn zolderkamertje. Ging weer aan de slag met de Kleuren en schets challenge van My Favorite Things.

Gebruikte Producten: Tweet Holiday's stempel en stans, Die-Namics Birch trees, Die-Namics Birch Trees (straight), Die-Namics stitched snow hills, bright Gingham paperpack.


Met twisted citron maakte ik de achtergrond en spetterde er water op, tevens wat opaque white gemengd met water. 

Stanste de bomen uit kraft en donkerbruin cardstock en plakte ze op elkaar. Bewerkte de takken met een witte gelpen voor de sneeuw. Plakte het paneel op een stuk donkerbruin cardstock en daarna op een de basis kaart waar ik een stuk designpapier op plakte.


Stempelde de drie huizen en het vogeltje op Copic papier en kleurde ze in met Copic Markers. Daarna stanste ik ze uit en plakte achter de huisjes wat twine. Bewerkte het sneeuw met Liquid applicator en plakte ze op.

Kleurde daarna de vogel en bewerkte ook de muts met Liquid applicator. Stempelde de vogel nogmaals en kleurde alleen de vleugels en knipte deze uit. Heat emboste de tekst op donkerbruin cardstock en plakte dit op het vogeltje en daarna de vleugels er overheen.

Fijne dag allemaal!

Groet, Marieke

Met het kaartje doe ik graag mee met de volgende challenge's:

My Favorite Things - Sketch Challenge
My Favorite Things - Color Challenge

zondag 11 november 2018

November release and krafty hop!

Hello everyone!

And the day has come that the November Release by Kraftin' Kimmie stamps is available! Go quickly to the shop and make sure the buy all our new goodies!


As always the day after the release we are all showcasing all the stamps another time. This time around i decided to make another serie of Artist Trading Cards and this time i used the uber cute Perky Penguin set. I think the are so versatile!


Used products: Raspberry Rose, Mermaid Melody, Yummy Yellow, Lovely Lagoon, Purple Pansy and Wicked black hybrid ink, Scenery stencil (water), From the otter side, Holiday village, Die-Namics surf and turf, Die-Namics BB iceberg, 


The backgrounds are made using the five different colors of hybride ink. Then i used the basic stencil to make waves in the water. Mixed some opaque white with water and splattered it on the background. I stamped the stars from the perky Penguin and the holiday village set in the matching color


Stamped the the sentiments using Wicked Black and on the Lovely lagoon card i make some music-notes using a black fineliner. Die cut the "ice" and icebergs and colored them using my Copic markers.


Stamped all the penguins and the hearts using Wicked Black and colored them in using my Copic Markers. I then fussy cut them out en glued them onto the scene.

Don't forget to hop around all the gorgeous cards and projects of my teammates! 

Greets, Marieke

Met de kaartjes doe ik graag mee met de volgende challenge:

Simon Says Stamp Monday Challenge - Make your own background


zaterdag 10 november 2018

Krafty Peeks day 4: Krafy Love + a challenge

Hallo allemaal / Hello Everybody!

Good morning and welcome to Day Four of our November New Release Krafty Peeks at Kraftin' Kimmie Stamps!

Today we have an absolutely fun stamp, and the image could be your new friend in no time! It's called Krafty love!


Used products: Wicked black and Raspberry Rose ink, From the otter side, White embossing powder, enamel dots, Waffle Flower stamp (envelope and coffee), Altenew stamp (splatters) five different colors of cardstock.

First i decided which stamps i wanted on the pieces of cardstock. Then i stamped and heat embossed them and cut them out. On the bases card i spread out the pieces of cardstock and decided were i wanted the colorful pieces so i could heat emboss the splatters.


Then i out some enamel dots on the card. I stamped the girl and colored her in using my Copic Markers. Then i fussy cut here out and stamped the hearts using Raspberry Rose. Glued the girl on the card using 3-d tape.

Have a great day!

Greets, Marieke

Met het kaartje doe ik graag mee met de volgende challenge's:

vrijdag 9 november 2018

Krafty Peek day 3: Perky Penguins + a basic stencil.

Hello everybody,

Welcome to day three of November release by Kraftin' Kimmie stamps and today we are showcasing a super fun set called Perky Penguins, not only do we have this stamp we also are showcasing one more stencil!


Used products: Scenery Stencil, Mermaid melody, Bubbly blue and Mermaid Melody hybrid ink, From the otter side, Die-Namics stitched rectangle a2 stax, die- namics speech bubbles

Using the circles on the basic stencil and the Memaid Melody and Bubbly Blue ink i made the circles. I wanted the lighter ones to look like sky and added some snow and snowflakes. The bottom circles are representing water so are darker and i splattered them with the mermaid melody mixed with water.


Stamped the fish, the penguin, and the ice and colored it in with my Copic Markers, i replace the line of the fishing rot with some twine. Stamped the sentiment and die cut it using the speech bubble die. Fussy cut everything and glued them on to the card using 3-d tape.

Have a lovely day!

Greets, Marieke

Met het kaartje doe ik graag mee met de volgende challenge's:

Addicted to stamps - Anything Goes
Simon Says Monday challenge - Make your own background