vrijdag 28 april 2023

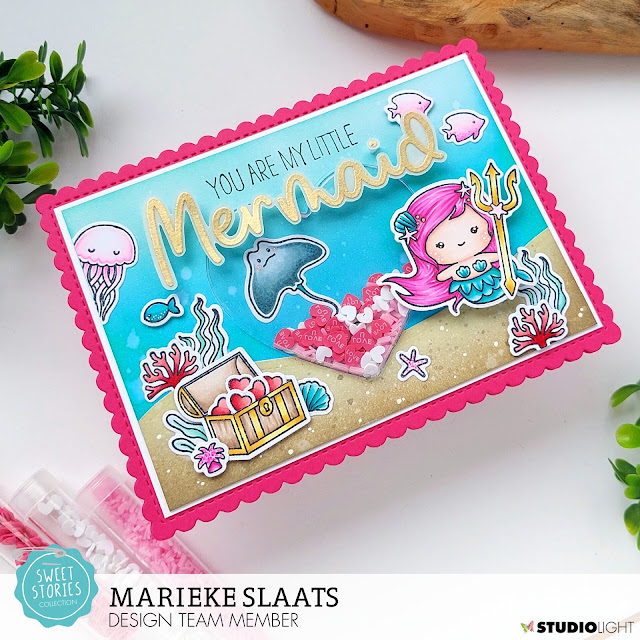
Studio Light - You Are My Little Mermaid

Hallo Allemaal,

Hier is mijn wekelijkse post voor Studio Light weer. Deze keer maakte ik met de nieuwste Sweet Stories producten een kaart. I'm back with my weekly post for Studio Light. This time around I decided on making a card using the newest Sweet Stories products.
De nieuwe release is vanaf vandaag te koop, ik kon het dan ook niet laten om er nog een gezellige kaart mee te maken. Ik inktblende de achtegrond met Cracked Pistahio, Peacock Feathers en Mermaid Lagoon. Spetterde water en inktblende het zand met Old Paper en Frayed Burlap. Stanste het uit en spetterde met water en Frayed Burlap.

The new release is as off today for sale! I could not resist creating another card using these fun images. I inkblended the background using Cracked Pistashio, Peacock Feathers and Mermaid Lagoon. Splattered some water and inkblended the sand using Old Paper and Frayed Burlap. Die cut the border and splattered some water and Frayed Burlap.
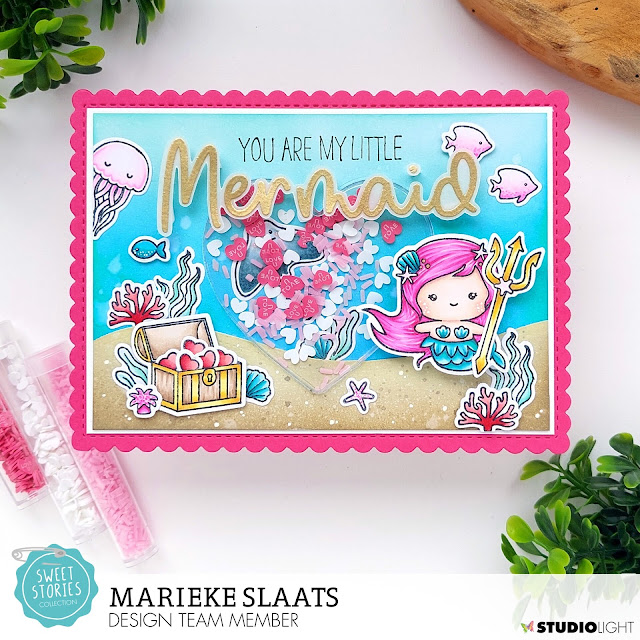
Stanste de achtergrond twee keer en rilde het op de tweede scallop. Plakte ze op elkaar. Sneed een rechthoek iets groter dan geinkte achtergrond en plakte dit op de kaart. Stanste het hart uit de achtergrond en plakte de blister aan de voorkant vast en het hart op de witte rechthoek.

Die cut the scalloped background twice and scored on of them on the second scallop. Glued them togethre and cut a white rectangle slightly larger then the inner rectangle. Die cut the heart out of the background and adhered the heart behind the inked panel and the die cut heart on the white background.
Stempelde alle afbeeldingen, kleurde ze in met mijn Copic markers en stanste ze uit met de bijpassende stansen. Plakte alles op de kaart, vulde de shaker en plakte het geheel dicht.

Stamped all the images, colored them up using my Copic markers and die cut them using the matching dies. Adhered everything on the card. Filled the shaker and closed the shaker by adhering everything on the base card.
Stempelde de tekst voordat ik de blister opplakte. Heat emboste de tekst op vellum en knipte dit uit. Plakte dit als laatste op de kaart. Stamped the sentiment before I adhered the blister behind the inked panel. Heat set the other sentiment on some vellum and cut it. Adhered the sentiment onto the card to finish it.

Gebruikte Copic Kleuren:
Zeemeermin - E000, E00, E04, E11, E21 / RV09, RV06, RV04, RV02 / BG18, BG15, BG13, BG11
Goud - Y28, Y17, Y11
Hout - E44, E43, E42, E41
Rood - R29, R35, R32
Groen - G02, G00, G000
Zacht roze - RV000, RV00, RV02, RV04
Hard Roze - RV09, RV06, RV04, RV02
Vis - BG09, BG07, BG05
Rog - BG78, BG75, BG72, BG70 / BG15, BG13, BG11

Heb een heerlijke dag!
Groet, Marieke

Papier: Smooth White, Poppin' Pink, Vellum
Extra: Goud embossingpoeder, SL-ES-BLISS05, Witte gelpen, SL-ES-SHAKE05 

donderdag 27 april 2023

Studio Light - Have an Otterly Great Birthday

Hallo Allemaal,

Hier is mijn wekelijkse post voor Studio Light weer. Deze keer maakte ik met de nieuwste Sweet Stories producten een kaart. I'm back with my weekly post for Studio Light. This time around I decided on making a card using the newest Sweet Stories products.
Deze kaart maakte ik voor de nieuwste tutorial van Studio Light. Onderaan het blog bericht kun je een (Engels talige) tutorial vinden hoe je deze kaart kunt maken. Veel kijk plezier!

This card I made especially for my tutorial for Studio Light. At the end of the blogpost there will be a (English) spoken tutorial on how to make this card. Have fun watching!
Gebruikte Copic Kleuren:
Hout - E37, E35, E33, E31
Touw - E44, E43, E42
Goud - E17, Y26, Y17, Y13
Wit - C5, C3, C1, C00, 0
Blauw - B28, B26, B24
Otters - W6, W4, W2, W1, W0 / C5, C3, C1, C00, 0 / R22, R20, R00 / N8, N6, N3
Fles - B02, B00, B000, 0
Oranje - YR04
Ballon - E44, E43, E42, E41, E40


Heb een heerlijke dag!
Groet, Marieke

Papier: SL-ES-PP71, Smooth White, Kraft, Woodgrain Light Brown (Lawn Fawn)
Extra: Wit embossingpoeder, SL-SS-MASK121, Witte gelpen

vrijdag 21 april 2023

Studio Light - Mermaid Kisses

Hallo Allemaal,

Hier is mijn wekelijkse post voor Studio Light weer. Deze keer maakte ik met de nieuwste Sweet Stories producten een kaart. I'm back with my weekly post for Studio Light. This time around I decided on making a card using the newest Sweet Stories products.
Zoals altijd inktblende ik eerst de achtergrond, ditmaal met Wilted Violet en Shaded Lilac. Spetterde water en Wilted Violet gemend met water. Inktblende de "shaduw" en planten met Wilted Violet en het stencil. Op een stuk wit cardstock inktblende ik Old Paper en Frayed Burlap, spetterde water en Frayed Burlap gemengd met water en stanste het uit.

As usual I inkblended the background first, this time I used Wilted Violet and Shaded Lilac. Splattered some water and Wilted Violet mixed with water. Inkblended the "border shadow" and plants using the mask and Wilted Violet. On some white cardstock I inkblended Old Paper and Frayed Burlap, splattered some water and Frayed Burlap mixed with water and die cut it.
Stanste alle onderdelen van de schelp en onderwater planten uit verschillende kleuren paars en roze cardstock. Inkte de bovenkant van de schelp met Worn Lipstick en deed er ook nog wat roze glitters op. Stanste de parel uit Copic papier en kleurde deze zodat het wat meer op een parel lijkt. Plakte alles in elkaar en op de kaart en bracht wat witte gelpen details aan.

Die cut all the elements of the seashell and the underwater plants out of different colors of purple and pink cardstock. Inkblended the toppart of the shell using Worn Lipstick and also added some pink glitter. Die cut the pearl out of Copic paper and colored it so it looked like a more realistic pearl. Adhered everything together and added it onto the card. Finished the die cuts off adding some white gelpen details.
Stempelde de afbeelding, kleurde hem in met Copic markers en plakte deze op de kaart. Heat emboste en stempelde de teksten, knipte en stanste deze uit en plakte ze op de kaart. Stamped the image, colored it up using my Copic markers and adhered it onto the card. Heat set and stamped the sentiments. Die cut and cut them by hand and adhered them onto the card.

Gebruikte Copic Kleuren:
Parel - BG13, BG11, BG10, BG00, 0
Zeemeermin - BG18, BG15, BG13, BG11 / V17, V15, V12 / E000, E00, E04, E11, E21 / R20 /  E44, E43, E42, E41 / BV04, BV02, BV00 / R85, R81

Heb een heerlijke dag!
Groet, Marieke

Papier: Smooth White, Grapesicle, Grape Jelly, SL-ES-PP70, SL-ES-PP69
Extra: Goud embossingpoeder, SL-SS-MASK202, Witte gelpen

vrijdag 14 april 2023

Studio Light - Ahoy Sailor

Hallo Allemaal,

Hier is mijn wekelijkse post voor Studio Light weer. Deze keer maakte ik met de nieuwste Sweet Stories producten een shaker kaart. I'm back with my weekly post for Studio Light. This time around I decided on making a shaker card using the newest Sweet Stories products.
Inktblende de achtergrond met Vintage Photo. Inktblende daarna Ground Espresso met de mask, inktblende de zijkanten met Ground Espresso en spetterde water. Stanste de cirkel uit de rechthoek en plakte hier de blister achter. Sneed een vierkant en inkblende hier Salty Ocean en Blueprint Sketch op.

Inkblended the background using Vintage Photo. Inkblended the woodgrain pattern using a mask and Ground Espresso, inked up the sides using Ground Espresso and splattered some water. Die cut the circle out of the inked panel and adhered the blister behind it. Cut a square and inkblended some Salty Ocean and Blueprint Sketch.
Legde de geinkte achtergrond tijdelijk op een witte basiskaart, traceerde de cirkel met een potlood en plakte hier het ge-inkte blauwe vierkant op. Stempelde alle afbeeldingen, kleurde ze in met mijn Copic markers en stanste ze uit met de bijpassende stansen. Plakte de afbeeldigen op de blauwe achtergrond. Vulde de shaker en plakte het geheel dicht.

Temporarly added the the inked background onto a white basecard and traced the circle adhered the blue square onto it. Stamped all the images, colored them up using my Copic markers and cut the using the matching dies. Adhered the images onto the blue square. Filled the shaker using sequins and closed it.
Stanste het frame van de patrijspoort, plakte dit op de voorkant en werkte dit af met parels. Heat emboste de tekst en stempelde de andere tekst. Knipte of stanste ze uit en plakte ze op de kaart. Plakte als laatste de afbeeldingen op de kaart. Die cut the frame off the porthole die, adhered it to the front and finished it off adding some pearls. Heat set and stamped the sentiments. Die cut or cut them by hand and adhered them onto the card. Finished the card off adding the front images.

Gebruikte Copic Kleuren:
Otters - W8, W6, W4, W3, W1, W00, 0 / R22, R20 / N7, N5, N3
Hout - E37, E35, E33, E31, E30
Goud - E27, Y26, Y15, Y11
Wit - C5, C3, c1, C00, 0
Blauw - B28, B26, B24

Heb een heerlijke dag!
Groet, Marieke

Stempels: SL-SS-SCD57, SL-SS-SCD58, SL-SS-STAMP441, SL-SS-STAMP442
Stansen: SL-SS-SCD57, SL-SS-SCD58, SL-SS-CD530
Papier: Smooth White, Black Licorice
Extra: Wit embossingpoeder, SL-ES-MASK155, SL-ES-BLISS08, SL-ES-SHAKE07, JMA-ES-PEARL22

dinsdag 11 april 2023

My Favorite Things - April Product Launch

Hello all,

It’s time for the My Favorite Things April product launch! All new products are available right now! The MFT design team is sharing projects created with the new stuff. You can find loads of inspiration! Het is tijd voor de My Favorite Things april product lancering. Alle nieuwe producten zijn vanaf nu verkrijgbaar! Het MFT design team deelt ook vandaag weer een lading aan inspiratie.
And what are you buying? For more inspiration I decided on making a trio of cards using the Fresh Foliage together with the Word Bouquet stamp to create some rainbow wreaths.

at is er in jouw mandje beland? Voor meer inspiratie maakte ik een trio van kaarten met de Fresh Foliage samen met de Word Bouquet stempel en maakte er regenboog kransen mee.
For all three cards I cut a 4 x4 inch Smooth White square. Using the Gina K. Designs Wreath Builder Templates I created a wreath using a different leave and the colors Cotton Candy, Poppin' Pink, Orange Zest, Lemon Drop, Limelight, Summersplash, Tropical Teal and Grape Jelly.

Voor alle drie de kaart sneed ik een Smooth White vierkant van 4 x 4 inch. Met de Gina K. Designs Wreath Builder Templates maakte ik kransen met verschillende bladeren uit de stempelset en de kleuren Cotton Candy, Poppin' Pink, Orange Zest, Lemon Drop, Limelight, Summersplash, Tropical Teal and Grape Jelly.
In the middle of all cards I stamped a sentiment out of the Word Bouquet stamp using a black ink. Adhered the white rectangle onto a 4 1/2 x 41/2 inch topfold Cement Gray cardbase using foam tape.

In het midden van alle kaarten stempelde ik een tekst uit de Word Bouquet stempel met zwarte inkt. Plakte de rechthoeken op een 4 1/2 x 4 1/2 inch topfold Cement Gray basiskaart met foamtape.
Topped all three cards off using different embellishments; enamel dots, rhinestones and sequins. Werkte alle drie de kaarten af met verschillende embellishments; enemal dots, rhinstones en sequins.

If you need to be even more inspired after this post make sure to have a look over at My Favorite Things Youtube ChannelWanneer je na deze post nog wat meer ideeen nodig heb neem dan even een kijkje op het Youtube kanaal van My Favorite Things.

Have a wonderful Day!
Greets, Marieke

maandag 10 april 2023

My Favorite Things April Release Countdown Day 1

Hello all,

Today is the last day of the April release countdown of My Favorite Things and you know what that means right? Tommorow all the new products will be avaible! Did you decide on what you are going to get? Luckly you have one more night to think about it! Vandaag is de laatste dag van de april release countdown van My Favorite Things en je weet wat dat betekend! Morgen zullen alle nieuwe producten beschikbaar zijn. Heb je al besloten wat je zou willen hebben? Gelukkig kun je er nog een dag over nadenken!
For today we have another add-on for the Money Card Die-Namics. This time around it's all about the movies. The Movie Night stamp and Movie Icons Die-Namics are a perfect fit for that.
Voor vaandaag hebben we een weer een nieuwe add-on voor de Money Card Die-Namics. Deze keer draait het allemaal om een bioscoop avondje. De Movie Night stempel en Movie Icons Die-Namics zijn er perfect voor gemaakt.
Cut the Money Card Die-Namics out of white cardstock and inkblended some Barn Door using the Radiating Rays stencil. Cut a black and white rectangle and chopped of the corners using a corner chopper. Die cut the Gift Card Pocket Die-Namics out of red cardstock and adhered all the elements on the card. Stanste de Money Card Die-Namics uit wit cardstock en inktblende Barn Door met de Radiating Rays stencil. Sneed een witte en zwarte rechthoek en knipte de hoeken met een corner chopper. Stanste de Gift Card Pocket Die-Namics uit rood cardstock en plakte alles op de kaart.

Stamped the small sentiment directly onto the card. Stamped the large sentiment using red and black ink and die cut it using the inner die of the Gift Card Pocket Die-Namics. Added a black cardstock behind it before I glued it onto the pocket. Stempelde de tekst rechtstreeks op de kaart. Stempelde de grote tekst met rode en zwarte inkt op wit cardstock en stanste het daarna uit met de binnenste stans van de Gift Card Pocket Die-Namics. Plakte er een stuk zwart cardstock achter en daarna ging het op de pocket zelf.
Die cut all the elements using the Movie Icons Die-Namics and different colors of cardstock. Inked up the popcorn and the cup and finished it off adding some glossy accent to the glasses. Stanste alle elementen uit de Movie Icons Die-Namics en verschillende kleuren cardstock. Beinkte de popcorn en de beker en werkte als laatste de bril af met wat glossy accent.

If you need to be even more inspired after this post make sure to have a look over at My Favorite Things Youtube Channel
Wanneer je na deze post nog wat meer ideeen nodig heb neem dan even een kijkje op het Youtube kanaal van My Favorite Things.

Have a wonderful Day!
Greets, Marieke

zondag 9 april 2023

My Favorite Things April Release Countdown Day 2

 Hello all!

The release day of the April release by My Favorite Things is getting closer! It's still packed full of new stuff so make sure you don't miss anything. Hop over to the blog of My Favorite Things and hop along all the blogs of the Designteam members to see the full reveal! De dag dat de My Favorite Things april release verkrijgbaar is komt dichter bij! We hebben nog steeds super leuke nieuwe dingen om aan jullie te laten zien, dus ga naar de hoofdpagina van My Favorite Things en hop langs alle blogs of social media kanalen van de Design team leden voor nog mee inspiratie!
Today we have the cutest Critter pots! If you love plants and critters this is the must go set for you! The Potted Pets Die-Namics goes together with the matching Grow Together stamp.

Vandaag hebben we de schattigste potten ooit! Als je planten en dieren leuk vind dan is dit de set voor jou! De Potted Pets Die-Namics gaat perfect met de bijpassende Grow Together stempel.
For my card I inked up a panel using Dried Marigold, Abondoned Coral en Picked Raspberry. Used the same colors together with the Ray of Light Stencil and splattered some water and white paint. Cut a strip of black and black & white pattern paper and adhered them together on a Smooth White topfold basecard.

Voor mijn kaart inkte ik een rechthoek met Dried Marigold, Abondoned Coral en Picked Raspberry. Gebruikte dezelfde kleuren inkt en het Ray of Light stencil. Spetterde daarna water en witte verf. Sneed een strip zwart cardstock en black & white designpapier. Plakte dit op elkaar en het geheel ging op een Smooth White basiskaart.
Die cut the plants and all the elements of the pots. Inked them up and added some details usnig a white gelpen. Adhered them together and onto the card. Heat set the sentiment and finished the card of adding some clear sequins. Stanste de planten en alle elementen van de potten. Beinkte ze en voegde wat details toe met een witte gelpen. Plakte alles op en in elkaar en op de kaart. Heat emboste de tekst en werkte de kaart af met wat doorzichtige sequins.

If you need to be even more inspired after this post make sure to have a look over at My Favorite Things Youtube ChannelWanneer je na deze post nog wat meer ideeën nodig heb neem dan even een kijkje op het Youtube kanaal van My Favorite Things.

Have a wonderful day!
Greets, Marieke

zaterdag 8 april 2023

My Favorite Things April Release Countdown Day 3

 Hello all,

Welcome to day three of the April release countdown by My Favorite Things, we are halfway there! So hop along for more beautiful inspiration by the team. Welkom bij dag drie van de april release countdown van My Favorite Things, we zijn halverwege! Hop gezellig mee langs alle design team leden voor meer inspiratie.
I'm so excited to see some Hot Foil dies being released again! For my Inspiration card I used the Hot Foil Double Hexagon Frames Die-Namics together with the Flowers & Fillers Die-Namics, topped of with a sentiment using the Word Bouquet.

Ja! Ik vind het zo leuk om te zien dat er nieuwe Hot Foil stansen gereleased worden. Voor mijn inspiratie kaart gebruikte ik de Hot Foil Double Hexagon Frames Die-Namics samen met de Flowers & Fillers Die-Namics en afgewerkt met een tekst uit de Word Bouquet.
Using a golden foil, I hot foiled the Hexagon onto a Smooth White piece of cardstock. Die cut it using the A2 Stitched Rectangle STAX Die-Namics 1. Heat set the sentiment out of the Word Bouquet using gold embossing powder. Cut a topfold Smooth White base card and adhered a panel of pattern paper out of the Springing for Houndstooth paperpad.

Met gouden folie, hot foiled ik the hexagon op een stuk Smooth White cardstock. Stanste het geheel uit met de A2 Stitched Rectangle STAX Die-Namics 1. Heat emboste de tekst uit Word Bouquet met goud embossing poeder. Sneed een Smooth White topfold basiskaart en plakte hier een stuk designpapier uit het Sprining for Houndstooth paperpad.
Die cut the flowers using Ripe Raspberry, Cotton Candy, Princess Pink, Sour Apple, Lemon Drop and Candied Yam cardstock. Adhered it together and onto the card. Added some white gelpen details to the orange cardstock. Stanste de bloemen met Ripe Raspberry, Cotton Candy, Princess Pink, Sour Apple, Lemon Drop en Candied Yam cardstock. Plakte alles in elkaar en op de kaart. Bracht wat witte gelpen details aan op het oranje cardstock.

If you need to be even more inspired after this post make sure to have a look over at My Favorite Things Youtube ChannelWanneer je na deze post nog wat meer ideeën nodig heb neem dan even een kijkje op het Youtube kanaal van My Favorite Things.

Have a wonderful day!
Greets, Marieke

vrijdag 7 april 2023

My Favorite Things April Release Countdown Day 4

 Hello all,

One day closer to the March release by My Favorite Things! Only four more days to go until the new release will be avaible! Dag 4 van de My Favorite Things maart release countdown is hier, dat betekend dat het nu nog maar vier dagen duurt voordat de nieuwe release verkrijgbaar is!
Today is all about being grateful for something if that is a friend, love or the faith in God. I decided on creating a card using the In My Prayers together with the Twice Blessed Die-Namics. 

Vandaag staat in het thema om ergens dankbaar voor te zijn, of dit nu een vriend is, liefde of je geloof in God. Ik maakte ditmaal een kaart met de In My Prayers samen met de Twice Blessed Die-Namics
Cut a Princess Pink Rectangle and stamped the Best Friend Background onto it using the Princess Pink ink. Masked of the top part and inked up some Princess Pink so the images will be "grounded" later. Sneed een Princess Pink rechthoek en stempelde hier de Best Friend Achtergrond stempel op met Princess Pink inkt. Maskeerde de bovenzijde en inkte wat Princess Pink zodat de afbeeldingen later "gegrond" kunnen worden.

Die cut one of the Twiced Blessed Die-Namics three times out of white cardstock, once out of gold cardstock and adhered them together. Stamped the sentiment out ot the Blessings onto the background and adhered the panel onto a topfold Smooth White base card. Stanste één van de Twice Blessed Die-Namics drie keer uit wit cardstock, een keer uit goud cardstock en plakte ze op elkaar. Stempelde de tekst uit de Blessings op de achtergrond en plakte het geheel op een Smooth White basiskaart.
Stamped the images, colored them up using my Copic markers and die cut them using the In My Prayers Die-Namics. Adhered them onto the card using foam tape and finsihed off the card by adding the blessed die cut. Stempelde de afbeeldingen, kleurde ze in met mijn Copic markers en stanste ze uit met de In My Prayers Die-Namics. Plakte ze op de kaart met foam tape en werkte de kaart af door de gestanste blessed op de kaart te plakken.

Used Copic Colors:
Skin - E000, E00, E04, E11, E21
Hair Girl - E44, E43, E42, E40
Hair Boy - E37, E35, E33, E31
Pink - R85, R83, R81, R20, R00
Blue - B97, B95, B93, B91
Dog - E57, E55, E53, E51, E50 / N6, N4, N3 / R27, R24, R22
Cat - C6, C4, C2, C0, C00 / R20, R00, R000

If you need to be even more inspired after this post make sure to have a look over at My Favorite Things Youtube ChannelWanneer je na deze post nog wat meer ideeën nodig heb neem dan even een kijkje op het Youtube kanaal van My Favorite Things.

Have a wonderful day!
Greets, Marieke