Posts tonen met het label Create a Smile. Alle posts tonen

vrijdag 6 juni 2025

Carlijn Design - ATC Swap

Hallo allemaal,

Afgelopen maand deed ik mee met de Carlijn Design ATC swap. Het thema was regenboog en ik maakte deze serie ATC kaarten. Last month there was a ATC swap over at Carlijn Design. The theme was rainbow and this is the series of cards I made.

Gebruikte Copic Kleuren:
Unicorn - E53, E51, E50, 0 / R20 / W5, W3, W1
Pink Top Left - RV17, RV14, RV13, RV11
Pink Bottom Left - RV06, Rv04, Rv02
Pink Top Right - RV29, RV27, RV25
Pink Bottom Right - R85, R83, R81

Heb een heerlijke dag!
Groet, Marieke

Stempels: Miss Sparkles
Stansen: Miss Sparkles, ATC Rechthoeken, Hallo Herfst, End of the Rainbow Die-Namics
Inkt: Memento Tuxedo Black, Unicorn White
Papier: Wit, Gold Sparkle, SL-PP-155
Extra: Goud Glitterlijm, Boho Stencil (Create a Smile)

maandag 14 april 2025

Pasen - ATC Swap

Hallo allemaal,

Afgelopen maand deed ik weer mee met een Facebook ATC swap. Het thema was pasen en ik maakte deze serie ATC kaarten. Last month there was a ATC swap on a Facebook group. The theme was Easter and this is the series of cards I made.

Gebruikte Copic Kleuren:
Chick - Y17, Y15, Y13, Y11
Ears - E53, E51, E50/ R22, R20, R00

Heb een heerlijke dag!
Groet, Marieke

Stempels: Joyful Easter (Create a Smile Stamps), Distressed Patterns (MFT)
Stansen: Itty Bitty Strips Die-Namics, Pocket letter die PL6501 Marianne Design
Inkt: Memento Tuxedo Black, Versamark Watermarkt ink, Limelight, Grapsicle, Summer Splash, Cotton Candy (MFT), Weathered Wood Distress inkt.
Papier: Wit, Grapsicle, Raspberry, Limelight, Summer Splash, CCL-FR-PP83
Extra: Wit Embossing Poeder, Rhinestones, English Brick Wall Stencil (MFT)

zondag 4 februari 2024

Studio Light - Leuke "kerst" Post

Hallo Allemaal,

Hier is mijn wekelijkse post voor Studio Light weer. Deze keer maakte ik met de Sweet Stories producten een hele speciale kerstkaart. Voor mijn beste vriendin maakte ik als kerstkaart onderstaande kaart en wel met een hele bijzondere reden; wij verwachten namelijk een kindje! Toen ik deze kaart maakte wisten we het nog maar net, daarom maakte ik als verassing voor haar deze kaart. 
De basis is een witte topfold kaart, ik beplakte deze met 1/4 inch strips van rood, groen en wit cardstock. Stanste de rechthoek en beinkte dit met inkt. Bewerkte het daarna met een stencil en stanste het sneeuw uit.
Maakte zelf de postzegel uit wit cardstock en bestempelde het met rode en groene inkt. Plakte het op de achtergrond en stempelde de andere stempels. Heat emboste de tekst op groen cardstock en stanste het uit. Stempelde de andere tekst op wit cardstock en het sneeuw. Stanste de rode tekst uit en plakte het op de kaart.
Stempelde alle afbeeldingen, kleurde ze in met mijn Copic markers en stanste ze uit met de bijpassende stansen of knipte ze uit. 

Gebruikte Copic Kleuren:
Rendier - E57, E55, E53, E51, E50 / E47, E44, E43, E42 / N8, N6 / R20, R00
Rood - R59, R39, R37, R29, R27, R24
Goud - E27, Y26, Y15, Y13
Groen - G99, G94, G21
Hout - E37, E35, E33, E31

Heb een heerlijke dag!
Groet, Marieke

Stempels: SL-SS-SCD55, Leuke Post, Baby Onderweg, Knuffel (Carlijn Design)
Stansen: SL-SS-SCD55, SL-SS-CD459, 
Inkt: Memento Tuxedo BlackVersamark Watermark inkt, Kraft, Jellybean Green, Red Hot, Versafine Onyx Black
Papier: Smooth White, Jellybean Green, Red Hot, Naturel

maandag 6 november 2023

Carlijn Design - ATC Swap

Hallo allemaal,

Afgelopen maand deed ik mee met de Carlijn Design ATC swap. Het thema was bloemen en ik maakte deze serie ATC kaarten. Last month there was a ATC swap over at Carlijn Design. The theme was Flowers and this is the series of cards I made.

Gebruikte Copic Kleuren:
Roze Bloemen - RV14, RV13, RV11, RV10
Bloemknopen - E19, YR18, Y38, Y15, Y13, Y11
Bijen - Y17, Y15, Y13 / B02, B00, B000, 0
Groen - G28, G07, YG05, YG01

Heb een heerlijke dag!
Groet, Marieke

Stempels: Good Day (Create a Smile), SL-SS-SCD55 (Studio Light), Bloementje (Carlijn Design)
Stansen: SL-SS-SCD55 (Studio Light), Bloementje, ATC Rechthoeken (Carlijn Design), Itty Bitty Strips Die-Namics (MFT)
Inkt: Memento Tuxedo Black, Versamark Watermark Inkt, Cracked Pistashio en Peacock Feathers Distress inkt, Lemon Drop
Papier: Smooth White, Lemon Drop, Black Licorice (MFT)
Extra: Wit Embossing Poeder

zaterdag 9 september 2023

Jullie passen BIJ-zonder goed bij elkaar.

Hallo allemaal,

Vandaag een kaart die ik maakte op bestelling. Mijn collega haar zus is getrouwd en vroeg mij of ik twee kaarten wilde maken. Eén voor hen zelf en één namens de kinderen van haar zus. Vandaag laat ik de kaart zien die ik voor hen maakte. Morgen is de andere kaart te zien! Today I show you a card that I made on commision. My colleague her sister is married and she asked me to create two cards. One for themselfs and one for the childeren of the happy couple. Today I will show you the card I made for them, tommorow I will show you the other one.
Het is een grote dubbele kaart geworden, 14 x 18,5. Sneed een gele rechthoek 13,5 x 18 en een rechthoek van aquarel papier van 13 x 17,5. Inktblende dit met Scattered Straw, Cracked Pistashio en Peacock Feathers. Stanste de Magic Iris Add-on en beinkte dit met Scattered Straw en Cracked Pistashio. Bespetterde beide met water en witte verf.

It's a large card 14 x 18,5. Cut a yellow rectangle 13,5 x 18 and a watercolor rectangle 13 x 17,5. Inkblended it using Scattered Straw, Cracked Pistashio and Peacock Feathers. Die cut the Magic Iris Add-on and inked it up using Scattered Straw and Cracked Pistashio. Splattered water and white paint.
Stanste twee verschillende gras borders en beinkte dit met Mowed Lawn en Rustic Wilderness. Met Ground Espresso en Vintage Photo maakte ik het zand en stanste dit uit. Plakte het tijdelijk op elkaar en knipte de cirkel en het slider gedeelte af. Die cut two different borders of grass inked them up using Mowed Lawn and Rustic Wilderness. Using Ground Espresso and Vintage Photo I made the sand, die cut the border. Temporarly added it to the Magic Iris Add-on and cut the pull tape and circle out of it.

Stanste een stuk Kraft cardstock met de Stitched Woodgrain Background, stanste het daarna met de Magic Iris Birdhouse. In plaats van een vogelhuis was het mijn opzet om een bijenkorf te maken. Sneed het daarom in stroken en beinkte het met Walnut Stain Distress inkt. Plakte het weer in elkaar, en stanste het dak en het huis nogmaals uit kraft cardstock. Sneed de onderkant van het huis, beinkte het dak en de onkerkant en plakte het op het huis. Die cut a piece of Kraft cardstock using the Stitched Woodgrain Backdrop, die cut it afterwards using the Magic Iris Birdhouse. Instead of making it a birdhouse my intention was to create a beehive. So I cut the house in strips and inked it up using Walnut Stain. Die cut the rough and the house again out of Kraft. Trimmed the bottom piece and inked both up before glueing them together. 
Stempelde of heat emboste de teksten. Stanste ze uit met de Itty Bitty Strips Die-Namics. Stanste het woord "bij" uit geel cardstock. Beinkte een stuk cardstock met Squeezed Lemonade en Wild Honey en printe daarna de namen en de datum. Stanste het uit met de cirkel stans en stempelde de ringen.

Stamped and heat set the sentiments, die cut them using the Itty Bitty Strips Die-Namics. Die cut the word "bee" out of yellow cardstock. Inked up a piece of watercolor paper using Squeezed Lemonade and Wild Honey, print the names and date on to it and die cut it using the circle die. Stamped the rings on the circle.
Stempelde of stanste alle onderdelen, kleurde ze in met mijn Copic markers en stanste of knipte ze uit. Maakte het Magic Iris mechanisme en plakte het op de voorzijde. Plakte daarna alle onderdelen op de kaart. Stamped or cut all the elements, colored them up using my Copic markers and cut them using the matching dies or my scicors. Assembled the Magic Iris mechanisme and adhered it to the front of the card. Adhered all the elements last.

Gebruikte Copic Kleuren:
Blauwe Bloemen - BG15, BG13, BG11, BG10
Roze Bloemen - RV14, RV13, RV11, RV10
Bloemknopen - E19, YR18, Y38, Y15, Y13, Y11
Bijen - Y17, Y15, Y13, Y11 / N8, N6, N4, N2 / B02, B00, B000, B0000, 0
Zwart - N8, N6, N4, N2
Hout - E37, E35, E33, E31
Groen - G28, G07, YG05, YG01
Steen / wit - C5, C3, C1, C00, 0
Slak - C5, C3, C1, C00, 0 / E44, E43, E42, E41
Worm - E04, E11, E21, E00

Heb een heerlijke dag!
Groet, Marieke

Stempels: Bicycle Built for You (Lawn Fawn), Avocado & Peer, Valentijn, Huwelijk (Carlijn Design), SL-SS-SCD50SL-SS-SCD52SL-SS-SCD55SL-SS-SCD37 (Studio Light), Snail Mail (Sunny Studio Stamps), Good Day (Create a Smile Stamps) 
Stansen: Tall Grass, Stitched Snow Drifts, Modern Serif Alphabet, Grassy Fields (My Favorite Things), Bicycle Built for You, Magic Iris, Magic Iris Add-on, Magic Iris Birhouse Add-on, Stitched Woodgrain Backdrop (Lawn Fawn), SL-SS-SCD50SL-SS-SCD52SL-SS-SCD55SL-SS-SCD37 (Studio Light), Snail Mail (Sunny Studio Stamps)
Papier: Smooth White, Lemon Drop, Kraft, Limelight, Black Licorice (My Favorite Things)

woensdag 11 januari 2023

Create a Smile Stamps - Guestdesigner

Hello all,

Today i'm pleased to be guestdesigning for the Create a Smile Stamps challenge blog. Two weeks ago i was picked as a winner and i was asked to be a guest designer for this challenge. I always say yes so did I for this one. Vandaag mag ik guestdesigner zijn voor Create a Smile Stamps challenge blog. Twee weken geleden was ik als winnaar uitgekozen en werd ik gevraagd als gastdesigner. Ik zeg nooit nee dus ook deze keer niet.
This week we challenge you to create a card with a sketch. You have to use atleast one Create a Smile product as a focal point and you can play along! If you do not own anything you can always try to create something with one of there Freebies.

Deze week dagen we je uit om een project te maken met bovenstaande schets. Je kunt meedoen zolang je er maar voor zorgt dat een Create a Smile product de hoofdrol heeft. Ben je nu nog niet in het bezit van een van deze leuke producten dan kun je altijd kijken of je iets kunt maken met een van deze Freebies.
For this challenge a cut a white base card and adhered some yellow pattern paper onto it. Cut a white rectangle and chopped off the cornors. Die cut a small banner out off black & white striped pattern paper and adhered that behind the white rectangle. Added the panel with foamtape onto the base card.

Voor deze challenge sneed ik een witte basiskaart en plakte hier geel designpapier op. Sneed een witte rechthoek en chopte hier de hoeken vanaf. Sneed een banner uit het black & white gestreepte designpapier en plakte dit achter de rechthoek. Het geheel ging met foamtape op de basiskaart.
Stamped, colored and cut the images. Heat set the sentiment on some black cardstock and trimmed it to a small banner. Adhered everything onto the card using different heights of foam tape. Stempelde, kleurde en knipte de afbeeldingen. Heat emboste de tekst op zwart cardstock en sneed het tot een banner. Plakte alles op de kaart met verschillende hoogte foamtape.

Used Copic Colors:
lama - W5, W3, W1, W00 / E000, E00, E04, E11, E21
Red - R59, R29, R24
Blue - B28, B26, B24, B23, B21
Yellow - Y17, Y15, Y13, Y11, Y00
Orange - YR07, YR04, YR02
White - C5, C3, C1
Green - YG67, YG63, YG03, YG01

Have a wonderful day!
Greets, Marieke

Stamps: Llamazing, Crazy Chicks (Create a Smile), Bitty Birthday Wishes (MFT)
Dies: Skinny Strips Die-Namics, Bleuprints 27 (MFT)
Ink: Memento Tuxedo Black, Tsukineko Versamark.
Paper: Smooth White, Black Licorice, Black & White Striped Paper Pad, Happy Trails Paper Pad.
Extra: White embossing powder.

zondag 18 december 2022

Santa made it Just in time

Hallo allemaal,

Het is alweer even geleden dat ik een kaart postte die ik maakte zonder dat het voor een DT opdracht was. Vandaag heb ik er dus eentje die ik maakte voor de laatste Create a Smile Challenge. It's been a while that I posted a card that I made a card that was not for DT purpose. So here it is! I made a card for the current Create a Smile Challenge.
Ik sneed een vierkant en plakte hier witte, rode en blauwe stroken cardstock op. Sneed een Stuk natural cardstock en inktblende hier de enveloppen op met Natural en Kraft inkt. Stanste het daarna in vier vierkanten.

Cut a square and added some white, red and blue 1/4 inch strips of cardstock. Cut a piece of Naturel cardstock inkblended the enveloppes onto them using Naturel and Kraft ink. Cut it into four pieces. Die cut the border of the squares.
Stempelde hier en daar wat teksten van Carlijn en Pawsome Stamps en besloot toen om de verlichting van de motor van echt licht te voorzien. Stempelde daarom de tekst rechts onderin en plakte daar de schakelaar. Plakte de vierkanten op en zorgde dat de draad aan de bovenzijde uitkwam.

Stamped some sentiments in black and brown ink and decided I wanted the light on the bike to actually light up. So I stamped the sentiment in the corner and adhered the switch there. Glued the square onto the card and made sure the wire were free to move.
Sneed de ster en maakte hier een gaatje in aan de zijde van de moter. Haalde hier de lichtdraden doorheen en plakte de ster op de kaart. Stempelde de afbeelding, kleurde ze in met mijn Copic markers en knipte ze uit. Prikte drie gaatjes in de lamp en plakte de lampjes aan de achterzijde en werkte de draden weg. Plakte de afbeelding op de kaart.

Cut the star and added a small hole on the left side of the star. Pulled the wires true the hole and adhered the star. Stamped the images, colored them up and cut them using my sciccors. Cut three small holes in the lights and adhered the actuall light behind it. Adhered the image and the wires onto the card.
Heat emboste de andere teksten op rood cardstock. Knipte de ene uit en stanste de andere tot een tekstbubbel. Werkte de kaart af door wat glossy accent op de motorbrillen en de lamp te doen. Heat set the other sentiments on some red cardstock. Cut one by hand and the other I die cut into a speech bubble. Finished off the card adding some Glossy Accent onto the goggles and the lamp.

Gebruikte Copic kleuren;
Blauw - B39, B37, B34
Rood - R59, R39, R29, R27, R24
Wit / zilver - C5, C3, C1, C00 , 0
Rendier - E59, E57, E55, E53, E51, E50 / E44, E43, E41
Zwart - N9, N7, N5, N3
Geel - Y17, Y15, Y13, Y11
Helm / handvatten - E27, E25, E23, E21
Huid - E000, E00, E04, E11, E21
Mond - R24, R22, R20

Heb een heerlijke dag!
Groet, Marieke

dinsdag 14 juni 2022

Studio Light - Warm Winter Wishes

Hallo Allemaal,

Hier is mijn wekelijkse post voor Studio Light weer. Aangezien ik wat achter loop in mijn kerstkaaten, besloot ik met de sneeuwmannen en slimline kaart te maken. I'm back with my weekly post for Studio Light. As I'm behind on my Christmas cards I figured it would be fun to create a Christmas card using the snowman.
Inkblende de kleuren Shaded Lilac en Blueprint Sketch Distress Oxide ink. Gebruikte een sneeuwvlokken stencil en inktblende nogmaals Blueprint Sketch. Spetterde water en witte verf en stanste het uit. Inkblended some Shaded Lilac and Blueprint Sketch Distress Oxide ink. Using a snowflake stencil and Bleuprint Sketch I inkblended the snowflakes. Splattered some water en white paint and die cut the rectangle.

Stanste de koffiebekers uit twee verschillende kleuren paars, inktblende de één met met Shaded Lilac de ander met witte inkt. Stempelde met de bijpassende kleuren inkt de sneeuwvlokken op de mokken. Stanste de chocolde, marshmallows en slagroom uit. Stippelde wat "cacoa" op de slagroom en plakte ze in elkaar. Die cut the coffeecups out 2 different colors of purple, inkblended one using Shaded Lilac the other I inkblended with white ink. Stamped the snowflakes in the matching colors onto the mugs. Die cut the chocolate, marshmallows and whiped cream and added some "cacoa" on the whiped cream. Glued everything together.
Stempelde alle afbeeldingen, stempelde de sneeuwman en sjaal met de spiegeltechniek. Kleurde alle afbeeldingen in met mijn Copic markers en stanste of knipte ze uit. Plakte ze in elkaar.

Stamped all the images, the snowman and scraf I also stamped using the mirror technique. Colored up all the images using my Copic markers and cut the using the matching dies or my sciccors. Glued the all the parts together.
Stempelde de teksten op wit cardstock, stanste de kleine teksten uit en knipte de wishes met de hand. Plakte alles op rechthoek en deze ging op een topfold witte basiskaart. Werkte de kaart af met verschillende maten sequins. Stamped all the sentiments on white cardstock. Die cut the small sentiments and cut the large one using my sciccors. Adhered everything on the rectangle and that went on a topfold white basecard.Finished off the card adding different seizes of sequins.

Gebruikte Copic Kleuren:
Wit - C4, C3, C2, C1, C00, 0
Oranje - YR09, YR04, YR02
Zwart - N8, N6, N4, N3
Bruin - E47, E44, E43, E42
Licht paars - V17, V15, V12, V91
Donker Paars - BV17, BV04, BV13, BV02
Heb een heerlijke dag!
Groet, Marieke

Stempels: SS SCD19, SS STAMP162, ES-STAMP96
Stansen: SS SCD19, SS CD206,
Inkt: Memento Tuxedo Black, versafine onix black, Shaded Lilac, Bleuprint Sketch Distress Oxide inkt, Witte inkt. Grapesicle, Bleuberry.
Papier: Smooth White, Grapesicle, Blueberry, Vintage Timber
Extra: Transparante Sequins

zaterdag 19 maart 2022

Hey Landlubber!

Hallo allemaal,

Vandaag ben ik er weer met een kaartje die ik maakte voor de lopende schets challenge bij Create a Smile Stamps. Today I'm back with a card that I made for the running Create a Smile sketch Challenge.
Sneed een topfold Smooth White basiskaart en een slag kleiner een Kraft rechthoek. Bewerkte de rechthoek met Vintage Photo Distress inkt en maakte er doormiddel van stempels en stiften een schatkaart van.

Cut a Smooth White topfold basecard, a slightly smaller Kraft rectangle. Out of the rectangle I made a treasure map using Vintage Photo Distress ink, stamps and markers.
Kleurde de afbeeldingen op de schatkaart in met mijn potloden. Stempelde de Koala en kleurde deze in met mijn Copic markers, knipte hem daarna uit. Stempelde de tekst op wit cardstock en stanste deze uit.

Colored up the images on the treasure map using my pencils. Stamped the koala and colored it up using my Copic markers, cut it using my sciccors. Stamped the sentiment on some white cardstock and cut it into a speech bubble.
Om de schets te volgen sneed ik zes verschillende kleuren strips en plakte deze op elkaar. Plakte alles op de kaart met verschillende hoogtes foamtape. To follow the sketch I trimmed six strips of colors and adhered them together. Glued everything on to the card using different heights of foamtape.

Gebruikte Copic kleuren:
Koala - W5, W3, W2, W1, W00 / R20, R00
Zwart - N8, N6, N4
Rood - R59, R39, R29
Geel - Y17, Y13
Grijs - C5, C3, C1
Hout - E37, E35, E33, E31
Blauw - B00, B000

Heb een heerlijke dag!
Groet, Marieke

Stempels: All hands on deck (Create a smile), P-arr-ty (Waffle Flower), Itty Bitty Birthday (My Favorite Things)
Stansen: Cool Cuts Speech Bubbles
Inkt: Memento Tuxedo Black / Rich Cocoa, Versafine Onix Black
Papier: Smooth White, Kraft, Black Licorice, Wild Cherry
Extra: Stabillo markers.

woensdag 23 februari 2022

Create a Smile Stamps - Guestdesigner

Hello all,

Today i'm pleased to be guestdesigning for the Create a Smile Stamps challenge blog. Two weeks ago i was picked as a featured designer and i was asked to be a guest designer for this challenge. I always say yes so did i for this one. Vandaag mag ik guestdesigner zijn voor Create a Smile Stamps challenge blog. Twee weken geleden was ik als featured designer uitgekozen en werd ik gevraagd als gastdesigner. Ik zeg nooit nee dus ook deze keer niet.
This week we challenge you to create a card with a moodboard. You have to use atleast one Create a Smile product as a focal point and you can play along! If you do not own anything you can always try to create something with one of there Freebies.
Deze week dagen we je uit om een project te maken met bovenstaande moodboard. Je kunt meedoen zolang je er maar voor zorgt dat een Create a Smile product de hoofdrol heeft. Ben je nu nog niet in het bezit van een van deze leuke producten dan kun je altijd kijken of je iets kunt maken met een van deze Freebies.
So for this challenge I decided on making a card using the Light up the dark and make a light mechanisme behind the lantern. First I made the background using Speckled Egg, Evergreen Bough and Black Soot Distress ink. Splattered some water and white paint and cut it using a stitched rectangle die.

Voor deze challenge besloot ik een kaart te maken met de Light up the dark en dan een licht mechanisme achter het lantaarntje te maken. Ik maakte eerst de achtergrond met Speckled Egg, Evergreen Bough en Black Soot Distress inkt. Spetterde water en witte verf en stanste het geheel uit met een gestikte rechthoek stans.
Die cut a border of grass and stamped the flowers on the background, colored them up using my Copic markers. Heat set the sentiment on to the background. Stamped the images, colored them up using my Copic markers and cut them by hand.

Stanste een border met gras en stempelde de bloemen op de achtergrond. Kleurde de bloemen in met mijn Copic markers en heat emboste de tekst op de achtergrond. Stempelde de afbeeldingen, kleurde ze in met mijn Copic markers en knipte ze daarna uit.
Decided were I wanted the lights to be and punched three small holes in the background. Adhered the mechanisme on the back of the card and heat set the sentiment on the grass were the light switch is. Assembled the card and adhered it onto a topfold Neutral cardbase.
Besloot waar de lampjes moesten en maakte drie kleine gaatjes in de achtergrond. Plakte het mechanisme op de achterkant van de achtergrond en heat emboste de tekst op het gras waar het druk mechanisme onder komt. Plakte alles op de kaart en het geheel ging op een topfold Neutral basiskaart.


Used Copic Colors:
Mole - W8, W6, W5, W4, W3, W1,W00, R20
Lantern - Y17, Y15, Y13, Y11
Light - Y02, Y00, Y000
Black - N8, N6, N4

Have a wonderful day!
Greets, Marieke

Stamps: Light up the dark (Create a Smile Stamps), Interactive Labels, Spring Gnomes (My Favorite Things)
Dies: Grassy Fields, Stitched Mini Slimline STAX Die-Namics
Ink: Memento Tuxedo Black, Tsukineko Versamark, Speckled Egg/ Evergreen Bough and Black Soot Distress ink.
Paper: Smooth White, Black Licorice, Neutral
Extra: Pearblossom Press Lights, Gold embossing powder, white embossing powder, white paint marker.

maandag 7 februari 2022

AAA Birthday - Guest Designer

Hello all,

A while back i was chosen as one of the designers that won the AAA Birthday Challenge! One of the perks was to be a guest designer for a challenge. I always say yes to that so here is my guest project for this challenge. Een tijdje terug werd ik uitgekozen tot één van de winnaars van de AAA Birthday challenge! Eén van de prijzen was om een guest designer te zijn voor een challenge. Ik zeg altijd ja, dus ook voor deze challenge. Hier is dan ook mijn project voor de challenge.
This month the challenge is to use a Pattern on your project so that can be a pattern on the background, paper somewhere or even create your own pattern!

Voor de challenge dagen we je uit om gebruik te maken van een patroon. Dat kan natuurlijk van alles design, van designpapier tot aan het gebruik van een stencil of misschien maak jij wel je eigen patroon!
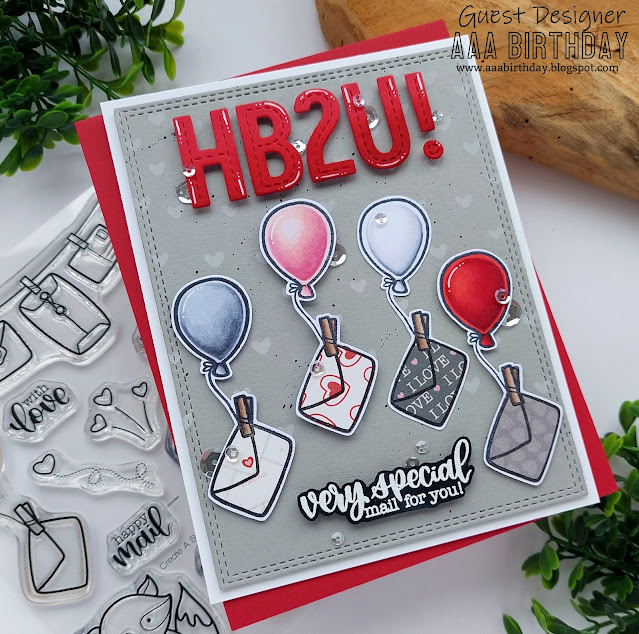
For my card I used a pattern on the background using a stencil and some white ink. But two make it even more fun, I paperpieced the enveloppes with pattern paper to make the challenge even more complete. Voor mijn kaart gebruikte ik een patroon op de achtergrond door gebruik te maken van een stencil en witte inkt. Maar twee is natuurlijk veel leukker, dus ik paperpiecte de enveloppen met designpapier om de challenge nog completer te maken.

So I cut a Gray rectangle and inkblended the hearts on to it. Splattered some black paint for some more intrest. Added the panel onto a white topfold base card. Heat set the sentiment on some black cardstock and cut it by hand. Stanste een grijze rechthoek en inktblende de harten erop. Spetterde wat zwarte spetters voor wat meer detail. Plakte de rechthoek op een witte topfold baisskaart. Heat emboste de tekst op zwart cardstock en knipte het geheel uit.
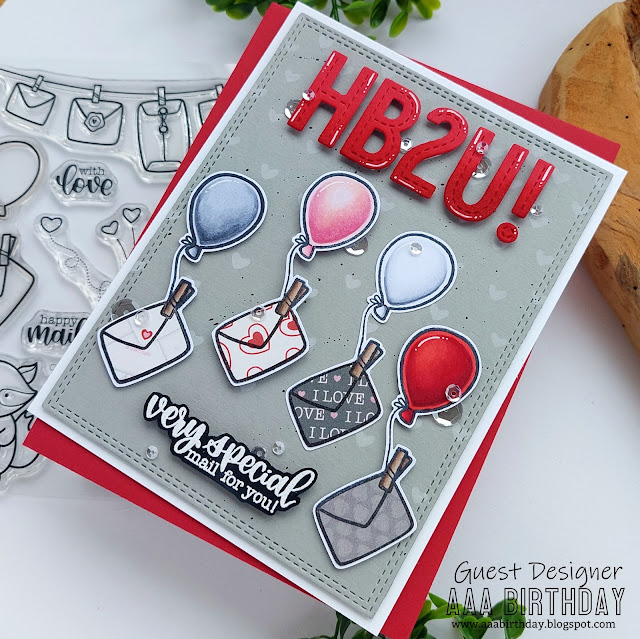
Stamped the balloons twice, one time on copic paper and one time on pattern paper. Colored the balloons and cut the enveloppes. Glued them together and onto the card. Die cut the letters and inkblended them a little so they would match better with the card.Finished the card of using some different seizes sequins. Stempelde de ballonen twee keer, één keer op Copic papier en één keer op designpapier. Kleurde de ballonen in en knipte de enveloppen uit en plakte ze op de andere. Stanste de letters uit en inktblende de onderkant. Plakte alles op de kaart en werkte het geheel af met verschillende maten doorzichtige sequins.

Used Copic Colors:
Dark Gray - C7, C5, C3, C1, C0
Light Gray - C5, C3, C1, C0, C00, 0
Pink - R85, R83, R81, R00, R000, R0000
Red - R59, R39, R37, R29, R27, R24
Brown - E47, E44, E43


With the card I would like to enter: 

Have a wonderful day!
Greets, Marieke

Stamps: Very Special Mail (Create a Smile Stamps)
Dies: In Stitches Alphabet and Numbers, Double Stitched A2 rectangle STAX Die-Namics (My Favorite Things)
Ink: Memento Tuxedo Black, Tsukineko Versamark, Hero Arts Unicorn Ink, Barn Door Distress ink.
Paper: Cement Gray, Smooth White, Red Hot, Black Licorice, Words of Love Carta Bella.
Extra: Black paint marker, Scattered hearts stencil (My Favorite Things), clear sequins, white gelpen, white embossingpowder.

vrijdag 3 december 2021

Stamp Anniething - Kawaii Cuties

 Hello all,

Today it's my time to show you another card using the Kawaii Cuties. I decided on making a card using this adorable pinguïn, to top it off i decided on making it a masculine card. Vandaag is het mijn beurt om jullie weer te inspireren met de nieuwste Kawaii Cuties. Ik besloot ditmaal een kaart te maken maken met de super leuke pinguïn, om het compleet te maken maakte ik er een mannelijk kaart van.
So first I cut a Caribbean Sea rectangle, on the top of the rectangle I cut a piece out of it and then I dry embost the piece. To give it some more interest I added some white stripes to the panel.

Sneed een Caribbean Sea rechthoek, uit de bovenkant sneed ik een driehoek en haalde het daarna door de stansmachine met een embossingfolder. Voor wat meer details voegde ik de witte strepen toe aan de "trui".
Die cut the bow and added some details using a white gelpen. Added the "sweater" and bow on to a topfold Smooth White basecard and added a white die cut button.

Stanste de strik en voegde wat details toe met een witte gelpen. Plakte de "trui" en de strik op een Smooth White topfold kaart en plakte het gestanste knoopje op.
Stamped the sentiment on some white cardstock, die cut it using a die. Heat set the other sentiment and die cut it. Stamped the image, colored it up and cut it using the matching die. Stempelde de tekst op wit cardstock en stanste het uit. Heat emboste de andere tekst en stanste ook deze. Stempelde de afbeeldingen, kleurde hem in en stanste het uit met de bijpassende stans.

Used Copic Colors:
Peguin - N8, N6, N4, N3, E53, E51, E50, YR09, YR07, YR04, R20
Sweater - BG09, BG07, BG05, BG03, C5, C3, C1, 0

Have a wonderful day!
Greets, Marieke

Stamps: The Holidays are Here (Stamp Anniething)
Dies: The Holidays are Here (Stamp Anniething), Itty Bitty Strips (MFT), Cool Cuts Speech Bubbles (Create a Smile stamps), Creatable Bow LR0325 (Marianne Design)
Paper: Caribbean Sea, Smooth White, Eiffel Tower
Ink: Memento Tuxedo Black, Versafine Onix Black, Tsukineko Versamark
Extra: Super Fine white embossing powder, white gelpen, Embossingfolder (Aurelie)