woensdag 30 maart 2022

Studio Light - Hello You Bring me Joy!

Hallo allemaal,

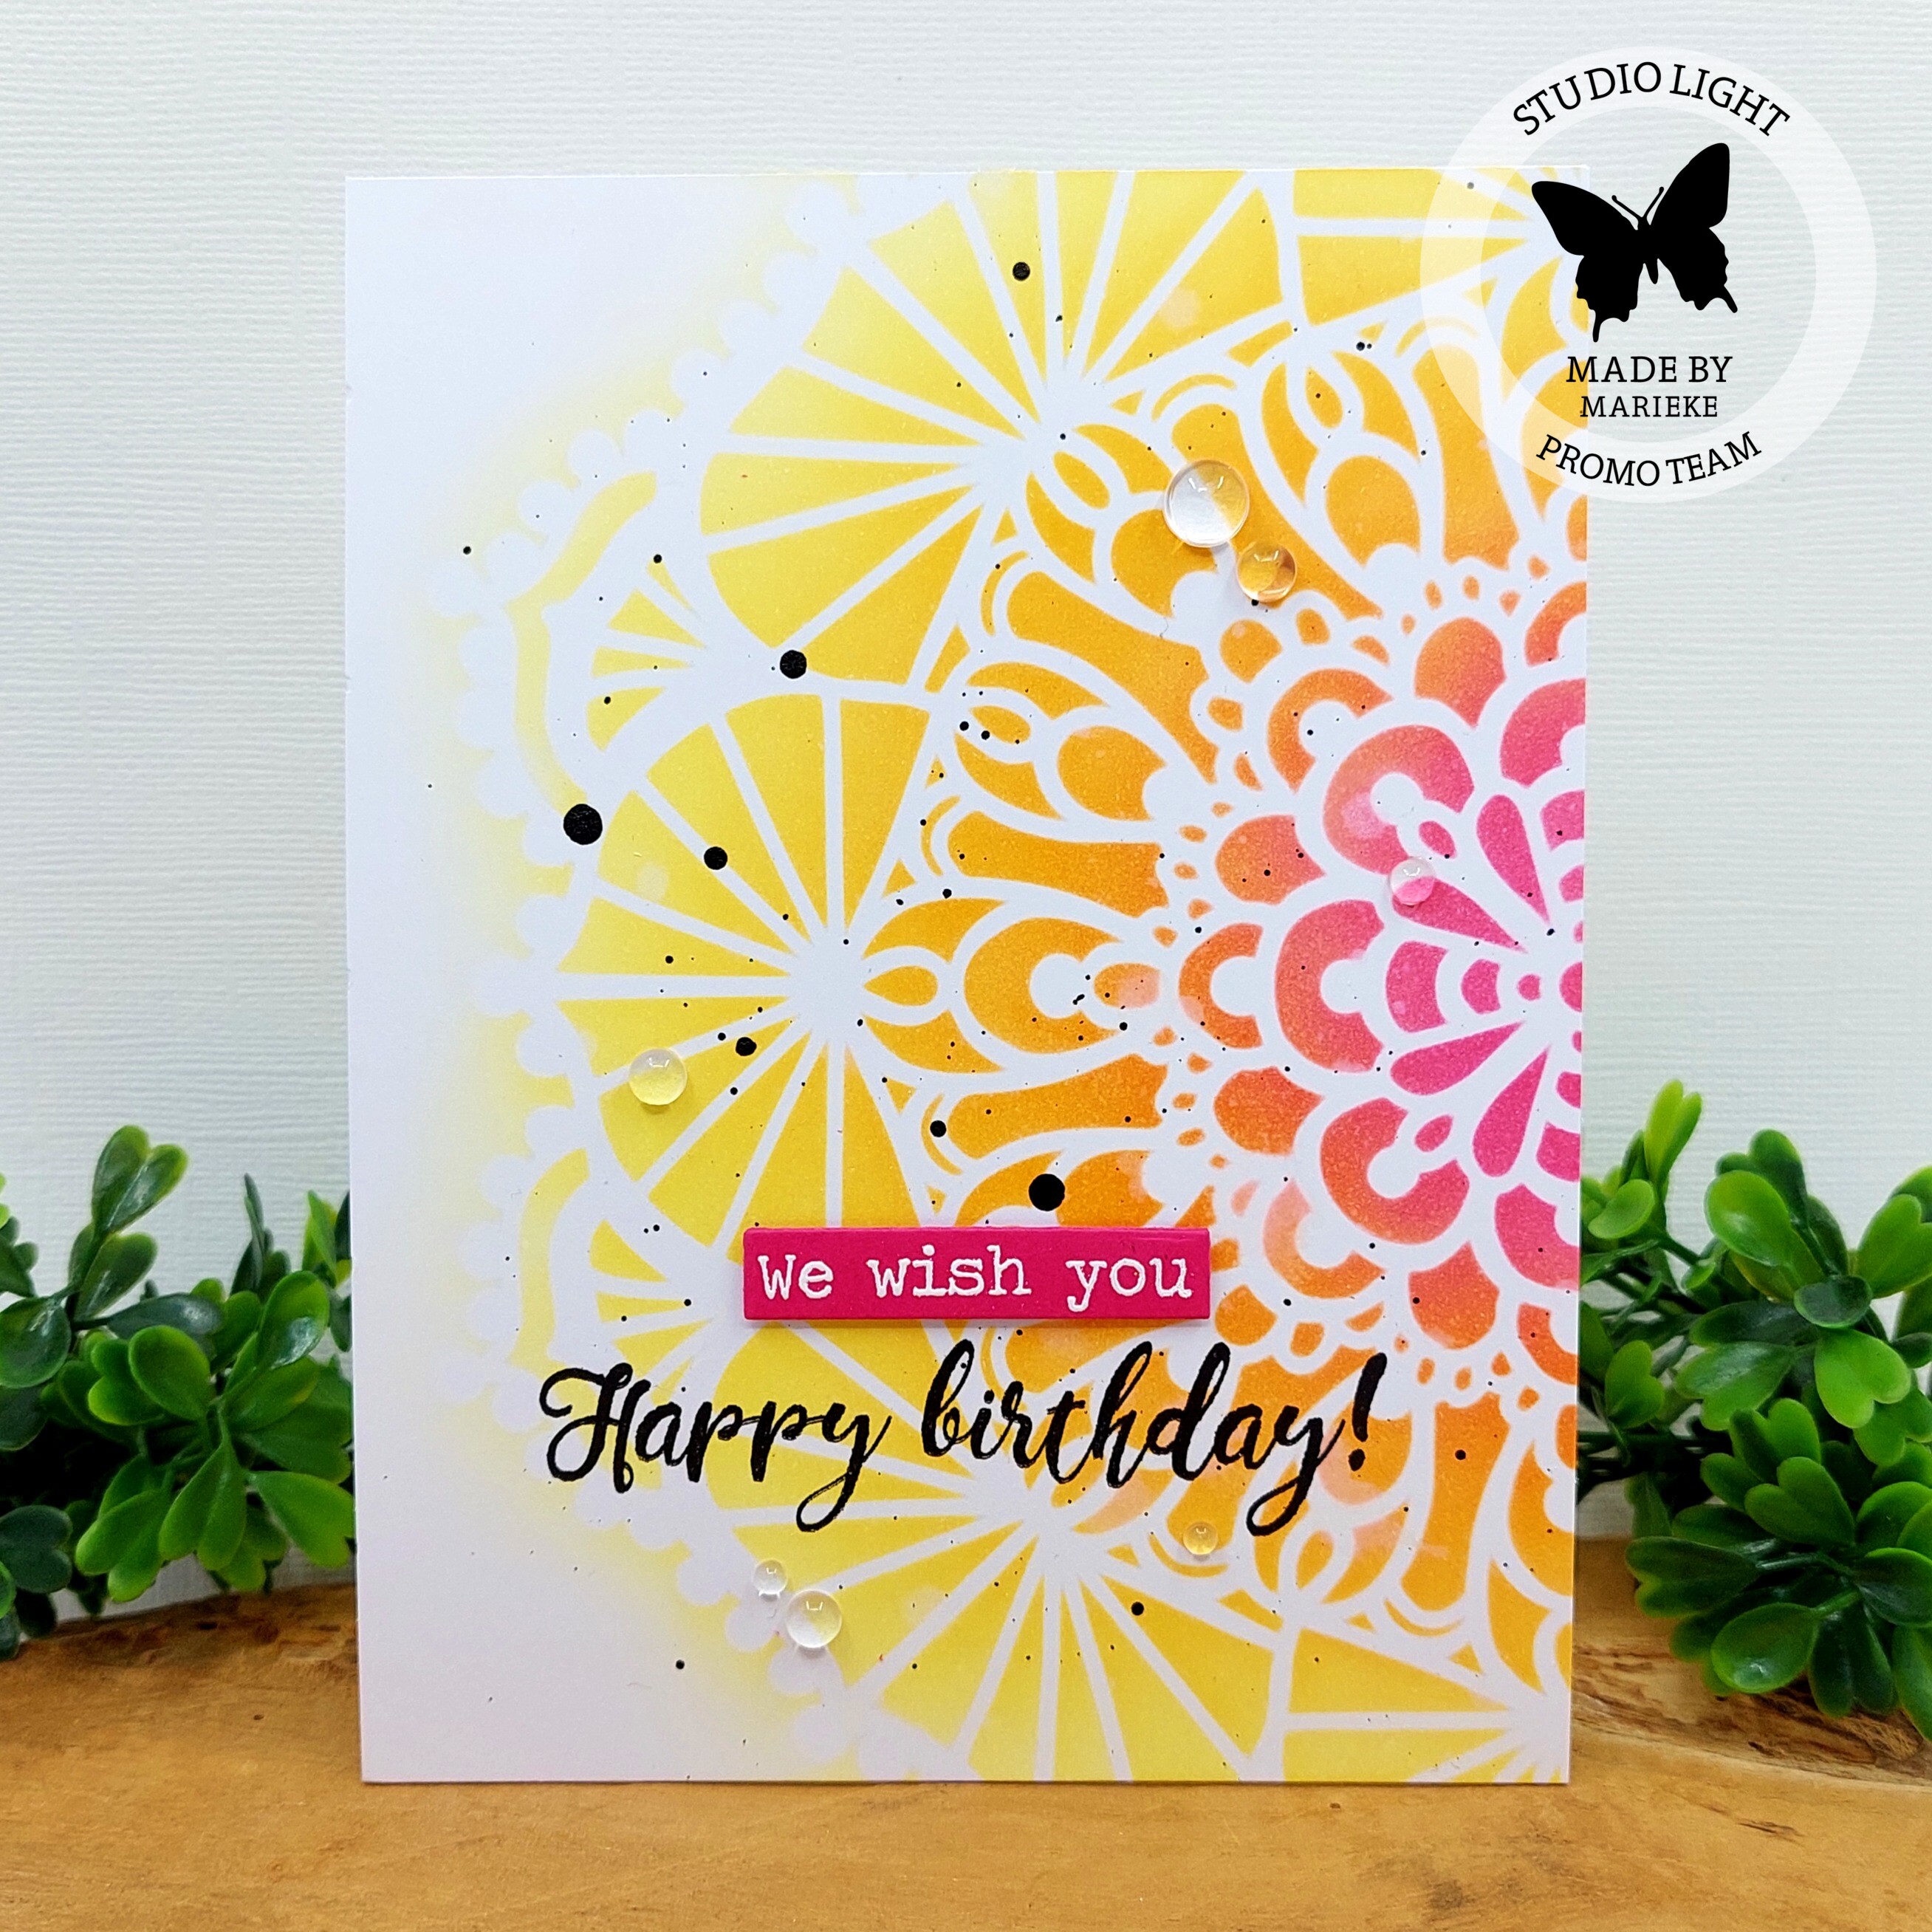
Daar ben ik dan weer met mijn wekelijkse Studio Light post. Dit keer ging ik nogmaals met de stencil van Art by Marlene aan de slag. I'm back again with my weekly post for Studio Light. This time I played again with the stencils by Art by Marlene!
Kun je de kaarten van vorige week nog herinneren? De een stencil, twee kaarten post? Mocht je hem nog een keer willen bezoeken neem dan even hier een kijkje. Ik gebruikte ditmaal dezelfde techniek alleen dan een ander stencil en andere kleuren Distress inkt.

Can you remember the cards I made last week? The one stencil, two cards post? Well if not you can find it here! This time around I did the same technique the only difference is that I used another stencil and some other colors of ink.
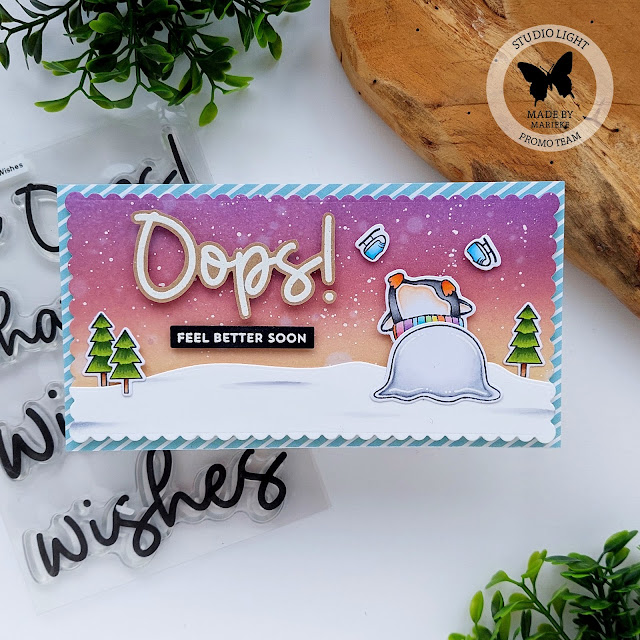
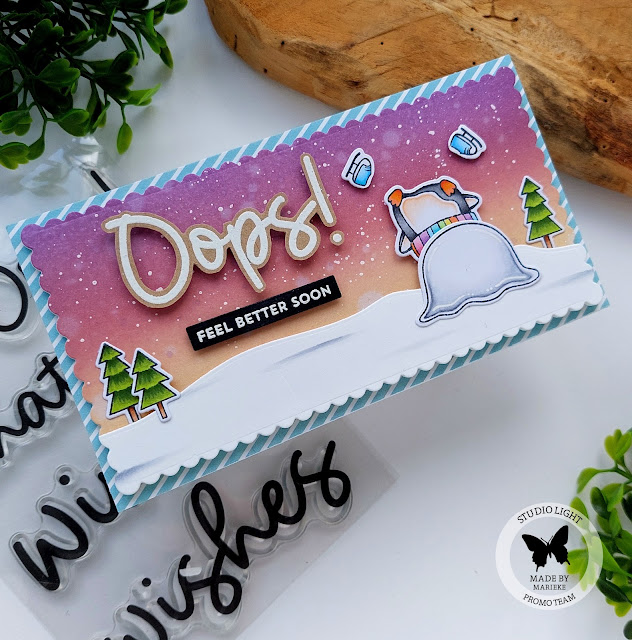
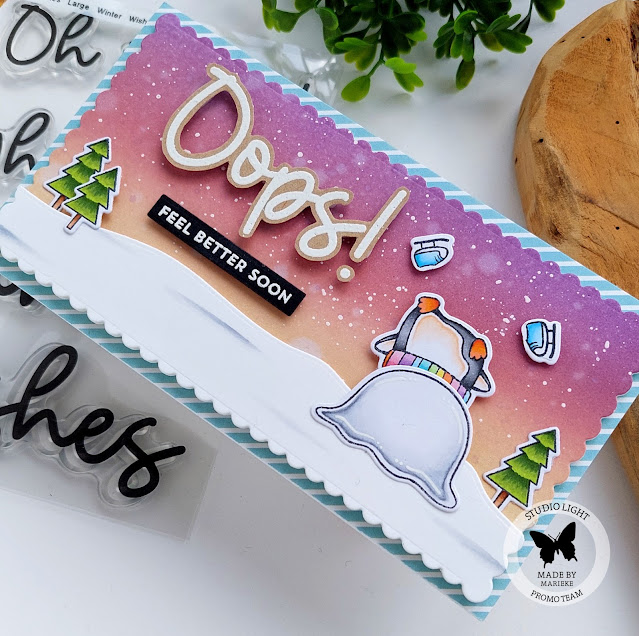
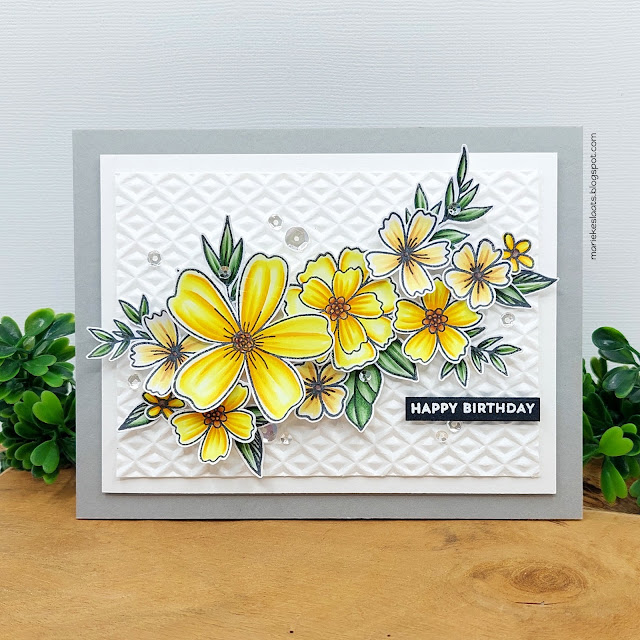
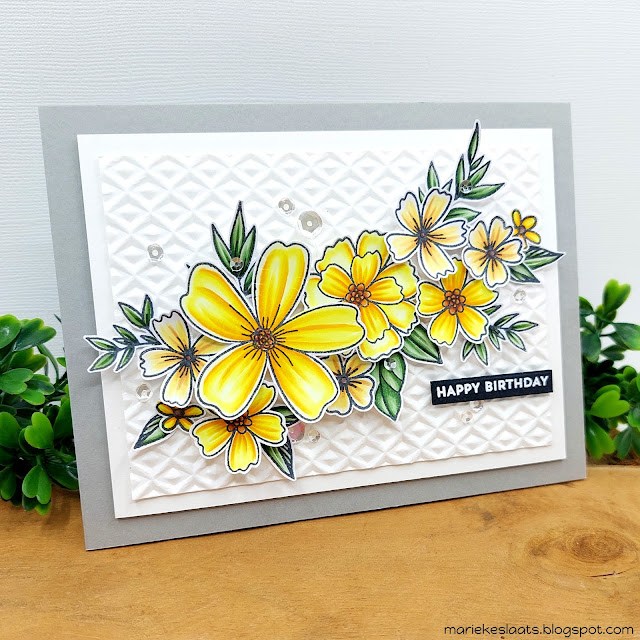
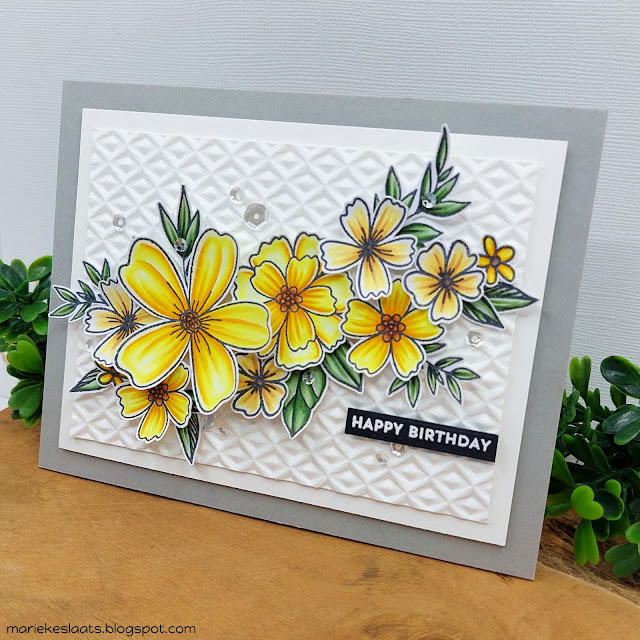
Sneed een stuk stempel papier van 8 1/2 x 5 1/2 inch en plakte er tijdelijk het stencil op met lijmspray. Inktblende het papier met Twisted Citron, Peacock Feathers, Mermaid Lagoon en Blueprint Sketch.

Cut a piece of stamping paper 8 1/2 x 5 1/2 inkch and temporarly added the stencil using spray glue. Inkblended some Twiste Citron, Peacock Feathers, Mermaid Lagoon and Blueprint Sketch onto it.


Spetterde zwarte verf en sneed het door de midden. Plakte beide helften op een witte basis kaart.

Splattered some black paint and cut the paper in half. Added both halfs onto a white base card.
Stempelde beide teksten rechtstreeks op de kaart. Stanste van de andere teksten de outline uit vellum en de tekst uit zwart cardstock (7x). Plakte er één op de voorzijde en de anderen op de achterzijde.

Stamped both of the sentiments directly onto the card. Die cut the other sentiments out of black cardstock (7x) and the outline out off vellum. Glued one off the words on the front of the vellum the other ones on the back.
Plakte de gestanste tekst op de kaart en werkte het geheel af met clear sequins. Glued the sentiment onto the card and finished of the card using some clear sequins.

Heb een heerlijke dag!
Groet, Marieke

Stempels: ES Stamp180, ES Stamp178
Stansen: ES CD169
Inkt: Twisted Citron/ Peacock Feathers/ Mermaid Lagoon and Bleuprint Sketch Distress inkt, Versafine Onix Black.
Papier: Smooth White, Black Licorice, Vellum
Extra: Transparante sequins, zwarte verfmarker, ABM ES Mask71

zondag 27 maart 2022

Studio Light - One Stencil Two Cards

 Hallo allemaal,

Toen ik gisteren de nieuwe stencils van Art by Marlene van Studio Light binnen kreeg kon ik het niet laten om er meteen mee aan de slag te gaan. Ik maakte niet één maar twee kaarten met het gebruik van één stencil.
Yesterday the new stencils by Art by Marlene by Studio Light arrived I could not resist playing with them. I did not make one card but two cards using one stencil.
Voor de basis sneed ik wat stempel papier van 8 1/4 bij 5 1/2 inch. Sprayde het stencil met stencil lijm en plakte het in het midden van het papier. 

For de base I cut a piece of stamping paper 8 1/4 x 5 1/2 inch. Sprayed the stencil using stencilglue and adhered it onto the paper.
Inktblende de kleuren Picked Raspberry, Carved Pumpkin en Squeezed Lemonade met het stencil op papier.

Inkblended the colors Picked Raspberry, Carved Pumkin and Squeezed Lemonade onto the paper using the stencil.
Verwijderde het stencil, spetterde water en zwarte verf. Sneed het papier door het midden van het stencil en plakte het op een witte basiskaart.

Removed the stencil, splattered some water and black paint. Cut the paper through the middle and glued both panels on a white basecard.
Stempelde op beide kaarten een tekst met zwarte inkt rechtstreeks op de kaart en heat emboste een andere tekst op roze cardstock en stanste het uit.

Stamped the sentiment on both cards using black ink and heat set the other sentiment on some pink cardstock. Die cut them into banners.
Plakte de tekst op de kaart en werkte beide kaarten af met verschillende maten doorzichtige droplets. Added the pink sentiments onto the card and finished the cards of using different seizes of clear droplets.

Heb een heerlijke dag!
Groet, Marieke

Stempels: SS Stamp163, ES SCD25, ABM BB Stamp125, ES Stamp177
Stansen: Skinny Strips Die-Namics (My Favorite Things)
Inkt: Picked Raspberry/ Carved Pumpkin/ Squeezed Lemonade, Versafine Onix Black,Tsukineko Versamark.
Papier: Smooth White, Poppin' Pink
Extra: Transparante droplets, wit embossing poeder, ABM ES Mask70

vrijdag 25 maart 2022

Studio Light - Sending Winter Wishes

Hallo Allemaal,

Hier is mijn wekelijkse post voor Studiolight weer. Deze keer maakte ik een winters kaartje met de SS Penguin en de SS Snowman samen. I'm back with my weekly post for Studiolight. This time around I made a wintery card using the SS Penguin and the SS snowman together.
Voor mijn kaart inktblende ik de achtergrond met Tattered Rose, Kitsch Flamingo en Seedles Preserve Distress Oxide inkt. Spetterde witte verf en water en stanste het uit. Plakte het op een witte basiskaart. Stanste een rand sneeuw en bewerkte dit met Peacock Feathers.

For my card I inkblended the background using Tattered Rose, Kitsch Flamingo and Seedles Preserve Distress Oxide ink. Splattered some white paint and water and die cut it. Added it onto a white base card, and die cut a border of snow. Added some Peacok Feathers on to it.
Stanste de geschupte stans  en de binnen stans uit de Essentials Slimline stans 34 uit wit cardstock en inktblende de binnenste stans met Antique Linen en Vintage Photo Distress inkt. Stempelde de afbeeldingen, kleurde ze in met mijn Copic markers en stanste ze uit. Plakte deze op de rechthoeken en werkte het geheel af met cijfers en de post stempel.

Die cut the scalloped frame and the inside die out of the Essentials Slimline Die 34 out of white cardstock and inkblended the inside using Antique Linen and Vintage Photo Distress ink. Stamped all the images, colored them up and die cut them using the matching dies. Added the images on the rectangles and finished them of using a post stamp and the numbers.
Heat emboste de kleine en grote teksten op gekleurd cardstock. Stanste de roze teksten uit en knipte de grote tekst. Plakte alles op de kaart en klaar was kees. Heat set the small and large sentiment. Die cut the small ones and cut the large one with my sciccors. Added everything on to the card and the card was all done!

Gebruikte Copic Kleuren:
Blauw / Groen - BG15, BG13, BG11, BG10
Wit muts / sjaal - W5, W3, W1, W00
Zwart - N6, N4, N3, N2
Roze - RV17, RV14, RV13, Rv11, RV10
Sneeuwman - BG11, BG10, BG00, BG000; YR09, YR04, YR02
Penguin - N6, N4, N3, N2 / E53, E52, E50, 0 / YR09, YR04, YR02
Slee - E37, E35, E33, E31
Witte envelop - C5, C3, C1, C00, 0
Bruine envelop - E44, E43, E42, E41
Bomen - YG67, YG63, YG03; E37, E35, E33

Heb een heerlijke dag!
Groet, Marieke

Stempels: SL SS Snowman, SL SS Penguin, SL SS Quotes Large Winter Wishes
Stansen: SL SS Snowy Fun, SL SS Snowman, SL SS Penguin, SL Essentials Slimline nr 34
Inkt: Peacock Feathers/ Antique Linen/ Vintage Photo Distress inkt, Tattered Rose/ Kitsch Flamingo and Seedles Preserve Distress Oxide inkt, Memento Tuxedo Black, Tsukineko Versamark.
Papier: Smooth White, Poppin' Pink, Boysenberry
Extra: Transparante sequins, wit embossing poeder.

dinsdag 22 maart 2022

My Favorite Things - Stylish Bouquet Builder Card Kit Release

 Hello all,

The day is here that the Stylish Bouquet Builder card kit release by My Favorite Things is avaible! What do you think is it beautiful or what? So what is ending up in your shopping cart? Watch your budget but have fun shopping! De dag is aangebroken dat de Stylish Bouquet Builder card kit release van My Favorite Things verkrijgbaar is! En wat vond je ervan schitterend toch? Welke producten belanden bij jou in het mandje? Let op je budget maar heb vooral plezier met winkelen!
So for today's inspiration I decided on going for a more CAS styled card using theFlower Bouquet Die-Namics, Flower Bouquet Builder Stencil, Stylish Sentiments together with the Bouquet Wrap Die-Namics.
Voor mijn inspiratie kaart van vandaag besloot ik voor een meer CAS style kaart te gaan met de Flower Bouquet Die-Namics, Flower Bouquet Builder Stencil, Stylish Sentiments en de Bouquet Wrap Die-Namics.
Cut a standard A2 seize Kraft topfold basecard. Cut a 4 x 5 1/4 Smooth White rectangle and glued them together. Die cut the Bouquet Wrap Die-Namics out of the Colorful Canvas Pattern Paper and adhered it into a wrap. Sneed een standaard A2 Kraft topfold basiskaart. Sneed een 4x 51/4 inch Smooth White rechthoek en plakte ze op elkaar. Stanste de Bouquet Wrap Die-Namics uit met de Colorful Canvas Pattern Paper en plakte het in elkaar.

Die cut the Flower Bouquet Die-Namics in the colors Cotton Candy, Lemon Drop, Sno Cone, Smooth White, Grapesicle and Limelight. Inkblended the flowers and leaves using the Flower Bouquet Builder Stencil. Stanste de Flower Bouquet Die-Namics uit de kleuren Cotton Candy, Lemon Drop, Sno Cone, Smooth White, Grapesicle en Limelight. Inktblende de bloemen en blaadjes met de Flower Bouquet Builder Stencil.
Splattered some white paint on some of the flowers and tried to make a bouquet on the card using all of them. Stamped the sentiments from the Stylish Sentiments onto the card and it was all done. Spetterde wat witte verf op een aantal bloemen en plakte het geheel op de kaart als een boeket bloemen. Stempelde de teksten uit het Stylish Sentiments stempel op de kaart en de kaart was klaar.

If you need to be even more inspired after this post make sure to have a look over at My Favorite Things Youtube ChannelWanneer je na deze post nog wat meer ideeën nodig heb neem dan even een kijkje op het Youtube kanaal van My Favorite Things.

Have a wonderful day!
Greets, Marieke

maandag 21 maart 2022

My Favorite Things - Stylish Bouquet Card Kit Countdown Day 1

Hello all,

Welcome to day one of the March Card kit Release countdown by My Favorite Things.   Lucky the wait on the Card kit Release is only short and you can have a shopping spree already tommorow Tuesday March 22nd at 10:00 am EST. Welkom bij dag een van de maart Card Kit Release countdown van My Favorite Things. Gelukkig hoef je maar even te wachten want morgen is de card kit al beschikbaar om 16:00!
The Card Kit contains the Stylish Sentiments stamp set, Flower Bouquet Die-Namics, Flower Bouquet Builder Stencil, Colorful Canvas Paper pad, Two sheets of Smooth White cardstock and one sheet of the following colors; Kraft, Black Licorice, Cotton Candy, Red Hot, Fire Coral, Orange Zest, Lemon Drop, Sour Apple, Jalepeno Popper, Summer Splash, Caribbean Sea, Tropical Teal and one sheet of Heavyweight Translucent Vellum. De Card Kit bestaat uit de Stylish Sentiments stempel, Flower Bouquet Die-Namics, Flower Bouquet Builder Stencil, Colorful Canvas Paper pad, twee vellen Smooth White cardstock en één vel cardstock van de volgende kleuren; Kraft, Black Licorice, Cotton Candy, Red Hot, Fire Coral, Orange Zest, Lemon Drop, Jalepeno Popper, Sour Apple, Caribbean Sea, Summer Splash, Tropical Teal en een vel dik doorschijnend vellum.
Offourse the supplies are sold separately, if you are only interested in a specific item. Beside the Kit there are also three seperate items sold with this set the Stylish Thank you Die-Namics, Stylish Happy Birthday Die-Namics and the Bouquet Wrap Die-Namics. As always My Favorite Things is offering a new free for $60 that comes with this kit; Stylish Congrats Die-Namics. Uiteraard zijn de producten ook los te koop, wanneer je alleen geïnteresseerd bent in één van de producten. Naast de Kit zelf biedt MFT de bijpassende Stylish Thank You Die-Namics, Stylish Happy Birthday Die-Namics en de Bouquet Wrap Die-Namics aan. Zoals iedere nieuwe release biedt My Favorite Things een nieuwe free for $60 en dat is ditmaal de Stylish Congrats Die-Namics.
So for my card I cut a standard A2 seize topfold Smooth White base card. Added a panel of pattern paper out of the Colorful Canvas Paper Pad to the front. Die cut a Smooth White circle and stamped the sentiments from the Stylish Sentiments in the middle.

Voor mijn kaart sneed ik een standaard A2 topfold Smooth White basiskaart. Beplakte de voorkant met een vel designpapier uit het Colorful Canvas Paper Pad. Stanste een Smooth White cirkel en stempelde de teksten uit de Stylish Sentiments stempel in het midden.
Die cut the flowers using the Flower Bouquet Die-Namics out of Cotton Candy, Limelight and Lemon Drop, inkblended them with the Flower Bouquet Builder Stencil using Poppin' Pink, Butterscotch and Mowed Lawn Distress ink. Glued them onto the card and added some white gelpen details. Finished of the card using some clear sequins. Stanste de bloemen met de Flower Bouquet Die-Namics uit Cotton Candy, Limelight en Lemon Drop. Inktblende de bloemen met de Flower Bouquet Builder Stencil en de kleuren Poppin' Pink, Butterscotch en Mowed Lawn Distress inkt. Plakte alles op de kaart en bracht wat witte gelpen details toe. Werkte het geheel af met wat transparante sequins.

If you need to be even more inspired after this post make sure to have a look over at My Favorite Things Youtube ChannelWanneer je na deze post nog wat meer ideeën nodig heb neem dan even een kijkje op het Youtube kanaal van My Favorite Things.

Have a wonderful day!
Greets, Marieke

zaterdag 19 maart 2022

Hey Landlubber!

Hallo allemaal,

Vandaag ben ik er weer met een kaartje die ik maakte voor de lopende schets challenge bij Create a Smile Stamps. Today I'm back with a card that I made for the running Create a Smile sketch Challenge.
Sneed een topfold Smooth White basiskaart en een slag kleiner een Kraft rechthoek. Bewerkte de rechthoek met Vintage Photo Distress inkt en maakte er doormiddel van stempels en stiften een schatkaart van.

Cut a Smooth White topfold basecard, a slightly smaller Kraft rectangle. Out of the rectangle I made a treasure map using Vintage Photo Distress ink, stamps and markers.
Kleurde de afbeeldingen op de schatkaart in met mijn potloden. Stempelde de Koala en kleurde deze in met mijn Copic markers, knipte hem daarna uit. Stempelde de tekst op wit cardstock en stanste deze uit.

Colored up the images on the treasure map using my pencils. Stamped the koala and colored it up using my Copic markers, cut it using my sciccors. Stamped the sentiment on some white cardstock and cut it into a speech bubble.
Om de schets te volgen sneed ik zes verschillende kleuren strips en plakte deze op elkaar. Plakte alles op de kaart met verschillende hoogtes foamtape. To follow the sketch I trimmed six strips of colors and adhered them together. Glued everything on to the card using different heights of foamtape.

Gebruikte Copic kleuren:
Koala - W5, W3, W2, W1, W00 / R20, R00
Zwart - N8, N6, N4
Rood - R59, R39, R29
Geel - Y17, Y13
Grijs - C5, C3, C1
Hout - E37, E35, E33, E31
Blauw - B00, B000

Heb een heerlijke dag!
Groet, Marieke

Stempels: All hands on deck (Create a smile), P-arr-ty (Waffle Flower), Itty Bitty Birthday (My Favorite Things)
Stansen: Cool Cuts Speech Bubbles
Inkt: Memento Tuxedo Black / Rich Cocoa, Versafine Onix Black
Papier: Smooth White, Kraft, Black Licorice, Wild Cherry
Extra: Stabillo markers.

vrijdag 18 maart 2022

Studio Light - New Adventure

 Hallo Allemaal,

Hier is mijn wekelijkse post voor Studiolight weer. Deze keer maakte ik een slimline kaart met de Stamp & Die Air Message. I'm back with my weekly post for Studiolight. This time around I made a slimline card using the Stamp & Die Air Message.
Ik maakte eerst de achtergrond met een wolkenstencil en de kleuren Wilted Violet, Shaded Lilac, Spun Suagr en Worn Lipstick. Spetterde water en Wilted Violet en stanste het uit. Heat emboste de tekst Fly en "let's" op de achtergrond en plakte het geheel op een witte rechthoek wat daarna op een Kraft geschubde achtergrond aan.

First off I made the background using a cloud stencil and the colors Wilted Violet, Shaded Lilac, Spun Suagr and Worn Lipstick. Splattered some water and Wilted Violet and die cut the background. Heat set the word Fly and stamped the "Let's" on the background. Added a white rectangle behind the background and the whole went on to a scullped Kraft background.
Stempelde de afbeeldingen, kleurde ze in met mijn Copic markers stanste ze uit en plakte ze op. Bewerkte de ramen met wat Glossy Accent. Stanste de tekst op de banner, stanste deze ook uit en achter het vliegtuig.

Stamped all the images, colored them in using Copic markers die cut them and glued them onto the card. Added some Glossy Accent onto the windows. Stamped the sentiment on the banner and die cut it, added it behind the airplane.
Heat emboste de losse teksten op Kraft papier en stanste ze uit. Stansten de harten uit roze cardstock, plakte ze op en bewerkte ze met wat Wink of Stella. Heat set the seperate sentiments on some Kraft cardstock and die cut them. Die cut some hearts and added the on the cardbase. Finished the card of using some Wink of Stella.

Gebruikte Copic Kleuren:
Roze - R85, R83, R81, R20, R00, R000
Wit - C5, C3, C1, C00,0
Blauw - B02, B00, B000, B0000
Paars - V17, V15, V12, V00, V000
Zwart - N6, N4, N2
Bruin - E44, E43, E42

Heb een heerlijke dag!
Groet, Marieke

Stempels: SL Essentials - Air Message, SL - ABM - Tekst & Play 
Stansen: SL Essentials - Air Message, SL Essentials - Shaker Die Cut - Oval.
Inkt:  Memento Tuxedo Black, Tsukineko Versamark, Wilted Violet/ Shaded Lilac/ Spun Sugar en Worn Lipstick Distress inkt.
Papier: Kraft, Smooth White, Cotton Candy
Extra: Glossy Accent, Wit Embossingpoeder, Wink of Stella, Slimline Cloud Edges Stencil (My Favorite Things).

donderdag 17 maart 2022

My Favorite Things - I Hope Your Birthday Is On Point

 Hello all,

Today i'm back again with a project for My Favorite Things. This time around I decided on making a Clean and Simple card that I could enter in the CASology Challenge
Vandaag ben ik weer terug met een project voor My Favorite Things. Deze keer maakte ik een Clean en Simpel kaart die ik kan insturen bij de CASology Challenge.
For the challenge they ask you to make a project with the que word Hat. I figured the Cactus with the sombrero out of the Let's Stick Together set would be great for this! Voor de challenge vragen ze om een project te maken met het que woord Hoed. Ik bedacht dat de cactcus met de sombrero uit de Let's Stick Together set ideaal is voor deze opdracht.
Cut a Smooth White topfold base card and masked off 5,5 cm of the top, inkblended some Scattered Straw, swapped the masking tape and inkblended some Gathered Twigs. Sneed een Smooth White topfold basiskaart, maskeerde 5,5 cm van de bovenkant, inktblende Scattered Straw, verwisselde de masking tape en inktblende wat Gathered Twigs. 

Stamped the cactus and the balloon (Birthday Bears), colored them up and cut them using my sciccors. Stamped the images onto the card and glued the colored ones on top of them. Stempelde de cactus en de balloon (Birthday Bears), kleurde ze in en knipte ze uit. Stempelde de afbeeldingen op de kaart en plakte de ingekleurde op de kaart.
Stamped the sentiment underneath the image and finished it of using some enemal dots. Stempelde de tekst onder de afbeeldinge en werkte het geheel af met gekleurde enemal dots.

Used Copic Colors:
Cactus - YG67, YG63, YG03, YG01
Hat - E47, E44, E43, E42, E41/ G07, G05, G03/ Y17, Y15, Y13/ C5, C3, C1, 0
Red - R59, R37, R29, R27, R24

If you need to be even more inspired after this post make sure to have a look over at My Favorite Things Youtube ChannelWanneer je na deze post nog wat meer ideeën nodig heb neem dan even een kijkje op het Youtube kanaal van My Favorite Things.

Have a wonderful day!
Greets, Marieke

vrijdag 11 maart 2022

Studio light - Oops! Feel Better Soon

Hallo Allemaal,

Daar ben ik weer met mijn wekelijkse inspiratie kaart voor Studio Light! Ditmaal besloot ik om met de winterse stempels een beterschap kaart te maken.
Today i'm back again to inspire you with some Studio Light products! This time I decided onmaking a get well soon card.
Voor deze kaart gebruikte ik Sweet Stories Penguin, Snowman en de Quotes Large Winter Wishes. For my inspiration card I combined the Sweet Stories Pengun, Snowman and the Quotes Large Winter.
Maakte eerst de achtergrond met Antique Linen, Victorian Velvet en Wilted Violet. Spetterde water en witte verf en stanste het uit met een geschupte rechthoek. Stanste de sneeuw met de rechthoek en een sneeuw stans en bracht met Copics wat details aan.

First I made the background using Antique Linen, Victorian Velvet and Wilted Violet Distress ink. Splatterd some water and white paint and die cut it using a scalloped rectangle. Die cut the snow out of white cardstock using a snow die and the scalloped rectangle die. Added some details using my Copic markers.
Stempelde alle afbeeldingen, kleurde ze in met mijn Copic markers en stanste ze uit met de bijpassende stansen. Knipte de schaatsen los van de penguin en werkte de stempel lijn weg met een witte gelpen. Heat emboste alle teksten op zwart en kraft cardstock en stanste knipte het uit. Plakte alles op de kaart en het geheel ging op een witte topfold kaart die ik beplakte met designpapier. Stamped all the images, colored them up using my Copic markers and die cut them using the matching dies. Cut the skates from the images and removed the stamping lines using a white gelpen. Heat set the sentiments on some kraft and black cardstock en cut them by hand or with a die. Added everything on the card and onto a topfold white base card, wich I added some pattern paper onto.

Gebruikte Copic Kleuren:

 Zwart - N6, N4, N3, N2
Buik / armen penguin - E53, E51, E50
Roze - R85, R83, R81
Oranje - Yr04, YR02, YR00
Geel - Y15, Y13, Y11
Groen - YG17, YG13, YG11
Teal - BG15, BG13, BG11
Blauw - B02, B00, B000
Paard - V17, V15, V12
White - C5, C3, C1, C00, 0
Bomen - YG67, YG63, YG03; E37, E35, E33

Heb een heerlijke dag!
Groet, Marieke

Stempels: SS Penguin, SS Snowman, SS Quotes Large Winter Wishes
Stansen: SS Penguin, SS Snowman, SS Snowy Fun
Inkt: Antique Linen/ Victorian Velvet/ Wilted Violet Distress inkt, Memento Tuxedo Black, Tsukineko Versamark.
Papier: Smooth White, Kraft, Black Licorice
Extra: Witte acryl verf, witte embossing poeder, witte gelpen.

donderdag 10 maart 2022

Sending You a Birthday Wish

Hallo allemaal,

Vandaag ben ik er weer met een kaartje die ik maakte met mijn Lawn Fawn producten. Ditmaal werd het een verjaardagskaart die ik mee laat doen met de Lawnfawnatics Challenge.
Today I'm back with a card using my Lawn Fawn products. This time around I made a birthday card that I'm entering in the latest Lawnfawnatics Challenge.
Stanste de Stitched Cloud Backdrop uit licht blauw cardstock en sneed het iets kleiner. Plakte het op een witte topfold kaart. Stempelde alle afbeeldingen en kleurde ze in met mijn Copic markers. 

Die cut the Stitched Cloud Backdrop out of light blue cardstock and trimmed it down a bit. Added it onto a topfold white base card. Stamped all the images, colored them up using my Copic markers.
Knipte alles uit en maakte het tot complete karakters. Stempelde en heat emboste de tekst en stanste ze uit, de wish knipte ik uit.

Cut all the images using my sciccors and die cut the balloons. Stamped all the sentiments and heat set two of them. Die cut the sentiment strips and cut the "wish" with my sciccors.
Plakte alles op de kaart, de vogels gingen op een action woble. De ballonen kregen een laagje Glossy Accent en de hartjes wat wink of stella. Glued everything onto the card, the birds went onto a action wobble. The balloons got a layer of Glossy Accent and the hearts got a layer of wink of stella.


Gebruikte Copic kleuren:
Vogels - E47, E44, E43; E53, E51, E50; YR27, YR24, YR23
Roze - RV17, RV14, RV13, RV11, RV10
Oranje - YR09, YR04, YR02
Geel - Y17, Y15, Y13, Y11
Groen - YG17, YG13, YG03, YG01
Licht Blauw - B04, B02, B00
Blauw - B26, B24, B23, B21
Paars - BV04, BV02, BV00, BV000
Rood - R59, R29, R24
Zwart - N6, N4, N3
Wit - W5, W3, W1, W00, 0

With this card I would like to enter:
Lawnfawnatics - All things Birthday

Heb een heerlijke dag!
Groet, Marieke

Stempels: Scootin' By (Ballonen), Special Delivery (Birds), Reveal Wheel Sentiments, Upon a Star (Lawn Fawn).
Stansen: Stitched Cloud Backdrop; Portrait, Scootin' By (Lawn Fawn),
Inkt: Tsukineko Versamark, Memento Tuxedo Black, Versafine Onix Black
Papier: Black Licorice, Smooth White, Sno Cone
Extra: Wit embossingpoeder, glossy accent, action wobble.

woensdag 9 maart 2022

Happy Birthday

 Hallo allemaal,

Ik had vorige week nog wat tijd over en besloot nog een kaartje te maken voor de lopende challenge op het Altenew blog. Ditmaal besloot ik geen build-a-flower stempel te gebruiken maar zelf aan het kleuren te gaan met de Wild & Free stempel. Last week I had some spare time left so I decided on making a card for the running challenge on the Altenew blog. This time I decided not using a Build-a-flower stamp but to color my own flowers using the Wild & Free stempel.
Voor mijn kaart stempelde ik eerst alle bloemen op Copic vriendelijk papier. Kleurde ze allemaal in met mijn Copic markers en knipte ze uit aangezien ik niet de stansen bezit.

For my card I first stamped all the images on some Copic Friendly paper. Colored them all up using my Copic markers and cut them afterwards because I do not own the dies.
Sneed een standaard A2 sidefold basiskaart. Sneed een witte rechthoek die wat kleiner was en dry emboste de Diamond Stars 3D embossing folder. Plakte beide witte rechthoeken op elkaar en het geheel ging met foamtape op de grijze basiskaart.

Cut a standard A2 sidefold gray cardbase. Cut a white rectangle slightly smaller and dry embost another white rectangle using the Diamond Stars 3D embossing folder. Glued both rectangles onto each other and glued them on to the base using foam tape.
Plakte alle bloemen op de kaart, heat emboste de tekst op zwart cardstock en stanste het uit. Plakte het op de kaart en werkte het geheel af met verschillende maten clear sequins. Glued all the flowers and leaves on to the card and heat set the sentiment, die cut them into a smaller strip. Glued the sentiment on the card using foam tape and finished of the card using different seizes of clear sequins.

Used Copic Colors:
Bright Yellow - Y38, Y08, Y06, Y04, Y00; E13, YR27, YR24, E18
Soft Yellow - Y11, YR31, E33; E79, E74
Green - YG67, YG63, YG61

Met de kaart doe ik graag mee met de volgende challenge;

Heb een heerlijke dag!
Groet, Marieke

Stempels: Wild & Free (Altenew), Itty Bitty Birthdays (My Favorite Things)
Stansen: Itty Bitty Strips Die-Namics (My Favorite Things).
Inkt: Tsukineko Versamark, Memento Tuxedo Black
Papier: Smooth White, Black Licorice, Cement Gray
Extra: Doorzichtige sequins, Diamond Stars 3D embossing folder (Altenew)