vrijdag 26 mei 2023

Studio Light - Waving Hello

Hallo Allemaal,

Hier is mijn wekelijkse post voor Studio Light weer. Deze keer maakte ik met de nieuwste Sweet Stories producten een slimline slider kaart. I'm back with my weekly post for Studio Light. This time around I decided on making a slimline slider card using the newest Sweet Stories products.
Zoals als maakte ik eerst de achtegrond. Met een stencil en de kleuren Peacock Feathers, Broken China en Blueprint Sketch Distress Oxide inkten. Spetterde water en stanste het uit. Inkten de kleuren Antique Linen en Vintage Photo Distress inkt voor de bodem en stanste deze ook uit.

As usual I made the background first. Using a mask and the colors; Peacock Feathers, Broken China and Blueprint Sketch Distress Oxide ink. Splattered some water and die cut the background. Inked up some Antique Linen and Vintage Photo Distress ink for the bottom and die cut a border.
Nu maakte ik het slider mechanisme. Hiervoor gebruikte ik de SL-ES-CD167. Omdat het een slimline kaart is zal de slider verlengd moeten worden, in deze tutorial laat ik zien hoe. Nadat het mechanisme was gemaakt, sneed ik een topfold kaart. Plakte hier designpapier op en een witte rechthoek. Hierop ging de achtergrond.

Now it was time to create the mechanisme. I used SL-ES-CD167 to create the slider. Because it's a slimline card you need to extend the pull tab, in this tutorial I show you how you can extend the tab. After the mechanisme was made, I cut a topfold base card. Adhered some pattern paper onto it and a slightly larger white rectangle then the inked panel. On top of all of that I adhered the mechanisme with foam tape.
Stempelde alle afbeeldingen, kleurde ze in met mijn Copic markers en stanste alle afbeeldingen uit. Plakte alles op de kaart en bewerkte de ruiten van de onderzeeboot met Glossy Effect.

Stamped all the imgaes, colored them up using my Copic markers and die cut all the elements. Adhered everything onto the card and added some Glossy Effect on to the windows of the submarine.
Stempelde de tekst "waving" met zwarte inkt op de achtergrond. De tekst "hello" stempelde ik met een blauwe inkt en knipte het uit. Plakte het daarna op de kaart en ook dit bewerkte ik met Glossy Effect. Stamped the sentiment "waving" using black ink and the sentiment "hello" I stamped using a blue ink and then cut it. Adhered the "hello" on to the card and finished it off adding some Glossy Effect onto it.

Gebruikte Copic Kleuren:
Boot - E79, E77, E74, E71, E70 / E42, E40, 0
Goud - E17, Y26, Y15, Y11
Hout - E37, E35, E33, E31
Groen - YG67, YG63, YG03, YG01
Paars - V06, V05, V04, V00
Onderzeeboot - Y17, Y15, Y13, Y11, Y00 / YR68, YR65, YR61
Teal - BG17, BG15, BG11
Oranje / roze - E95, E93, E91
Schilpad - G28, G07, YG07, YG05, YG03, YG01 / W1

zondag 21 mei 2023

Studio Light - You Are Mermazing

Hallo Allemaal,

Hier is mijn wekelijkse post voor Studio Light weer. Deze keer maakte ik met de nieuwste Sweet Stories producten een shaker kaart. I'm back with my weekly post for Studio Light. This time around I decided on making a shaker card using the newest Sweet Stories products.
Stanste een paarse cirkel, een slag kleiner stanste ik een cirkel uit aquarelpapier. Inktblende de achtergrond met Shaded Lilac, Wilted Violet en Villanious Potion. Beinkte het nog een keer maar ditmaal met een stencil. Spetterde water en witte verf en plakte het op de basis.

Die cut a purple circle, a die smaller I die cut a cirkle out of watercolor paper. Inkblended the background using Shaded Lilca, Wilted Violet and Villanious Potion. Inked the colors again using a mask. Splattered some water and white paint and adhered it to the base.
Stanste twee keer de buitenste cirkel van de porthole stans. Beinkte er eentje met Shaded Lilac en Wilted Violet. Bij de andere stanste ik de binnen cirkel eruit zodat ik een frame overhield. Stempelde de tekst op de geinkte cirkel. Beinkte het frame met Peacock Feathers en Cracked Pistashio, plakte de blister vast aan het frame.

Die cut the outer circle of the porthole die, inked one up using Shaded Lilac and cut the other until it was a frame. Die cut the sentiment onto the purple circle. Inked up the frame using Peacock Feathers and Cracked Pistashio. Adhered the blister behind the frame.
Vulde de shaker met shaker materiaal en sloot de cirkel. Plakte het frame om de shaker heen en op het frame plakte ik allerlei verschillende parels en rhinestones.

Filled up the shaker using shaker material and closed it. Adhered the frame around the blister and added all kinds of pearls and rhinestones onto the frame.
Stempelde de afbeeldingen, kleurde ze in met mijn Copic markers en stanste ze uit met de bijpassende stansen. Stanste het zeewier en de schelp, bewerkte dit met inkt en een gelpen en plakte alles op de kaart. Stamped all the images using Copic markers and cut them using the matching dies. Die cut the weed and shell, inked them up and added some white gelpen details before glueing it onto the card.

Gebruikte Copic Kleuren:
Licht paars - BV17, BV04, BV02, BV00, BV000
Donker Paars - V09, V06, V05, V04, V01
Teal - BG18, BG15, BG13, BG11
Huid - E000, E00, E04, E11, E21 / R20

Heb een heerlijke dag!
Groet, Marieke

dinsdag 9 mei 2023

My Favorite Things - May Product Launch

 Hello all,

It’s time for the My Favorite Things May product launch! All new products are available right now! The MFT design team is sharing projects created with the new stuff. You can find loads of inspiration! Het is tijd voor de My Favorite Things mei product lancering. Alle nieuwe producten zijn vanaf nu verkrijgbaar! Het MFT design team deelt ook vandaag weer een lading aan inspiratie.
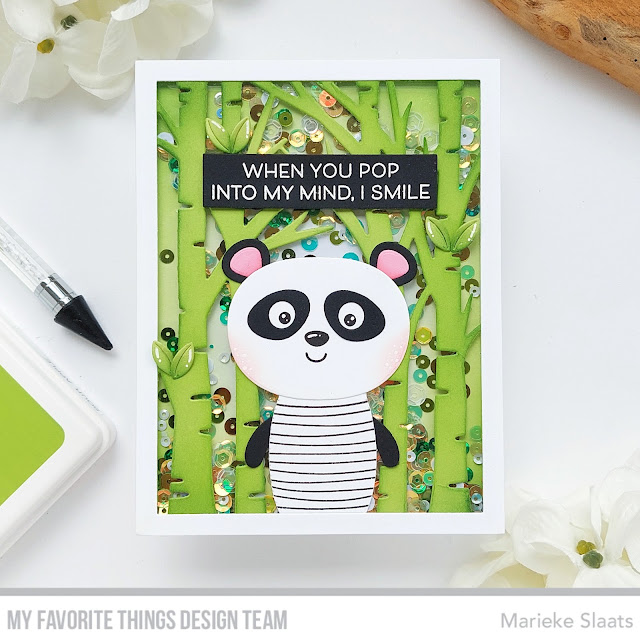
So there were some super fun new products in this release, what are you really getting this release? For today's inspiration card I decided on making a shaker card using the Pop-Up Pals Die-Namics.

Er zaten een aantal leuk nieuwe producten in deze release, wat ga jij echt halen? Voor mijn inspiratie van vandaag maakte ik een shaker kaart met de Pop-Up Pals Die-Namics.
Started on the base, it's a topfold Smooth White basecard, inked it using Twisted Citron and Mowed Lawn. Die cut the Birch Tree Forest Cover-Up Die-Namics out of Sour Apple and inked it up using Rustic Wilderness. Adhered a piece of acetate behind it.

Begon met de basis, het is een topfold Smooth White basiskaart, inkte deze met Twisted Citron en Mowed Lawn. Stanste de Birch Tree Forest Cover-Up Die-Namics uit Sout Apple en binkte dit met Rustic Wilderness. Plakte achter de bomen een stuk acetate.
Die cut a Smooth White border using the A2 Rectangle Frames Die-Namics. Die cut and stamped all the elements of the panda using the Pop-Up Pals Die-Namics. Assembled it and adhered it onto the card.

Stanste een Smooth White rand met de A2 Rectangle Frames Die-Namics. Stanste en stempelde de elementen van de panda met de Pop-Up Pals Die-Namics en plakte het geheel in elkaar en op de kaart.
Filled the shaker, closed it and adhered the frame. Die cut some leaves, inked them up using Rustic Wilderness and added some white gelpen details to the card. Heat set the sentiment on some Black Licorice and trimmed it down to a banner. Vulde de shaker, plakte hem dicht en plakte het witte frame erop. Stanste wat bladeren, beinkte deze met Rustich Wilderness en voegde wat witte gelpen details to. Heat emboste de tekst op Black Licorice cardstock en sneed het tot een banner.

If you need to be even more inspired after this post make sure to have a look over at My Favorite Things Youtube ChannelWanneer je na deze post nog wat meer ideeen nodig heb neem dan even een kijkje op het Youtube kanaal van My Favorite Things.

Have a wonderful Day!
Greets, Marieke

maandag 8 mei 2023

My Favorite Things May Release Countdown Day 1

 Hello all,

Today is the last day of the April release countdown of My Favorite Things and you know what that means right? Tommorow all the new products will be avaible! Did you decide on what you are going to get? Luckly you have one more night to think about it! Vandaag is de laatste dag van de april release countdown van My Favorite Things en je weet wat dat betekend! Morgen zullen alle nieuwe producten beschikbaar zijn. Heb je al besloten wat je zou willen hebben? Gelukkig kun je er nog een dag over nadenken!
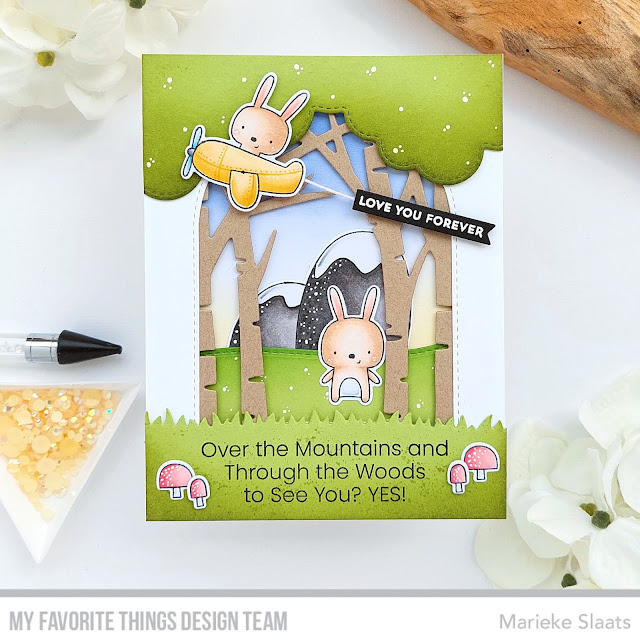
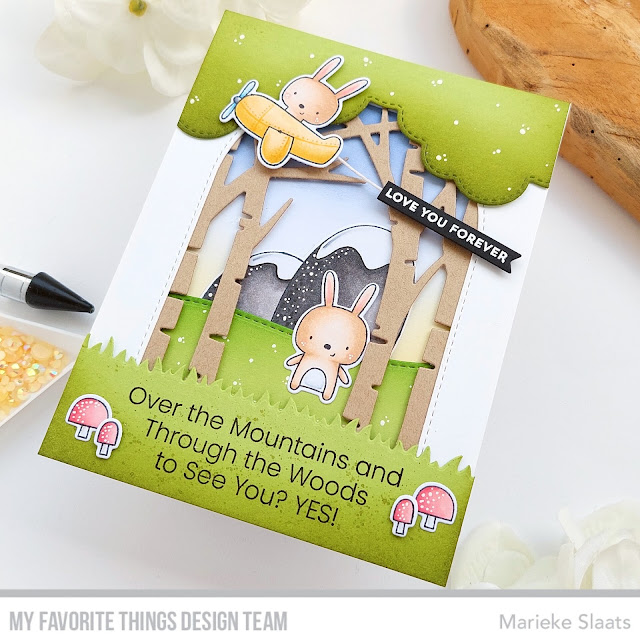
Today we are showcasing a adorable friendship set called I'm Glad We Fit In. Using this set I created a little scene matching it up with a few scenery Die-Namics.

Vandaag laten we een super leuke set zien genaamd I'm Glad We Fit In. Met deze stempel maakte in combinatie met verschillende Die-Namics een scene.
Cut a Smooth White base card and a Smooth White rectangle 4 1/4 inch x 5 1/2 inch. Cut the Inside & Out Stitched Arch STAX Die-Namics out of the white rectangle. Die cut the grass and leaves out of Sour Apple and inked it up using Peeled Paint and Mowed Lawn. Sneed een Smooth White basiskaart en een Smooth White rechthoek 4 1/4 inch x 5 1/2 inch. Stanste de Inside & Out Stitched Arch STAX Die-Namics uit de witte rechthoek. Stanste het gras en de bladeren uit Sour Apple en beinkte dit met Peeled Paint en Mowed Lawn.

Stamped the sentiment on the grass. Die cut the Birch Tree Forest Cover-Up Die-Namics out of Kraft cardstock. Adhered this behind the white panel. Adhered the grass and leaves onto the front of the panel. Inkblended some Scattered Straw and Faded Jeans on the base card. Stempelde de tekst op het gras. Stanste de Birch Tree Forest Cover-Up Die-Namics uit Kraft cardstock. Plakte dit achter de witte rechthoek. Plakte het gras en de bladeren op de voorkant van de rechthoek. Inkte wat Scattered Straw en Faded Heans op de basiskaart.
Stamped all the images. colored them up using my Copic markers and cut them using the I'm Glad We Fit In Die-Namics. Added all the elements onto the card, heat set the sentiment on some Black Licorice cardstock and turned it into a banner. Adhered this behind the plane, finished the card of by adding some white gelpen details. Stempelde alle afbeeldingen, kleurde ze in met mijn Copic markers en stanste ze uit met Glad We Fit In Die-Namics. Plakte alle elementen op de kaart, heat emboste de tekst op Black Licorice cardstock en maakte er een banner van. Plakte deze achter het vliegtuig en op de kaart. Werkte de kaart af door wat witte gelpen details toe te voegen.

Used Copic Colors:
Bunny - E55, E53, E51, E50 / C3, C1, C00, 0/ R22, R20
Mushrooms - R35, R32, R20/ W2, W00
Plain - Y17, Y26, Y23, Y21/ C5, C3, C1/ B02, B00

If you need to be even more inspired after this post make sure to have a look over at My Favorite Things Youtube ChannelWanneer je na deze post nog wat meer ideeën nodig heb neem dan even een kijkje op het Youtube kanaal van My Favorite Things.

Have a wonderful day!
Greets, Marieke

zondag 7 mei 2023

My Favorite Things May Release Countdown Day 2

 Hello all!

The release day of the May release by My Favorite Things is getting closer! It's still packed full of new stuff so make sure you don't miss anything. Hop over to the blog of My Favorite Things and hop along all the blogs of the Designteam members to see the full reveal! De dag dat de My Favorite Things mei release verkrijgbaar is komt dichter bij! We hebben nog steeds super leuke nieuwe dingen om aan jullie te laten zien, dus ga naar de hoofdpagina van My Favorite Things en hop langs alle blogs of social media kanalen van de Design team leden voor nog mee inspiratie!
For today the MFT team is showcasing all things school, if it's a gift for a teacher or someone that is graduating from school we got you covered today ;). I decided on making a gift card holder using the Teach, Sleep, Repeat together with the “Dry Erase” Whiteboard Die-namics.

Voor vandaag laat het MFT team jullie producten zien die alles met school te maken hebben. Of je nu een cadeautje wil maken voor de lerares of voor iemand die geslaagd is voor school we laten het vandaag zien! Ik maakte met een cadeaukaart met de Teach, Sleep, Repeat en de “Dry Erase” Whiteboard Die-namics.
Cut the Money Card Die-Namics using the Joyful Plaid Paper Pad. Die cut the Gift Card Pocket Die-Namics using Cotton Candy and the inner die using Smooth White. Inked some grey ink on the bottom and adhered them together. Stanste de Money Card Die-Namics uit Joyful Plaid Paper Pad. Stanste de Gift Card Pocket Die-Namics uit Cotton Candy en Smooth White en plakte het op elkaar. Inkte het witte stansje met grijze inkt.

Die cut the “Dry Erase” Whiteboard Die-namics out of Cotton Candy, Smooth White, Black Licorice and Cement Gray. Stamped the sentiment out of the Teach, Sleep, Repeat set using Lemon Drop and a black ink. Adhered the board together and onto the card. Stanste de “Dry Erase” Whiteboard Die-namics uit Cotton Candy, Smooth White, Black Licorice, Lemon Drop en Cement Gray. Stempelde de tekst uit de Teach, Sleep, Repeat set met Lemon Drop en een zwarte inkt. Plakte het bord in elkaar en op de kaart.
Stamped the "best teacher ever" sentiment on the inner piece of the Gift Card Pocket Die-Namics. Stamped the images out of School is Cool stamp and colored them up using my Copic markers. Die cut them using the School is Cool Die-Namics and adhered them on to the card. Stempelde de tekst "best teacher ever op het binneste gedeelte van de Gift Card Pocket Die-Namics. Stempelde de afbeeldingen van de School is cool stempel en kleurde ze in met mijn Copic markers. Stanste de afbeeldingen uit met de School is Cool Die-Namics en plakte de afbeeldingen op de kaart.

Used Copic Colors:
Blue - BG02, BG01, BG00
Roze - R85, R83, R81
Green - G84, G24, G21, G20
Orange - YR02, YR01, YR00
White - C5, C3, C1, C00
Yellow - Y26, Y23, Y21
Bruin - E44, E43, E41
Skin - E000, E00, E04, E11, E21

If you need to be even more inspired after this post make sure to have a look over at My Favorite Things Youtube ChannelWanneer je na deze post nog wat meer ideeën nodig heb neem dan even een kijkje op het Youtube kanaal van My Favorite Things.

Have a wonderful day!
Greets, Marieke

zaterdag 6 mei 2023

My Favorite Things May Release Countdown Day 3

 Hello all,

Welcome to day three of the May release countdown by My Favorite Things, we are halfway there! So hop along for more beautiful inspiration by the team. Welkom bij dag drie van de mei release countdown van My Favorite Things, we zijn halverwege! Hop gezellig mee langs alle design team leden voor meer inspiratie.
Today we are showcasing the newest set by artist Stacey Yacula called Peaceful Birds. Beside the new stampset we are also showcasing another hot foil die, the Hot Foil Octagon Frames Die-Namics
Vandaag laten we de nieuwste set van artiest Stacey Yacula zien genaamd Peaceful Birds. Naast de nieuwe stempel introduceren we ook een andere hot foil stans, namelijk de Hot Foil Octagon Frames Die-Namics.
For my card I cut a Kraft basecard, on a piece of Smooth White cardstock I hotfoiled the Hot Foil Octagon Frames Die-Namics using gold foil. Heat set the sentiment out of the Deepest Sympathy stamp on the white rectangle and adhered it on the base card.

Voor mijn kaart sneed ik een kraft basiskaart, op een stuk Smooth white cardstock hot foiled ik de Hot Foil Octagon Frames Die-Namics met gouden foil. Heat emboste de tekst uit de Deepest Sympathy stempel op de witte rechthoek en plakte het op de basiskaart.
Stamped the images using a light ink on some watercolor paper and colored them up using my zig markers. Die cut the images using the Peacuful Birds Die-Namics and adhered them on to the card. Finished the card of by adding some gold sequins. Stempelde de afbeeldingen met een lichte inkt op aquarel papier en kleurde zin met mijn Zig markers. Stanste de afbeeldingen uit met de Peaceful Birds Die-Namics en plakte ze op de kaart. Werkte de kaart af met verschillende gouden sequins.

Used Zig Colors:
Olive Green - 043
Mid Geen - 046
Oatmeal - 064
Light Brown - 061
Vanilla - 073
Light Gray - 091
Pale Rose - 230
Blush - 069

If you need to be even more inspired after this post make sure to have a look over at My Favorite Things Youtube ChannelWanneer je na deze post nog wat meer ideeën nodig heb neem dan even een kijkje op het Youtube kanaal van My Favorite Things.

Have a wonderful day!
Greets, Marieke

vrijdag 5 mei 2023

My Favorite Things May Release Countdown Day 4

 Hello all,

One day closer to the May release by My Favorite Things! Only four more days to go until the new release will be avaible! Dag 4 van de My Favorite Things mei release countdown is hier, dat betekend dat het nu nog maar vier dagen duurt voordat de nieuwe release verkrijgbaar is!
Today we have the cutest images by our artist Yan Au! These racoons are to die for if you ask me! I created a birthday card using the Little Rascal together with the older Happy Birthday Script Die-Namics.

Vandaag hebben we de liefste afbeeldingen van Artiest Yan Au! De wasberen zijn om voor in de rij te staan als je het mij vraagt! Ik maakte met de Little Rascal en de oudere Happy Birthday Script Die-Namics een verjaardag kaart.
Inkblended on some white cardstock Scattered Straw, Spiced Marmelade and Carved Pumpkin. Splattered some water and Carved Pumpkin and adhered it onto a Smooth White base card. Die cut the Happy Birthday Script Die-Namics four times out of Smooth White and adhered it together and onto the card.

Inktblende op wit cardstock Scattered Staw, Spiced Marmerlade en Carved Pumpkin. Spetterde water en Carved Pumpkin en plakte het op een topfold Smooth White base card. Stanste de Happy Birthday Script Die-Namics vier keer uit Smooth White cardstock. Plakte het op elkaar en op de kaart.
Heat set the sentiment on some Orange Zest cardstock and trimmed it to down to a banner. Stamped the images, colored them up using my Copic markers and cut them using the Little Rascal Die-Namics. Adhered all the images onto the card using different heights of foam tape. Heat emboste de tekst op Orange Zest Cardstock, sneed het tot een banner en plakte het op. Stempelde de afbeeldingen, kleurde ze in met mijn Copic markers en stanste ze uit met de Little Rascal Die-Namics. Plakte de afbeeldingen op de kaart met verschillende maten foamtape.

Used Copic Colors:
Racoon - W6, W4, W2, W0, W00, 0 / R20, R00 / N6, N4, N2
Yellow - Y15, Y13, Y11
Teal - BG34, BG34
Red - R35, R32

If you need to be even more inspired after this post make sure to have a look over at My Favorite Things Youtube ChannelWanneer je na deze post nog wat meer ideeën nodig heb neem dan even een kijkje op het Youtube kanaal van My Favorite Things.

Have a wonderful day!
Greets, Marieke

donderdag 4 mei 2023

My Favorite Things May Release Countdown Day 5

 Hello all,

It’s time for the My FavoriteThings May release countdown! During the countdown, the MFT Design Team is sharing lots of projects featuring all of the new products. The new release will officially be available on May 9nd at 10:00 am EST (= Europe: May 9nd at 4:00 pm CET). Het is tijd voor de My Favorite Things mei release countdown! Nog 5 dagen en dan is de nieuwe release verkrijgbaar. Tijdens de countdown, laat het MFT Design Team verschillende projecten zien met alle nieuwe producten. De release zal verkrijgbaar zijn op 9 mei om 10:00 am EST (in Nederland op 9 mei om 16:00).
Today is all about a relax evening in or outside your house. With the Outdoor Décor Die-Namics, Patio Plants Die-Namics and the Privacy Fence Die-Namics My Favorite Things got you covered for some scene building!

Vandaag draait alles om een relaxte avond binnen of buiten je huis. Met de Outdoor Décor Die-Namics, Patio Plants Die-Namics en de Privacy Fence Die-Namics heeft My Favorite Things alle benodigheden voor je!
Cut a Smooth White base card and cut a piece of Milk Chocolate slightly larger dan 1,5 inch. Out of woodpattern paper I cut 1/4 inch strips, inked them up and adhered them onto the Milk Chocolate panel. Out of Smooth White I cut the Privacy Fence Die-Namics. Adhered a panel of Smooth White behind it. Inked up the sky using Tumbled Glass, stamped the sentiment out of the Outdoor Oasis Sentiments and adhered all the elements on the card.

Sneed een Smooth White basiskaart en uit Milk Chocolate sneed ik een rechthoek iets groter dan 1,5 inch. Uit het houtstructuur papier sneed ik 1/4 inch stroken en plakte dit op de Milk Chocolate rechthoek. Uit Smooth White stanste ik de Privacy Fence Die-Namics. Plakte achter de hekken een stuk Smooth White. Beinkte de lucht met Tumbled Glass, stempelde de tekst uit de Outdoor Oasis Sentiments en plakte de elementen op de kaart.
Cut all the other pieces for the scene out of Jalepeno Popper, Limelight, Tropical Teal, Sno Cone, Cement Gray, Smooth White and Lemon Drop. Adhered them together and on the card. For the rug I used the Joyful Plaid Paper Pad. Sneed alle onderdelen voor de kaart uit Jalepeno Popper, Limelight, Tropical Teal, Sno Cone, Cement Gray, Smooth White en Lemon Drop.Plakte alles op de kaart, voor het tapijt gebruikte ik de Joyful Plaid Paper Pad.

If you need to be even more inspired after this post make sure to have a look over at My Favorite Things Youtube ChannelWanneer je na deze post nog wat meer ideeën nodig heb neem dan even een kijkje op het Youtube kanaal van My Favorite Things.

Have a wonderful day!
Greets, Marieke

dinsdag 2 mei 2023

Studio Light - Fintastic Wishes

Hallo Allemaal,

Hier is mijn wekelijkse post voor Studio Light weer. Deze keer maakte ik met de nieuwste Sweet Stories producten een slimline kaart. I'm back with my weekly post for Studio Light. This time around I decided on making a slimline card using the newest Sweet Stories products.
Maakte als eerste de achtergrond, op een stuk Summer Splash cardstock inktblende ik Evergreen Bough, Lucky Clover and Pine Needles Distress ink. Inktblende de stralen met de mask en Lucky Clover en spetterde water. Stanste de rechthoek uit met een slimline stans.

First off I made the background, on a piece of Summer Splash cardstock I inkblended Evergreen Bough, Lucky Clover and Pine Needles. Inkblended the beams using a mask and Lucky Clover and splattered some water. Die cut it using a slimline die.
Inktblende Antique Linen en Vintage Photo, spetterde water en Vintage Photo en stanste uit. Plakte het op de kaart met foam tape. Heat embsote de tekst op groen en paars cardstock. Stanste en knipte deze uit. Sneed een sidefold basiskaart en plakte hier het designpapier en daarna de geinkte rechthoek op.

Inkblended Antique Linen and Vintage Photo, splattered some water and Vintage Photo and die cut the sand. Adhered it onto the base using foam tape. Heat set the sentiments on some green and purple cardstock en and cut them by hand and with a die. Cut a white sidefold basecard and adhered some pattern paper onto it and the inked background went on top of that using foamtape.
Stempelde de afbeeldingen, kleurde ze in met mijn Copic markers en stanste ze daarna uit. Plakte alles op de kaart en werkte de helm af met een laagje glossy accent. Stamped all the images, colored them up using my Copic markers and die cut them using the matching dies. Adhered everything onto the card and finished it off adding some glossy accent to the helmet.

Gebruikte Copic Kleuren:
Geel - Y17, Y15, Y13, Y11
Groen - YG07, YG05, YG03, YG01
Schildpad - G28, G07, YG07, YG05, YG03, YG01 / W1
Roze - RV29, RV25, RV23, RV21
Blauw - B02, B00, B000, B0000
Teal - BG15, BG13, BG11
Paars - V09, V06, V05, V04, V01
Goud - E27, Y26, Y15, Y11
Hout - E37, E35, E33, E31
Otter - C8, C6, C4, C2 / N7, N5, N3/ R20
Helm - BG18, E18, E15, YR24, YR21 / N7, N5, N3

Heb een heerlijke dag!
Groet, Marieke

Papier: Smooth White, Sour Apple, Grape Jelly, Summer Splash, KJ-BBKJ-PP08
Extra: Wit embossingpoeder, SL-SS-MASK201 ,SL-ES-3DGL01