vrijdag 29 april 2022

Studio Light - Let's PAW-TY it's your Birthday

Hallo Allemaal,

Hier is mijn wekelijkse post voor Studiolight weer. Deze keer maakte ik een slimline kaart met Buddy van Creative Craftlab, uiteraard combineerde ik hem met een aantal andere producten van Studio Light.. I'm back with my weekly post for Studiolight. This time around I made a slimline card using Buddy that is in the Creative Craftlab line. Offcourse I used other Studio Light products.
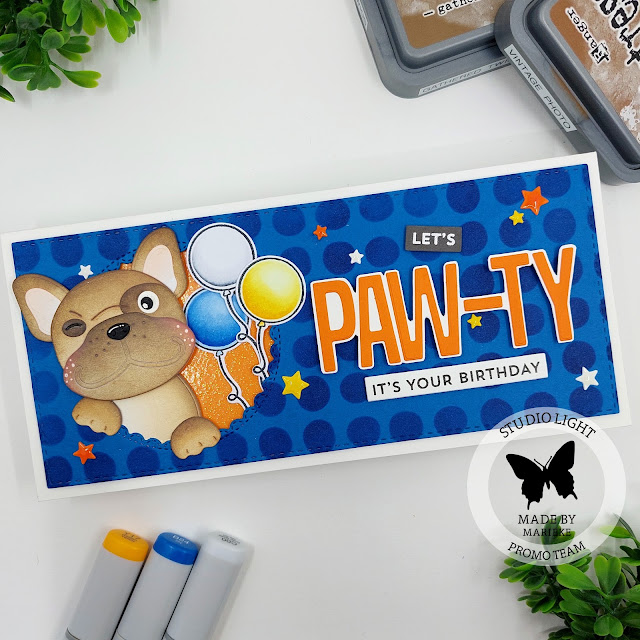
Stanste een blauwe rechthoek en inktblende met een donkerblauwe inkt de cirkels op de rechthoek en stanste daarna de cirkel uit de rechthoek. Stanste alle losse onderdelen uit wit cardstock voor Buddy en inktblende ze met Gathered Twigs, Vintage Photo en Ground Espresso Distress Oxide inkt.

Die cut a blue rectangle, inkblende the circles using a darker color blue ink and die cut the circle out of the rectangle. Die cut the loose elements of Buddy out of white cardstock and inkblended it using Gathered Twigs, Vintage Photo and Ground Espresso Distress Oxide ink.
Voor de oren gebruikte ik Tattered Rose Distress Oxide inkt en de wangen inktblende ik met Worn Lipstick Oxide inkt. Plakte het geheel in elkaar en werkte Buddy af met een witte gelpen. Plakte Buddy in het venster.

For the ears I used Tattered Rose Distress Oxide ink and inkblended the cheeks using Worn Lipstick Oxide ink. Glued Buddy together and finished him of using a white gelpen. Added Buddy into the frame.
Plakte een stuk oranje glitter cardstock op een witte topfold basiskaart en plakte met foamtape de rechthoek op de basiskaart. Stanste het woord Paw-ty en oranje cardstock en plakte het op wit cardstock. Knipte het daarna de tekst ui met een wit randje eromheen.

Cut a white topfold base card and added a piece of orange glitter cardstock onto it. Added the Blue rectangle on the base card using some foam tape. Die cut the word Paw-ty out of orange cardstock and glued it on some white cardstock. Cut the word using my sciccors leaving a white border.
Heat emboste en stempelde de kleinere teksten en stanste ze uit. Stanste uit oranje, geel en wit cardstock wat sterren en plakte deze op de kaart. Werkte de sterren af met wat Glossy Accent. Stempelde de drie ballonen en kleurde ze in met mijn Copic markers, stanste ze uit met de bijpassende stansen en plakte ze op de kaart. Heat set and stamped the sentiments and die cut them. Die cut some stars out of Orange, Yellow and white cardstock. Adhered them onto the card and added some Glossy Accent. Stamped the balloons, colored them up and cut them using the matching die.

Gebruikte Copic kleuren:
Geel - Y17, Y15, Y13, Y11, Y00
Wit - C5, C3, C1, C00, 0
Blauw - B28, B26, B24, B23, B21

Heb een heerlijke dag!
Groet, Marieke


Stempels: SL-SS-SCD19, 
Stansen: SL-SS-SCD19, CCL-FR-CD172, CCL-ES-CD159, CCL-ES-CD157, SL-ES-CD178, SL-ES-CD183
Inkt: Gathered Twigs/ Vintage Photo/ Ground Espresso/ Worn Lipstick en Tattered Rose Distress Oxide inkt Memento Tuxedo Black, Versafine Onix Black, Tsukineko Versamark, Blue Beyond.
Papier: Smooth White, Eiffel Tower, Corn Flower, Orange Zest, Black Licorice, Oranje glitter cardstock.
Extra: Glossy Accent, Wonky Dots Stencil (MFT)

donderdag 28 april 2022

Sunny Studio - Wedded Bliss

 Hello all,

I'm very excited to share today's post because as of this month I will be joining in with the Sunny Studio Stamps Design Team! So from now on every week I will share a new project using there fabulous products! Ja, zo'n leuk nieuws in mijn blogpost van vandaag! Vanaf deze maand zal ik deelnemen aan het designteam van Sunny Studio Stamps! Vanaf vandaag zal ik jullie dus iedere week inspireren met hun leuke producten!
To kick everything off I'm sharing my first card that is a mini slimline wedding card using the Wedded Bliss.

Om dan maar meteen de starten laat ik jullie vandaag een mini slimline kaart zien met de super leuke Wedded Bliss.
So first off I cut a white panel, die cut it and embost the panel using the Moroccan Circles Embossing Folder. Cut a rectangle out of pattern paper and glued that on top of the embossed panel.

Sneed een witte rechthoek en stanste deze uit, bewerkte het daarna met de Moroccan Circles Embossing folder. Stanste een rechthoek uit design papier en plakte het op de ge-emboste achtergrond.
Using the same outer die I cut a small piece of white cardstock and some pattern paper from the same paperpad and adhered them together. Added some twine for some interest. Die cut the heart out of the Cupcake Shape dies twice out of cardstock and pattern paper and glued the onto the twine.

Stanste met dezelfde stans een stuk designpapier en wit cardstock en plakte dit op elkaar. Voegde wat twine toe voor wat meer diepte. Stanste uit cardstock en design papier het hartje van de Cupcake Shape Dies en plakte dit op het twine.
Stamped the image, colored it up using my Copic markers and cut them using the Wedded Bliss Die. Die cut a heart out of cardstock and another one out of white cardstock and dry embost the smallest heart. Adhered them together. Heat set all the sentiments using gold embossing powder and cut them. Adhered eveything onto a light grey base card. Stempelde de afbeeldingen, kleurde hem in met mijn Copic markers en stanste hem uit met de Wedded Bliss stans. Stanste het grote hart uit licht grijs cardstock en een slag kleiner uit wit cardstock en emboste deze. Heat emboste de teksten met goud embossing poeder op wit cardstock en stanste en knipte deze uit. plakte alles op een licht grijze basiskaart.

Used Copic Colors:
Penguins - N6, N4, N3, N2 / YR04, YR02, YR00 / E53, E51, E50, 0 / R20
Suit - W4, W2, W1, W00
Pink - RV02, RV00, RV000, RV0000
Crown - C3, C1, C00
Rose - YG13, YG11 / R24, R22, R20

Have a wonderful Day!
Greets, Marieke

dinsdag 26 april 2022

My Favorite Things - Rainbow Bridge Card Kit Release

 Hello all,

The day is here that the Rainbow Bridge card kit release by My Favorite Things is avaible! What do you think is it beautiful or what? So what is ending up in your shopping cart? Watch your budget but have fun shopping! De dag is aangebroken dat de Rainbow Greetings card kit release van My Favorite Things verkrijgbaar is! En wat vond je ervan schitterend toch? Welke producten belanden bij jou in het mandje? Let op je budget maar heb vooral plezier met winkelen!
For today's inspiration I decided to use the fun Through the Clouds stencil together with a few other products that come in the versatile card kit.
Voor mijn inspiratie van vandaag besloot ik het leuke Through the Clouds stencil te gebruiken in combinatie met verschillende andere producten die in deze card kit zitten.
Cut a Smooth White topfold base card. Inkblended the clouds using the stencil and Salty Ocean Distress ink on the card. Splattered some water and die cut two cloud borders and inkblended those aswell. Sneed een Smooth White topfold basiskaart. Inktblende de wolken met het stencil en Salty Ocean Distress inkt op de kaart. Spetterde water en stanste twee wolken randen en blende hier wat inkt op.

Die cut the rainbow using the Raindbow Bridge Die-Namics out of Picked Raspberry, Orange Zest, Lemon Drop, Limelight, Summer Splash and Grape Jelly. Adhered it onto the card and die cut the cat Silhouette using Black Licorice and the Pet Silhouettes Die-Namics. Stanste de regenboog van de Rainbow Bridge Die-Namics uit Picked Raspberry, Orange Zest, Lemon Drop, Limelight, Summer Splash en Grape Jelly. Plakte alles op de kaart en stanste de kat met de Pet Silhouette Die-Namics en Black Licorice cardstock.
Stamped the sentiment out of the Rainbow Bridge Goodbyes directly onto the card. Die cut a red heart, glued it onto the card and added some Glossy Accent. Finished the card of using different seizes of clear sequins. Stempelde de tekst uit de Rainbow Bidge Goodbyes rechtstreeks op de kaart. Stanste het hartje uit, plakte dit op de kaart en gaf het een laagje Glossy Accent. Werkte de kaart af met verschillende maten clear sequins.

If you need to be even more inspired after this post make sure to have a look over at My Favorite Things Youtube ChannelWanneer je na deze post nog wat meer ideeën nodig heb neem dan even een kijkje op het Youtube kanaal van My Favorite Things.

Have a wonderful day!
Greets, Marieke

maandag 25 april 2022

My Favorite Things - Rainbow Bridge Card Kit Countdown Day 1

 Hello all,

Welcome to day one of the April Card kit Release countdown by My Favorite Things.   Lucky the wait on the Card kit Release is only short and you can have a shopping spree already tommorow Tuesday April 26th at 10:00 am EST. Welkom bij dag een van de April Card Kit Release countdown van My Favorite Things. Gelukkig hoef je maar even te wachten want morgen is de card kit al beschikbaar om 16:00!
The Card Kit contains the Rainbow Bridge Goodbyes stamp set, Rainbow Bridge Die-Namics, Pet Silhouettes Die-Namics, Through the Clouds Stencil, Heavenly Glow Stencil, Pawsome Prints Paper pad, Two sheets of Smooth White cardstock and one sheet of the following colors; Wild Cherry, Orange Zest, Lemon Drop, Limelight, Cornflower, Grape Jelly and Black Licorice. De Card Kit bestaat uit de rainbow Bridge Goodbyes stempel, Rainbow Bridge Die-Namics, Pet Silhouettes Die-Namics, Through the Clouds Stencil, Heavenly Glow Stencil, Pawsome Prints Paper pad, twee vellen Smooth White cardstock en één vel cardstock van de volgende kleuren; Wild Chery, Orange Zest, Lemon Drop, Limelight, Cornflower, Grape Jelly en Black Licorice.
Offourse the supplies are sold separately, if you are only interested in a specific item. Beside the Kit there are also three seperate items sold with this set the With Sympathy Die-Namics, There Are No Goodbyes Stamp Set and the Paw Prints Die-Namics (previously released). As always My Favorite Things is offering a new free for $60 that comes with this kit; Cutest Clouds Ever Die-Namics. Uiteraard zijn de producten ook los te koop, wanneer je alleen geïnteresseerd bent in één van de producten. Naast de Kit zelf biedt MFT de bijpassende With Sympathy Die-Namics, There Are No Goodbyes Stamp Set en de (eerder gereleased) Paw Prints Die-Namics aan. Zoals iedere nieuwe release biedt My Favorite Things een nieuwe free for $60 en dat is ditmaal de Cutest Clouds Ever Die-Namics.
For my first card I kept it Clean and Simple. I cut a Smooth White cardbase, stamped the pawprints using Cement Gray and stamped the sentiment out of the same 
Rainbow Bridge Goodbyes stamp set using black ink. Die cut the heart out of the Paw Prints Die-Namics out of Red Hot and ahered everything onto a Cement Gray basecard. Voor mijn eerste kaart maakte ik een Clean en Simple kaart. Ik sneed een Smooth white rechthoek, stempelde met Cement Gray de pootjes op de kaart en uit dezelfde 
Rainbow Bridge Goodbyes stempel stempelde ik de tekst met zwarte ink. Stanste het hart uit de Paw Prints Die-Namics uit Red Hot cardstock en plakte alles op een Cement Gray basiskaart.

If you need to be even more inspired after this post make sure to have a look over at My Favorite Things Youtube ChannelWanneer je na deze post nog wat meer ideeën nodig heb neem dan even een kijkje op het Youtube kanaal van My Favorite Things.

Have a wonderful day!
Greets, Marieke

zondag 24 april 2022

Proost op jullie Huwelijk

Hallo allemaal,

Gisteren liet ik jullie een huwelijks kaart zien, deze maakte ik op bestelling voor de zus van de bruid. Aangezien de bruid een collega van mij is was het team ook uitgenodigd om op het bruiloftsfeest te mogen zijn. Ik maakte daarom deze kaart. Yesterday I showed you a wedding card, now it happens that I made that card for the sister of the bride. The bride is a colleague of mine so the team was invited to the wedding party also, for this event I made this card. 
Het is een grote dubbele kaart geworden, 14 x 18,5. Sneed een witte rechthoek van 13,5 x 18 en een rechthoek van aquarel papier van 13 x 17,5. Op het laatste inktblende ik Scattered Straw, Fossilized Amber en Tea Dye. Spetterde water en inktblende witte inkt met het Scattered Heart Stencil. Spetterde witte verf en plakte het op de basiskaart.

It´s a big card, 14 x 18,5 out of Kraft paper. Cut a white rectangle 13,5 x 18 and a watercolor rectangle 13 x 17,5. On the last one I inkblended Scattered Straw, Fossilized Amber and Tea Dye. Splattered some water and inkblended the hearts using white ink and the scattered hearts stencil. Splattered some white paint and glued them onto the base card.
Stanste de outline en de flessen uit groen cardstock en inktblende Bundled Sage en Rustic Wilderness op het groen. Stanste uit hetzelfde groende cardstock en zilver cardstock dezelfde cirkels plakte deze verschoven op elkaar en plakte deze op de flessen. Die cut the outline and the bottles out of green cardstock. Inkblended them using Bundles Sage and Rustic Wilderness. Die cut a green silver circle and glued them slightly moved together on to the bottles.

Stanste alle losse lettersen cijfers uit wit of zwart cardstock. Plakte Proost op de outline en op de basis. Heat emboste de tekst op jullie op rood cardstock, stanste dit uit en plakte het op de kaart. Stempelde de tekst Huwelijk rechtstreeks op de kaart.
Die cut all the letters and numbers out of black and white cardstock. Glued the word Proost onto the outline and onto the base. Heat set the sentiment on some red cardstock, die cut it and glued it on the card. Stamped the word Huwelijk directly on the card.
Plakte de letters en cijfers op de kaart en op de flessen. De flessen gingen op de kaart en ik maakte het schuim met een liquid applicator. Werkte de kaart af met wat rode hartjes. Glued the letters and numbers on the card and the bottles. Glued the bottles on the card and made the foam of the beer using liquid applicator. Finished off the card adding some red hearts

Heb een heerlijke dag!
Groet, Marieke

Stempels: Huwelijk (Carlijn Design)
Stansen: Proost, Slimline kaart 6 Champagne, (Carlijn Design), lowercase alphabet (Craft Emotions), Tree Builder, Tag Builder Blueprints 5, Skinny Strips, A2 Circle STAX Die-Namics (My Favorite Things)
Inkt: Versafine Onix Black, Scattered Straw, Fossilized Amber, Tea Dye, Bundled Sage, Rustic Wilderness, Picket Fence, Tsukineko Versamark.
Papier: Kraft, Sour Apple, Smooth White, Red Hot, Silver (My Favorite Things)
Extra: Scattered Hearts Stencil (My Favorite Things), Liquid Appliqué, witte verf marker.

vrijdag 22 april 2022

Scrap & Co Challenge - Bloemen

Hallo allemaal,

Het met nog een week te gaan voor de maandelijkse challenge van Scrap & Co laat ik jullie deze kaart kaart zien. Deze maand dagen we je uit om een project te maken met daarop bloemen verwerkt. Volgens mij een hele veelzijdig thema dus doen jullie gezellig mee? With only a week to go for the montly challenge at Scrap & Co, I have this card for you. This month we challenge you to make a project wich showcases flowers. Are you playing with us?
Meedoen met de challenge is simpel; 
  • Maak een nieuwe kaart, lay-out, plannerpagina, scrapalbum of mixed mediaproject met de opdracht van die maand. (max. 2 inzendingen per persoon)
  • Gebruik voor je nieuwe creatie producten/ merken die we verkopen in de (web)winkel. Twijfel je neem dan even een kijkje in de webwinkel.
  • Plaats van je project 1 foto (anders zijn we het overzicht kwijt) voor de 28ste van deze maand in de betreffende map in de Scrap & Co Facebookgroep, of op Instagram onder de #ScrapenCoChallenge en tag @Scrap_en_Co
En wie weet start jij het begin van de volgende maand wel met een leuke cadeaubon van 15 euro voor de (web)winkel, of word je door het designteam uitgekozen tot gastdesigner!

Playing with the challenge is really easy;
  • Make a new card, mixed media project, scrapbook layout, planner page or a scrap album using the theme of this month. (a maximum of 2 entries per person)
  • Use products and or brands that are being sold in the (web)shop. If you are in doubt what the store is selling take a look over at the webshop.
  • Add 1 photo of your project (otherwise we will loose track of things) in the matching folder in the Scrap & Co Facebookgroup. Or over at Instagram and use the #ScrapenCoChallenge and tag @Scrap_en_Co
And who knows you might even win a giftvoucher of 15 euro to the (web)shop, or you might being picked as a guestdesigner for a upcomming challenge.
Voor mijn kaart sneed ik een witte rechthoek en beplakte dit met designpapier. Stanste er een cirkel uit en plakte acetate aan de achterkant. Sneed een iets smaller witte rechthoek en inktblende dit met Tumbled Glass en spetterde water en witte verf. Vulde de shaker en plakte hem dicht. Cut a wit rectangle and added a layer of pattern paper. Die cut a circle out of it and added some acetate on the back. Cut a slightly smaller rectangle and inkblended some Tumbled Glass, splattered some water and white paint. Filled up the shaker and closed the shaker.

Stempelde alle bloemen en de vogels. Kleurde ze in met mijn Copic markers, stanste alles uit en plakte het om de shaker heen. Stamped all the flowers and the birds. Colored them up using my Copics and die cut them using the matching dies. Glued everything around the circle to turn it into a wreath.
Stanste de letters en cijfers uit goud cardstock en plakte dit in het midden van de shaker. Heat emboste de teksten op wit cardstock en stanste of knipte het uit. Plakte de teksten op de kaart met foam tape. Die cut the letters and numbers and adhered them on to the shaker. Heat set the sentiments on some white cardstock and cut them using a die and my sciccor. Added the sentiments to the card using foam tape.

Gebruikte Copic kleuren:
Groen - YG17, YG13, YG11
Wit - C5, C3, C1, 0
Geel - Y17, Y15, Y13
Blauw - B52, B45, B41, B04, B02
Paars - BV04, BV02, BV00, V17, V15
Roze - R85, R83, R81
Vogel - RV02, RV00, Rv000, RV0000
Oranje - YR02, YR04, YR00
Mannetjes vogel - E53, E51, E50, B02, B00, B000
Zwart - N6, N4, N2

Heb een heerlijke dag!
Groet, Marieke

Stempels: Spring Songbird, Winter Songbird (My Favorite Things), Huwelijk (Carlijn Design)
Stansen: Spring Songbird, Winter Songbird, Skinny Strips Die-Namics, Inside & Out stitched Circle Stax Die-Namics, Captions Alphabet Die-Namics (My Favorite Things), Slimline kaart 6 Champagne (Carlijn Design)
Papier: Smooth White, Colorful Canvas Paper Pad, Goud cardstock

maandag 18 april 2022

Studio Light - Hi and You

Hallo Allemaal,

Hier is mijn wekelijkse post voor Studiolight weer. Deze keer maakte ik twee kaarten met de SS Beer en Bijen in combinatie met de HI en You van Karin Joan. I'm back with my weekly post for Studiolight. This time around I made two cards using the SS Bear and Bees in combination with the Hi and You by Karin Joan.
Ik maakte eigenlijk twee dezelfde soort kaarten alleen dan net even anders en ik gebruikte beide nieuwe sets van Karin Joan. 

I made almost two of the same cards only then using the different die and stamp set by Karin Joan.
Sneed een sidefold witte basiskaart en inktblende de kleuren Squeezed Lemonade en Wild Honey. Spetterde daarna wat zwarte verf. Stanste de teksten You uit twee verschillende kleuren grijs en wit cardstock en plakte het op elkaar. 

Cut a sidefold with basecard and inkblended de colors Squeezed Lemonade and Wild Honey. Splattered some black paint. Die cut the word You out of two different colors of gray and white cardstock and adhered them together.
Stempelde de bij, kleurde hem in en stanste hem uit. Bepaalde waar ik alles wilde hebben en stempelde het streepjes hart en de andere tekst op de kaart. Plakte daarna alles op de kaart en werkte de vleugels af met wink of stella.

Stamped the bee, colored him up and die cut him using the matching die. Decided where I wanted everything to be and stamped the striped heart and the sentiment onto the card. Glued everything on the card and finished off adding some Wink of Stella in the wings.
Sneed een topfold witte kaart. Inktblende Squeezed Lemonade en Wild Honey op de kaart met het stencil en spetterde zwarte verf. Stanste het woord Hi en hello uit twee verschillende kleuren grijs en wit cardstock en plakte het op elkaar.

Cut a topfold white base card. Inkblended the colors Squeezed Lemonade en Wild Honey on the card using a stencil and splattered some black paint. Die cut the word Hi and Hello out of two different colors of gray and white cardstock and adhered them together.
Stempelde de bij, kleurde hem in en stanste hem uit. Bewerkte de vleugels met wink of Stella. Bepaalde waar ik alles wilde hebben en stempelde de tekst op de kaart. Plakte daarna de bij en de teksten op de kaart. Stamped the bee, colored him up using my Copic markers and cut him using the matching die. Added some wink of stella to the wings. Decided where I wanted eveything to be and stamped the sentiment directly onto the card. Glued all the loose elements on the card and it was all finished.

Gebruikte Copic kleuren:
Bijen - N8, N6, N4; Y17, Y15, Y13, Y11/ B02, B00, B000, B0000/ R20

Heb een heerlijke dag!
Groet, Marieke

Stempels: SS-SCD37, SS-STAMP215, KJ-BBKJ-SCD27
Stansen: SS-SCD37, KJ-BBKJ-SCD27, KJ-BBKJ-SCD26
Inkt: Squeezed Lemonade and Wild Honey Distress inkt, Memento Tuxedo Black, Versafine Onix Black.
Papier: Smooth White, Eiffel Tower, Gravel Gray.
Extra: Wink of stella clear, 6002/0828 Scr@p Stencil Bee Happy.

donderdag 14 april 2022

Studio Light - Welcome Baby

Hallo Allemaal,

Hier is mijn wekelijkse post voor Studio Light weer. Deze keer maakte ik een babykaart met de SS Chicken & Eggs. Naast dat het mijn wekelijkse post is, heb je ook nog (6x) kans om de complete collectie van de Spring Sweet Stories te winnen op mijn InstagramI'm back with my weekly post for Studio Light. This time around I made a baby card using the SS Chicken & Eggs. Beside that it is my weekly post, this card is part of a Instagram Hop also. With this hop you have six chances on winning the whole new Sweet Stories Spring Collection!
Ik maakte eerst de kaart en daarna de tag maar eigenlijk deed ik bijna hetzelfde. Sneed een witte rechthoek en kleurde daar het gras op. Stempelde de afbeeldingen, kleurde ze in en stanste ze uit.

First I made the card, but I made the tag almost the same. Cut a white rectangle and colored the grass. Stamped all the images, colored them up and die cut them using the matching dies.
Stanste de geschupte rand en plakte daar de rechthoek op. Stempelde beide teksten op de rechthoek. Sneed een topfold basiskaart en beplakte dit met designpapier. Plakte hier de rechthoek op en werkte het geheel af met enemal dots.

Die cut the scalloped rectangle and added the grass rectangle. Stamped both of the sentiments directly onto the card. Cut a topfold white base card and added a layer of pattern paper. Glued everything on the base card and finished of using enemal dots.
Voor de tags deed ik hetzelfde alleen stanste ik de tag uit designpapier en wit cardstock. Voor de tag gebruikte ik wat zwarte twine. For the tag I did the same except I die cut the tag out of pattern paper and white cardstock, I also added some black twine.

Gebruikte Copic kleuren:
Gras - YG17, YG13, YG11
Kuiken - Y17, Y15, Y13, Y11/ YR04, YR02, YR00
Schaal - BG15, BG15, BG11, BG10


Heb een heerlijke dag!
Groet, Marieke

Stempels: SS-SCD36, SS-STAMP215, SS-STAMP214, CCL-FR-STAMP164
Stansen: SS SCD36, CCL-ES-CD209
Inkt: Memento Tuxedo Black, Versafine Onix Black, Lemon Drop
Papier: Neenah Classic Crest, Echo Park - Hello Baby, it's a boy.
Extra: enemal dots, witte gelpen, wink of stella.

dinsdag 12 april 2022

My Favorite Things - April Product Launch

 Hello all,

It’s time for the My Favorite Things April product launch! All new products are available right now! The MFT design team is sharing projects created with the new stuff. You can find a lot of inspiration! Het is tijd voor de My Favorite Things april product lancering. Alle nieuwe producten zijn vanaf nu verkrijgbaar! Het MFT design team deelt ook vandaag weer een lading aan inspiratie!
So for the release day I decided to play with the newest Miss Tina stamp called SPECtacular. For today's inspiration I decided on making a mini slimline birthday card.

Voor de release dag besloot ik met de nieuwste Miss Tina stempel genaamd SPECTacular aan de slag te gaan. Voor de inspiratie kaart van vandaag maakte ik een mini slimline verjaardagskaart. 
Heat set the glasses on some Sno Cone, Summer Splash and Tropical Teal. Die cut the glasses using the SPECtacular Die-Namics. Heat set the sentiment (Bitty Birthday Wishes) on some Black Licorice cardstock and die cut it.

Heat emboste de brillen op Sno Cone, Summer Splash en Tropical Teal cardstock. Stanste ze uit met de SPECtacular Die-Namics. Heat emboste de tekst (Bitty Birthday Wishes) op Black Licorice cardstock en stanste het uit.
Cut a Smooth White base card and added a Cement Gray panel. Cut a Smooth White rectangle and stamped the sentiment. Added all the elements on to the card using foam tape and finished of using enemal dots. Sneed een Smooth White basis kaart en plakte er een Cement Gray panel. Sneed een Smooth White rechthoek en stempelde de tekst. Plakte alle elementen op de kaart met foamtape en werkte de kaart af met enemal dots.

If you need to be even more inspired after this post make sure to have a look over at My Favorite Things Youtube ChannelWanneer je na deze post nog wat meer ideeen nodig heb neem dan even een kijkje op het Youtube kanaal van My Favorite Things.

Have a wonderful Day!
Greets, Marieke

maandag 11 april 2022

My Favorite Things April Release Countdown Day 1

Hello all,

Today is the last day of the April release countdown of My Favorite Things and you know what that means right? Tommorow all the new products will be avaible! Did you decide on what you are going to get? Luckly you have one more night to think about it! Vandaag is de laatste dag van de aapril release countdown van My Favorite Things en je weet wat dat betekend! Morgen zullen alle nieuwe producten beschikbaar zijn. Heb je al besloten wat je zou willen hebben? Gelukkig kun je er nog een dag over nadenken!  
Today we are showcasing the newest stamp by artist Tiddly Inks called; Sweet Señorita. For my inspiration card with it, I made a more simple card. 
Vandaag laten we de nieuwste stempel zien van artiest Tiddly Inks genaamd; Sweet Señorita. Voor mijn inspiratie kaart van vandaag maakte ik een wat simpelere kaart met deze stempel.
Cut a A2 topfold base card and glued two strips pattern paper that comes in the Happy Patterns Paper pad. Cut a Smooth White 4x51/4 inch rectangle masked of the bottom and inked up some Stormy Sky using the Small Brick Wall Stencil. Splattered some black paint and inkblended the bottom using Stormy Sky and Black Soot.

Sneed een Smooth White A2 topfold basiskaart en plakte er twee stroken designpapier uit het Happy Pattern Paper Pad op. Sneed een Smooth White rechthoek van 4 x 51/4 inch en maskeerde de onderkant. Inkte de stenen met het Small Brick Wall Stencil en Stormy Sky. Spetterde zwarte spetters en inkte de onderkant met Stormy Sky en Black Soot Distress inkt.
Stamped the images, colored them up and die cut them using the matching dies. Heat set the sentiment and die cut it. Glued everything onto the base card using foam tape and finished the card off using some different colors enemal dots. Stempelde de afbeeldingen, kleurde ze in met mijn Copic markers en stanste ze uit met de bijpassende stansen. Heat emboste de tekst op Black Licorice en stanste het uit. Plakte alles op de basiskaart met foamtape en werkte het geheel af met enemal dots.

Used Copic Colors:
Yellow - Y17, Y15, Y13, Y11, Y00, Y000
Black - N8, N6, N4
Skin - E000, E00, E04, E11, E21/ R20
White - C5, C3, C1, C00, 0
Teal -BG18, BG15, BG13, BG11, BG10
Pink - RV17, RV14, RV13, RV11
Red - R59, R29, R27, R24
Blue - B28, B26, B24, B23
Taco - E44, E43, E42, E41/ YG17/ Y17/ R27
Green - YG67, YG63, YG03

If you need to be even more inspired after this post make sure to have a look over at My Favorite Things Youtube ChannelWanneer je na deze post nog wat meer ideeën nodig heb neem dan even een kijkje op het Youtube kanaal van My Favorite Things.

Have a wonderful Day!
Greets, Marieke