Posts tonen met het label Winter. Alle posts tonen

woensdag 29 januari 2025

Winter Groetjes

Hallo allemaal,

Afgelopen maand deed ik weer mee met een Facebook ATC swap. Het thema was Winter en ik maakte deze serie ATC kaarten. Last month there was a ATC swap on a Facebook group. The theme was Winter and this is the series of cards I made.

Gebruikte Copic Kleuren:
Blue - B00, B000, B0000
Red - R59, R39, R27, R24
White - C5, C3, C1, C00, 0
Pink - R00, R000, R0000, 0
Brown - E44, E43, E42, E41
Orange - YR68, YR65

Heb een heerlijke dag!
Groet, Marieke

Stempels: Winter Birds, Frosty Fairy Friends (Lawn Fawn), Sneeuwpop, Hallo Herfst (Carlijn Design)
Stansen: Frosty Fairy Friends, Hallo Herfst, ATC Rechthoeken Snijmallen
Inkt: Memento Tuxedo Black, Versamark Watermarkt ink, Limelight (MFT)
Papier: Wit, Rood, CCL-FR-PP81
Extra: Wit Embossing Poeder, shakermateriaal

woensdag 4 december 2024

Sending Wishing... (winter edition)

Hallo Allemaal,

Vandaag maakte ik een kaart voor de lopende Lawnfawnatics Challenge; Coffee,tea & treats. Ik denk dat de muisjes veel plezier beleven tijdens het sneeuwballengevecht en een lekker warm drankje, wat denk jij? Today a card that I created for the running Lawnfawnatics Challenge; Coffee,tea & treats. I think the mice are having quite some fun watching having a snowball fight while enjoying some hot drinks
Beinkte een rechthoek, bespetterde het met water, witte verf en Blueprint Sketch gemengd met water. Stanste een strook sneeuw en beinkte de onderkant met inkt. Stanste de mok uit wit cardstock en beinkte ook hier de onderzijde.

Inked up a rectangle, splattered some water, white paint and Blueprint Sketch mixed with water. Die cut a piece of snow and inked up the bottom of the snow using Distress ink. Die cut the mug and again inked up the bottom.
Maakte van de mok een shakerkaart, voordat ik deze opplakte vulde ik hem uiteraard met shakermateriaal. Heat emboste alle teksten op roze of grijs cardstock en stanste alles uit.

Turned the mug into a shaker, before adding it on the card I offcourse filled it up with shakermaterial. Heat set all the sentiments on pink and gray cardstock and die cut all of them.
Stempelde alle afbeeldingen, kleurde ze in met mijn Copic markers en knipte alles uit. Plakte alle onderdelen op de kaart. Stamped all the images, colored them up using my Copic markers and cut them by hand. Added all the elements on the card using glue or foamtape.

Gebruikte Copic kleuren:
Pink - R85, R83, R81
Purple - BV04, BV02, BV00, BV000, BV0000
White - C5, C3, C1
Wood - E37, E35, E33
Mice - W6, W4, W2, W1, W00 / R22, R20, R00

Heb een heerlijke dag!
Groet, Marieke

Inkt: Memento Tuxedo Black, Versamark Watermark inkBlueprint Sketch and Spun Sugar Distress ink Oxide. Shaded Lilac and Blueprint Sketch Distress ink.
Papier: White, Picked Raspberry and Eiffel Tower (MFT)

vrijdag 15 december 2023

Altenew - Season's Greetings

Hallo allemaal,

Vandaag ben ik er weer met een kaart die ik als gastdesigner voor Altenew maakte. Dit keer heb ik een kaart die ik maakte met een aantal nieuwe en een aantal oudere producten. Today i'm back again with a post as a guestdesigner for Altenew. This time around I created a card using some new and older products.
De basis van de kaart is een topfold witte kaart. Ik sneed een rechthoek 5 x 3 3/4 inch en beinkte dit met het Sweater Pattern Builder stencil en de kleuren Mauve en Berrylicious. Plakte dit op een donker kleur cardstock en plakte het met foam tape op de kaart.

The base of the card is a topfold white card. Cut a white rectangle 5 3 3/4 inch and inked it up using the Sweater Pattern Builder stencil and the colors Mauve and Berrylicious. Adhered the rectangle onto a darker shade of cardstock and on the base using foam tape.
Op hetzelfde kleur cardstock hotfoiled ik de tekst met witte hot foil en de Holiday Greetings Hot Foil Plate. Stanste het daarna uit met de bijpassende Holiday Greetings Die Cut.

On to the same color of cardstock I hotfoiled the sentiment using the Holiday Greetings Hot Foil Plate and white hot foil. Afterwards I cut it using the matching Holiday Greetings Die Cut.
Stempelde de Mini Delight: Very Berry stempel met Mauve en Berrylicious. De blaadjes stempelde ik met Aloe Vera, Matcha Tea en Swamp Green. Knipte het uit en plakte ze op de kaart. Werkte de kaart af met wat roze rhinestones. Stamped the Mini Delight: Very Berry stamp using Mauve and Berrylicious. The leaves are die cut using Aloe Vera, Matcha Tea and Swamp Green. Cut them using my sciccors and adhered them on the card. Finished the card of by adding some pink thinestones.

Heb een heerlijke dag!
:Liefs, Marieke

zaterdag 2 december 2023

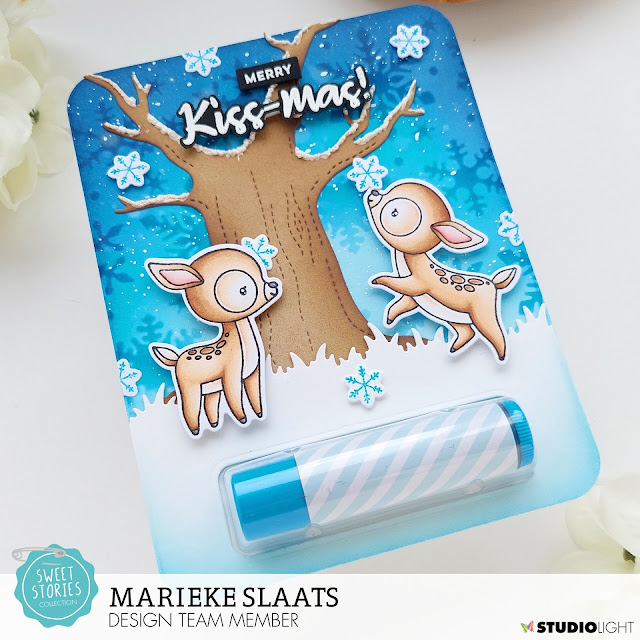
Studio Light - Merry Kiss-Mas!

Hallo Allemaal,

Hier is mijn wekelijkse post voor Studio Light weer. Deze keer maakte ik met de nieuwste Sweet Stories producten een Lipbalm kaart. I'm back with my weekly post for Studio Light. This time around I decided on making a Lipbalm card using the newest Sweet Stories products.
Stanste uit wit cardstock de Money Card Die-Namics (MFT) en uit aquarelpapier. Inktblende de kleuren Tumbled Glass, Mermaid Lagoon en Chipped Sapphire. Met een stencil en de twee donkerste blauwe kleuren inkt ging ik nog een keer over de achtergrond heen. Spetterde water en witte verf.

Die cut the Money Card Die-Namics (MFT) out of white cardstock and watercolor paper. Inkblended the colors Tumbled Glass, Mermaid Lagoon and Chipped Sapphire. Using the mask and the two darkest colors I inkblended the snowflakes. Splattered some water and white paint.
Stanste het gras uit een helft van de Money Card Die-Namics en beinkte de onderkant met de twee lichte kleuren blauwe inkt. Plakte deze tijdelijk op de achtergrond en stanste de lipbalm pouch eruit. Plakte de pouch aan de binnenzijde. Beplakte een lipbalm met designpapier en plakte de pocket dicht. Die cut the grass out of half of the Money Card Die-Namics en inked up the bottom using the two lightest colors of blue. Temporarly added them together and die cut the lipbalm die. Adhered the pouch to the back of the grass. Adhered some pattern paper to the lipbalm and closed the card.

Stanste de boom uit Kraft cardstock, bewerkte dit met Vintage Photo en Walnut Stain en bewerkte de takken met Fluffy Stuff. Plakte de boom achter het gras en knipte wat over hing af. Stempelde de sneeuwvlokken met Mermaid Lagoon en stanste ze uit. Die cut the tree out of Kraft cardstock, added some Vintage Photo and Walnut stain and added some Fluffy Stuff to the branches. Adhered the card to the pocket and cut of what was to much. Stamped the snowflakes using Mermaid Lagoon and die cut the using the matchihng dies.
Stempelde de afbeeldingen, kleurde ze in met mijn Copic markers en stanste ze uit. Heat emboste de teksten met wit embossing poeder op zwart cardstock. Stanste en knipte ze uit en plakte ze op de kaart. Stamped all the images, colored them up using my Copic markers and cut them using the matching dies. Heat set the sentiments using white powder and black cardstock. Die cut or cut them using my sciccors and adhered all the elements ot the card.

Gebruikte Copic Kleuren:
Herten - E57, E55, E53, E51, E50, 0 / R20, R00, R000 / N6, N4

Heb een heerlijke dag!
Groet, Marieke

zaterdag 18 november 2023

My Favorite Things November Release Spotlight Day 4

 Hello all,

Welcome to day four of the November release spotlight post by My Favorite Things! So hop along for more beautiful inspiration by the team. Welkom bij dag vier van de november release spotlight dag van My Favorite Things. Hop gezellig mee langs alle design team leden voor meer inspiratie.
For the last day I created a more Clean and Simple card using the Merry Moose together with the Drifts & Hills Stencil.

Voor mijn kaart van vandaag maakte ik een Clean en Simpel kaart met de Merry Moose en het Drifts & Hills Stencil.
Cut a topfold Smooth White Cardbase, added some snow using Peacock Feathers Distress ink and a stencil. Splattered some ink and let it dry. Heat embost the sentiment and cut it.

Sneed een topfold Smooth White basiskaart, maakte sneeuw met Peacock Feathers Distress inkt en een stencil. Spetterde wat inkt op de kaart en heat emboste de tekst op een stuk kraft.
Stamped the images, colored them up using my Copic markers and cut them using the matching Merry Moose Die-Namics. Added them to the card and gave the noses of the reindeer some detail. Stempelde de afbeeldingen, kleurde ze in met Copic markers en stanste ze uit met de bijpassende Merry Moose Die-Namics. Voegde wat detail toe aan de neuzen van de herten en plakte alles op de kaart.

Used Copic Colors:
Red - R59, R29. R27, R24
Pink - R85, R83, R81
Blue - B04, B02, B00, B000
Light Green - YG05, YG03, YG01
Dark Green - YG67, YG63, YG03
Blue Green - BG15, BG13, BG11
Black - N9, N7, N6, N4
Yellow - Y17, Y15, Y13
Grey / White - C5, C3, C1, C00, 0
Moose - E59, E57,E55 / E47, E44, E43, E42
Wood - E35, E33, E31

If you need to be even more inspired after this post make sure to have a look over at My Favorite Things Youtube ChannelWanneer je na deze post nog wat meer ideeën nodig heb neem dan even een kijkje op het Youtube kanaal van My Favorite Things.

Have a wonderful day!
Greets, Marieke

vrijdag 17 november 2023

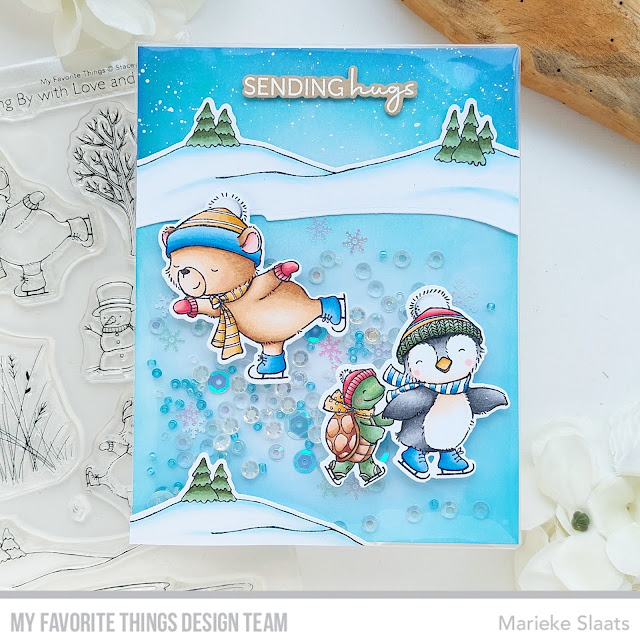
My Favorite Things November Release Spotlight Day 3

 Hello all,

Welcome to day three of the November release spotlight post by My Favorite Things! So hop along for more beautiful inspiration by the team. Welkom bij dag drie van de november release spotlight dag van My Favorite Things. Hop gezellig mee langs alle design team leden voor meer inspiratie
Today the designteam is showcasing the new stamps by artist Stacey Yacula. For my card I decided to create a shaker card using the Warm Winter Hugs together with the Something for Everything (love that the sentiments have two fonts!).

Vandaag laat het designteam die nieuwste stempels van Stacey Yacula zien. Voor mijn kaart maakte ik een shaker kaart met de Warm Winter Hugs en de Something for Everything (ik vind het geweldig dat er twee fonts in één zin zit!).
Inkblended a piece of watercolor paper using Tumbled Glass, Peacock Feathers and Blueprint Sketch. Splattered the whole panel with water and only the top part with white paint. Put the panel into an Avery Elle pocket and adhered the top part on the inked panel. Filled the rest with shaker material and closed the pocket before adhering it to a white topfold base card.

Inktblende op aquarelpapier de achtergrond met Tumbled Glass, Peacock Feathers en Blueprint Sketch. Spetterde water op de hele achtergrond en alleen witte verf op de bovenzijde. Stopte het geheel in een Avery Elle pocket en plakte de bovenkant vast aan de pocket. Vulde de onderkant van de shaker met shakermateriaal en sloot de pocket voordat ik het geheel op een witte topfold basiskaart plakte.
Stamped the images, colored them up using Copic markers and cut them using the matching Warm Winter Hugs Die-Namics. Heat set the sentiment using white embossinpowder on to Kraft cardstock and cut it using the matching Something for Everything Die-Namics. Stempelde de afbeeldingen, kleurde ze in met mijn Copic markers en stanste ze met de bijpassende Warm Winter Hugs Die-Namics. Heat emboste de tekst met wit embossingpoeder op Kraft cardstock en stanste het uit met de bijpassende Something for Everything Die-Namics.

Used Copic Colors:
Bear - E57, E55, E53, E51, E50 / R22, R20, R00
Turtle - G94, YG63, G21 / E18, E35, E33, E53, E11
Penguin - N6, N4, N2 / E53, E51, E50, 0 / YR24, YR23, YR21
Red - R37, R35, R32
Blue - B26, B24, B23, B21
Yellow - YR24, YR23, YR21
White - C5, C3, C1, C00, 0

If you need to be even more inspired after this post make sure to have a look over at My Favorite Things Youtube ChannelWanneer je na deze post nog wat meer ideeën nodig heb neem dan even een kijkje op het Youtube kanaal van My Favorite Things.

Have a wonderful day!
Greets, Marieke

donderdag 16 november 2023

My Favorite Things November Release Spotlight Day 2

 Hello all,

Day two of November release spotlight day by My Favorite ThingsDag twee van de My Favorite Things november release spotlight dag is hier! 
Today the spotlight is on the newest stamp by artist Yan and it's so cute! For my card I used; North Pole Pals, the Heavy Snowfall Stencil together with some older products to create a mail card.

Vandaag staat de spotlight op de nieuwste stempel van artiest Yan en hij is zo schattig! Voor mijn kaart gebruikte ik de North Pole Pals, het Heavy Snowfall Stencil samen met wat oudere producten om een post kaart te maken.
On a white topfold base card I adhered some 1/4 inch strips of red and white cardstock. Out of Cement Gray I cut a rectangle and die cut the sides using Notebook Edge Die-Namics. With a white ink I inkblended the sides and the snowfall. Cut a strip of snow and cut the sides with the same die as the panel. Plakte op een witte topfold kaart rode en witte stroken papier van 1/4 inch. Sneed een rechthoek van Cement Gray en stanste de zijkanten met de Notebook Edge Die-Namics. Met een witte inkt beinkte ik de zijkanten en de sneeuwval. Stanste een strook sneeuw en ook de zijkanten met dezelfde stans als de grijze rechthoek.

Out of white cardstock I die cut the smallest die out of Postage Stamp STAX Die-Namics. Stamped the number out of Price Tag with Wild Cherry. Stamped the snowflakes using Cement Gray and adhered it on to the panel. Stamped the stamps out of First Class Friend on to the post stamp. Uit with cardstock stanste ik de kleinste maat postzegel van de Postage Stamp STAX Die-Namics. Stempelde het nummer van de Price Tag met Wild Cherry. Stempelde de sneeuwvlokken met Cement Gray en plakte het op de kaart. Stempelde over de postzegel de teksten van de First Class Friend.
Stamped the images, colored them up using my Copic markers and cut them using the matching North Pole Pals Die-Namics. Heat set the top sentence on some red cardstock and the other sentences directly on the base card. Stempelde de afbeeldigen, kleurde ze in met mijn Copic markers en stanste ze uit met de bijpassende North Pole Pals Die-Namics. Heat emboste de bovenste zin op rood cardstock en de andere heat emboste ik rechtstreeks op de grijze rechthoek.

Used Copic Colors:
Polar Bear - E53, E51, E50, 0 / R20, R00
Penguin - E53, E51, E50, 0 / YR02, YR00 / N6, N4, N3, N2
Red - R59, R37, R27, R24
White - C5, C3, C1, C00, 0
Black - N6, N4, N3, N2
Gold - E18, Y26, Y17, Y13

If you need to be even more inspired after this post make sure to have a look over at My Favorite Things Youtube ChannelWanneer je na deze post nog wat meer ideeën nodig heb neem dan even een kijkje op het Youtube kanaal van My Favorite Things.

Have a wonderful day!
Greets, Marieke

dinsdag 14 november 2023

My Favorite Things - November Release Day!

 Hello all,

It’s time for the My Favorite Things November release! All new products are available right now! The MFT design team is sharing projects created with the new stuff. You can find loads of inspiration! Het is tijd voor de My Favorite Things november product lancering. Alle nieuwe producten zijn vanaf nu verkrijgbaar! Het MFT design team deelt ook vandaag weer een lading aan inspiratie.
Yay the new release is avaible as we speak! For today I created a more clean and simple winter card using the Snow Happy.

Ja de nieuwe release is verkrijgbaar vanaf nu! Ik maakte een wat meer clean en simpel winterse kaart met de Snow Happy.
The base is a topfold white card, cut another 4 1/4 x 5 1/2 inch white rectangle and cut the shape using Inside & Out Stitched Arch STAX Die-namics. Inkblended a piece of watercolor paper using Tumbled Glass, Peacock Feathers and Faded Jeans. De basis is een topfold witte kaart, sneed een rechthoek 4 1/4 x 5 1/2 inch en en stanste hier de Inside & Out Stitched Arch STAX Die-Namics uit. Inktblende een stuk aquarel papier met Tumbled Glass, Peacock Feathers en Faded Jeans.

Die cut the Birch Tree Forest Cover-up Die-Namics out of Kraft cardstock. Inkblended the trees using Vintage Photo and Walnut stain. Splattered some water and white paint on the trees and the background. Adhered both on the base of the card. Stanste de Birch Tree Forest Cover-up Die-Namics uit Kraft cardstock. Inktblende het met Vintage Photo en Walnut Stain. Spetterde daarna water en witte verf op de bomen en achtergrond, plakte beide op de kaart.
Die cut a strip of snow using the Stitched Snow Drifts Die-Namics. Inkblended it with Tumbled Glass and Peacock Feathers. Stamped the sentiment and adhered the snow behind the panel and the panel on the card. Stamped the images, colored them up and cut them using the matching Snow Happy Die-Namics. Stanste een strip sneeuw met de Stitched Snow Drifts Die-namics. Inktblende de sneeuw met Tumbled Glass en Peacock Feather. Stempelde de tekst en plakte het achter het paneel en op de kaart. Stempelde de afbeeldingen, kleurde ze met mijn Copic markers en stanste ze beide uit met de bijpassende Snow Happy Die-Namics.

Used Copic Colors:
Snowman - W3, W1, W0, W00, 0 / YR24, YR23, YR21 / R59, R39, R37, R35 / C5, C3, C1, C00 / N8, N6, N4, N2 / R20
Fox - E09, E07, YR24, YR23, YR21 / W5, W3, W1, W00 / R22 / G99, G94, G21 / C5, C3, C1, C00

If you need to be even more inspired after this post make sure to have a look over at My Favorite Things Youtube ChannelWanneer je na deze post nog wat meer ideeën nodig heb neem dan even een kijkje op het Youtube kanaal van My Favorite Things.

Have a wonderful day!
Greets, Marieke

maandag 18 september 2023

Happy Howl-idays

Hallo allemaal,

Met nog een weekje vakantie en geen DT verplichtingen maakte ik nog wat kaarten voor mijzelf. Dit keer maakte ik een kaart met de leuke wolven van Lawn Fawn. Weer een interactieve kaart want die vind ik leuk om te maken. With one more holiday week to go and no DT obligations I had some more time to create cards just for me. This time around I created a card with the wolves by Lawn Fawn. Yet another interactive card just because I like to create those.
Als eerste maakte ik het mechanisme. Ik stempel de beide verschillende wolven op Copic papier en maskeerde deze. Maakte de achtergronden met Distress Inkten, spetterde water en daarna witte en zwarte verf. Verwijderde de masking tape en kleurde de afbeeldingen in, waarna ik ze stanste met de Magic Picture Changer. First of I made the mechanisme. I stamped both of the wolfs on some Copic paper and masked them. Inked up the background using Distress inks, splattered some water and some black and white paint afterwards. Removed the masking tape and colored up the images. Die cut both parts using the Magice Picture Changer.
Op een stuk aquarel papier inkten ik grijze Distress inkten, spetterde dit met witte en zwarte verf. Stanste het stuk met de Magic Picture Changer Add-on en plakte het mechanisme in elkaar. Beinkte de achtergrond met Twisted Citron, Peacock Feathers en Black Soot. Spetterde water en witte verf en plakte het op een witte topfold kaart. On a piece of watercolor paper I inked up some gray Distress inks, splattered it with water, white and black paint and die cut it using the Magic Picture Changer Add-on. Assembled the mechanisme and started on the base of the card. Inked up some Twisted Citron, Peacock Feathers and Black Soot. Splattered some water and white paint and adhered it on a white topfold base card.
Stanste uit een stuk grijs cardstock de Stitched Dens en plakte dit op de voorzijde van het mechanisme. Van een stuk wit cardstock maakte ik het sneeuw, stanste dit aan de bovenzijde en opnieuw met de Stiched Dens. Stanste ook een strook "sneeuw" en beinkte beide met Speckled Egg en Salvaged Patina. Plakte daarna alles op de kaart. Die cut a piece of gray cardstock using the Stitched Dens en adhered it on the front of the mechanisme. Out of white cardstock I created the snow, die cut the top and again used the Stitched Dens for the middle part. Die cut another piece of "snow" and inked both parts up using Speckled Egg and Salvaged Patina. Adhered the pieces on the card.
Stempelde alle afbeeldingen, kleurde ze in met mijn Copic markers en knipte ze uit. Plakte alles op de kaart en stempelde de teksten op wit cardstock. Stansten "Howl" en de banners uit. Werkte de kaart af door wat witte gelpen details toe te voegen. Stamped all the images, colored them up using my Copic markers and cut them with my siccors. Adhered all the elements on the card. Stamped the sentiments on some white cardstock and die cut the "Howl". Die cut the sentiments using a banner die and adhered everything on the card. Finished off by adding some white gelpen details.

Gebruikte Copic Kleuren:
Wolven - W6, W4, W2 / W3, W1, W00, 0 / R22, R20, R00
Bomen - YG67, YG63, YG03, YG01 / E37, E35, E33
Steen - C6, C4, C2

Heb een heerlijke dag!
Groet, Marieke

Stempels: Merry Messages, Wolf Before 'n Afters, Wild Wolves, Yeti or Not, Merry Mice (Lawn Fawn)
Stansen: Stitched Dens, Magic Picture Changer, Magic Picture Changer Add-On (Lawn Fawn), In Stitched Alphabet Die-Namics, Bitty Strips Die-Namics (MFT)
Inkt: Memento Tuxedo Black, Versafine Onyx Black, Twisted Citron, Peacock Feathers, Black Soot, Hickory Smoke, Speckled Egg en Salvaged Patina Distress inkt.
Papier: Smooth White, Gravel Gray (MFT), Peacock (Lawn Fawn)
Extra: White gelpen, White and Black Paint marker.

dinsdag 12 september 2023

We Wish You Fairy Happy Holidays

Hallo allemaal,

Naast koffie ben ik helemaal weg van wreaths, toen ik de Lawn Fawn Wreath Add-on zag moest ik deze hebben. Ik maakte er deze kaart mee met de Fairy Friends.
Beside coffee i'm a total nerd for wreaths, so when I saw the Wreath Add-on by Lawn Fawn I had to get it. I created this card with it using also Fairy Friends.
Begon met de achtergrond, inktblende de achtergrond met Stormy Sky en Black Soot. Spetterde water en stempelde de achtergrond met zwarte inkt. Stanste het geheel daarna uit.

First made the background, inkblended it usign Stormy Sky and Black Soot. Splattered some water and stamped the lined background using a black ink. Die cut everything using the add-on die.
.Stanste de wreath die drie keer uit verschillende kleuren teal cardstock. Plakte deze op elkaar, stanste de besjes uit wit cardstock en plakte deze op waarna ik ze bewerkte met glitterlijm. 

Die cut the wreath three times out of different colors of teal cardstock and adherd them onto each other. Die cut the berries out of white cardstock, adhered them and added some glitter.
Stanste alle onderdelen uit voor de Magic Iris mechanisme en maakte de slider. Stempelde de tekst op een witte topfold basiskaart en plakte daar het mechanisme, de achtergrond en wreath op. Emboste de tekst op Tropical Teal cardstock en stempelde de andere met dezelfde kleur inkt. Stanste of knipte de teksten uit en plakte ze op de kaart.

Die cut all the elements of the Magic Iris mechanisme and made the slider. Stamped the sentiment on a topfold white base card. Adhered the mechanisme, de background and the wreath on to the base card. Heat set the sentiment on some Tropical Teal cardstock, stamped the other sentiment using the same color ink and cut it by hand or with a die cut.
 Stempelde de afbeeldingen, kleurde ze in met mijn Copic markers en stanste ze uit met de bijpassende stansen. Plakte alles op de kaart en bewerkte de vleugels met glitter. Stamped all the images, colored them up using my Copic markers and cut them using the matching dies. Adhered everything on to the card and added some glitters to the wings.

Gebruikte Copic Kleuren:
Huid - E000, E00, E04, E11, E21
Haar - E44, E43, E42
Wit - W5, W3, W1
Jurken/ haarband - BG15, BG13, BG11, BG10
Sjaals - BG75, BG72, BG70
Vleugels - B02, B00, B000, B0000, 0

Heb een heerlijke dag!
Groet, Marieke

Stempels: Fairy Friends, Magic Holiday Wishes (Lawn Fawn), All Lined Up Diagonally Background (My Favorite Things)
Inkt: Memento Tuxedo Black, Stormy Sky and Black Soot Distress inks, Versafine Onyx Black, Tropical Teal, Berrylisicous (My Favorite Things), Versamark Watermark Ink
Papier: Smooth White, Tropical Teal, Berrylicious, Sno Cone (My Favorite Things)
Extra: White embossing powder, White paint Marker, Stickles - Crystal