donderdag 8 december 2022

My Favorite Things December Release Countdown Day 5

 Hello all,

It’s time for the My FavoriteThings December release countdown! During the countdown, the MFT Design Team is sharing lots of projects featuring all of the new products. The new release will officially be available on December 6th at 10:00 am EST (= Europe: December 6th at 4:00 pm CET). Het is tijd voor de My Favorite Things december release countdown! Nog 5 dagen en dan is de nieuwe release verkrijgbaar. Tijdens de countdown, laat het MFT Design Team verschillende projecten zien met alle nieuwe producten. De release zal verkrijgbaar zijn op 6 december om 10:00 am EST (in Nederland op  december om 16:00)
Are you ready for the last release of this year?? We are going out with a bang I can tell you! For today we are showcasing you Festive Fireworks that match perfectly with the Banner Day Celebrations with the matching It's a Banner Day Die-Namics. And to top it of we also are introducing you to the Outline and Solid Numbers Die-Namics.
Zijn jullie klaar voor de allerlaatste maandelijkse release van dit jaar?? We gaan er uit met een boom en een knal! Voor vandaag laten we de Festive Fireworks zien die perfect samen gaat met de Banner Day Celebrations en de bijpassende It's a Banner Day Die-Namics. En om het geheel compleet te maken introduceren we ook de Outline en Solid Numbers Die-Namics.
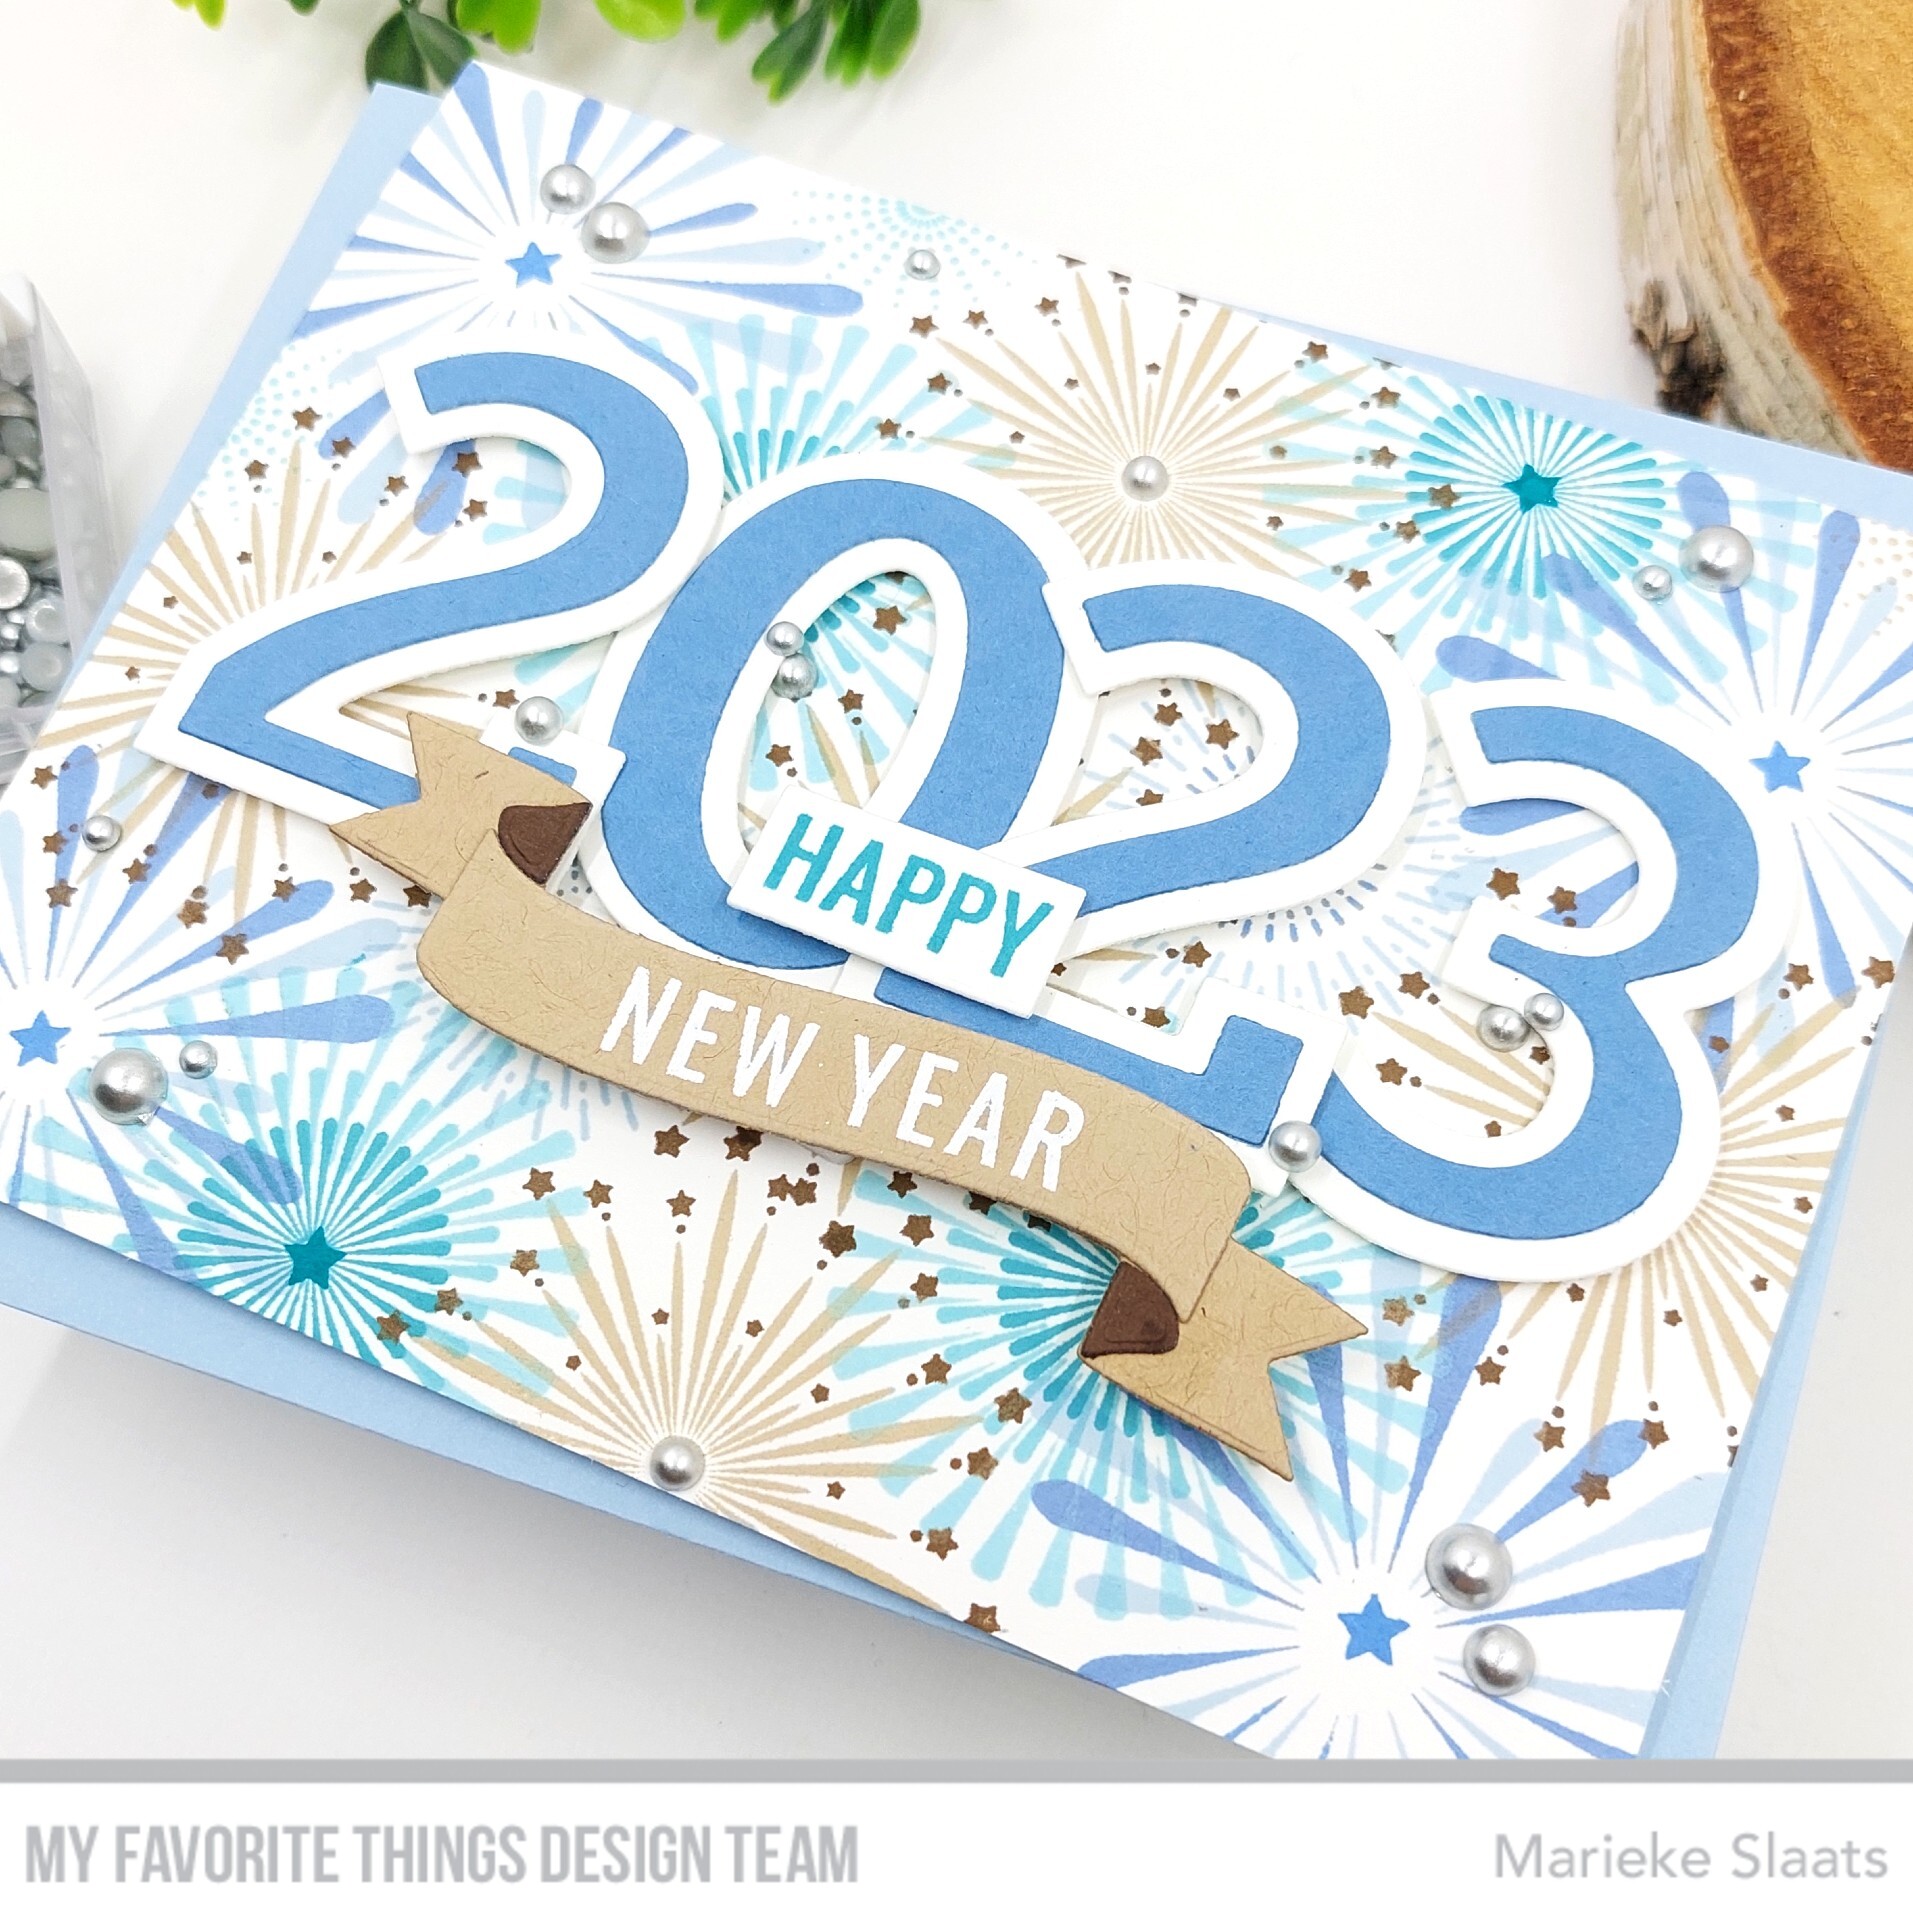
For my inspiration card for today I cut a a2 seize topfold basecard and stamped the fireworks onto them using teal, blue and brown inks. Stamped te sentiment "happy" on some Smooth White cardstock and trimmed it down. Heat set the other sentiment on Kraft can die cut it using the It's a Banner Day Die-Namics.

Voor mijn inspiratie kaart van vandaag sneed ik een A2 topfold Smooth White basiskaart en stempelde hier het vuurwerk op met teal, blauw en bruine inkten. Stempelde op Smooth White cardstock de tekst "happy" en stansten uit. Op Kraft cardstock heat emboste ik de andere tekst en stanste hem uit met de Banner Day Die-Namics.
Die cut the numbers out of Smooth White and Blue Yonder cardstock and adhered them together. Adhered the sentiments on top of the numbers and finished off adding some mat pearls. Stanste uit Smooth White en Blue Yonder cardstock de cijfers en plakte alles op de kaart. Werkte het geheel af met wat mat zilveren parels.

If you need to be even more inspired after this post make sure to have a look over at My Favorite Things Youtube ChannelWanneer je na deze post nog wat meer ideeën nodig heb neem dan even een kijkje op het Youtube kanaal van My Favorite Things.

Have a wonderful day!
Greets, Marieke

woensdag 7 december 2022

Studio Light - Your Love is Magical

 Hallo Allemaal,

Hier is mijn wekelijkse post voor Studio Light weer. Deze keer maakte ik met de Sweet Stories producten een Valetijn lichtjes kaart. I'm back with my weekly post for Studio Light. This time around I decided on making a slimline valtine card with the Sweet Stories products and some lights!
Eerst maakte ik de achtergrond. Ik inkblende het gras/ zand en water met stencils en Blueprint Sketch, Salty Ocean, Gathered Twigs, Mowed Lawn en Peeled Paint Distress inkt. Daarna maskeerde ik de onderkant en inktblende de lucht met Antique Linen, Speckled Egg, Chipped Sapphire en Black Soot. Spetterde water en witte inkt en stanste het geheel uit.

First I made the background. I inkblended the grass/ sand and water using masks and Blueprint Sketch, Salty Ocean, Gathered Twigs, Mowed Lawn and Peeled Paint Distress ink. Masked off the bottom part and inkblended the sky using Antique Linen, Speckled Egg, Chipped Sapphire and Black Soot. Splattered water and white paint and die cut the whole background.
Stempelde alle afbeeldingen, kleurde ze in met mijn Copic markers en stanste ze uit met de bijpassende stansen. Stanste de tekst "magical" uit rood cardstock en bewerkte het met een witte gelpen. Stanste de ketel uit cardstock en kleurde de "lovepotion" met Copic markers.

Stamped all the images, colored them up using my Copic markers and die cut them using the matching dies. Die cut the sentiment "magical" out of red cardstock en added some white gelpen details. Die cut the kettle and colored the "lovepotion" using my Copic markers.
Heat emboste de tekst op zwart cardstock en heat emboste de "swirl" op vellum en stanste uit met de bijpassende stans. Bepaalde waar alles ging zodat ik kon bepalen waar ik de lampjes wilde hebben. Maakte bovenin gaatjes en plakte aan de achterzijde de lampjes op.

Heat set the sentiment on some black cardstock, heat set the "swirl" on vellum and die cut it using the matching dies. Decided were I wanted everything to be so I could decid where the light were going. Added a small hole and glued the lights behind it.
Stempelde met zwarte tekst "push here" daar zit de schakelaar van de lamp onder. Sneed een witte rechthoek net iets groter dan de scene plakte dit op elkaar en daarna ging het met foamtape op een dubbele topfold rode basiskaart. Plakte daarna alles op de kaart met lijm of foamtape. Stamped the sentiment "push here" with a black ink, de switch for the lights is at that spot. Cut a white rectangle slightly larger then the scene and adhered them together. Glued the everything onto a Topfold red basecard. Added the images using glue or foamtape.

Gebruikte Copic Kleuren:
Kikker - G28, G07, YG07, YG05 / W5, W3, W1, W00, 0
Grote bladeren - G28, G07, YG07, YG05
Planten - 
YG67, YG63, YG03 / E47, E44, E43
Rood - R59, R29, R27, R24
Roze - R85, R83, R81
Paars - V17, V15, V12
Stenen - C3, C1, C00
Donkerblauw -  B36, B34, B32
Lichtblauw - B00, B000, B0000
Goud - 
E27, Y26, Y15, Y11

Heb een heerlijke dag!
Groet, Marieke

Inkt: Memento Tuxedo Black, Versafine Onix BlackTsukineko VersamarkBlueprint Sketch/ Salty Ocean/ Gathered Twigs/ Mowed Lawn/ Peeled Paint/ Antique Linen/ Speckled Egg/ Chipped Sapphire en Black Soot Distress inkt
Papier: Smooth White, Red Hot, Black Licorice (MFT)
Extra: Wit embossingpoeder, SL-SS-MASK127, SL-SS-MASK119, SL-ES-LED02

vrijdag 2 december 2022

Studio Light - Love is in the Air

 Hallo Allemaal,

Hier is mijn wekelijkse post voor Studio Light weer. Deze keer maakte ik een super zoetige kaart met de stempels uit de Sweet Stories valentijn collectie. I'm back with my weekly post for Studio Light. This time around I made a cute card using one of the stamps from the Sweet Stories valentine Collection.
Eerst maakte ik de basiskaart. Op een stuk sidefold Smooth White basiskaart plakte ik drie kleuren strips van 1/4 inch op de kaart. Trimde de zijkanten af en de basis is klaar. Inktblende op een rechthoek de kleuren Picked Raspberry, Kitsch Flamingo en Dried Marigold. Spetterde water en met het stencil en de Picked Raspberry maakte ik de harten.

First I made the base of the card. On a sidefold Smooth White basecard I adhered three different colors of 1/4 inch strips. Trimmed of the acces and the base was done. Inkblended some Picked Raspberry, Kitsch Flamingo and Dried Marigold. Splattered some water, with the mask and Picked Raspberry I made the hearts.
Sneed uit wit de grote wolk inktblende hier Dried Marigold en Kitsch Flamingo op en stempelde de tekst Love met zwarte inkt. heat emboste de andere tekst op roze cardstock en stanste deze uit. Uit Wit, Kraft, Poppin' Pink, Cotton Candy, Princess Pink en Peach Bellini stanste ik alle onderdelen van de luchtballon en maakte het tot een geheel. Inktblende het mandje met Vintage Photo.

Cut a big cloud out of white card inkblended Dried Marigold and Kitsch Flamingo and stamped the sentiment Love with a black ink. Heat set the other sentiment on some pink cardstock and die cut it. Out of White, Kraft, Poppin' Pink, Cotton Candy, Princess Pink and Peach Bellini I die cut the elements of the hot air ballon and made it into a whole. Inkblended the basket using Vintage Photo.
Stanste de losse wolken uit wit en inktblende ook deze met Dried Marigold en Kitsch Flamingo. Plakte ze op de kaart met lijm. Maakte het slider element door gebruik te maken van de SL-ES-CD167 en plakte alles op de kaart.

Die cut the clouds seperate out of white cardstock and inked them up using Dried Marigold and Kitsch Flaminog. Adhered them onto the card using glue. Made the slider element using the SL-ES-CD167 and adhered everything onto the card.

Stempelde de mol en de zonnebril, kleurde ze in met mijn Copic markers en stanste ze uit met de bijpassende stans. Plakte het op de kaart en gaf de zonnebril was accent met de 3-d Glossy accent. Stamped the mole and the sunglasses, colored them up using my Copic markers and die cut it using the matching dies. Adhered everything onto the card and added some accent to the glasses using the 3-d glossy accent.


Gebruikte Copic kleuren:
Mol - N6, N4, N3, N2 / R22, R20 / E21, E11, E00
Zonnebril - RV17, RV13, RV11 / N8, N6, N4 

Heb een heerlijke dag!
Groet, Marieke

Stempels: SL-SS-SCD53, SL-SS-STAMP328, SL-SS-STAMP329
Stansen: SL-SS-SCD53, SL-SS-CD459, SL-ES-CD167
Inkt: Memento Tuxedo BlackTsukineko Versamark, Versafine Onix BlackVintage Photo/ Picked Raspberry/ Kitsch Flamingo/ Dried Marigold Distress Oxide inkt.
Papier: Smooth White, Poppin' Pink, Peach Bellini, Kraft, Cotton Candy and Princess Pink (MFT).
Extra: Wit embossingpoeder, SL-SS-MASK160, SL-ES-3DGL01

woensdag 30 november 2022

My Favorite Things - Wednesday Sketch Challenge #622

 Hello all!

Today I am back again with a new Sketch Challenge by My Favorite Things. This week I decided to make aClean and Simple card. Vandaag ben ik er weer met een nieuwe schets challenge van My Favorite Things. Deze keer maakte ik een Clean en Simpel kaart
For this week sketch I decided to only swap around the shapes, so instead of the rectangle's I used the Stackable Snowflakes Die-Namics to fill in for that shape.

Deze week veranderde ik alleen de vorm van de rechthoeken in de vorm van de sneeuwvlokken door ze te vervangen met de Stackable Snowflakes Die-Namics
Cut a Smooth White topfold base card. Die cut the Stackable Snowflakes Die-Namics out of Smooth White also and glued them together. Adhered them onto the base card using foam tape. And trimmed off the acces from the top one.

Sneed een Smooth White topfold basiskaart. Stanste de Stackable Snowflakes Die-Namics uit Smooth White en plakte ze op elkaar. Plakte ze daarna op de kaart met foam tape en knipte het overhangende aan de bovenkant af.

Heat set the sentiment out of the Itty Bitty Holiday on Kraft cardstock and die cut it using the Itty Bitty Strips Die-Namics. Finished off the card adding some wooden stars. Heat emboste de tekst uit de Itty Bitty Holiday op Kraft cardstock en stanste het daarna uit met de Itty Bitty Strips Die-Namics. Werkte de kaart af door wat houten sterren toe te voegen.

If you need to be even more inspired after this post make sure to have a look over at My Favorite Things Youtube ChannelWanneer je na deze post nog wat meer ideeen nodig heb neem dan even een kijkje op het Youtube kanaal van My Favorite Things.

Have a wonderful day!
Greets, Marieke

dinsdag 29 november 2022

My Favorite Things - Christmas Cash Card Kit Release

Hello all,

The day is here that the Christmas Cash Card Kit release by My Favorite Things is avaible! What do you think is it beautiful or what? So what is ending up in your shopping cart? Watch your budget but have fun shopping! De dag is aangebroken dat de Christmas Cash Card Kit release van My Favorite Things verkrijgbaar is! En wat vond je ervan schitterend toch? Welke producten belanden bij jou in het mandje? Let op je budget maar heb vooral plezier met winkelen!

Yesterday I explained this Card Kit is comming with a few Add-on products. For my inspiration for today's release I made a birthday project using the Birthday Cash stamp and the Birthday Basics Die-Namics.
Gisteren vertelde ik al dat de Card Kit met een aantal Addon producten komt. Voor mijn inspiratie voor vandaag maakte ik een verjaardag project met de Birthday Cash stempel en de Birthday Basics Die-Namics.

Out of Smooth White cardstock I die cut the Money Card Die-Namics, die cut the Lip Balm rectangle and the whole in the top of the card. Stamped the sentiment directly onto it using a black ink. Die cut the bottom part out of the Rainbow Love Paper Pad. Uit Smooth White cardstock stanste ik de Money Card Die-Namics, met de Lip Balm rechthoek en het gat aan de bovenkant stanste ik eruit. Stempelde de tekst met zwarte inkt rechtstreeks op de kaart. Stanste het onderste strookje uit de Rainbow Love Paper Pad.

Masked of the bottom part of the card and inked up some Salty Ocean. Stamped the currency at the top using the Price Tag stamp. Maskeerde de onderkant en inktblende wat Salty Ocean. Stempelde het bedrag met de Price Tag stempel op de kaart.
Die cut all the elements of the cupcakes that comes with the Birthday Basics Die-Namics. Inked up the cake, colored the cream using my Copics and assembled them together. Glued them onto the card, glued the Lip Balm Pouch on the back filled it with the money and closed it. Stanste alle onderdelen van de cupcapes uit de Birthday Basics Die-Namics, inkte de cake en kleurde de slagroom met mijn Copics. Plakte ze in elkaar en op de basis. Plakte de Lip Balm Pouch op de achterkantvan de kaart, vulde de pouch met geld en maakte hem dicht.

If you need to be even more inspired after this post make sure to have a look over at My Favorite Things Youtube ChannelWanneer je na deze post nog wat meer ideeen nodig heb neem dan even een kijkje op het Youtube kanaal van My Favorite Things.

Have a wonderful Day!
Greets, Marieke

maandag 28 november 2022

My Favorite Things - Christmas Cash Card Kit Countdown day 1

Hello all,

One more day to go and then all the November Card Kit products by My Favorite Things will be for sale! So set your alarm clocks and make sure you are on time! Nog een dag te gaan en dan zijn de November Card Kit producten van My Favorite Things verkrijgbaar! Dus zet je wekker en zorg dat je niet te laat bent!

So beside the Christmas Kit, My Favorite Things is also releasing a couple of themed add-ons to this Card Kit. One of them is the Tooth Fairy Addon. It comes with a stamp and matching Die-Namics.
Naast de kerst Kit komt er met deze release ook een aantal thema add-ons voor deze Card Kit. Een daarvan is de Tooth Fairy Addon. Je kunt dan een matchende Die-Namics en stempel extra aankopen.

Inkblended Spun Sugar, Picked Raspberry and Wilted Violet on some paper and die cut  it using the Money Card Die-Namics. Splattered some water and die cut the Lip Balm die out of it. Adhered the Lip Balm Pouch on the back of the card. Inktblende Spun Sugar, Picked Raspberry en Wilted Violet en stanste het daarna uit met de Money Card Die-Namics. Spetterde water en stanste het Lip Balm stuk eruit. Plakte een Lip Balm Pouch aan de achterzijde van de kaart.

Out of Smooth White I die cut a cloud, inkblended it with Spun Sugar and Stamped the sentiment out of the Tooth Fairy Wishes stamp. Adhered it to the back using foam tape. Die cut all the elements of the Tooth Fairy out of different colors of cardstock and the Tooth Fairy Die-Namics. Uit Smooth White stanste ik een wolk, inktblende Spun Sugar en stempelde de tekst uit de Tooth Fairy Wishes stempel. Plakte het op de kaart met foam tape. Stanste alle onderdelen van de Tooth Fairy met verschillende kleuren cardstock en de Tooth Fairy Die-Namics.
Assembled the Tooth Fairy and adhered it to the base. Heat set the sentiments out of the Tooth Fairy Wishes and Price Tag stamp on some Poppin' Pink and die cut it using the elements. Adhered everything to the base. Finished the base of adding some gold sparkle stars. Maakte de Tooth Fairy klaar en plakte het op de basis. Heat emboste de teksten uit de Tooth Fairy Wishes en Price Tag stempel op Poppin' Pink en stanste het uit met de bijpassende stansen. Plakte alles op de kaart en werkte het geheel af met wat gouden sterren.

If you need to be even more inspired after this post make sure to have a look over at My Favorite Things Youtube ChannelWanneer je na deze post nog wat meer ideeën nodig heb neem dan even een kijkje op het Youtube kanaal van My Favorite Things.

Have a wonderful day!
Greets, Marieke

zondag 27 november 2022

My Favorite Things - Christmas Cash Card Kit Countdown Day 2

 Hello all,

Welcome to day one of the November Card Kit Release countdown by My Favorite Things. Lucky the wait on the Card kit Release is only short and you can have a shopping spree already Tuesday November 29th at 10:00 am EST. Welkom bij dag een van de November Card Kit Release countdown van My Favorite Things. Gelukkig hoef je maar even te wachten want dinsdag is de card kit al beschikbaar om 16:00!

The Card Kit contains the Christmas Cash stamp set, Price Tag stamp set, Money Card Die-Namics, Christmas Complements Die-Namics, Feelin' Festive Paper Pad, Lip Balm Pouches and Three Sheets of Smooth White and one of each of the following colors; Ripe Raspberry, Wild Cherry, Moroccan Spice, Caribbean Sea, Tropical Teal, Prickly Pear, Jalepeno Popper, Kraft, Black Licorice and Iridescent RainbowDe Card Kit bestaat uit de Christmas Cash stamp set, Price Tag stamp set, Money Card Die-Namics, Christmas Complements Die-Namics, Feelin' Festive Paper Pad, Lip Balm Pouches and Three Sheets of Smooth White and one of each of the following colors; Ripe Raspberry, Wild Cherry, Moroccan Spice, Caribbean Sea, Tropical Teal, Prickly Pear, Jalepeno Popper, Kraft, Black Licorice and Iridescent Rainbow.
Offourse the supplies are sold separately, if you are only interested in a specific item. As always My Favorite Things is offering a new free for $60 that comes with this kit; . Uiteraard zijn de producten ook los te koop, wanneer je alleen geïnteresseerd bent in één van de producten. Zoals iedere nieuwe release biedt My Favorite Things een nieuwe free for $60 en dat is ditmaal de .
Cut the Money Card Die-Namics out of Blue Beyond cardstock. Die cut the lipbalm pocket out of it. Cut the outline out of Wilde Cherry. Heat set the sentiment out of the Christmas Cash stamp on to the base. Sneed the Money Card Die-Namics uit Blue Beyond cardstock. Stanste de lipbalm pocket eruit en de outline met Wild Cherry. Heat emboste de tekst uit de Christmas Cash stempel op de basis.

Die cut the hole on the top and assembled the money into the pouch. Heat set the dollar amount using the Price Tag stamp on some Wild Cherry and die cut it. Stanste het gat boven eruit en plakte de geld pocket in elkaar. Heat emboste het geldbedrag met de Price Tag stempel op Wild Cherry en stanste het uit.
Masked off the bottom of the tag and inkblended some white ink. Splattered some white paint and stamped the images. Colored them up using my Copic markers and die cut them using the matching Die-Namics. Maskeerde de onderkant en inktblende witte inkt. Spetterde witte verf en stempelde de afbeeldingen. Kleurde ze in met mijn Copic markers en stanste ze uit met de bijpassende Die-Namics.

Used Copic Colors:
Red - R59, R39, R37, R29, R27, R24
Skin - E000, E00, E04, E11, E21
White - C5, C3, C1, C00, 0
Black - N8, N6, N4, N3
Gold - E27, YR23, Y13, Y11
Reindeer - E57, E55, E53, E51, E50 / W5, W3, W1
Letter - E43, E42, E41, E40

If you need to be even more inspired after this post make sure to have a look over at My Favorite Things Youtube ChannelWanneer je na deze post nog wat meer ideeen nodig heb neem dan even een kijkje op het Youtube kanaal van My Favorite Things.

Have a wonderful Day!
Greets, Marieke