donderdag 30 juni 2022

Sunny Studio - Summer Greenery Dies

Hello all,

I'm back again with my weekly post for Sunny Studio Stamps. Today I hope to inspire you with a card using the Summer Greenery dies. Daar ben ik weer met mijn wekelijkse post voor Sunny Studio Stamps. Vandaag hoop ik jullie te inspireren met een kaart met de Summer Greenery stans.
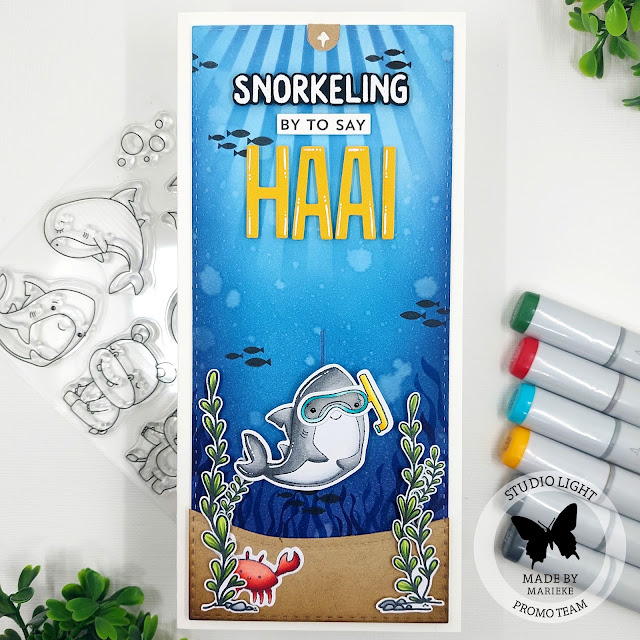
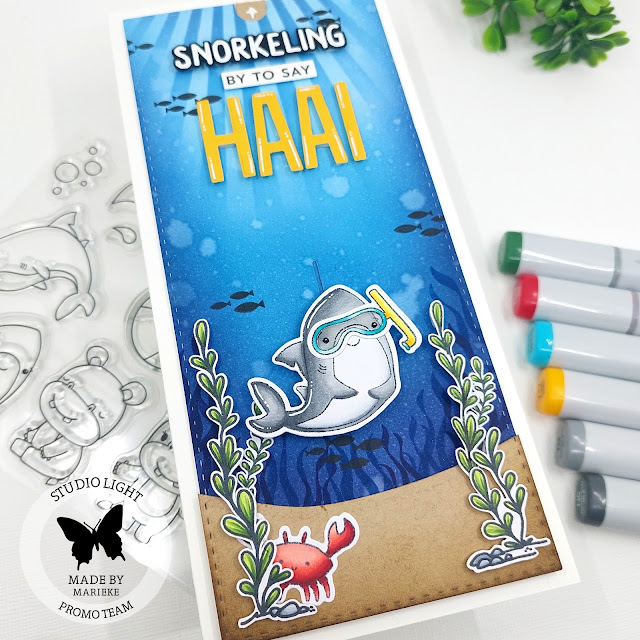
First off I trimmed a white rectangle, splattered some black paint and let it dry. Die cut the Summer Greenery Dies out of a teal, blue and green carstock. Inkblended them using inks and splattered some water, paint or ink onto them. Sneed een witte rechthoek, spetterde er zwarte verf op en liet het drogen. Stanste de Summer Greenery stansen uit teal, blauw en groen cardstock. Inktblende de bladeren. Spetterde er water, verf en inkt op.
Glued the leaves onto the rectangle and trimmed of what was hanging off the rectangle. Cut a white topfold basecard. Added the pattern panel onto the base card using foamtape. Plakte de bladeren op de rechthoek en knipte het overhangende blad af. Sneed een topfold witte basiskaart en plakte hier het bladerenrechthoek op met foam tape.
Die cut the sunshine die four times out of black cardstock and glued them together and onto the card. Stamped the sentiment out of the Sending Sunshine stamp on white paper. Trimmed it to a small banner and added it to the card using foam tape. Finished of the card adding some clear sequins. Stanste de Sunshine stans vier keer uit zwart cardstock. Plakte ze op elkaar en op de kaart. Stempelde de tekst uit Sending Sunshine stempel op wit paper. Sneed het tot een banner en plakte het op de kaart met foamtape. Werkte de kaart af met doorzichtige sequins.

Have a wonderful day!
Greets, Marieke

woensdag 29 juni 2022

My Favorite Things - Wednesday Sketch Challenge #600

 Hello all!

Today I am back again with a new Sketch Challenge by My Favorite Things. This week I decided to make another card using the Parachute Pals . Vandaag ben ik er weer met een nieuwe schets challenge van My Favorite Things. Deze week maakte ik een kaart met de nieuwe Parachute Pals.

So for this week sketch I did not swap around alot and stayed kinda true to the sketch.
Voor de schets van deze week veranderde ik niets en bleef trouw aan de schets.

Cut a sidefold Smooth White Base card. Cut a Smooth White rectangle and stamped the City Block Background onto it using a black ink. Cut the rectangle apart and added it onto the base.

Sneed een Smooth White basiskaart en een Smooth White rechthoek. Stempelde hier de City Block Background op met zwarte inkt. Sneed twee stukken uit de rechthoek en plakte het op de basis met foamtape.
Stamped all the images, colored them up using my Copic markers and cut them using the matching Die-Namics. Heat set the sentiment out of the Bitty Birthday Wishes on some Black Licorice cardstock and trimmed it down. Finished the card of adding some enemal dots. Stempelde alle afbeeldingen, kleurde ze in met mijn Copic markers en stanste ze uit met bijpassende Die-Namics. Heat emboste de tekst uit de Bitty Birthday Wishes op Black Licorice cardstock en knipte het tot een banner. Werkte de kaart af met enemal dots.

If you need to be even more inspired after this post make sure to have a look over at My Favorite Things Youtube ChannelWanneer je na deze post nog wat meer ideeen nodig heb neem dan even een kijkje op het Youtube kanaal van My Favorite Things.

Used Copic Colors:
Bunnies - E57, E55, E53, E51, E50 / N6, N4
Teal - BG15, BG13, BG11, BG10
Yellow - Y37, Y35, Y32
Red - R27, R24, R22, R20
White - W3, W1, W00
Blue - B02, B00, B000, B0000


Have a wonderful day!
Greets, Marieke

vrijdag 24 juni 2022

Studio Light - Snorkeling by to say HAAI

Hallo Allemaal,

Daar ben ik weer met mijn wekelijkse inspiratie kaart voor Studio Light! Ditmaal besloot ik om met de nieuwe Sweet Stories een slimline slider kaart te maken. 
Today i'm back again to inspire you with some Studio Light products! This time I decided on making a slimline slider card using the new Sweet Stories.
Ik maakte eerst de achtergrond met Tumbled Glass, Broken China en Chipped Sapphire Distress inkt. Stanste het geheel uit en spetterde water. Met een mix van Broken China en Chipped Sapphire en een stencil maakte ik de stralen.

First off I made the background using Tumbled Glass, Broken China and Chipped Sapphire Distress ink. Die cut the background and splattered some water. With a mix of Broken China and Chipped Sapphire using a stencil I made the beams.
Stanste het zand uit Kraft cardstock en inkte het met Walnut Stain Distress inkt. Stempelde wat zeewier en vissen op de achtergrond. Stempelde alle afbeeldingen, kleurde ze in met mijn Copic markers en stanste of knipte ze uit. Die cut the sand out of Kraft cardstock and inked it up using Walnut Stain Distress ink. Stamped the seaweed and the fish on the background. Stamped all the images, colored them up using my Copics and die cut or cut them using my sciccors.

Heat emboste, stempelde en stanste de teksten, bepaalde waar deze gingen en waar ik de haai wilde hebben. Maakte vervolgens het slider gedeelte volgens deze Youtube tutorial. Heat set, stamped and die cut the sentiments. Decided were I wanted the sentiments and the images. Made the slider part using the following Youtube tutorial.
Plakte alles op de kaart, de gehele kaart ging vervolgens op een dubbele witte sidefold kaart. Ik werkte de bril af met wat glossy accent. Glued everything onto the base and the base went onto a side fold white basecard. To finish of the card I added some Glossy Accent to the glasses.

Gebruikte Copic kleuren:
Haai - N6, N4, N3, N2 / C5, C3, C1, C00, 0
Groen - YG67, YG63, YG03
Krab - R59, R29, R24, R22, R20
Stenen - C5,C3,C1
Bril - BG15, BG13, BG11 / Y17, Y15, Y13


Heb een heerlijke dag!
Groet, Marieke

Stempels: SS SCD46, SS SDC47, SS Stamp270, 
Stansen: SS SCD46, SS SDC47, ES CD167, SS CD153, SS CD394, CCL - ES CD157
Inkt: Tumbled Glass/ Broken China/ Chipped Sapphire and Walnut Stain Distress ink, Memento Tuxedo Black, Tsukineko Versamark. Blue Beyond, Cornflower.
Papier: Smooth White, Kraft, Black Licorice, ES PP04
Extra: Wit embossing poeder, witte gelpen, glossy accent.

donderdag 23 juni 2022

Sunny Studio - Fintastic Birthday Wishes

Hello all,

I'm back again with my weekly post for Sunny Studio Stamps. Today I hope to inspire you with a card that I made using the Fintasic Friends. Daar ben ik weer met mijn wekelijkse post voor Sunny Studio Stamps. Vandaag hoop ik jullie te inspireren met een kaart die ik maakte met de  Fintastic Friends.
For today's card I decided on combining some sets and turn it into a underwater birthday card. First off I made the background using Tumbled Glass, Salty Ocean, Broken China and Chipped Sapphire Distress inkt. Splattered some water and inked up some ray of lights using Salty Ocean and a stencil.

Voor de kaart van vandaag besloot ik om een aantal stempels te combineren en er een onderwater verjaardag kaart mee te maken. Ik startte met de achtergrond en inktblende Tumbled Glass, Salty Ocean, Broken China en Chipped Sapphire Distress inkt. Spetterde water en inkte daarna wat zonnenstralen met een stencil en Salty Ocean.
Stamped all the images from the Fintastic Friends, Tropical Scenes and the Purrfect Birthday stamps. Colored them up using my Copic markers and cut them using the matching dies. Stamped and cut the shark using the mirror image technique and cut the cake.

Stempelde alle afbeeldingen uit de Fintastic Friends, Tropical Scenes en de Purrfect Birthday stempels. Kleurde ze in met mijn Copic markers en stanste ze uit met de bijpassende stansen. Stempelde de haai met de spiegel techniek, kleurde in en knipte hem uit.
Decided were I wanted the air bubble to be and draw it using my Copic markers and white gelpen, added a few smaller ones above the large one. Heat set the sentiments from the Fintastic Friends and Heartfelt Wishes stamps on the card. Added all the images on to the card and finished it off using some glossy accent on all the air bubbles. Besloot waar ik de grote luchtbel wilde hebben en kleurde deze in met mijn Copic markers en een witte gel pen, voegde nog wat kleinere luchtbellen toe aan de bovenzijde. Heat emboste de teksten uit Fintastic Friends en Heartfelt Wishes stempels rechtstreeks op de kaart. Plakte alle afbeeldingen op de kaart en werkte het geheel af met Glossy Accent.

Used Copic Colors:
Sand - E55, E53, E51, E50
Light Green - G07, G05, G03
Dark Green - YG67, YG63, YG03
Yellow - Y17, Y15, Y13, Y11
Pink - RV17, RV14, RV13, RV11
Orange - YR07, YR04, YR02
Stones - C5, C3, C1, C00
Blue - B26, B24, B23, B21
Purple - BV17, BV04, BV13, BV02
Shark - C8, C6, C4, C2 / W5, W3, W1, W00, 0 / R24, R22, R20
Cake - E44, E43, E42, E41
White - C5, C3, C1, 0

Have a wonderful day!
Greets, Marieke

dinsdag 21 juni 2022

My Favorite Things - Beach Day Card Kit Release

Hello all,

The day is here that the Beach Day Card Kit release by My Favorite Things is avaible! What do you think is it beautiful or what? So what is ending up in your shopping cart? Watch your budget but have fun shopping! De dag is aangebroken dat de Beach Day Card Kit release van My Favorite Things verkrijgbaar is! En wat vond je ervan schitterend toch? Welke producten belanden bij jou in het mandje? Let op je budget maar heb vooral plezier met winkelen!

For today's card I decided to go slimline because well there is alot to fit on! So with using stencils the Beach Bungalow, Shady Palm and Beach Bungalow Accessoires Die-Namics I created this slimline card.

Wat is er nu niet leuk aan een slimline kaart? Je kunt er altijd zo lekker veel op kwijt daarom vind ik ze ook zo leuk. Met de Beach Bungalow, Shady Palms en de Beach Bungalow Accessoires Die-Namics maakte ik mijn slimline kaart.

Cut a Smooth White rectangle 3 1/4 inch x 8 1/4 inch. Inkblended the sky using the Slimline Cloud Edges Stencil and Salty Ocean. The sand I made using the Slimline Drifts & Hills Stencil using Antique Linen and Vintage Photo Distress Oxide inks. Sneed een Smooth White rectangle 3 1/4 x 8 1/4 inch. Inktblende de lucht met het Slimline Cloud Edges Stencil en Salty Ocean. Het zand maakte ik met het Slimline Drifts & Hills Stencil met Antique Linen en Vintage Photo Distress Oxide inks.

Die cut all the elements using Vintage Timber, Sour Apple, Limelight, Smooth White, Cement Gray, Summer Splash, Lemon Drop, Poppin' Pink and Fire Coral. Glued them together and added some white gelpen details. Stanste alle elementen met de kleuren Vintage Timber, Sour Apple, Limelight, Smooth White Cement Gray, Summer Splash, Lemon Drop, Poppin' Pink en Fire Coral cardstock. Plakte alles in elkaar en voegde wat witte gelpen details toe.

Glued the inkblended rectangle on to a Summer Splash topfold base card and stamped the sentiment out of the Life's a Beach stamp in the middle of the rectangle. Added the die cut images and my card was done. Plakte de geinkte achtergrond op een topfold Summer Splash basiskaart en stempelde de tekst uit de Life's a Beach Stempel in het midden van de rechthoek. Plakte daarna alle losse elementen op de kaart.

If you need to be even more inspired after this post make sure to have a look over at My Favorite Things Youtube ChannelWanneer je na deze post nog wat meer ideeen nodig heb neem dan even een kijkje op het Youtube kanaal van My Favorite Things.

Have a wonderful Day!
Greets, Marieke

maandag 20 juni 2022

My Favorite Things - Beach Day Card Kit Countdown Day 1

 Hello all,

Welcome to day one of the June Card kit Release countdown by My Favorite Things. Lucky the wait on the Card kit Release is only short and you can have a shopping spree already tommorow Tuesday June 21st at 10:00 am EST. Welkom bij dag een van de Juni Card kit Release countdown van My Favorite Things. Gelukkig hoef je maar even te wachten want morgen is de card kit al beschikbaar om 16:00!
The Card Kit contains the Life's a Beach stamp set, Beach Bungalow Die-Namics, Beach Bungalow Accessories Die-Namics, Shady Palm Die-Namics and one sheet of the following colors; Smooth WhitePoppin' Pink, Red Hot, Orange Zest, Lemon Drop, Limelight, Jalapeno Popper, Sno Cone, Summer Splash, Lazy Day, Cornflower, Kraft, Milk Chocolate, Cement Gray, Black Licorice. De Card Kit bestaat uit de Life's a Beach stempel, Beach Bungalow Die-Namics, Beach Bungalow Accessories Die-Namics, Shady Palm Die-Namics en één van elk van de volgende kleuren cardstock; Smooth WhitePoppin' Pink, Red Hot, Orange Zest, Lemon Drop, Limelight, Jalapeno Popper, Sno Cone, Summer Splash, Lazy Day, Cornflower, Kraft, Milk Chocolate, Cement Gray, Black Licorice.
Offourse the supplies are sold separately, if you are only interested in a specific item. Beside the Kit there are also three seperate items sold with this set the; Sandcastle Builder Die-Namics and the Sand and Surf Die-Namics. As always My Favorite Things is offering a new free for $60 that comes with this kit; Itty Bitty Summer Stamp. Uiteraard zijn de producten ook los te koop, wanneer je alleen geïnteresseerd bent in één van de producten. Naast de Kit zelf biedt MFT de bijpassende Sandcastle Die-Namics and the Sand and Surf Die-Namics aan. Zoals iedere nieuwe release biedt My Favorite Things een nieuwe free for $60 en dat is ditmaal de Itty Bitty Summer stempel.
For my card I started with a topfold Sno Cone card base, using the Sand and Surf Die-Namics in the colors Kraft, Lazy Day and Cornflower I created the water. Before adding this on the base card I heat set the sentiment from the Life's a Beach stamp.

Voor mijn kaart sneed ik een topfold Sno Cone basiskaart, met de Sand and Surf Die-Namics in de kleuren Kraft, Lazy Day en Cornflower maakte ik het water en strand. Voordat ik dit op de kaart plakte heat emboste ik de tekst uit Life's a Beach stempel.
Die cut the tree and birds from the Shady Palm Die-Namics using the colors Vintage Timber, Kraft, Milk chocolate, Cement Gray, Limelight and Jalepeno Popper. Assembled them and glued them on to the card. Stanste de boom en de vogels met de Shady Palm Die-Namics. Ik gebruikte de kleuren Vintage Timber, Kraft, Milk Chocolate, Cement Gray, Limelight en Jalepeno Popper. Maakte het tot een geheel en plakte het op de kaart.

If you need to be even more inspired after this post make sure to have a look over at My Favorite Things Youtube ChannelWanneer je na deze post nog wat meer ideeën nodig heb neem dan even een kijkje op het Youtube kanaal van My Favorite Things.

Have a wonderful day!
Greets, Marieke

donderdag 16 juni 2022

Sunny Studio - Tropical Trees Backdrop Die

 Hello all,

I'm back again with my weekly post for Sunny Studio Stamps. Today I hope to inspire you with a card that I made using the Tropical Trees Backdrop Die combined with the Magic Iris die. Daar ben ik weer met mijn wekelijkse post voor Sunny Studio Stamps. Vandaag hoop ik jullie te inspireren met een kaart die ik maakte met de  Tropical Trees Backdrop Die, gecombineerd met de Magic Iris stans.

So for this card I die cut a watercolor panel using the Magic Iris Die. Inkblended the panel using Peacock Feathers, Cracked Pistashio Distress ink. For the sky I used Fossilized Amber and Spiced Marmalade. The Magic Iris Addon Is just as big as the Tropical Trees Backdrop Die. So I die cut the inkblended panel another time this time with the Tropical Trees Backdrop die. Die cut the backdrop another time out of kraft cardstock.

Voor mijn kaart stanste ik eerst een rechthoek met de Magic Iris stans. Inktblende de rechthoek met Peacock Feathers, Cracked Pistashio Distress inkt. Voor de lucht gebruikte ik Fossilized Amber en Spiced Marmalade. De Magic Iris Addon is net zo groot als de Tropical Trees Backdrop Die. Ik stanste daarom de rechthoek nog een keer maar dan met de Tropical Trees Backdrop stans. Stanste de backdrop nog een keer uit kraft cardstock.
Out of kraft  and green cardstock I die cut the trees, ut of the leaves and inkblended the trees using Walnut Stain and Peeled Paint Distress ink. Adhered them together, inkblended the "beach" also with Walnut Stain and adhered it onto the inkblended rectangle. Die cut the clouds added some Fossilized Amber and adhered them onto the panel.

Uit Kraft en groen cardstock stanste ik de bomen, kmipte de bladeren los en inktblende de bladeren en stammen met Walnut Stain en Peeled Paint. Plakte ze op elkaar en inktblende het "strand" ook met Walnut Stain. Plakte het strand aan de inkblend achtergrond vast. Stanste de wolken en bewerkte deze met Fossilized amber, plakte ze daarna op de achtergrond.
Die cut all the parts for the magic slider and assembled it. Inkblended the arrow mechanisme with Spiced Marmelade. Temporarly added the closed iris behind the panel and traced the horizon line. Inkblended the Iris using the right colors. 

Stanste alle onderdelen van de Magic Slider en plakte het in elkaar. Inktblende het pijl mechanisme met Spiced Marmelade. Plakte de iris tijdelijk achter het panel en trok in streep waar de horizon komt. Inktblende de iris met de juiste kleuren Distress inkt.
Cut a Kraft rectangle, cut a white topfold base card and glued them together. Temporaly added the inkblended panel on to the kraft rectangle and glued the die cut circle onto it. Stamped the sentiment from the Inside Greetings Congrats onto it. Glued the iris onto the back of the inkblended panel and onto the basecard.

Sneed een Kraft rechthoek, sneed een witte topfold basiskaart en plakte ze op elkaar. Plakte tijdelijk de geinkte achtergrond op de kraft rechthoek en plakte de gestanste cirkel op waar hij hoort. Stempelde de tekst uit de Inside Greetings Congrats op de cirkl. Plakte de iris achterop de geinkte achtergrond en het geheel op de kaart.
Stamped the flamingo's and hearts out of the Fabulous Flamingo's and the Snail Mail stamps. Colored them up using my Copic markers and cut them by hand and the matching dies. Adhered all the images and die cuts on the card using glue and or foam tape. Stempelde de flamingo's en de harten uit de Fabulous Flamingos en de Snail Mail stempels. Kleurde ze in met mijn Copic markers en knipte ze uit of stanste ze. Plakte alle afbeeldingen en stansen op de kaart met lijm of foamtape.

Used Copic Colors:
Flamingo - RV13, RV42, R01, R00 / C5,C3,C1,0 / Y13, Y11
Hearts - R59, R29, R27, R24


Have a wonderful day!
Greets, Marieke

dinsdag 14 juni 2022

Studio Light - Warm Winter Wishes

Hallo Allemaal,

Hier is mijn wekelijkse post voor Studio Light weer. Aangezien ik wat achter loop in mijn kerstkaaten, besloot ik met de sneeuwmannen en slimline kaart te maken. I'm back with my weekly post for Studio Light. As I'm behind on my Christmas cards I figured it would be fun to create a Christmas card using the snowman.
Inkblende de kleuren Shaded Lilac en Blueprint Sketch Distress Oxide ink. Gebruikte een sneeuwvlokken stencil en inktblende nogmaals Blueprint Sketch. Spetterde water en witte verf en stanste het uit. Inkblended some Shaded Lilac and Blueprint Sketch Distress Oxide ink. Using a snowflake stencil and Bleuprint Sketch I inkblended the snowflakes. Splattered some water en white paint and die cut the rectangle.

Stanste de koffiebekers uit twee verschillende kleuren paars, inktblende de één met met Shaded Lilac de ander met witte inkt. Stempelde met de bijpassende kleuren inkt de sneeuwvlokken op de mokken. Stanste de chocolde, marshmallows en slagroom uit. Stippelde wat "cacoa" op de slagroom en plakte ze in elkaar. Die cut the coffeecups out 2 different colors of purple, inkblended one using Shaded Lilac the other I inkblended with white ink. Stamped the snowflakes in the matching colors onto the mugs. Die cut the chocolate, marshmallows and whiped cream and added some "cacoa" on the whiped cream. Glued everything together.
Stempelde alle afbeeldingen, stempelde de sneeuwman en sjaal met de spiegeltechniek. Kleurde alle afbeeldingen in met mijn Copic markers en stanste of knipte ze uit. Plakte ze in elkaar.

Stamped all the images, the snowman and scraf I also stamped using the mirror technique. Colored up all the images using my Copic markers and cut the using the matching dies or my sciccors. Glued the all the parts together.
Stempelde de teksten op wit cardstock, stanste de kleine teksten uit en knipte de wishes met de hand. Plakte alles op rechthoek en deze ging op een topfold witte basiskaart. Werkte de kaart af met verschillende maten sequins. Stamped all the sentiments on white cardstock. Die cut the small sentiments and cut the large one using my sciccors. Adhered everything on the rectangle and that went on a topfold white basecard.Finished off the card adding different seizes of sequins.

Gebruikte Copic Kleuren:
Wit - C4, C3, C2, C1, C00, 0
Oranje - YR09, YR04, YR02
Zwart - N8, N6, N4, N3
Bruin - E47, E44, E43, E42
Licht paars - V17, V15, V12, V91
Donker Paars - BV17, BV04, BV13, BV02
Heb een heerlijke dag!
Groet, Marieke

Stempels: SS SCD19, SS STAMP162, ES-STAMP96
Stansen: SS SCD19, SS CD206,
Inkt: Memento Tuxedo Black, versafine onix black, Shaded Lilac, Bleuprint Sketch Distress Oxide inkt, Witte inkt. Grapesicle, Bleuberry.
Papier: Smooth White, Grapesicle, Blueberry, Vintage Timber
Extra: Transparante Sequins

vrijdag 10 juni 2022

Studio Light - Picture Perfect

Hallo Allemaal,

Hier is mijn wekelijkse post voor Studiolight weer. Deze keer maakte ik twee kaarten met de Buddie stempels in combinatie met de eerdere honden stempels uit de Creative Craftlab lijn. I'm back with my weekly post for Studiolight. This time around I made two cards using the Buddy stamp in combination with the other dog stamps from a earlier release by Creative Craftlab.

Sneed twee witte topfold basiskaarten, stempelde bij beide een tekst uit de STAMP 167 en trok het lijntje op beide kaarten door met een zwarte fineliner.

Cut two topfold white basecards, stamped the sentiments out of the STAMP 167 onto the card and finished the line using a black fineliner and my ruller.

Stempelde beide honden, kleurde ze in met mijn Copic markers en stanste ze uit met de kleine polaroid. Kleurde de achtergrond van de hond met Copics. Stanste twee maal de kleine polaroid uit wit cardstock en plakte de hond afbeelding erin.

Stamped both of the dogs, colored them up using my Copic markers and cut them using the small polaroid die. Colored up the background of the dogs using my Copics. Cut the small polaroid twice out of white cardstock and glued the dog images into it.

Stempelde de # teksten op de polaroid en deze gingen met foamtape op de basiskaart. Stempelde op beide kaarten nog een hondenpootje met bruine inkt. Die cut the #sentiments on to the polaroids and adhered them on the card using foam tape. Finished the cards off adding a small brown pawprint.

Gebruikte Copic kleuren:
Bruine hond - E59, E57, E55, E53, E5, E50 / R22, R20, R00 / N8, N6, N4
Zwarte hond - N8, N6, N4, N2 / R22, R20, R00 / C5, C3, C1, C00, 0
Rood - R59, R29, R27
Blauw - B23, B21

Heb een heerlijke dag!
Groet, Marieke

Stempels: CCL FR STAMP167, CCL FR STAMP166, CCL ES STAMP221
Stansen: CCL ES CD235
Inkt: Memento Tuxedo Black, Versafine Onix Black, Versafine Vintage Sepia
Papier: Smooth White.
Extra: Zwarte fineliner.

donderdag 9 juni 2022

Sunny Studio - Country Carnival

 Hello all,

I'm back again with my weekly post for Sunny Studio Stamps. Today I hope to inspire you with a card that I made using the Country Carnival. Using this set I decided to turn it into a interactive card using lights. Daar ben ik weer met mijn wekelijkse post voor Sunny Studio Stamps. Vandaag hoop ik jullie te inspireren met een kaart die ik maakte met de Country Carnival. Deze keer besloot ik een interactieve kaart te maken met licht.
For today I started with the background, I cut two blue rectangle's and adhered them temporarly onto each other. Using a sunburst stencil and Peacock Feathers Distress ink I inkblended the rays. Splattered some white paint and let it dry.

Voor vandaag startte ik met de achtergrond, sneed twee blauwe rechthoek en plakte ze tijdelijke op elkaar. Met een sunburst stencil en Peacock Feathers Distress inkt maakte ik de stralen. Spetterde wat witte verf en liet het drogen.
I used the Halo lights by Pearblossom Press. To figure out were I wanted everything to go I stamped the images of the Country Carnival and die cut them using the matching dies. Placed the Ferris Wheel onto the card and decided how big the circle behind it needed to be. Die cut the circle, stamped the Press Here sentiment on the small rectangle and adhered the light mechanisme behind the panel. Glued the smaller rectangle on to the bigger rectangle using foam tape. Adhered the background on to a white topfold basecard.

Ik gebruikte een halo kicht van Pearblossom Press. Om te bepalen waar ik het lichtmechanisme wilde hebben, stempelde ik de afbeeldingen van de Country Carnival stempel en stanste ze uit met de bijpassende stansen. Legde het reuzenrad op de kaart en besloot hoe groot de cirkel achter het reuzerad moest worden. Stanste deze uit en stempelde de tekst daar waar de drukknop zit. Plakte het mechanisme achter de kaart en de beide rechthoeken op elkaar met foam tape. Plakte het geheel op een witte topfold basiskaart.
Colored up all the images using my Copic markers and added some white gelpen details to the bears. Kleurde alle afbeeldingen in met mijn Copic markers en bracht op de beren wat witte gelpen details aan.

Used Copic Colors:
Bears - E57, E55, E53, E51, E50 / R22
Red - R59, R29, R27, R24
Yellow - Y17, Y15, Y13, Y11
Teal - BG15, BG13, BG11
Orange - YR09, YR04, YR02
White - C5,C3,C1, 0
Black - N8, N6, N4
Blue - B24
Heat set the sentiment on some yellow cardstock and cut it into a banner. Heat set the other sentiment on some black cardstock and cut it using my scissors. Glued eveything on the card using foam tape. Heat emboste de tekst op geel cardstock en stanste het tot een banner. Heat emboste de andere tekst op zwart cardstock en knipte het uit. Plakte alles op de kaart met foam tape. 


Have a wonderful day!
Greets, Marieke