zaterdag 23 december 2023

My Favorite Things December Release Spotlight Day 4

Hello all,

Welcome to day four of the December release spotlight post by My Favorite Things! So hop along for more beautiful inspiration by the team. Welkom bij dag vier van de december release spotlight dag van My Favorite Things. Hop gezellig mee langs alle design team leden voor meer inspiratie.
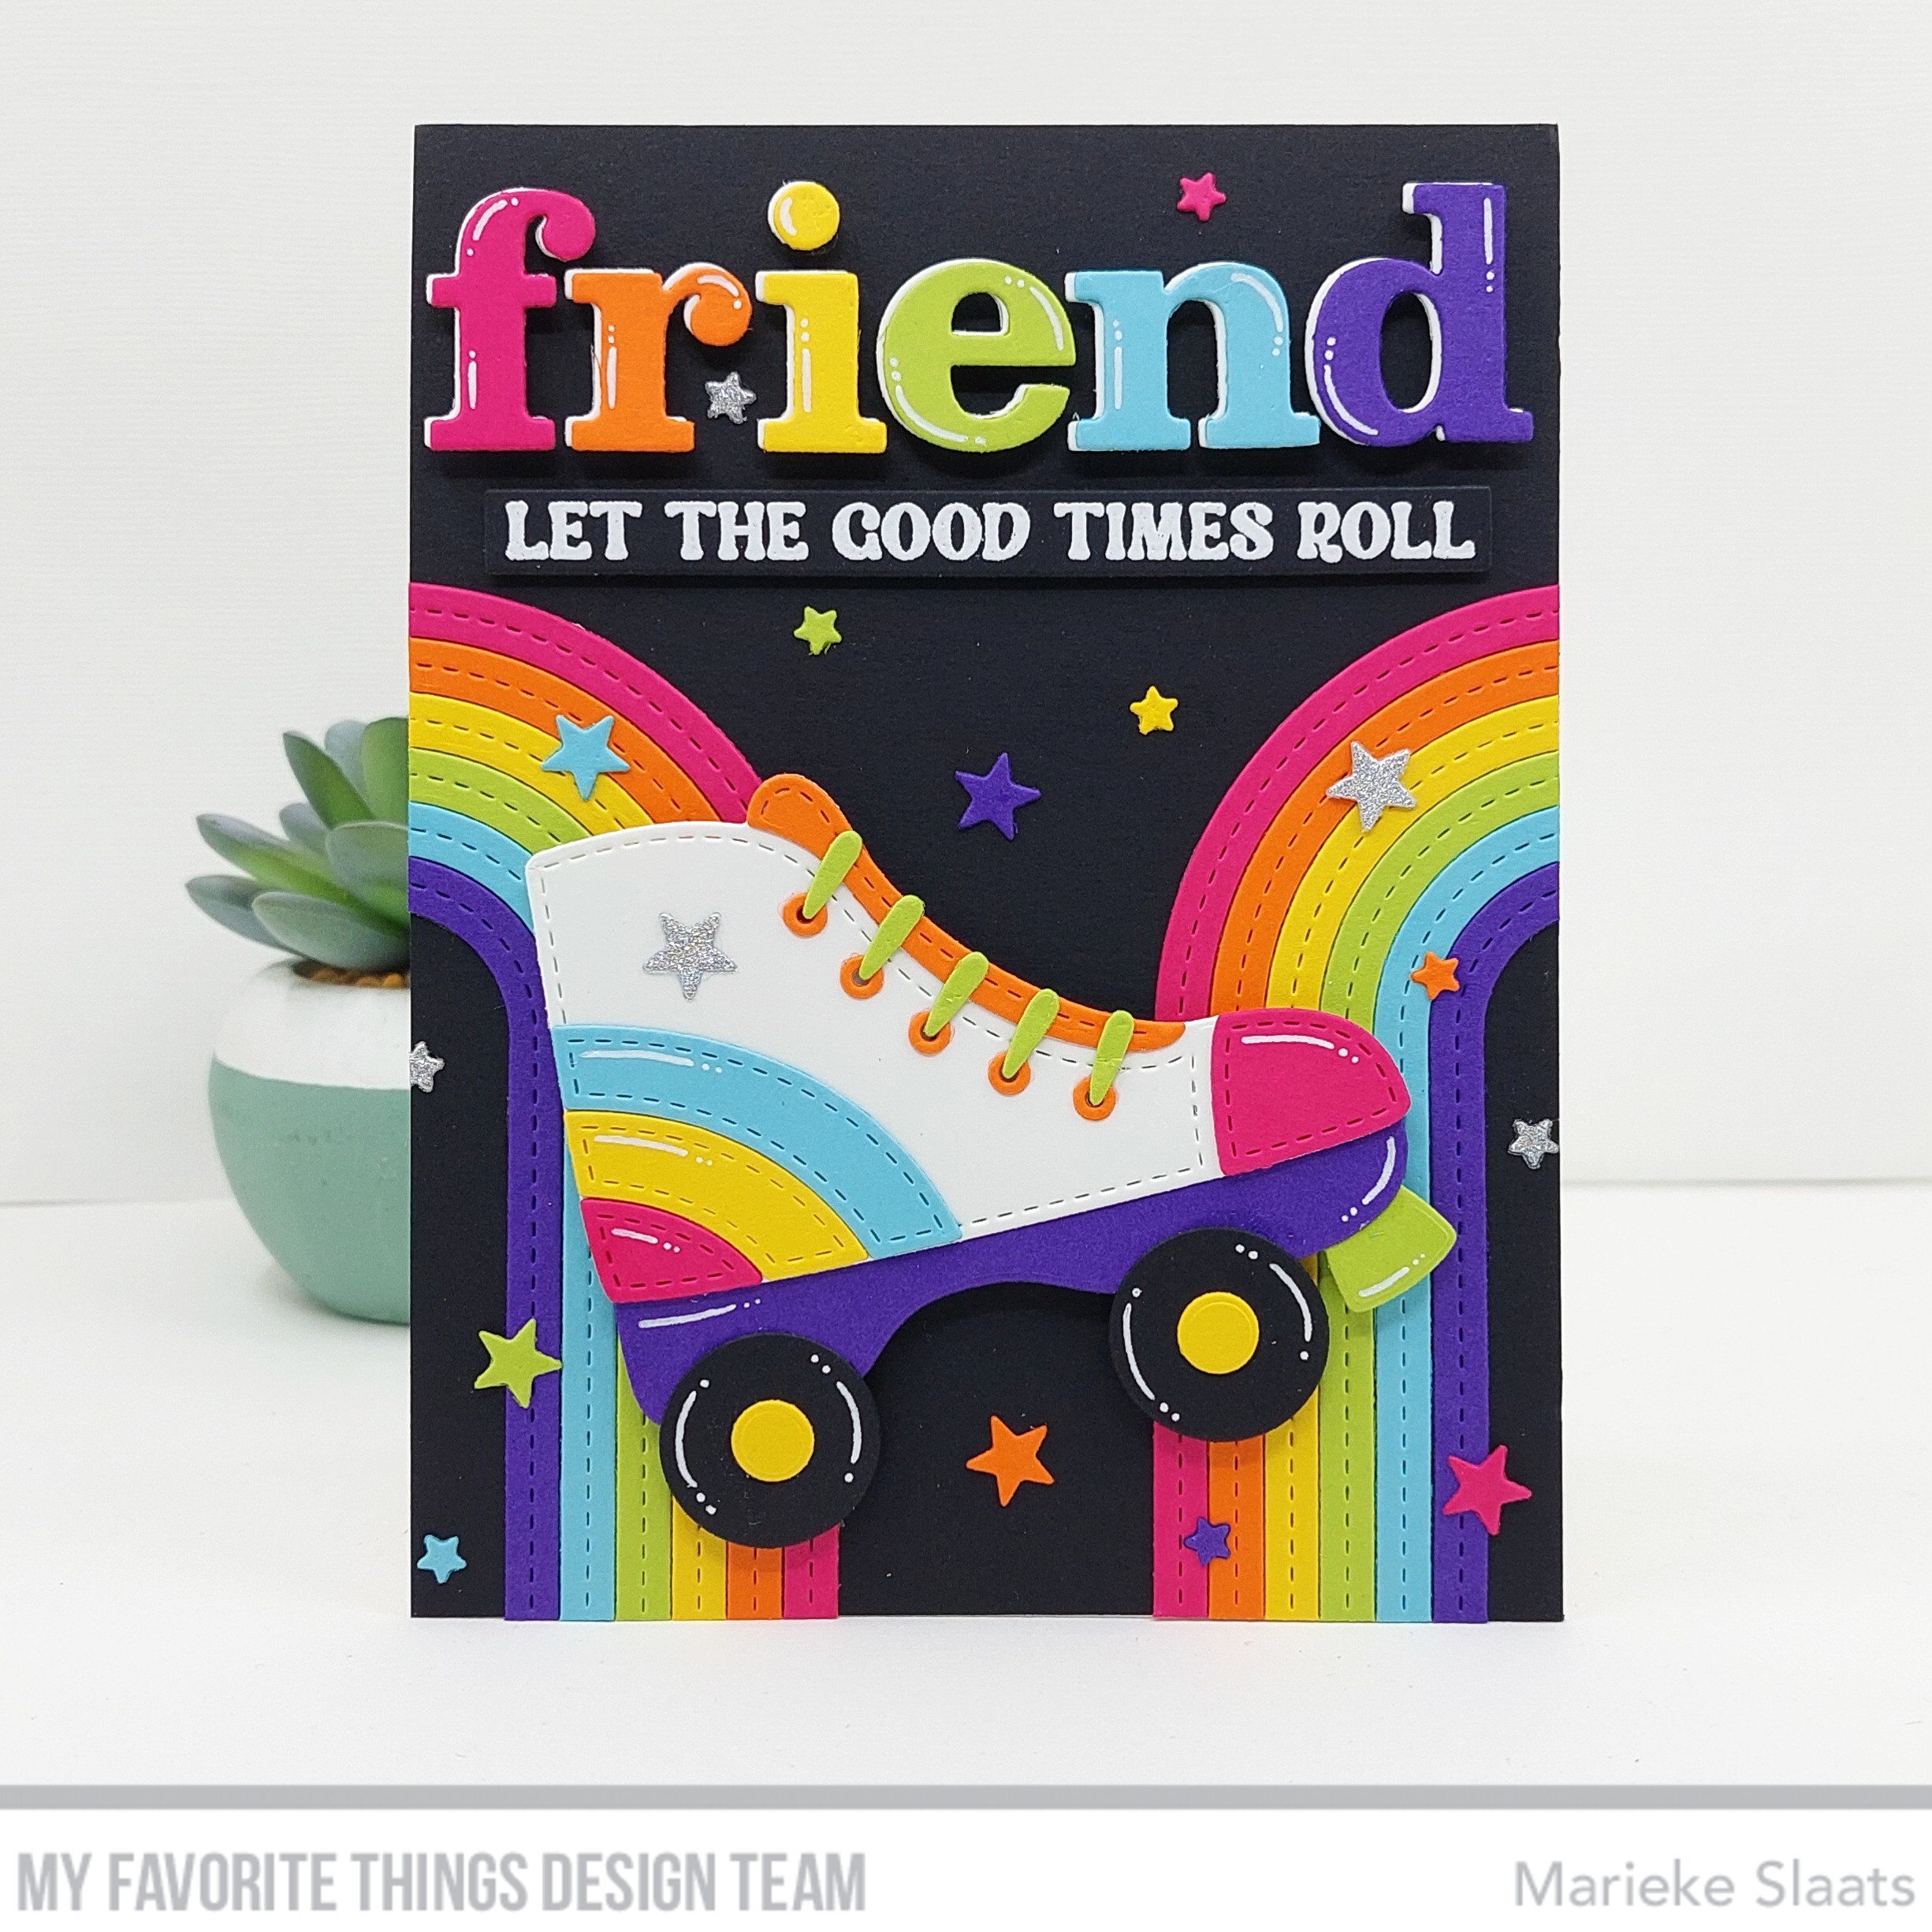
Are you ready for some 70's vibe? When I saw the Roller Skate Die-Namics I Immediately knew I wanted to create a 70's vibe card. So I combined a few older products with the new and voila here it is!

Ben je klaar voor wat jaren 70 feeling? Toen ik de Roller Skate Die-Namics zag wist ik meteen dat ik een jaren 70 vibe kaart wilde maken. Voor mijn kaart combineerde ik wat oudere met nieuwe producten en voila hier is hij dan.
Cut a white topfold basecard and adhered a Black Licorice rectangle on to it. Die cut the Stiched Rainbow Die-Namics out of different colors of cardstock and cut them in half. Adhered each half to the sides of the card. Die cut the word friend using the Modern Serif Alphabet Die-Namics out of white and the same colors of cardstock that I used for the rainbow.

Sneed een witte basiskaart en plakte hier een Black Licorice rechthoek op. Stanste de Stitched Rainbow Die-Namics uit verschillende kleuren cardstock en sneed hem doormidden. Plakte de helften op de kaart. Stanste het woord "friend" met het Modern Serif Alphabet Die-Namics uit wit en dezelfde kleuren gekleurd cardstock.
Heat set the sentiment out of the Let the Good Times Roll stamp on some black licorice and cut it into a banner. Using the same colors of cardstock, white, black and silver glitter cardstock i die cut the Roller Skate Die-Namics and the stars out of Tag Builder Blueprints 6 Die-Namics. Finished the card of by adding some white gelpen details. Heat emboste de tekst met de Let the Good Times Roll stempel op Black Licorice en sneed het tot een banner. Uit dezelfde kleuren cardstock, wit, zwart en zilver cardstock stanste ik de Roller Skate Die-Namics en de sterren met de Tag Builder Blueprints 6 Die-Namics en plakte ze op de kaart. Werkte de kaart af met witte gelpen details.

If you need to be even more inspired after this post make sure to have a look over at My Favorite Things Youtube ChannelWanneer je na deze post nog wat meer ideeën nodig heb neem dan even een kijkje op het Youtube kanaal van My Favorite Things.

Have a wonderful day!
Greets, Marieke

vrijdag 22 december 2023

My Favorite Things December Release Spotlight Day 3

 Hello all,

Welcome to day three of the December release spotlight post by My Favorite Things! So hop along for more beautiful inspiration by the team. Welkom bij dag drie van de december release spotlight dag van My Favorite Things. Hop gezellig mee langs alle design team leden voor meer inspiratie.
Today the spotlight is on the newest stamp by artist Yan and it's so cute! For my card I used; Micest Friend to create a shaker birthday card.

Vandaag staat de spotlight op de nieuwste stempel van artiest Yan en hij is zo schattig! Voor mijn kaart gebruikte ik de Micest Friend om een shaker verjaardag kaart te maken.
Cut a white rectangle, die cut the Inside & Out Stitched Arch STAX Die-Namics and masked of the bottom. Inkblended Kraft to the bottom. Then added the tape to the top and inkblended Peacock Feathers and Cracked Pistashio. Added the tape on the Kraft part and inkblended some Hickory Smoke. Cut a water color panel and inkblended it using Kraft ink. Stamped the background using the same color ink and the Whimsical Woodgrain Background.

Sneed een witte rechthoek en stanste hier de Inside & Out Stitched Arch STAX Die-Namics en maskeerde de onderzijde. Inktblende Kraft ink op de bodem en verplaatste de tape naar boven. Inktblende Peacock Feathers en Cracked Pistashio, verplaatste daarna de masking tape over het Kraft en beinkte de rechthoek met Hickory Smoke. Sneed een aquarel rechthoek en beinkte de zijkanten met Kraft en stempelde met dezelfde kleur de Whimsical Woodgrain Background.
Filled up the shaker and closed it. Heat set the sentiment and cut it to a banner. Stamped all the images using Micest Friend and Presents and Pupcakes. Colored them up and cut them using the matching Micest Friend and Presents and Pupcakes Die-Namics. Vulde de shaker en plakte hem dicht. Heat emboste de tekst en maakte het tot een banner. Stempelde alle afbeeldingen uit Micest Friend en Presents and Pupcakes. Kleurde ze in met mijn Copic markers en stanste ze daarna uit met de bijpassende Micest Friend en Presents and Pupcakes Die-Namics.

Used Copic Colors:
Grey - C5, C3, C1, C0, C00, 0
Pink - R22, R21, R00
Teal - BG15. BG13, BG11, BG10
Brown - E47, E44, E43, E42, E41
White C5, C3, C1
Blue - B02, B00, B000, B0000, 0
Cheese - Y17, Y15, Y13, Y11

If you need to be even more inspired after this post make sure to have a look over at My Favorite Things Youtube ChannelWanneer je na deze post nog wat meer ideeën nodig heb neem dan even een kijkje op het Youtube kanaal van My Favorite Things.

Have a wonderful day!
Greets, Marieke

Studio Light - Magical Christmas

Hallo Allemaal,

Hier is mijn wekelijkse post voor Studio Light weer. Deze keer maakte ik met oudere Sweet Stories producten een Harry Potter kerstkaart. I'm back with my weekly post for Studio Light. This time around I decided on making a Harry Potter inspired card using some older Sweet Stories products.
Sneed een witte basiskaart en beplakte deze met rode en gele strips. Uit cremé cardstock stanste ik de achtergrond, beinkte deze met Antique Linen en Vintage Photo. Bespetterde met water en Vintage Photo. Beinkte daarna twee hoeken met een stencil en beide kleuren Distress inkt.

Cut a white basiscard and adhered red and yellow strips of paper on to them. Cut the background out of cream cardstock and inked the sides up using Antique Linen and Vintage Photo. Splattered some water and Vintage Photo. Inked the corners using a mask and the same colors of ink.
Met waxseal maakte ik de waxzegel. Plakte hieronder wat goud garen en plakte dit op de kaart. Stempelde beide teksten op de kaart en plakte het op de basiskaart.

Using red wax and a snowflake seal I made the waxseal. Adhered some gold twine behind it and adhered it on the card. Stamped both of the sentiments and adhered the panel on the base card.
Stempelde alle afbeeldingen, kleurde ze in met mijn Copic markers en stanste ze uit met de bijpassende stansen. Plakte alles op de kaart en stempelde de lijnen achter de enveloppen. Stamped all the images, colored them up using my Copic markers and cut them using the matching dies. Adhered everything on the card and stamped the lines behind the enveloppes.

 Gebruikte Copic Kleuren:
Rood - R39, R29, R24
Geel - Y17, Y15, Y13
Zwart - N8, N6, N4, N3, N2
Haar / hout - E37, E35, E33, E31
Goud - E27, Y26, Y15, Y13
Grijs - C8, C6, C4,C2, C0
Muts + bezem en kurk - E47, E44, E43, E42, E41
Envelop - E53, E51, E50
Huid - E000, E00, E04, E11, E21
Groen - G99, G94, G21

Heb een heerlijke dag!
Groet, Marieke

Stansen: SL-SS-SCD18, SL-SS-SCD51, SL-SS-SCD72, SL-SS-CD723
Papier: Smooth White, Cremé, Red Hot, Lemon Drop

donderdag 21 december 2023

My Favorite Things December Release Spotlight Day 2

Hello all,

Day two of December release spotlight day by My Favorite ThingsDag twee van de My Favorite Things december release spotlight dag is hier! 
For today's card I went for a more Clean and Simple design using the Soda Pop stamp and matching Soda Pop Die-Namics.

Voor mijn kaart van vandaag maakte ik een Clean en Simpel design met de Soda Pop stempel en de bijpassende Soda Pop Die-Namics.
On the botton of a regular white topfold card I inkblended Spun Sugar and Worn Lipstick and inkblended Worn Lipstick and a white ink again using the Snowfall Stencil. Splattered some white paint afterwards. On some vellum I heat set the sentiment. 

Aan de onderkant van een standaard witte kaart inktblende ik Spun Sugar en Worn Lipstick. Inktblende Worn Lipstick en een witte inkt nogmaals dit keer met het Snowfall Stencil. Spetterde witte verf en heat emboste de tekst daarna op vellum.
Die cut the bottels and the straws out of white cardstock. Inkblended them using Squeezed Lemonade, Mustard Seed, Spun Sugar, Picked Raspberry, Cracked Pistashio, Peacock Feathers, Shaded Lilac and Wilted Violet. Adhered them on the card and trimmed of the exces. Adhered the sentiment on top of the card. Stanste de flessen en rietjes uit wit cardstock. Inktblende ze met Squeezed Lemonade, Mustard Seed, Spun Sugar, Picked Raspberry, Cracked Pistashio, Peacock Feathers, Shaded Lilac en Wilted Violet. Plakte ze op de kaart en sneed overhangend af. Plakte als laatste de tekst aan de voorzijde van de flessen.

If you need to be even more inspired after this post make sure to have a look over at My Favorite Things Youtube ChannelWanneer je na deze post nog wat meer ideeën nodig heb neem dan even een kijkje op het Youtube kanaal van My Favorite Things.

Have a wonderful day!
Greets, Marieke

woensdag 20 december 2023

My Favorite Things December Release Spotlight Day 1

Hello all,

Today is day one for the My Favorite Things spotlight posts! The upcomming four days the Designteam will show you projects using all of the new goodies that where release last tuesday! Vandaag is dag één van de My Favorite Things spotlight posts! De aankomende vier dagen zal het designteam verschillende projecten laten zien met de nieuwe release producten die sinds dinsdag verkrijgbaar zijn!
For today's project I created a card using one of the other stamps by artist Jenoblade called Crafty Friends. I went creative with it and made a colorful card. 

Voor mijn kaart van vandaag gebruikte ik een van de andere sets van artiest Jenoblade genaamd Crafty Friends. Met deze set maakte ik een creative kleurrijke kaart.
The base is a A2 size white card. Adhered a panel of pattern paper out of the Over the Rainbow Paper Pad. Cut a white 3 3/4 x 5 inch rectangle. Masked the bottom and inkblended some Hickory Smoke. De basis van de kaart is een witte A2 card. Plakte een rechthoek van designpapier uit het Over the Rainbow Paper Pad. Sneed een witte rechthoek 3 3/4 x 5 inch en maskeerde de onderkant en beinkte het Hickory Smoke.

Stamped the splatters using the Distressed Patterns stamp and the colors; Cotton Candy, Orange Zest, Lemon Drop, Limelight, Summer Splash, Grapesicle. Adhered the rectangle on a slightly larger Black Licorice rectangle. Stempelde de spetters met de Distressed Pattern stempels met de kleuren Cotton Candy, Orange Zest, Lemon Drop, Limelight, Summer Splash, Grapesicle.Plakte een Black Licorice rechthoek die iets groter is dan de witter rechthoek achter de witte.
Heat set the sentiments on some Black Licorice. Die cut the sentiment using Kraft and the In Stitches Alphabet Die-Namics. Stamped the images, colored them up using my Copic markers and cut them using the Crafty Friends Die-Namics. Heat emboste de teksten op Black Licorice cardstock. Stanste de andere tekste met Kraft en het In Stitches Alphabet Die-Namics. Stempelde de afbeeldingen, kleurde ze in met mijn Copic markers en stanste ze daarna met de Crafty Friends Die-Namics.

Used Copic Colors:
Cat - C6, C4, C2, C1, C0 / R22, R20
Bunny - E57, E55, E53, E51, E50 / R22, R20
Copic - C6, C4, C2 / C4,C2,C00, 0 / R85, R83, R81
Brush - E09, E08, E07, E04 / E27, Y26, Y15, Y13/ N8, N6, N4/ V09, V17, V15, V12

If you need to be even more inspired after this post make sure to have a look over at My Favorite Things Youtube ChannelWanneer je na deze post nog wat meer ideeën nodig heb neem dan even een kijkje op het Youtube kanaal van My Favorite Things.

Have a wonderful day!
Greets, Marieke

dinsdag 19 december 2023

My Favorite Things - December Release Day!

 Hello all,

It’s time for the My Favorite Things December release! All new products are available right now! The MFT design team is sharing projects created with the new stuff. You can find loads of inspiration! Het is tijd voor de My Favorite Things december product lancering. Alle nieuwe producten zijn vanaf nu verkrijgbaar! Het MFT design team deelt ook vandaag weer een lading aan inspiratie.
For today's card I created another mailcard. This time around I combined the Soda Pop together with the Bottle Cap and Bottle Cap Alphabet Die-Namics.

Voor mijn kaart van vandaag maakte ik wederom een postkaart. Deze keer combineerde ik de Soda Pop samen met de Bottle Cap en Bottle Cap Alphabet Die-Namics.
On a white topfold base card I adhered some 1/4 inch strips of Cotton Candy, Ripe raspberry and white cardstock. Out of Kraft I cut a rectangle and die cut the sides using Notebook Edge Die-Namics. With Kraft ink I inkblended the sides and stamped the background using the Never- Ending Love BackgroundPlakte op een witte topfold kaart Cotton Candy, Ripe Raspberry en witte stroken papier van 1/4 inch. Sneed een rechthoek van Kraft en stanste de zijkanten met de Notebook Edge Die-Namics. Met Kraft inkt beinkte ik de zijkanten en stempelde de achtergrond met de Never-Ending Love Background.

Out of white cardstock I die cut the smallest die out of Postage Stamp STAX Die-Namics. Stamped the number out of Price Tag with Ripe Raspberry. Stamped the hearts using Cotton candy and adhered it on to the panel. Stamped the stamps out of First Class Friend on to the post stamp. Uit wit cardstock stanste ik de kleinste maat postzegel van de Postage Stamp STAX Die-Namics. Stempelde het nummer van de Price Tag met Ripe Raspberry. Stempelde de harten met Cotton candy en plakte het op de kaart. Stempelde over de postzegel de teksten van de First Class Friend.
Die cut all the elements for the bottle useing the Soda Pop Die-Namics. Stamped the hearts and the sentiment using Soda Pop and the colors Cotton Candy and Ripe Raspberry. Heat set the sentiment on the base and on a piece of Ripe Raspberry. Die cut the Bottle Caps using Ripe Raspberry and white cardstock. The letter out of Cotton Candy and assembled them before adding them on the card. Stanste alle elementen van de fles met de Soda Pop Die-Namics. Stempelde de hearten en de tekst van Soda Pop met Cotton Candy en Ripe Raspberry en plakte het op de kaart. Heat emboste de tekst op de kaart en op Ripe Raspberry. Stanste de doppen uit wit en Ripe Raspberry en de letters uit Cotton Candy. Plakte het op elkaar en op de kaart.

If you need to be even more inspired after this post make sure to have a look over at My Favorite Things Youtube ChannelWanneer je na deze post nog wat meer ideeën nodig heb neem dan even een kijkje op het Youtube kanaal van My Favorite Things.

Have a wonderful day!
Greets, Marieke

maandag 18 december 2023

My Favorite Things December Release Preview Day

 Hello all,

It’s time for the My FavoriteThings December release! During the release week, the MFT Design Team is sharing lots of projects featuring all of the new products. The new release will officially be available tommorow December 19th ! Het is tijd voor de My Favorite Things december release week! Tijdens de release week, laat het MFT Design Team verschillende projecten zien met alle nieuwe producten. De release zal verkrijgbaar zijn morgen 19 december!
I totally love the Right on Track stamp by artist Jenoblade. I figured it woul be fun to combine it with the older Money Card and Turntable Die-Namics.

De Right on Track stempel van artiest Jenoblade, is er eentje helemaal in mijn straatje. Ik dacht dat het leuk was om te combineren met de Money Card en Turntable Die-Namics.
Die cut the Money Card Die-Namics and inkblended the background. Die cut the record out of black and white cardstock and adhered it on to the card. Die cut the sentence using different colors of cardstock and the Bitty Banner Alphabet Die-Namics. Stanste een Money Card met de bijpassende Die-Namics en inktblende de achtergrond. Stanste de plaat uit wit en zwart cardstock en plakte het in elkaar. Stanste de tekst uit verschillende kleuren cardstock met de Bitty Banner Alphabet Die-Namics.

Stamped the sentiment on the bottom of the Money Card and assembled the card. Die cut the numbers 10 and adhered them. Stempelde de tekst op de onderzijde van de Money Card en plakte het geheel in elkaar. Stanste de nummers 10 en plakte deze op de kaart.
Stamped all the images, colored them up using my Copic markers and cut them using the matching Right on Track Die-Namics. Adhered the images and the card was done. Stempelde afbeeldingen, kleurde ze in met mijn Copic markers en stanste ze uit met de bijpassende Right on Track Die-Namics. Plakte de afbeeldingen op de kaart en klaar is kees.

Used Copic Colors:
Racoon - C6, C4, C2 / N8, N6, N4, N2 / R22, R20
Cat - C5, C3,C1, C00, 0 / N8, N6, N4 / R22, R20
Fox - E09, YR27, YR24, YR23, YR21 / N6, N4 / W5, W3, W1, W00 / R22, R20
Dog - E57, E55, E53, E51, E50, R22
Teal - BG18, BG15, BG13, BG11, BG10
Pink - R85, R83, R81
Yellow - Y17, Y15, Y13, Y11
Black - N8, N6, N4, N2
Green - YG07, YG05, YG03, YG01

If you need to be even more inspired after this post make sure to have a look over at My Favorite Things Youtube ChannelWanneer je na deze post nog wat meer ideeën nodig heb neem dan even een kijkje op het Youtube kanaal van My Favorite Things.

Have a wonderful day!
Greets, Marieke

zondag 17 december 2023

Altenew - Have a Beautiful Birthday

Hallo allemaal,

Daar was ik weer eens met nog een kaart als gastdesigner voor Altenew. Dit keer ging ik aan de slag met de Ornamental Bouquet producten. I'm back again with a post as a guesdesigner for Altenew. This time around I created a card using the Ornamental Bouquet products.
Met gouden folie hotfoilede ik de Ornamental Bouquet Hot Foil Plate op wit cardstock. Beinkte daarna het boeket met de kleuren Mauve, Berrylicious, Acai Berry, Aloe Very, Matcha Tea, Swamp Green, Icy Lemonade, Oelong tea en Citronella en het Ornamental Bouquet Simple Coloring Stencil. Knipte het daarna uit met mijn schaar.

USing gold foil and the Ornamental Bouqout Hot Foil Plate I hot Foiled it on to white cardstock. After that I colored it using the Simple Coloring Stencil Ornamental Bouquet and the colors; Mauve, Berrylicious, Acai Berry, Aloe Very, Matcha Tea, Swamp Green, Icy Lemonade, Oelong tea and Citronella. Cut the bouquet afterwards using my sciccors.
Sneed een zacht roze rechthoek 4 1/4 x 5 1/2 en beinkte de hoek met Mauve. Spetterde water en gouden verf en plakte het op een witte basiskaart. Plakte de boeket op de kaart en knipte het overlappende af.

Cut a soft pink 4 1/4 x 5 1/2 inch rectangle and added some Mauve in the cornor. Splattered water and gold paint and adhered it to the base card. Added the bouquet and cut of the sides.
Heat emboste de teksten, stanste en knipte ze uit en plakte ze verhoogd op de kaart. Werkte de kaart af door wat gouden parels op te plakken. Heat set the sentiments and cut the with my sciccors or a die. Adhered them to the card and finished the card of by adding some golden pearls. 

Heb een heerlijke dag!
Groet, Marieke

zaterdag 16 december 2023

Altenew - Hello My Dear Friend

Hallo allemaal,

Hier ben ik dan weer met nog een keer een post voor Altenew. Ook vandaag maakte ik een kaart met de nieuwe inkten van Altenew, ditmaal combineerde ik de inkten met de Dancing Sunflowers. I'm back again with a new post for Altenew. For today I created a card using the new Altenew Inks combined with the older Dancing Sunflowers.
De basis is een standaard topfold witte kaart. Sneed een rechthoek 5 1/4 x 4 en beinkte de kant waar de bloem komt met Mauve inkt. Spetterde daarna met Mauve en Berrylicious. Plakte de rechthoek op de kaart met foamtape.

The base of the card is a A2 topfold white basecard. Cut a white rectangle 5 1/4 x 4 inch and inked the side were the flower is going using Mauve. Splattered some Mauve and Berrylicious and adhered the rectangle to the basecard using foam tape.
Stanste de bloem met de Dancing Sunflowers Die Cut en beinkte het met de Dancing Sunflowers Simple Coloring Stencil. Ik gebruikte de kleuren Mauve, Berrylicious, Acai Berry, Aloe Very, Matcha Tea, Icy Lemonade, Oelong tea en Citronella. 

Die cut the flower using the Dancing Sunflower Die Cut and inked it up using the Dancing Sunflower Simple Coloring Stencil. I used the colors; Mauve, Berrylicious, Acai Berry, Aloe Very, Matcha Tea, Icy Lemonade, Oelong tea and Citronella. 
Plakte de bloem op de kaart en bewerkte het met transparante sequins. Stanste de tekst uit de Versatile Greetings Die Cut en plakte ze op elkaar. Stempelde de andere tekst van de Cherry Blossoms Bunch en stanste het tot een banner voordat ik het opplakte. Adhered the flower on the basecard and added some transparant sequins. Die cut the sentiment using the Versatile Greetings Die Cut and adhered them together. Stamped the other sentiment out of the Cherry Blossoms Bunch and die cut it to a banner before adding the sentiment to the card.

Heb een heerlijke dag!
Liefs, Marieke

vrijdag 15 december 2023

Altenew - Season's Greetings

Hallo allemaal,

Vandaag ben ik er weer met een kaart die ik als gastdesigner voor Altenew maakte. Dit keer heb ik een kaart die ik maakte met een aantal nieuwe en een aantal oudere producten. Today i'm back again with a post as a guestdesigner for Altenew. This time around I created a card using some new and older products.
De basis van de kaart is een topfold witte kaart. Ik sneed een rechthoek 5 x 3 3/4 inch en beinkte dit met het Sweater Pattern Builder stencil en de kleuren Mauve en Berrylicious. Plakte dit op een donker kleur cardstock en plakte het met foam tape op de kaart.

The base of the card is a topfold white card. Cut a white rectangle 5 3 3/4 inch and inked it up using the Sweater Pattern Builder stencil and the colors Mauve and Berrylicious. Adhered the rectangle onto a darker shade of cardstock and on the base using foam tape.
Op hetzelfde kleur cardstock hotfoiled ik de tekst met witte hot foil en de Holiday Greetings Hot Foil Plate. Stanste het daarna uit met de bijpassende Holiday Greetings Die Cut.

On to the same color of cardstock I hotfoiled the sentiment using the Holiday Greetings Hot Foil Plate and white hot foil. Afterwards I cut it using the matching Holiday Greetings Die Cut.
Stempelde de Mini Delight: Very Berry stempel met Mauve en Berrylicious. De blaadjes stempelde ik met Aloe Vera, Matcha Tea en Swamp Green. Knipte het uit en plakte ze op de kaart. Werkte de kaart af met wat roze rhinestones. Stamped the Mini Delight: Very Berry stamp using Mauve and Berrylicious. The leaves are die cut using Aloe Vera, Matcha Tea and Swamp Green. Cut them using my sciccors and adhered them on the card. Finished the card of by adding some pink thinestones.

Heb een heerlijke dag!
:Liefs, Marieke