dinsdag 31 oktober 2023

My Favorite Things - October Release Day!

 Hello all,

It’s time for the My Favorite Things October release! All new products are available right now! The MFT design team is sharing projects created with the new stuff. You can find loads of inspiration! Het is tijd voor de My Favorite Things oktober product lancering. Alle nieuwe producten zijn vanaf nu verkrijgbaar! Het MFT design team deelt ook vandaag weer een lading aan inspiratie.
Yay the new release is avaible as we speak! For today I created another Christmas card. This time around I used the Kitchen Cuties, Sweetest Holiday Wishes and the new Colorful Christmas Text Paper Pad.

Ja de nieuwe release is verkrijgbaar vanaf nu! Ik maakte wederom een kerst kaart. Deze keer gebruikte ik de Kitchen Cuties, Sweetest Holiday Wishes en het nieuwe Colorful Christmas Text Paper Pad.
Cut a topfold white base and added a piece of pattern paper onto it. Die cut the a white scalloped rectangle using Blueprints 27 Die-Namics. Cut a Eiffel Tower rectangle and a slightly smaller white rectangle. Inkblended the bricks using Hickory Smoke and the English Brick Wall Stencil. Inked the ground using a brown ink.

Sneed een witte topfold basiskaart en beplakte dit met het nieuwe designpapier. Stanste een witte gescupte rand met de Blueprints 27 Die-Namics. Sneed een Eiffel Tower rechthoek en een slag kleinere witte rechthoek. Beinkte deze met Hickory Smoke en het English Brick Wall Stencil. Voor de grond gebruikte ik een bruine kleur inkt.
Stamped all the images, colored them up using my Copic markers and cut them using the matching Kitchen Cuties Die-Namics. Heat set the sentiment on to some Red Hot and cut it using the banner out of the same blueprints as used earlier. Added some Christmas floral that comes with this month free for $60 Mini Holly Wreath Die-Namics. Stempelde alle abeeldingen, kleurde ze in met mijn Copic markers en stanste ze uit met de bijpassende Kitchen Cuties Die-Namics. Heat emboste de tekst op Red Hot cardstock en stanste het uit met de banner die in de eerder gebruikte Blueprints zit. Voegde nog wat kerstbloemen toe aan de banner hiervoor gebruikte ik deze maand free for $60 de Mini Holly Wreath Die-Namics.

Used Copic Colors:
Cats - W6, W4, W2, W1
White - C5, C3, C1, 0
Green - YG67, YG63, YG03, YG01
Red - R59, R39, R29, R27, R24
Bags - E47, E44, E43, E42, E41
Eggs - E53, E51, E50 / Y17, Y15, Y13
Flour - YR31, YR30 , 0
Fridge - C6, C4, C2
Counter - T8, T6, T4

If you need to be even more inspired after this post make sure to have a look over at My Favorite Things Youtube ChannelWanneer je na deze post nog wat meer ideeën nodig heb neem dan even een kijkje op het Youtube kanaal van My Favorite Things.

Have a wonderful day!
Greets, Marieke

maandag 30 oktober 2023

My Favorite Things October Release Preview Day

 Hello all,

It’s time for the My FavoriteThings October release! During the release week, the MFT Design Team is sharing lots of projects featuring all of the new products. The new release will officially be available tommorow October 31st ! Het is tijd voor de My Favorite Things oktober release week! Tijdens de release week, laat het MFT Design Team verschillende projecten zien met alle nieuwe producten. De release zal verkrijgbaar zijn morgen 31 oktober!
For today I created a christmas card using the latest set by Yan called Merry Moose. A set with some super fun moose on adventures. 

Voor vandaag maakte ik een kerst kaart met de nieuwste set van Yan genaamd Merry Moose. Een set met super leuke rendieren op avontuur.
On a piece of cardstock I inkblended Salvaged Patina, Peacock Feathers and Lucky Clover. Splattered some water and white paint and glued it onto a topfold white base card. Die cut the trees using kraft cardstock and the Winter Trees Die-Namics.

Op een stuk aquarel papier inktblende ik de kleuren Salvaged Patina, Peacock Feathers en Lucky Clover. Spetterde water en witte verf en plakte het op een witte topfold basis kaart. Stanste de bomen uit kraft met de Winter Trees Die-Namcis.
Die cut a border of snw using the Stitched Snow Drifts Die-Namcis and inked it using Salvaged Patina. Heat set the sentiment on to Red Hot and cut it to a banner. Stamped the images, colored them up and cut them using the Merry Moose Die-Namics. Adhered all the elements on the card to fiish it off. Stanste een rand sneeuw met de Stitched Snow Drifts Die-Namics en beinkte het met Salvaged Patina. Heat emboste de tekst op Red Hot cardstock en sneed het tot een banner. Stempelde alle afbeeldingen, kleurde ze met mijn Copic markers en stanste ze uit met de Merry Moose Die-Namics. Plakte alle elementen op de kaart om de kaart compleet te maken.

Used Copic Colors:
Deer- E59, E7, E55, E53, E51, E50 / E43, E42, E41
Wood - E37, E35, E33, E31
Birds - R39, R37, R35, R32
Green - G99, G94, G82
White - C3, C1, 0
Pink - R20, R00
Fire - YR04, Y38, Y35, Y31

If you need to be even more inspired after this post make sure to have a look over at My Favorite Things Youtube ChannelWanneer je na deze post nog wat meer ideeën nodig heb neem dan even een kijkje op het Youtube kanaal van My Favorite Things.

Have a wonderful day!
Greets, Marieke

donderdag 26 oktober 2023

Studio Light - Be My Valentine

Hallo Allemaal,

Hier is mijn wekelijkse post voor Studio Light weer. Deze keer maakte ik met de nieuwste Sweet Stories producten een Valentijn shaker kaart. I'm back with my weekly post for Studio Light. This time around I decided on making a Valentine shakercard using the newest Sweet Stories products.
Stanste uit Kraft Cardstock twee keer de geschubte achtergrond en rilde er een op 2 cm, plakte ze aan elkaar dit is de basis van de kaart. Sneed een witte rechthoek en 0,5 cm kleiner een stuk watercolor papier. Beinkte dit met Distress inkten, spetterde water en liet het drogen. 

Out of Kraft cardstock I die cut the scalloped rectangle twice, scored one at 2 cm and adhered them together. This is the base of the card. Cut a white rectangle and a rectangle out of watercolor paper 0,5 cm smaller. Inked up the watercolor panel with Distress inks, splattered water and let it dry.
Beinkte een stuk aquarel papier met distress inkt en stanste dit uit met de gras stans. Plakte het op de kaart en stanste uit het midden het hart. Stempelde alle afbeeldingen kleurde ze in met mijn Copic markers en stanste ze uit met de bijbehorende stansen. Maskeerde de boom en stanste hier de enveloppen op.

Inked up a piece of wtercolor paper for the gras using Distress inks and die cut it using a grass die. Adhered this on the card and die cut the heart out of the middel. Stamped all the images, colored them up with my Copic markers and cut them using the matching dies. Masked the tree and stamped the enveloppes in the tree. 
Bepaalde waar de losse enveloppen kwamen en stempelde de gestipte lijnen. Plakte de blister aan de achterzijde vulde de shaker en plakte hem dicht. Plakte alle afbeeldinge op de kaart en stempelde de tekst. Heat emboste de andere tekste op vellum en knipte deze uit en plakte hem daarna op de kaart. Decided were the lose enveloppes are going and stamped the dotted lines. Adhered the blister behind the panel, filled the shaker and closed it. Stamped the sentiment and heat set other sentiment on to vellum. Cut the large sentiment and adhered everything on the base card.

Gebruikte Copic Kleuren:
Wasberen - C6, C4, C2 / T8, T6, T4 / R22, R20, R00
Paddenstoelen - R24, R22, R20 / W3, W1, W00
Blaadjes - YG67, YG63, YG03
Oranje - YR65, YR63, YR61
Roze - R24, R22, R20
Wit - C5, C3, C1, C00, 0
Hout - E37, E35, E33, E31, E30

woensdag 25 oktober 2023

Studio Light - Cheers to New Adventures

Hallo Allemaal,

Hier is mijn wekelijkse post voor Studio Light weer. Deze keer maakte ik een wijnlabel met de laatste zomer Sweet Stories release. I'm back with my weekly post for Studio Light. This time around I decided wine label using the Summer Sweet Stories products.
Ik haalde een oud Dutch Doobadoo stencil tevoorschijn en sneed de winetag uit Kraft, en wit cardstock. Beplakte de voorzijde met designpapier en daarop ging een smallere kraft variant. De witte tag, beinkte ik met blauwe inkt en bestempelde daarna met achtergrond stempels.

I dusted of a older Dutch Doobadoo stencil and cut the stencil using Kraft and white cardstock. Added some pattern paper to the front of the card and inked the white cardstock using a blue ink. Stamped the background using the same blue inks and some stamps.
Stempelde alle afbeeldingen, kleurde ze met mijn Copic markers en stanste ze uit. Met de Mirror techniek stempelde ik de otter nog een keer, kleurde deze in en knipte hem uit. Plakte alle afbeeldingen op de tag.

Stamped all the images, colored them up using my Copic markers and die cut them using the matching dies. Using the mirror technique I stamped the otter another time, colored him up and cut him. Adhered all the images onto the tag.
Stanste het woord "cheers" drie keer uit rood cardstock. Plakte deze op elkaar, stempelde daarna de andere tekst op een stuk wit cardstock en stanste deze tot een banner. Plakte beide op de tag en stempelde als laatste de vogels.

Die cut the word "Cheers" three times out of red cardstock. Adhered them together and stamped the other sentiment on some white cardstock and cut it to a banner. Adhered both to the tag and stamped some birds.

Gebruikte Copic Kleuren:
Bears - E55, E53, E51, E50 / N6, N4 / R22, R20, R00
Pumkins - YR09, YR07, YR04, YR02 / YG67, YG63, YG03
Leaves - YR04, YR02, Y38, Y35
Handcart - E37, E35, E33, E31, E30 / N8, N6, N4 / C6, C4, C2

Heb een heerlijke dag!
Groet, Marieke

Stempels: SL-SS-SCD53,SL-SS-SCD58, SL-SS-STAMP215, SL-SS-STAMP442, JMA-ES-STAMP140
Dies: SL-SS-SCD53SL-SS-SCD58, Cheers Die-Namics
Papier: Kraft, White, Red Hot

vrijdag 20 oktober 2023

Studio Light - Videotutorial

Hallo Allemaal,

Hier is mijn wekelijkse post voor Studio Light weer. Deze keer maakte ik een kaart met de nieuwste Sweet Stories stempels, die vanaf vandaag te koop zijn! I'm back with my weekly post for Studio Light. This time around I decided card using the newest Sweet Stories products, they are for sale as we speak!
Deze kaart maakte ik voor de nieuwste tutorial van Studio Light. Onderaan het blog bericht kun je een (Engels talige) tutorial vinden hoe je deze kaart kunt maken. Veel kijk plezier!

This card I made especially for my tutorial for Studio Light. At the end of the blogpost there will be a (English) spoken tutorial on how to make this card. Have fun watching!

Gebruikte Copic Kleuren:
Racoon - C4, C2, C00 / T6, T4, T3, T2 / C3, C1, C0
Deer - E55, E53, E51, E50 / W4, W2
Beaver - E35, E33, E31, E30
Mushroom - W3, W1, W00, 0 / R22, R20, R00, R000
Orange - YR09, YR04, YR02
Teal - BG18, BG15, BG13, BG11
Yellow - Y38, Y35, Y32


Heb een heerlijke dag!
Groet, Marieke

woensdag 18 oktober 2023

Studio Light - Birthday's are S'MORE Fun with Friends

Hallo Allemaal,

Hier is mijn wekelijkse post voor Studio Light weer. Deze keer maakte ik met de nieuwste Sweet Stories producten een verjaardag kaart. I'm back with my weekly post for Studio Light. This time around I decided on making a birthday card using the newest Sweet Stories products.
Maakte als eerste de achtergrond met Distress inkten, daarna stanste ik het gras, beinkte dit ook met Distress inkt en stanste uit de Kraft cardstock de grond. Met het nieuwe stencil en Glow In the Dark Paste maakte ik de vuurvliegjes in de lucht. 

First off I made the background using Distress inks. Cut the grass and sand and inked them up with Distress inks. Using the new mask and some Glow in the Dark paste I made the fireflies in the sky.
Maakte met Distress inkten de maan en stempelde de teksten op de kaart. Stanste uit verschillende kleuren cardstock de tent en het kampvuur en plakte het in elkaar en op de kaart. Stanste de letters voor het woord S'more.

With Distress inks I created the moon and stamped the sentiments directly onto the card. Out of different colors of cardstock I die cut the tent and campfire and assembled them. Die cut the letters so I could create the word S'more.
Stempelde de afbeeldingen, kleurde ze in met mijn Copic markers en stanste ze uit met de bijpassende stansen. Plakte alles op de kaart en werkte het af met een witte gelpen. Stamped the images, colored them up using my Copic markers and cut them using the matching dies. Adhered everything on the card and finished it of by adding some white gelpen details.

Gebruikte Copic Kleuren:
Bevers - E37, E35, E33, E31, E30 / E79, E77, E73, E71/ N8, N6, R20, R00
Blauw - B28, B26, B24
Wit - C5, C3, C1, 0
Roze - R20, R00, R000
Rood - R59, R37, R29, R27, R24
Hout - E47, E44, E43, E42

Heb een heerlijke dag!
Groet, Marieke

Papier: Smooth White, Red Hot, Sour Apple, Kraft, Lemon Drop, Black Licorice, Eiffel Tower, Pineapple, Lemon Chiffon, Orange zest, Cement Gray (MFT), Kraft Woodgrain (Lawn Fawn)

maandag 16 oktober 2023

Hoera een kleindochter

 Hallo allemaal,

Naast de kaart van zondag vroeg de zus van mijn collega of ik ook een kaart kon maken voor haar ouders. De enige opdracht die ik mee kreeg was om er een tractor op te verwerken. Nou had ik toch net de tractor van Lawn Fawn gekocht kon ik deze meteen gebruiken. Beside the card that I showed you on sunday, my colleague's sister also asked me to create a card for there parents. The only restriction I had was to use a tractor, I both the new set by Lawn Fawn a few weeks back that was not a problem!
De basis is een witte topfold kaart beinkte de bovenzijde met Tumbled Glass en Salty Ocean met een wolken stencil. Stanste de hekwerken en beide grasvelden. Voordat ik ze stanste beinkte ik het met Mowed Lawn en Twisted Citron en bespetterde het met water. Sneed een strook kraft en bewerkte dit met Vintage Photo. plakte daarna de scene op de kaart.

The base of the card is a white card. Inked up the top using Tumbled Glass and Salty Ocean using a cloud stencil. Die cut the fences and both grass pieces. Before die cutting I inked up some Mowed Lawn and Twisted Citron. Cut a strip of kraft cardstock added some Vintage Photo and assembled the scene.
Stempelde alle afbeeldingen en onderdelen, kleurde ze met mijn Copic markers en knipte alles uit. Bestempelde de rompers met de tekst opa en oma en plakte daarna alle onderdelen op de kaart.

Stamped all the images and elements, colored them up using my Copic markers and cut them. Stamped the sentiments on to the onesies and adhered all the elements on to the card.
Stanste de outline uit Cotton Candy beinkte dit met Picked Raspberry. Stanste "hoera" uit wit cardstock en beinkte dit met Spun Sugar. Plakte ze op elkaar en stempelde de andere tekst met Cotton Candy, stanste het tot een banner en plakte beide op de kaart. Out of Cotton Candy I cut the outline and inked it up using Picked Raspberry. Die cut "Hoera" out of white cardstock and inked it up using Spun Sugar. Adhered them together and stamped the other sentiments on some white cardstock using Cotton Candy ink. Die cut it using a die and adhered them on the card.

Gebruikte Copic Kleuren:
Pink - R85, R83, R81, R00
White - C5, C3, C1, C00, 0
Wood - E37, E35, D33, E31
Green - YG67, YG63, YG03, YG01
Cows - E27, E25, E23 / C3, C1, 0 / W4, W2 / E000, E00, E04, E11, E21
Skin - E000, E00, E04, E11, E21
Hair Guy - E37, E35, E33
Hair Girl - Y26, Y23, Y21
Hat - E44, E43, E42
Jeans - B97, B95, B93, B91
Black - T8, T6, T4
Grey / Silver - C6, C4, C2

Heb een heerlijke dag!
Groet, Marieke

Stempels: Tiny Farm, Hay There, Hayrides, Little Bundle (Lawn Fawn), Cadeaubon (Carlijn Design)
Stansen: Gefeliciteerd Hoera (Carlijn Design), Grassy Fields Die-Namics, Rolling Hills Die-Namics (My Favorite Things), Scalloped Fence (Sunny Studio Stamps)
Inkt: Memento Tuxedo Black, Versafine Onyx Black, Spun Sugar/ Picked Raspberry/ Tumbled Glass/ Salty Ocean/ Twisted Citron/ Mowed Lawn en Vintage Photo Distress inkt, Cotton Candy en Kraft (MFT)
Papier: Smooth White, Cotton Candy, Kraft (MFT)
Extra: Mini Cloud Edges Stencil (MFT)

zaterdag 14 oktober 2023

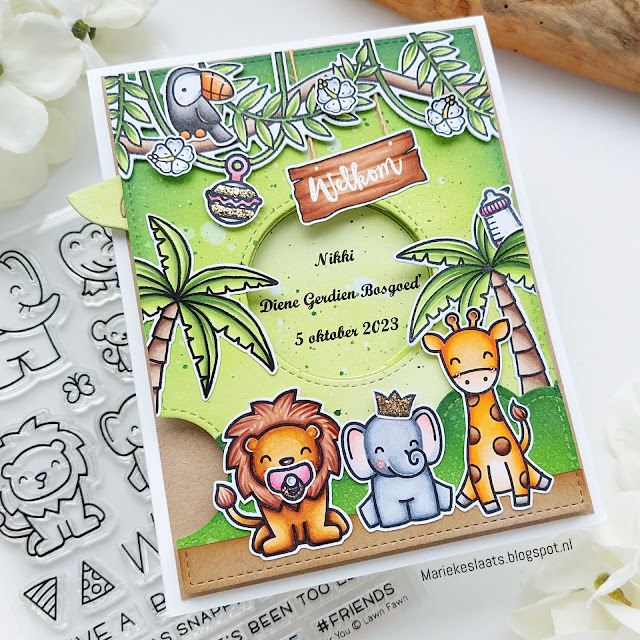
Welkom, Nikki

Hallo allemaal,

Mijn collega is vorige week bevallen van een gezonde dochter Nikki. Haar zus vroeg mij een kaart te maken voor deze heugelijk gebeurtenis en de enige opdracht die ik kreeg was om er een jungle thema aan te geven. My colleague gave birth to a healty baby girl Nikki. Her sister asked me to create a card for her, with the only the only "restriction" to make it a jungle theme.
Om de kaart specialer te maken maakte ik er een interactieve kaart van met de Magic Iris stans van Lawn Fawn. Ik beinkte een rechthoek met Twisted Citron, Mowed Lawn en Rustic Wilderness. Spetterde water en Rustic Wilderness en stanste het uit met de Magic Iris Add-on. 

To make the card even more special I decided to create a interactive card using the Magic Iris die by Lawn Fawn. I inked up a rectangle using Twisted Citron, Mowed Lawn and Rustic Wilderness. Splattered some water and Rustic Wilderness and cut it using the Magic Iris Add-on.
Stanste alle onderdelen voor de Magic Iris en beinkte zo nodig met Twisted Citron, bespetterde met water en Rustic Wilderness en plakte het mechanisme in elkaar. Plakte het mechanisme achter de rechthoek. Het geheel ging op een iets grotere kraft rechthoek en daarna op een witte basiskaart.

Die cut all the elements of the Magic Iris inked up the parts that are needed for the iris itself with Twisted Citron. Splattered some water and Rustic Wilderness on to them and assembled the mechanisme. Adhered the mechanimse behind the addon. Glued the mechanisme on a slightly larger kraft rectangle and then on a topfold white cardbase.
Met mijn printer printte ik de naam en geboortedatum, voordat ik het printte heb ik het papier al beinkte en bespetterd met Twisted Citron, water en Rustic Wilderness. Stanste het geheel uit en plakte de cirkel achter de Magic Iris.

Using my printer I print out the name and date of birth, but before doing so I inked up and splattered the paper using Twisted Citron, water and Rustic Wilderness. Die cut the print spot out of the paper and glued it behind the Magic Iris.
Stempelde alle afbeeldingen, kleurde ze in met mijn Copic markers en knipte of stanste ze uit. Plakte alles op elkaar en op de kaart. Bewerkte de baby onderdelen en de kroon met gouden glitters en heat emboste de tekst op het uithangbord. Stamped all the images, colored them up using my Copic markers and die cut or fussy cut them. Glued all the elements on the card, before doing so I heat set the sentiment on the sign and added some golden glitter to the baby elements.

Gebruikte Copic Kleuren:
Green - YG67, YG63, YG03, YG01
Tree - E47, E44, E43, E42
White - C5, C3, C1, C00, 0
Elephant - C6, C4, C2, C1, C0 / R20, R00, R000
Lion - E59, E99, YR27, YR24, YR31, YR30 / E31, E33, E34, E37, E25, E29
Pink - R85, R83, R81
Giraffe - YR68, YR65, Y38, Y35, Y32 / E53, E51, E50 / E37, E35, E33 / W4, W2
Geel - Y15, Y13, Y11
Toecan - T8, T6, T4, T2 / YR68, YR65, YR61

Heb een heerlijke dag!
Groet, Marieke

Stempels: Wild for You, Toucan do it (Lawn Fawn), Tropical Scenes, Seasonal Trees (Sunny Studio Stamps), Baby Panda (Carlijn Design), SL-SS-SCD36 (Studio Light), Mirror (MFT)
Stansen: Tropical Scenes, Seasonal Trees (Sunny Studio Stamps), Magic Iris, Magic Iris Add-on, Puffy Cloud Borders (Lawn Fawn).
Inkt: Memento Tuxedo Black, Versamark Watermark Inkt, Twisted Citron/ Mowed Lawn, Rustic Wilderness en Vintage Photo Distress inkt.
Papier: Smooth White (MFT)

vrijdag 13 oktober 2023

Studio Light - Welcome to the Neighborhood

Hallo Allemaal,

Hier is mijn wekelijkse post voor Studio Light weer. Deze keer maakte ik met de nieuwste Sweet Stories producten een kaart. I'm back with my weekly post for Studio Light. This time around I decided on making a card using the newest Sweet Stories products.
Sneed een witte basiskaart en beinkte de achtergrond met Salty Ocean en de bomen met Walnut Stain. Stanste de boom drie keer uit Kraft cardstock en beinkte dit met Walnut Stain. Het bladerendek stanste ik uit twee verschillende kleuren groen cardstock en beinkte dit ook met twee verschillende kleuren distress inkt. Plakte het op elkaar en bewerkte het bladeredek met een witte gelpen.

Cut a white basecard, inked the background using Salty Ocean and the trees using Walnut Stain. Die cut the tree, three times out of Kraft carstock and inked it up using Walnut Stain. The leaves I cut out of two different colors of green cardstock and inked it up using two different colors of ink. Adhered them together and added some white gelpen details to it.
Met Antique Linen en Vintage Photo Distress inkt maakte ik het zand, stanste dit uit met een stans en deed dit ook met een stuk groen cardstock. Plakte dit op de kaart en bewerkte dit met een witte gelpen. Stanste alle onderdelen voor op de bomen en plakte dit op.

Using Gathered Twigs Distress ink I made the sand, die cut it using a die and used the same die for the grass and green cardstock. Adhered this on the card and added some white gelpen details to it. Die cut all the tree elements and adhered them onto the trees.
Stempelde alle afbeeldingen, kleurde ze in met mijn Copic markers en stanste ze uit met de bijpassende stansen. Heat emboste en stempelde de teksten, knipte of stansten deze uit en plakte alles op de kaart.Stamped all the images, colored them up using my Copic markers and cut them using the matching dies. Heat set and stamped the sentiments, cut them using my sciccors or a die and adhered all the elements on the card.

Gebruikte Copic Kleuren:
Hert - E57,E55, E53, E51, E50 / R22, R20, R00
Paddestoelen - R59, R29, R27, R24 / W5, W3, W1, W00, 0 / R20 / C5, C3, C00, 0
Kikker - YG67, YG63, YG03, YG01
Wasbeer - T8, T6, T4, T3, T2 / W5, W3, W1, W00, 0 / R22, R20, R00
Vlinder -Y15, Y13, Y11 / W3, W1
Vogel - Y15, Y13, Y11, B04, B02, B00 / C3, C1, C00 / N2, N0/ YR04 / YR02

Heb een heerlijke dag!
Groet, Marieke

Papier: Smooth White, Sour Apple, Limelight, Kraft, Vintage Timber