vrijdag 28 juli 2023

Studio Light - Winter Wishes & Snowflake Kisses

Hallo Allemaal,

Hier is mijn wekelijkse post voor Studio Light weer. Deze keer maakte ik met de nieuwste Sweet Stories producten een kaart. I'm back with my weekly post for Studio Light. This time around I decided on making a card using the newest Sweet Stories products.
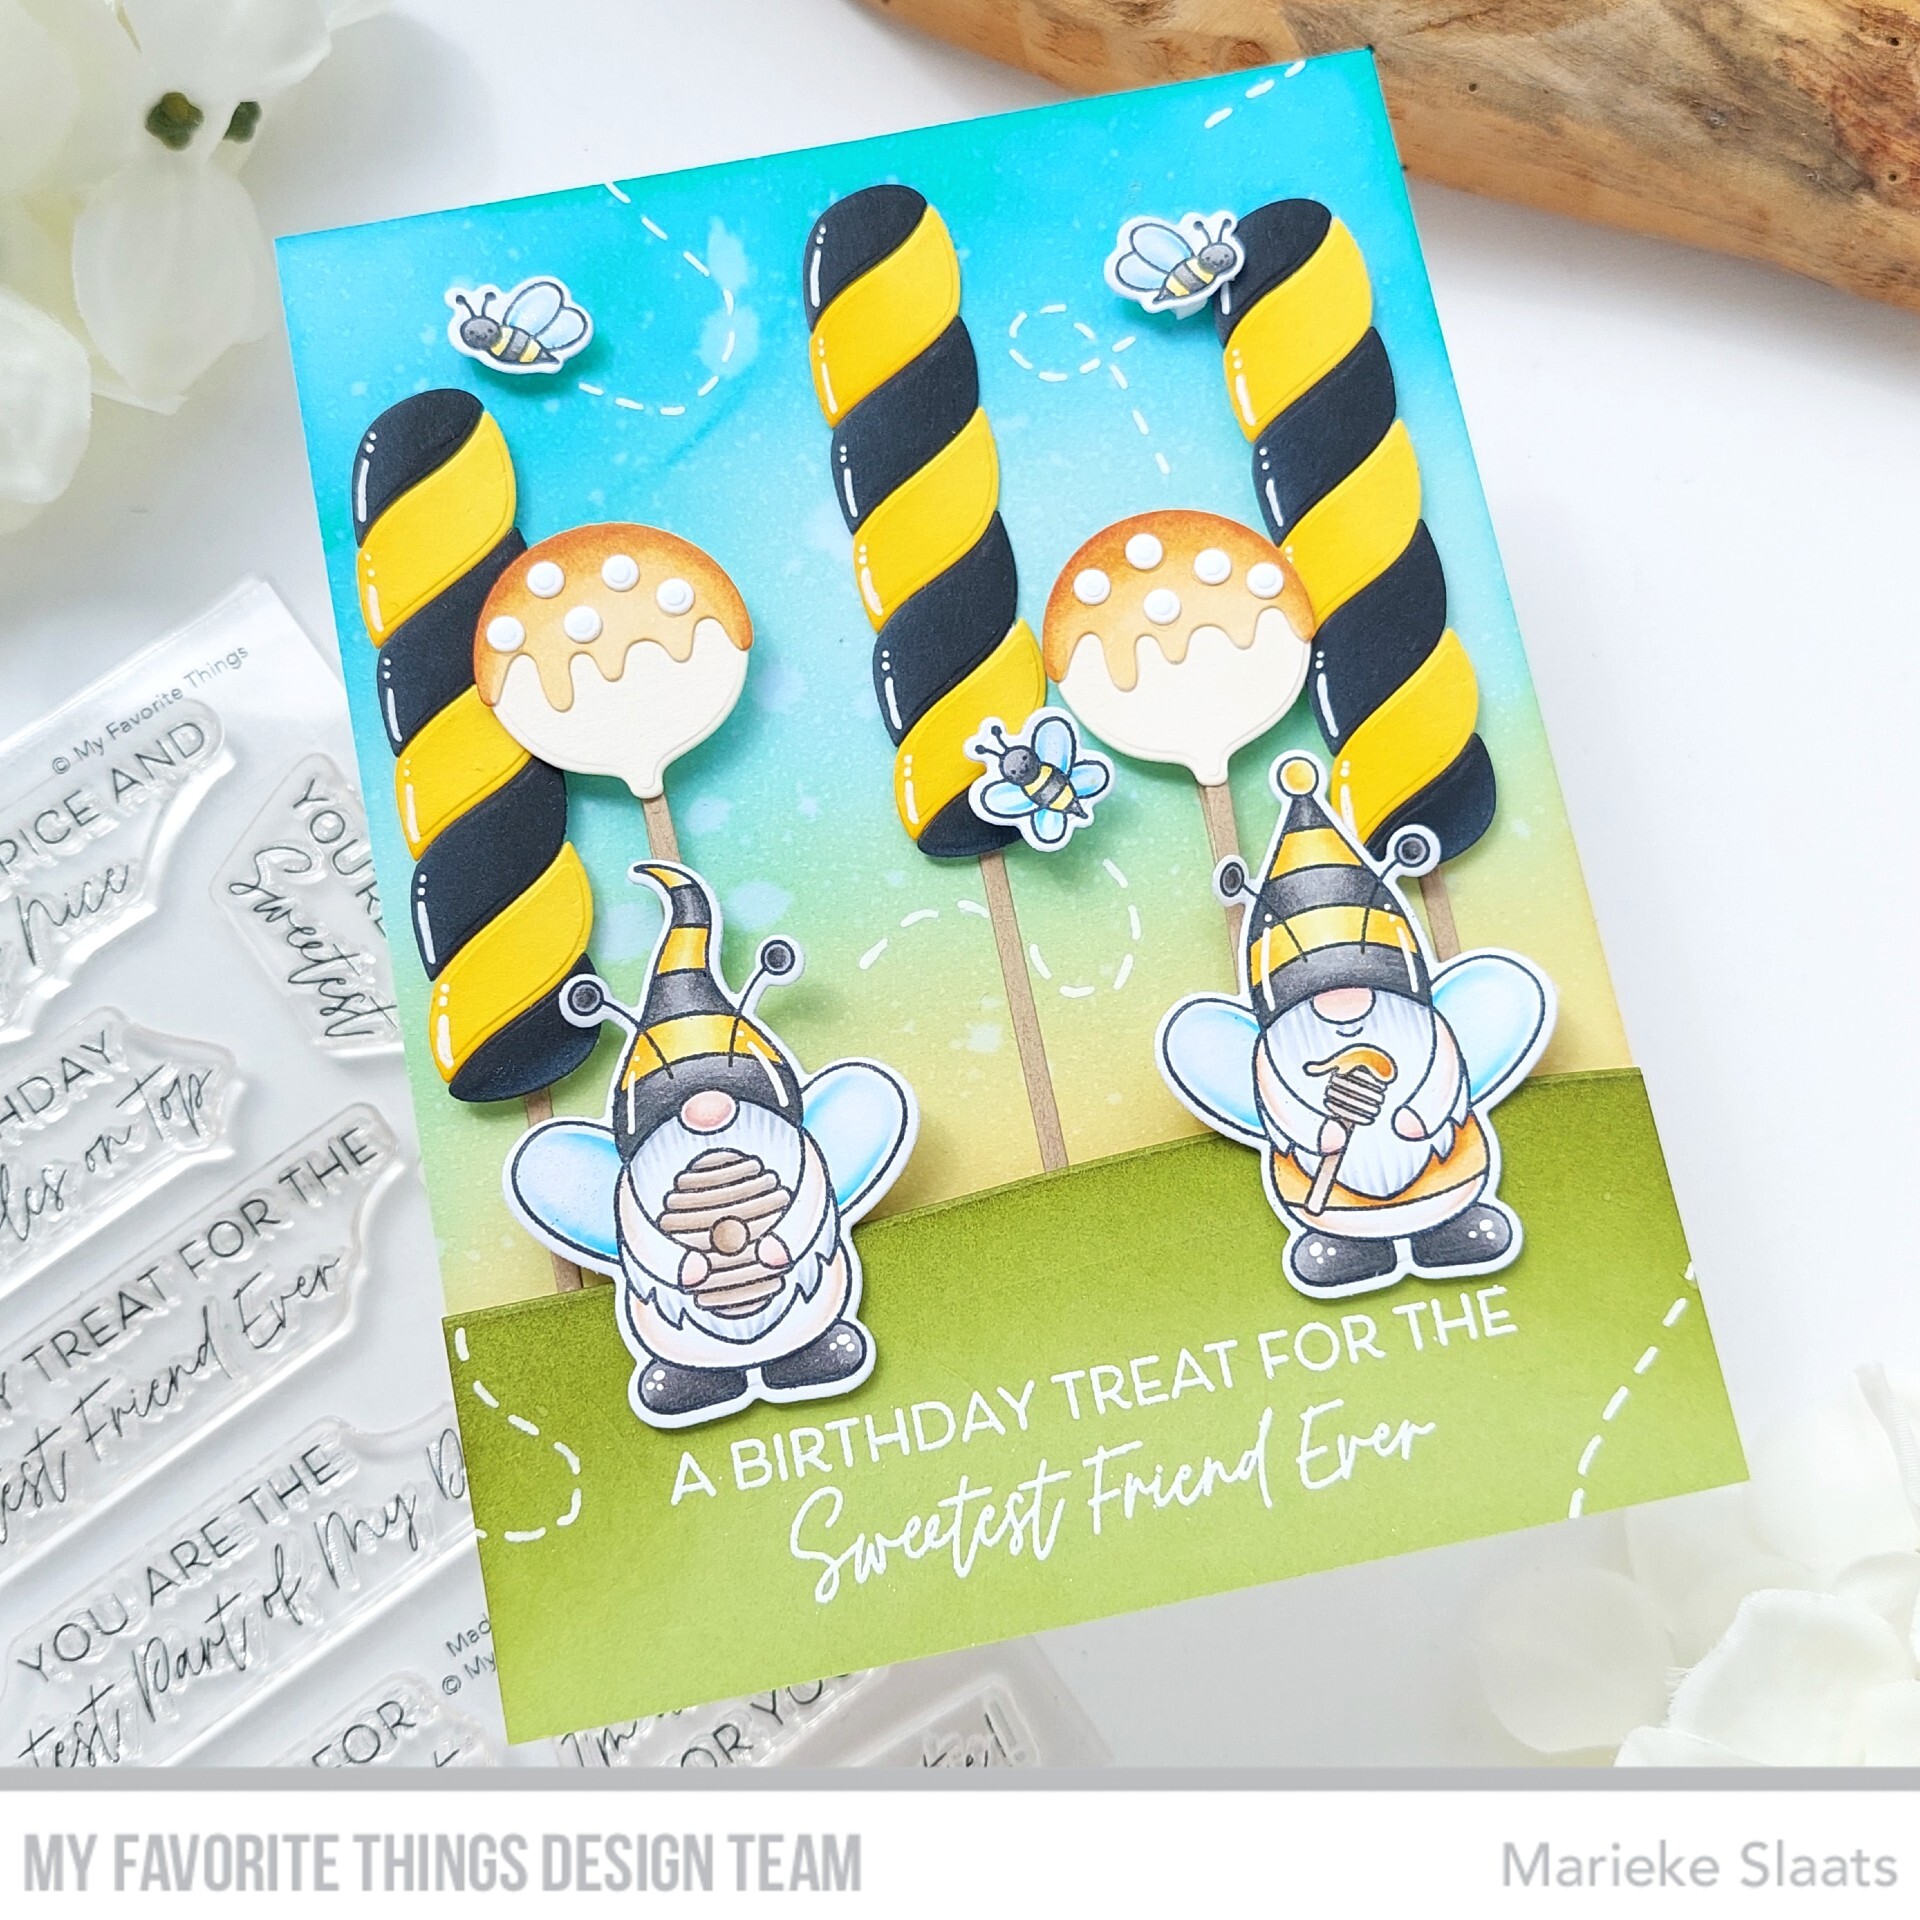
Beinkte een rechthoek met Speckled Egg en Evergreen Bough, stanste het uit met Money Card Die-Namics en beinkte daarna de zijkanten met Black Soot. Met dezelfde kleuren inkt maakte ik de sneeuwvlokken op de achtergrond en spetterde water en witte verf.

Inked up the rectangle using Speckled Egg and Evergreen Bough, die cut it using the Money Card Die-Namics en inked up the sides using Black Soot. Using the same colors ink an a stencil I made the background. Splattered some water and paint afterwards.
Stanste het lipbalm gedeelte uit de onderkant van de kaart, de rand uit houtnerf cardstock en beinkte dit met Walnut Stain. Daarna maakte ik er wat sneeuw op met wat fluff. De lipbalm zelf beplakte ik met wat designpapier zodat het paste bij mijn achtergrond. Plakte het geheel in elkaar met tape.

Die cut the lipbalm part out of the bottom of the card, the outline out of woodfineer cardstock and inked it up using Walnut Stain. Added some snow ussing fluff. To make the lipbalm match my card I added some pattern paper on to it. Adhered everthing together using tape.
Stempelde alle afbeeldingen, kleurde ze in met mijn Copic markers en stanste uit met de bijpassende stansen. Stempelde de sneeuwvlokken met Evergreen Bough en Speckled Egg, stanste ze daarna uit. Stempelde de tekst met rode inkt en stanste het tot banner. Werkte de kaart af met verschillende maten doorzichtige sequins. Stamped all the images, colored them up using my Copic markers and cut them using the matching dies. Stamped all the snowflakes using Evergreen Bough or Speckled Egg, die cut them afterwards. Stamped the sentiment using a red ink and die cut them into sentiment strips. Finished off the card by adding some different seizes of clear sequins.

Gebruikte Copic kleuren:
Huid - E000, E00, E04, E11, E21 / R20
Haar - E44, E43, E42, E41 / E79, E77, E74, E71
Rood - E59, E39, E37, E35
Vleugels - BG72, BG70, 0
Sneeuw - BG01, BG000

Heb een heerlijke dag!
Groet, Marieke

Stansen: SL-SS-SCD67, SL-SS-SCD19, SL-SS-SCD51, Money Card Die-Namics.
Inkt: Memento Tuxedo Black, Speckled Egg, Walnut Stain, Evergreen Bough en Black Soot Distress ink, Amarena Cherry (MFT)
Papier: Smooth White, Woodgrain cardstock (Lawn Fawn), CCL-FR-PP86
Extra: witte gelpen,SL-ES-MASK213

dinsdag 25 juli 2023

My Favorite Things - Something Sweet Card Kit Release

Hello all,

The day is here that the Something Sweet Card Kit release by My Favorite Things is avaible! What do you think is it beautiful or what? So what is ending up in your shopping cart? Watch your budget but have fun shopping! De dag is aangebroken dat de Something Sweet Card Kit release van My Favorite Things verkrijgbaar is! En wat vond je ervan schitterend toch? Welke producten belanden bij jou in het mandje? Let op je budget maar heb vooral plezier met winkelen!
Inked up a panel using Scattered Straw, Cracked Pistashio and Peacock Feathers Distress inks. Splattered some water and adhered it onto a Smooth White A2 basecard. Cut a piece of grass using and inked it using Peeled Paint. Heat set the sentiment out of the Something Sweet Stamp.

Beinkte een rechthoek met Scattered Straw, Cracked Pistahio en Peacock Feathers Distress inkt. Spetterde water en plakte het daarna op een Smooth White basiskaart. Sneed een stuk gras van Sour Apple en beinkte dit met Peeled Paint. Heat embsote de tekst uit de Something Sweet Stempel.
Die cut the elements of the candy / cake using different colors of cardstock and the Sweet Sticks Die-Namics. Colored the honey/caramel with Copic markers. Adhered them together, inked the sides and glued them on the base card.

Stanste alle onderdelen van de snoepjes / cake uit verschillende kleuren cardstock en de Sweet Sticks Die-Namics. Kleurde de honing/ caramel met Copic markers. Plakte alles aan elkaar en beinkte de zijkanten van de snoepjes. Plakte daarna alles op de kaart.
Stamped the images using Buzzing with Happiness, colored them up using my Copic markers and cut them using the matching Buzzing with Happiness Die-Namics. Adhered them on to the card and finished off adding some white gelpen details. Stempelde de afbeeldingen uit Buzzing with Happiness, kleurde ze in met Copic markers en stanste ze uit met de bijpassende Buzzing with Happiness Die-Namics. Plakte alles op de kaart en werkte het geheel af met wat witte gelpen details.

Copic colors used:
Black - T8, T6, T4
Yellow - Y17, Y15, Y13, Y11
Wings - B02, B00, B000, B0000, 0
Beard - C3, C1, C00
Honey - YR27, YR24, Y23, Y21
Wood / Beehive - E44, E43, E42, E41
Skin - E000, E00, E04, E11, E21

If you need to be even more inspired after this post make sure to have a look over at My Favorite Things Youtube ChannelWanneer je na deze post nog wat meer ideeen nodig heb neem dan even een kijkje op het Youtube kanaal van My Favorite Things.

Have a wonderful Day!
Greets, Marieke

maandag 24 juli 2023

My Favorite Things - Somthing Sweet Card Kit Countdown day 1

Hello all,

One more day to go and then all the July Card Kit products by My Favorite Things will be for sale! So set your alarm clocks and make sure you are on time! Nog een dag te gaan en dan zijn de juli Card Kit producten van My Favorite Things verkrijgbaar! Dus zet je wekker en zorg dat je niet te laat bent!
The Card Kit contains the Something Sweet Stamp, Sweet Sticks Die-Namics, Cotton Candy Cone Die-Namics, Sweet Summer Color Blends Pattern Paper Pad and one of each of the following colors; Smooth White,Ripe Raspberry, Orange Zest, Limelight, Sour Apple, Sno Cone, Summer Splash, Blue Yonder, Grapesicle, Grape Jelly, Kraft and Milk ChocolateDe Card Kit bestaat uit de Something Sweet Stamp, Sweet Sticks Die-Namics, Cotton Candy Cone Die-Namics, Sweet Summer Color Blends Pattern Paper Pad en een van de volgende kleuren cardstock; Smooth White,Ripe Raspberry, Orange Zest, Limelight, Sour Apple, Sno Cone, Summer Splash, Blue Yonder, Grapesicle, Grape Jelly, Kraft and Milk Chocolate. 

Offourse the supplies are sold separately, if you are only interested in a specific item. As always My Favorite Things is offering a new free for $60 that comes with this kit; Sweet Die-Namics . Uiteraard zijn de producten ook los te koop, wanneer je alleen geïnteresseerd bent in één van de producten. Zoals iedere nieuwe release biedt My Favorite Things een nieuwe free for $60 en dat is ditmaal de Sweet Die-Namics.
Inked up a panel using Picked Raspberry, Saltwater Taffy and Tattered Rose Distress ink. Using the same colors and the Plaid Builder Stencil I inked up the stripes. Splattered some water and white paint and adhered it onto a A2 Smooth White base card. Beinkte een rechthoek met Picked Raspberry, Saltwater Taffy en Tattered Rose Distress inkt. Met dezelfde kleuren en het Plaid Builder Stencil maakte ik de strepen. Spetterde water en witte verf en plakte het op een topfold A2 Smooth White basiskaart.

Cut the Cotton Candy Cone Die-Namics out of Summer Splash, Sno Cone and Kraft cardstock. Inked up all elements up using the matching inks. Adhered them together and onto the card. To make the card sweeter I added some googly eyes, cheeks en a mouth. Ik stanste de Cotton Candy Cone Die-Namics uit Summer Splash, Sno Cone en Kraft cardstock. Bewerkte de die cuts met de bijpassende kleuren inkt. Plakte ze in elkaar en op de kaart. Om het geheel wat vrolijker te maken plakte ik nog wiebelogen, wangen en een mond toe.
Heat set the sentiments on to Ripe Raspberry cardstock and cut it using the Itty Bitty Strips Die-Namics. Die cut the Sweet Die-Namics 4x out of Smooth White and adhered them together and on the card. Finished the card off adding some golden glitter and white cardstock confetti. Heat emboste de teksten op Ripe Raspberry cardstock en stanste ze uit met de Itty Bitty Strips DIe-Namics. Stanste de Sweet Die-Namics 4x uit Smooth White en plakte ze op elkaar en op de kaart. Werkte de kaart af met wat gouden glitter en witte confetti.

If you need to be even more inspired after this post make sure to have a look over at My Favorite Things Youtube ChannelWanneer je na deze post nog wat meer ideeën nodig heb neem dan even een kijkje op het Youtube kanaal van My Favorite Things.

Have a wonderful day!
Greets, Marieke

donderdag 20 juli 2023

Studio Light - Snow Much Fun 2.0

Hallo Allemaal,

Hier is mijn wekelijkse post voor Studio Light weer. Deze keer maakte ik met de nieuwste Sweet Stories producten een kaart. I'm back with my weekly post for Studio Light. This time around I decided on making a card using the newest Sweet Stories products.
Startte met het maken van de achtergrond. Inktblende Antique Linen, Milled Lavender, Seedles Preserves en Wilted Violet. Spetterde water en witte verf en plakte het op een witte basiskaart.

Started with my background. Inkblended Antique Linen, Milled Lavender, Seedles Preserves and Wilted Violet. Splattered some water and white paint onto it and adhered it on the base card.

Stansten een stuk wit cardstock en beinkte dit met Lost Shadow en Shaded Lilac. Spetterde wat Milled Lavender en stempelde de pootjes en het "de snowangel" met Shaded Lilac. Stanste de tekst uit wit en paars cardstock en plakte deze op elkaar. Heat emboste de tekst op hetzelfde cardstock en stansten uit.

Die cut a  piece of white cardstock and inkblended it using Lost Shadow and Shaded Lilac. Splattered some Milled Lavender and stamped the paws and the "snowangel" using Shaded Lilac. Die cut the sentiment out of white and purple cardstock and adhered them together. Heat set the other sentiment onto the same cardstock and trimmed it to a banner.
Stempelde alle afbeeldingen, kleurde ze in met mijn Copic markers en stanste ze uit met de bijpassende stansen. Bewerkte de afbeeldigen met een witte gelpen en maakte het mechanisme van Lawn Fawn passend voor mijn kaart. Plakte alles op de kaart met lijm of foam tape. Stamped all the images, colored them up using my Copic markers and cut them using the matching dies. Added some white gelpen details to the images and created the mechanisme using a Lawn Fawn die. Adhered the mechanisme and the images on to the card with glue or foam tape.


Gebruikte Copic Kleuren:
Groen - YG17, YG13, YG11
Paars - V09, V17, V15
Yeti - E53, E51, E50, 0 / R22, R20 / E000, E00, E11, E21
Blauw - B02, B00, B000, B0000
Bomen - E37, E35, E33 / YG67, YG63, YG03, YG01

Heb een heerlijke dag!
Groet, Marieke

zaterdag 15 juli 2023

My Favorite Things July Release Spotlight Day 4

Hello all,

Welcome to day four of the July release spotlight post by My Favorite Things! So hop along for more beautiful inspiration by the team. Welkom bij dag vier van de juli release spotlight dag van My Favorite Things. Hop gezellig mee langs alle design team leden voor meer inspiratie.

Today is the last day of the My Favorite Things release inspiration week. For my project today I created a shaker card using the You're a Unicorn Die-Namics together with the matching One in a Unicorn stamp.

Vandaag is de laatste dag van de My Favorite Things inspiratie release week. Voor mijn kaart van vandaag maakte ik een shaker met de You're a Unicorn Die-Namics samen met de bijpassende One in a Unicorn stempel.
Cut a Smooth White base card, cut a 3 3/4 x 5 inch pattern paper rectangle using the Rainbow Plaid Paper Pad. Die cut the rectangle in to a frame using the Inside & Out stitched Arch STAX Die-namics. Adhered a piece of acetate on the back and filled it up with golden stars.

Sneed een Smooth White basis kaart, een rechthoek 3 3/4 x 5 inch uit designpapier. Hiervoor gebruikte ik het Rainbow Plaid Paper Pad. Stanste de rechthoek tot een frame met de Inside & Out Stitched Arch STAX Die-Namics. Plakte een stuk acetate achter het frame en maakte er een shaker van. Vulde de shaker met gouden sterren.
Die Cut the unicorn using different colors of cardstock and inkblended the pieces using Distress Inks. Adhered the unicorn together and added some white gelpen details to the eye and cheek. Heat set the sentiments using gold embossingpowder onto Smooth White cardstock and trimmed it to a banner. Stanste de eenhoorn uit verschillende kleuren cardstock en inktblende de losse onderdelen met Distress inkten. Plakte de eenhoorn in elkaar en voegde witte gelpen details toe op het oog en de wang. Heat emboste de tekst met goud embossing poeder op Smooth White en sneed het tot een banner.

If you need to be even more inspired after this post make sure to have a look over at My Favorite Things Youtube ChannelWanneer je na deze post nog wat meer ideeën nodig heb neem dan even een kijkje op het Youtube kanaal van My Favorite Things.

Have a wonderful day!
Greets, Marieke

vrijdag 14 juli 2023

My Favorite Things July Release Spotlight Day 3

 Hello all,

Welcome to day three of the July release spotlight post by My Favorite Things! So hop along for more beautiful inspiration by the team. Welkom bij dag drie van de juli release spotlight dag van My Favorite Things. Hop gezellig mee langs alle design team leden voor meer inspiratie.
Today we are showcasing the new sets by artist Yan. Two larger sets that are for bot canine lovers, a dog grooming set and the one I used today Feline Fun.

Vandaag laten we de nieuwste stempels zien van artiest Yan. Twee grotere set voor zowel de hond als de kattenliefhebber. Een honden trimsalon set en de set die ik vandaag gebruikte Feline Fun.
Cut a Smooth White A2 base card and added some pattern paper using the Poppin' Polka Dots Paper Pad. Added some Gravel Gray for the floor and plinth out of Smooth White.

Sneed een Smooth White A2 basiskaart en plakte hier designpapier op uit de Poppin' Polka Dots Paper Pad. Een strook Gravel Gray voor de vloer en de plint uit Smooth White.
Stamped all the images, colored them up using my Copic markers and cut them using the Feline Fun Die-Namics. Adhered all the images on to the card and stamped the sentiment directly on to the base. Stempelde alle afbeeldingen, kleurde ze met Copic markers and stanste uit met de Feline Fun Die-Namics. Plakte alle afbeeldingen op de kaart en stempelde de tekst direct op de kaart.

Used Copic Colors:
Green - YG67, YG63, YG03, YG01
Purple - BV04, BV02, BV00, BV000
Teal - BG15, BG13, BG11
Skin - E000, E00, E04, E11, E21 / R20
Hair - E44, E43, E42

If you need to be even more inspired after this post make sure to have a look over at My Favorite Things Youtube ChannelWanneer je na deze post nog wat meer ideeën nodig heb neem dan even een kijkje op het Youtube kanaal van My Favorite Things.

Have a wonderful day!
Greets, Marieke

Studio Light - Videotutorial

 Hallo Allemaal,

Hier is mijn wekelijkse post voor Studio Light weer. Deze keer maakte ik een slimline winter kaart met de nieuwste Sweet Stories Winter release, deze is vanaf vandaag verkrijgbaar! I'm back with my weekly post for Studio Light. This time around I decided on making a Christmas card using the newest Sweet Stories Winter release. This release is for sale as off today!
Deze kaart maakte ik voor de nieuwste tutorial van Studio Light. Onderaan het blog bericht kun je een (Engels talige) tutorial vinden hoe je deze kaart kunt maken. Veel kijk plezier!

This card I made especially for my tutorial for Studio Light. At the end of the blogpost there will be a (English) spoken tutorial on how to make this card. Have fun watching!

Gebruikte Copic Kleuren:
Muisjes - E55, E53, E51, E50 / R20, R00, R000 / T8, T6, T4
Paars - BV14, BV08, BV04, BV02, BV00
Teal - BG09, BG07, BG05, BG01
Blauw (brillen) - B02, B00, B000, B0000
Wit - C3, C1, 0
Sneeuw - BG01, BG000, BG0000, 0


donderdag 13 juli 2023

My Favorite Things July Release Spotlight Day 2

 Hello all,

Day two of July release spotlight day by My Favorite ThingsDag twee van de My Favorite Things juli release spotlight dag is hier!
Today we are going to fly high with the Plane and Simple Die-Namics. For my card I combined the fun dies with the matching Plane and Simple sentiments and created a airmail card.

Vandaag gaan we sky high met de Plane and Simple Die-Namics. Voor mijn kaart combineerde ik deze leuke stansen met de bijpassende Plane and Simple sentiments en maakte een luchtpost kaart.
Cut a Smooth White base card and made my own pattern paper using white, red and blue cardstock strips. Cut a piece of cardstock using the Torn Paper Edges Die-Namics and inked it up using the Tiny Clouds Stencil and Kraft Ink.

Sneed een Smooth White basis kaart en maakte mijn eigen design papier met wit, rood en blauw cardstock stroken. Sneed een rechthoek met de Torn Paper Edges Die-Namics en beinkte dit met de Tiny Clouds Stencil en Kraft inkt.
Die cut all the elements of the Plane and Simple Die-Namics twice out off different colors of cardstock and assembled them. Stamped one sentiment using a brown in the right top cornor and the other one using Red Hot onto the banner. Finished the card off adding some dotted lines using the Adorable Elephant stamp. Stanste alle elementen van de Plane and Simple Die-namics twee keer uit verschillende kleuren cardstock en plakte het tot een geheel. Stempelde een tekst rechtsboven met bruine inkt en de andere op de banner met Red Hot. Werkte de kaart af door wat gestreepte lijnen te stempelen uit de Adorable Elephant stempel.

If you need to be even more inspired after this post make sure to have a look over at My Favorite Things Youtube ChannelWanneer je na deze post nog wat meer ideeën nodig heb neem dan even een kijkje op het Youtube kanaal van My Favorite Things.

Have a wonderful day!
Greets, Marieke

woensdag 12 juli 2023

My Favorite Things July Release Spotlight Day 1

Hello all,

Today is day one for the My Favorite Things spotlight posts! The upcomming four days the Designteam will show you projects using all of the new goodies that where release last monday! Vandaag is dag één van de My Favorite Things spotlight posts! De aankomende vier dagen zal het designteam verschillende projecten laten zien met de nieuwe release producten die sinds maandag verkrijgbaar zijn!
Today the MFT family is welcoming a new artist to their product line! Yenoblade is a awesome artist with super fun and cute images. For my card today I created a clean and simple birthday card with Hang out and Celebrate together with Fresh Foliage.

Vandaag verwelkomen we een nieuwe artiest aan de product lijn van MFT! Yenoblade is een artiest met leuke en schattige afbeeldingen. Voor mijn kaart van vandaag maakte ik een Clean en Simple verjaardag kaart met de Hang Out and Celebrate samen met de Fresh Foliage stempel.
Cut a Smooth White a2 base card and inkblended the corners using Twisted Citron, Mowed Lawn and Rustic Wilderness. Splattered some water and stamped the leaves using Jalapeno Popper and the Fresh Foliage stamp.

Sneed een Smooth White A2 base card en inktblende de hoeken met Twisted Citron, Mowed Lawn en Rustic Wilderness. Spetterde water en stempelde de bladeren met Jalapeno Popper en de Fresh Foliage stempel.
Stamped the images, colored them up using my Copic markers and cut them using the Hang Out and Celebrate Die-Namics. Adhered the images on the card using foam tape. Stamped the sentiment direclty onto the card. Stempelde de afbeeldingen, kleurde ze in met mijn Copic markers en stanste ze uit met de Hang Out and Celebrate Die-Namics. Plakte ze op de kaart met foam tape en bracht wat gelpen details aan. Stempelde de tekst rechtstreeks in het midden van de kaart.

Used Copic Colors:
Sloth - E59, E57, E55, E53, E51, E50 / R20
Red - R59, R39, R29, R27, R24
Green - YG67, YG63, YG03, YG01
Branch - E47, E44, E43

If you need to be even more inspired after this post make sure to have a look over at My Favorite Things Youtube ChannelWanneer je na deze post nog wat meer ideeën nodig heb neem dan even een kijkje op het Youtube kanaal van My Favorite Things.

Have a wonderful day!
Greets, Marieke

dinsdag 11 juli 2023

My Favorite Things - July Release Day!

Hello all,

It’s time for the My Favorite Things July release! All new products are available right now! The MFT design team is sharing projects created with the new stuff. You can find loads of inspiration! Het is tijd voor de My Favorite Things juli product lancering. Alle nieuwe producten zijn vanaf nu verkrijgbaar! Het MFT design team deelt ook vandaag weer een lading aan inspiratie.
For my Release inspiration post I created a Clean and Simple card using the Carnival Critters together with one of the new stencils; Watercolor Circle Stencil.

Voor mijn release inpsiratie post maakte ik een Clean en Simple kaart met de Carnival Critters samen met één van de nieuwe stencils; Watercolor Circle Stencil.
Cut a Smooth White topfold base card. Temporarly added the Watercolor Circle Stencil and inkblended it using Spun Sugar and Antique Linnen. Added the Sunny Rays Stencil and inked up some Kitsch Flamingo and Squeezed Lemonade. For the bottom I used Lost Shadow.

Sneed een Smooth White topfold basiskaart. Plakte tijdelijk het Watercolor Circle Stencil en inktblenden het met Spun Sugar en Antique Linen. Plakte het Sunny Rays Stencil en beinkte het met Kitsch Flamingo en Squeezed Lemonade. Voor de onderkant gebruikte ik Lost Shadow.
Removed the stencil and stamped the background stamp directly on to the card, the same goes for the sentiment. Stamped the cat, colored it up using my Copic markers and cut it using the Carnival Critters Die-Namics. Adhered it on to card using foam tape. Verwijderde het stencil en stempelde de achtergrond direct op de kaart, hetzelfde geldt voor de tekst. Stempelde de kat, kleurde hem in met mijn Copic markers en stanste hem uit met de Carnival Critters Die-Namics. Plakte de kat op de kaart met foam tape.

Used Copic Colors:
Cat - W5, W3, W1, W00 / R20, R00
Cotton candy - RV02, RV00, RV000, RV0000
Yellow - Y02, Y00, Y000
White - C5, C3, C1, 0

If you need to be even more inspired after this post make sure to have a look over at My Favorite Things Youtube ChannelWanneer je na deze post nog wat meer ideeën nodig heb neem dan even een kijkje op het Youtube kanaal van My Favorite Things.

Have a wonderful day!
Greets, Marieke