zaterdag 26 januari 2019

Kraftin' Kimmie Saturday Challenge - Layers

Hallo allemaal / Hello everybody!

Today it's Saturday wich means a new challenge started over at Kraftin Kimmie Stamps Blog, today the theme is Layers!. You can go every route with this theme so get your stamps out and play along.


We always enjoy your creations so be sure to submit them so you can have a chance to WIN a $40 gift card to the Shop!! Show us your stuff!! In keeping in line with the rest of our challenges (our Krafty Scrappy Challenge), we will be drawing one winner per month from all Saturday Challenge entries to win a $40 gift card!! You can enter as many times per month as you'd like!!


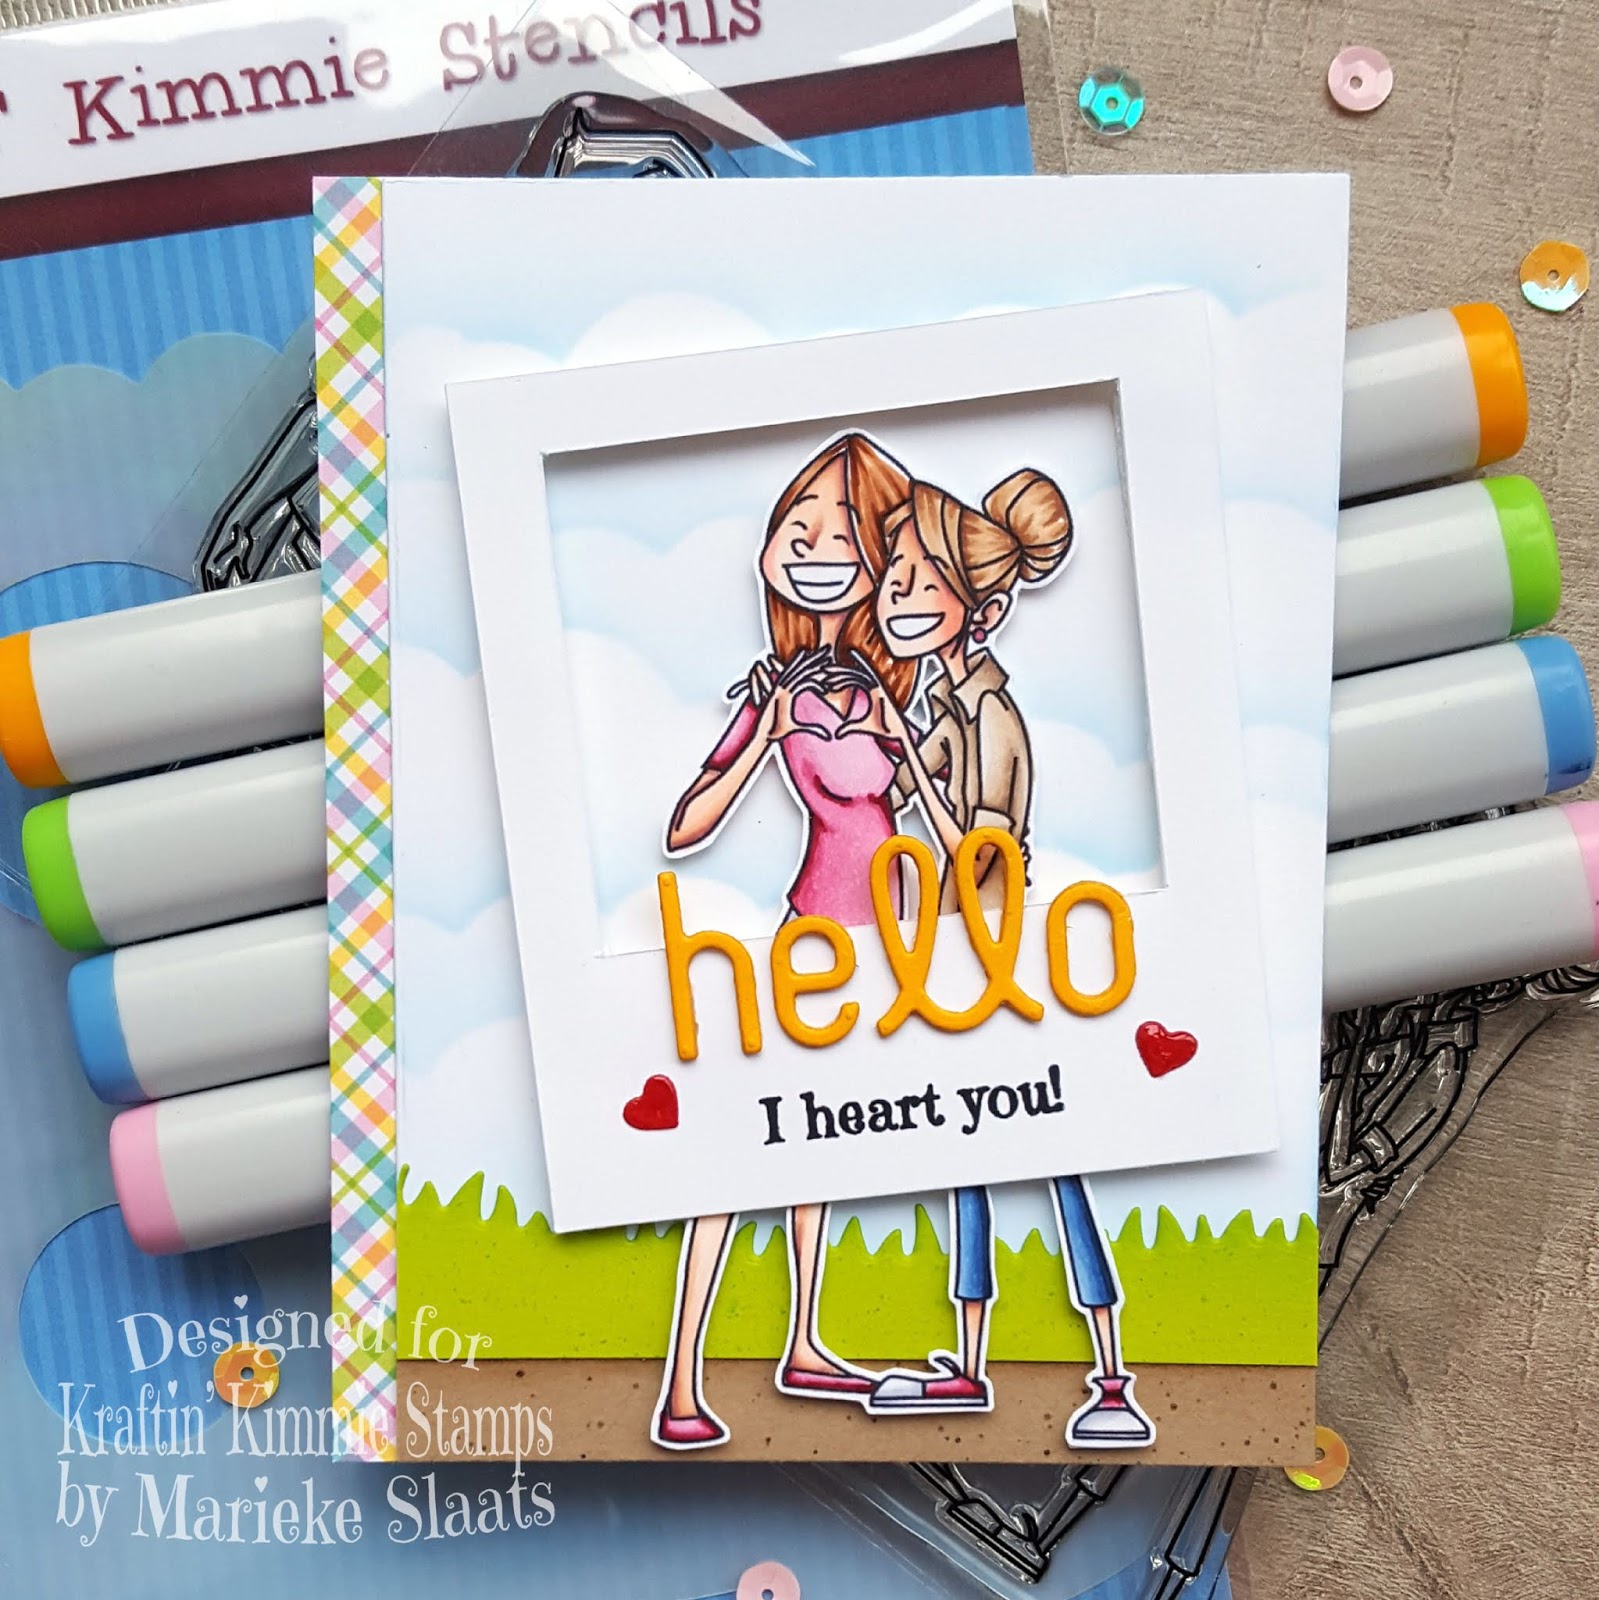
Used products: You complete me, Wicked black hybrid ink, Krafty scenery stencil, Die-Namics spring scene builder.


First of i made the scene using some different kinds of cardstock and the die-namics spring scene builder. The clouds i made using the krafty scenery stencil. Stamped the sentiment on to it and added some birds using a fineliner.


Stamped the image using wicked black and colored them in in using my Copic Markers. I fussy cut the images and glued in on to my card base.

Have a lovely day! 

Greets, Marieke


donderdag 24 januari 2019

Happy birthday twin cards

Hallo allemaal,

Dinsdag overdag ging ik eens zitten voor de Dutch Card Lovers en de Lift Challenge, uitdagingen. Ik dacht een idee uit en bedacht ook meteen dat ik er dan twee zou maken en het zwart en wit zou omdraaien. Zo ging ik aan de slag met wat papier en stansen. Dit keer dus geen kleurwerk best knap van mezelf ;).

Gebruikte producten: Stitched blooms Die-namics, Die-namics Cause for celebration, Die-namics single stitched lines, Essential sentiments, Black Licorices, Green Room, Smooth White and Wild Cherry cardstock. 


Van wit en zwart cardstock maakte ik eerst de basis en stanste deze met de rechthoekige Die-namics. Ik gebruikte daarna de witte en zwarte Molotov arcrylic paint markers en splatterde op beide rechthoeken de tegenovergestelde kleur verf. 


Stanste uit wit en zwart cardstock vier keer de cirkel stans en uit het cardstock ook vijf keer het woord happy plakte de cirkels en happy op elkaar. Stempelde en heat emboste het woord birthday en sneed dit in een smalle banner. 


Stanste de bloemen, blaadjes en knopen uit de gekleurde stukken cardstock en maakte ze wat ronder. Plakte de cirkels op de kaart en aan één zijde de bloemen. De andere zijde plakte ik happy en de banner en werkte de kaart af met wat sequins. Op alle bloemen deed ik ook nog wat Wink of stella om ze net wat meer te geven.

Fijne avond allemaal!

Liefs, Marieke

Met het kaartje doe ik graag mee met de volgende challenge's:
Dutch Card Lovers - Kies een koude kleur (groen) en mix deze met warme (rood en geel). 
Lift challenge - Gebruik een zwarte achtergrond.

zaterdag 19 januari 2019

Kraftin' Kimmie Saturday Challenge - Flowers

Hallo allemaal / Hello everybody!

Today it's Saturday wich means a new challenge started over at Kraftin Kimmie Stamps Blog, today the theme is flowers!. You can go every route with this theme so get your stamps out and play along.


We always enjoy your creations so be sure to submit them so you can have a chance to WIN a $40 gift card to the Shop!! Show us your stuff!! In keeping in line with the rest of our challenges (our Krafty Scrappy Challenge), we will be drawing one winner per month from all Saturday Challenge entries to win a $40 gift card!! You can enter as many times per month as you'd like!!

Used products: Wicked Black, Beary Love, Buds and Blooms, Fancy Florals, Kick-assy birthday, basic dots, Die-Namics beautiful, Sentiment strips cover up Die-Namics.


Made the background using the cover up die-namics, die cut it four times and glued it together. I splashed some water mixed with black geso on to it for the effect. Adhered a black panel behind it and glued it onto a white top fold card.


Stamp the bear, leaves and flowers onto neenah paper and colored them using my Copic markers. Then i fussy cut all the images and adhered it to the panel. I heat embost the sentiment on to a piece of black cardstock. Die cut the beautiful die three times out of black cardstock and once out of white and adhered it together and then on to the card. Finished it of using some black enemal dots.

Have a beautiful day!

Greets, Marieke


donderdag 17 januari 2019

With our sincere thanks

Hallo allemaal,

Gisteren maakte ik deze kaart, mijn moeder vroeg of ik een kaart kon maken voor het hondenpension waar hun hondjes altijd heen gaan. Deze gaan sluiten en ze wilde hen bedanken met een kaart. Ze wilde dus een bedank kaart er ze wilde graag drie honden. Deze opdracht gecombineerd met de sketch en kleuren challenge van My Favorite Things en klaar was kees.

Gebruikte producten: Puppy Kisses, From all of us, Die-Namics Grassy Fields, Heart tree Die-Namics, Die-Namics A2 rectangle staxx, Mini cloud edges stencil, Petite plaid paperpad, Kraft / blue yonder and sour apple cardstock.


Stanste uit wit cardstock twee maal het grootste paneel uit de rectangle staxx. Op één maakte ik met Salty Ocean distress inkt en het stencil de wolken. Op dit paneel plakte ik een strook designpapier, een dun strookje cardstock en met sour apple een strookje gras dat ik maakte met de grassy fields stans.

Vervolgens stanste ik de boom uit dat paneel, ik zorgde ervoor dat het einde van de stronk ter hoogte zou komen waar het hoofd van de middelste hond zat. Plakte het paneel op het witte paneel en dit geheel ging op een dubbele topfold kraft kaart.


De boom stanste ik nog vijf keer, drie keer uit kraft en één keer uit sour apple en blue yonder. Legde de blaadjes, stam en hartjes op de juiste plek en de twee extra stukken kraft gebruikte ik om de stronk te plaatsen zodat hij niet zo zou zweven. Bewerkte ten slotte het blauw hart met glossy accent.

Stempelde de drie honden en kleurde ze in met mijn Copics. Knipte ze uit op een wit randje na en plakte ze op de basiskaart. Stempelde de tekst op een strook wit cardstock en plakte deze ook verhoogd op de basis.

Fijne dag allemaal!

Groet, Marieke

Met het kaartje doe ik graag mee met de volgende challenge's:
My Favorite Things - Sketch challenge
My Favorite Things - Color challenge

dinsdag 15 januari 2019

Wishing you a sweet, fun and sparkly birthday

Hallo allemaal,

Ik ging gisterenavond weer eens aan de slag met de sketch van My Favorite Things, de nieuwe release en ik combineerde hem met de birthday challenge. 

Gebruikte producten: Rainbows & Unicorns stempel en stans, Die-Namics stitched cloud edges, Die-Namics rainbow, Die-Namics sunny skies, Stencil mini cloud edges and party patterns paperpack, wink of stella clear glitter, white gelpen, Salty Ocean distress ink.


De kaart had ik eerst anders in gedachten ik wilde echt de focus houden op de cirkel maar dan verdween de rest weer dus dat werd niet wat. Na wat gepuzzel kwam ik tot deze layout. Ik sneed eerst een dubbele basis kaart. Hij is groot dit keer 12 x 14,2 topfold. Ik heb een strook gesneden van 12 x 13 en een rechthoek van 8,5 x 11,5. Plakte deze op elkaar en maakte met het stencil en de salty ocean de lucht. Stempelde de tekst op het grote rechthoek en plakte dit op de basis kaart. Voordat ik het op de basiskaart plakte, plakte ik een klein strookje designpapier eronder

De regenboog had ik nog liggen van de vorige kaart en hoefde ik alleen maar wat in te korten. Stanste de zon uit geel cardstock en plakte dit in het midden van het kleinste rechthoek. De regenboog ging er over heen. Stanste twee wolken randen uit wit cardstock en plakte deze er boven op met verschillende maten 3-d tape. 


Stempelde het kasteel en de unicorn en kleurde deze in met mijn Copic Markers. Stanste deze uit met bijbehorende stansen en plakte ze op de kaart. De regenboog, de haren en de hoorn bewerkte ik met wink of stella clear glitter.

Gebruikte Copic Kleuren:

Wit - C3, C1, C0, C00, O
Paars - BV08, V17, V15, V12
Roze - R89, R85, R83, R81
Oranje - YG09, YG07, YG04, YG02
Geel - YG16, Y17, Y15, Y13
Groen - YG17, YG07, YG05, YG03
Blauw - B18, B16, B14, B12

Fijne dag allemaal!

Groet, Marieke

Met het kaartje doe ik graag mee met de volgende challenge's:

My Favorite Things - Sketch Challenge
My Favorite Things - Birthday Challenge

zondag 13 januari 2019

January release and krafty hop!

Hello everyone!

And the day has come that the
January Release by Kraftin' Kimmie stamps is available! Go quickly to the shop and make sure the buy all our new goodies!


So to recap again what awesome goodies we had this release you can hop along the designer blogs and see even more inspiration using one or more of the January release products! As for me one of my Krafty intentions for the new year, is to make a set of ATC cards every release. So here is this month series using You are SUPER.

Used prodcuts: You are SUPER, Pretty in Pink / Bubbly Blue / Pumpkin Patch / Purple Pansy / Yummy Yellow and Wicked black hybrid inks, Marianne Design creatable (LR0354), Marianne Design Pocket letter die (PL6501), Picket Fence distress ink, MFT radiating rays stencil.


For the sets i made the background for times using Perfect in Pink, Bubbly Blue, Pumpkin Patch and Purple Pansy hybrid ink. With the radiating rays stencil en Picket Fence distress ink i made the beams. I splattered some white and black splatters on to it using some Tombow Acrylic Markers.

Die cut the city die by Marianne Design four times and gave the windows a yellow background. Adhered it to the base and die cut it using the smallest die from the Pocket letter die. Stamped the sentiment on the cards using Wicked Black. Adhered the smaller base to a bigger black base wich i die cut using the largest die from the pocket letter die set.  


Stamped the images on to some Copic paper and colored them in using my Copic Markers. I cut the circles my self and masked the images of so i could make the background yellow using Yummy Yellow hybrid ink. I thought it was to yellow so i gave the outside some black using Wicked Black. I finished the images of using some gold stickles on the letter on the outfit. Adhered the circle on the card using 3-d tape.

Have a relax Sunday!

Greets, Marieke

vrijdag 11 januari 2019

Krafty Peek day 3: You Complete me

Hello all,

Welcome back for day three of the January release by Kraftin' Kimmie stamps and today we are showcasing a super fun set by artist Emilie Goullet called you complete me.


It's another 4 x 6 set with a verity of sentiments and two beautiful images. 

For my card i used: You complete me, Wicked Black / Marvellous MochaKrafty scenery stencil, Doodlebug design paper, Die-Namics simply hello & i love you, Die-Namics stitched strip, Die-Namics grassy fields, Dutch Doobadoo polaroid stencil.


First i stamped the images and colored it up using my Copic Markers, then i fussy cut it leaving a white border. I took some white cardstock and made the smallest seize polaroid in the set. I stamped the sentiment on to is and die cut the word hello 4 times out of yellow cardstock and adhered it on top. Die cut some hearts from red cardstock and gave the some gloss using glossy accent.

Die cut the grass using the grassy fields and gave it some green with Mowed Lawn. Cut a piece of cardstock and gave it some brown using Marvellous Mocha hybrid ink. Made the clouds using the stencil and Salty Ocean distress ink. Adhered everything together and gave it a strip of designpaper.

Have a wonderful day!

Greets, Marieke


donderdag 10 januari 2019

Krafty Peek day 2: Beary Love, one new Krafty ink and two Krafty Stencils!

Hello all,

Welcome to day 1 of the January Krafty peeks by Kraftin' Kimmie stamps and today we have some excitement going on! Yesterday we introduced you to a new artist and a new product, today we are showcasing two new stencils and a new pink ink color!

First of we start with a new uber cute set by Artist Melissa Baker-Nguyen called Beary love!


Again a versatile set that you can use for many projects! I will show you a totally different project on February the 19th using the same set! 

So as said earlier we are introducing a new pink color named: Pretty in pink. Also there will be two more stencils available there will be a Happy hearts stencil and Harlequin stencil!

So to my card used products: Beary Love, Happy Hearts stencil, Pretty in Pink, Ruby Red, Wicked BlackRaspberry Rose, Squishy hugs (sending), Lovey Dots, Die-Namics Love, kraft / white and red cardstock.


Stamped the images using Wicked black and colored them in using my Copic Markers. I took a piece of white cardstock and made hearts onto it using the Happy Hearts stencil and the Pretty in Pink ink. I took another piece of white cardstock and mixed Ruby Red and Raspberry rose and die cut the word Love. I die cut the word three more time using white cardstock and glued them onto each other. I glued everything on the card and finished the letters of using some Glossy accent.

Have a lovely day!

Greets, Marieke


woensdag 9 januari 2019

Krafty Peek day 1: You are SUPER + a new krafty product enamel dots!

Hello all,

Welcome, welcome, welcome! It's time for our January Release!!! Today we are kickin' off our Krafty Peeks at Kraftin' Kimmie Stamps! And we not only we have some incredible new stamp sets to share, we have a new artist joining us we have a new product!

First of we have this really versatile set by our new  artist Neda Sedraddin and it's called You are super!


It's a great set you can use in many many ways! If it's just for a friend to give them some strength or to you mom for mothers day! 

So as for the new product you might have seen it already we are starting januari with a blast introducing to you: Enamel dots! There are two sets available on Sunday, Basic dots and Lovey Dots. 

So as for my card products used: You are SUPER, Wicked black, basic dots, wow superfine gold and white embossing powder, black and red cardstock, Die-Namics mom, Die-Namics stitched rectangle staxx a2, stencil radiating rays.


Die cut a piece of black cardstock, then i took the stencil en used versamark ink to make the rays and heat embost it using gold embossing powder. Die cut the word mom from red cardstock and gave it some accent using a white gelpen. Heat embost the sentiment using white embossing powder. Stamped the images using Wicked black hybrid ink and colored it in Using my Copic markers. Gave the M some gold stickles and finished the card of using the basic enamel dots.

Have a lovely day!

Greets, Marieke


dinsdag 8 januari 2019

Happy Birthday

Hallo allemaal,

Gisterenavond ging ik nog even aan de slag met de andere twee lopende challenge's bij My Favorite Things. De schets challenge en het birthday theme challenge. Ik maakte er een lekker kleurrijke kaart van.

Gebruikte producten: Up in the air stempel en stans, Die-Namics stitched cloud edges, Die-Namics cause of celebration, Die-Namics stitched rainbow, Die-Namics sticthed strip (stars), Die-Namics rectangle a2 staxx, Mermaid Lagoon / Salty Ocean en Tumbled glass distress inkt. Essential sentiment stempel, Boysenberry / Razzle Berry / Orange Zest / Pineapple / Limelight en Summer Splash cardstock.


Uit wit cardstock sneed ik twee rechthoeken, de onderkant bewerkte ik met een corner chopper en de bovenkant met de Die-Namics stiched cloud edges en plakte deze op elkaar met 3-d tape. Met de bovengenoemde drie distress inkt kleuren maakte ik de achtergrond en stanste deze met een rechthoekige stans. 

De regenboog stanste ik uit de bovengenoemde kleuren cardstock en ik plakte deze aan elkaar en achter de wolken. Ik bewerkte de regenboog met wat Wink of Stella clear glitter. 

De tekst happy stanste ik twee keer uit zwart cardstock en één keer uit zilver glitter cardstock en plakte dit op elkaar. Heat emboste de tekst op zwart cardstock met wit embossing poeder en plakte dit op de tekst happy.


Stempelde de olifant en de luchtballon met Memento inkt en kleurde de afbeeldingen in met mijn Copic Markers. Stanste ze uit met de bijbehorende stansen en plakte deze op de kaart. Uit dezelfde kleuren cardstock stanste ik wat sterren en plakte deze wat verspreid over de kaart. Het geheel ging op een dubbele top fold kaart.

Gebruikte Copic kleuren:

Ballon - R59, R29, R27, R24, C3, C1, C00, 0
Mandje - E57, E55, E53
Olifant - C5, C3, C1, C0, C00, R22, R20, R00

Fijne dag allemaal!

Groet, Marieke

Met het kaartje doe ik graag mee met de volgende challenge's:

My Favorite Things - Sketch Challenge
My Favorite Things - Birthday Challenge
Simon Says Wednesday Challenge - Something new (rainbow die)
Simon Says Monday Challenge - Use something new (rainbow die)
Seize the birthday - Confetti
As you Like it challenge - Anything Goes
Crazy for CAS - Dieren

zaterdag 5 januari 2019

Have a Llovely Christmas

Hallo allemaal,

Aller eerst voor iedereen de beste wensen! Het nieuwe jaar er al weer een werkweek op zitten en vandaag even gezeten om weer gezellig mee te doen met de Challenge's van My Favorite Things. Ditmaal maakte ik een kaartje voor de lopende kleuren challenge. 

Gebruikte Producten: Die-Namics Birch trees, Die-Namics Birch Trees (straight), Die-Namics stitched snow hills, Die Namics rectangle staxx a2, Happy Llamadays,  sweet tooth and cement gray cardstock, Ultra fine goud embossing poeder, vellum, Mermaid Lagoon / Peacock Feathers en Cracked Pistachio distress ink.


Ik maakte de eerste de achtergrond met distress inkt en bewerkte dit met water en een witte Tombow marker. Stanste de bomen uit wit en grijs cardstock en plakte ze op elkaar. Stanste de sneeuw uit wit cardstock en plakte dit alles op een grijze topfold kaart. 


Heat emboste de tekst op vellum en plakte dit om de kaart. Stempelde de lama's en kleurde ze in met mijn Copic Markers. Bewerkt de cadeautjes met een witte fineliner en wat wink of Stella. Knipte de lama's dit keer uit aangezien ik de stansen niet heb en plakte ze op de kaart.

Gebruikte Copic kleuren:

Grijs - C5, C3, C1, C00, 0
Blauw - B39, B36, B34, B32
Turqousie - BG18, Bg15, BG13, Bg11
Roze - R20
Warm Grijs - W5, W3, W1

Fijne dag allemaal!

Groet, Marieke

Met het kaartje doe ik graag mee met de volgende challenge's:

My Favorite Things - Color Challenge
Simon Says Wednesday Challenge - Something new (Happy Llamadays stamp)
Simon Says Monday Challenge - Party
ABC Christmas Challenge - A = for anything Christmas goes
Hobbyvision - Christmas

dinsdag 1 januari 2019

Copic tutorial - How to make a winter background using Copics

 Hallo Copic fans,


Vandaag heb ik voor jullie een video tutorial waarin ik laat zien hoe je een ijs achtergrond achter een schaatsend persoon of dier kan maken. Tevens laat ik zien hoe je wolken en lucht kunt maken.

De rubber stempel die ik gebruikt heb heet Icy Fairy van Kraftin' Kimmie stamps.


De eerste foto laat zien dat het een hele neutrale achtergrond is die wanneer je het ijs vervangt door sneeuw ook prima als achtergrond kan gebruiken. De laatste foto is een volledige uitwerking van de kaart


Hopelijk vonden jullie de video tutorial leerzaam en zie ik op de Colourstock Facebookpagina snel jullie verschillende ijs of sneeuw creaties voorbij komen, tot de volgende tutorial!