zaterdag 30 september 2023

It's Your Day Enjoy it to the Fullest

Hallo allemaal,

Vandaag nog een kaartje die ik maakte in mijn vakantie, nou ja half dan want ik maakte hem van de week af omdat hij nog half op mijn bureau lag. Dit keer nogmaals de wolven, in een nachtscene, de kleuren zijn misschien wat donkerder uitgevallen als je van mij gewend bent. For today another card I made in my holiday, well partcial because it still needed to be finished so I did that this week. This time around again I used the wolfs in a nightscene, mayby the colors are more darker then you are used from me. 
Maakte als eerste de achtergrond op grijs cardstock inktblende ik Black Soot en Chipped Sapphire. Spetterde water en plakte het op de kaart. Met Vintage Photo, Mowed Lawn, Rustic Wilderness en Black Soot maakte ik de grond en het bladerendek. Spetterde water en daarna Ground Espresso. Stanste het uit en legde het aan de kant.

Made the background using Black Soot and Chipped Sapphire on a piece of gray cardstock. Splattered some water and added it to the card. Using Vintage Photo, Mowed Lawn, Rustic Wilderness and Black Soot to make the ground and the leaves. Splattered some water and Ground Espresso. Die cut both and set them aside.
Stanste de bomen uit aquarel papier en beinkte dit met Vintage Photo, Walnut Stain en Black Soot. Plakte het op de kaart en heat emboste de tekst op het bladerendek. Plakte het op de kaart en stanste een cirkel. Beinkte dit met Weathered Wood en Hickory Smoke. Spetterde water en stempelde de spetters.

Die cut the trees out of watercolor paper and inked it using Vintage Photo, Walnut Stain and Black Soot. Adhered this on the card, afterwards I heat set the sentiment on to the leaves. Die cut a circle and inked it using Weathered Wood and Hickory Smoke. Splattered some water and added some splatters. Adhered the elements on the card.
Stempelde alle afbeeldingen, kleurde ze in met mijn Copic markers en knipte ze uit. Plakte ze op de kaart en stempelde beide teksten. Stanste de vleermuizen uit zwart cardstock en gaf ze ogen met een witte gelpen. Plakte ze op de kaart om de kaart af te ronden. Stamped all the images, colored them up using my Copics and cut them. Adhered them on the card and stamped both of the sentiments. Die cut the bats using black cardstock and added some eyes with a white gel pen. Finished the card by adding the images and the bats.

Gebruikte Copic Kleuren:
Wolven - W6, W4, W2 / W3, W1, W00, 0 / R22, R20, R00
Steen - C6, C4, C2

Heb een heerlijke dag!
Groet, Marieke

Stempels: Wolf Before 'n AftersWild Wolves (Lawn Fawn) Distressed Patterns (MFT)
Stansen: Puffy cloud borders, Lift the flap tree backdrop, Scalloped Treat Box Haunted House Add-on (Lawn Fawn) Grassy Fields Die-Namics (MFT)

donderdag 28 september 2023

Studio Light - Happy Haunting

Hallo Allemaal,

Hier is mijn wekelijkse post voor Studio Light weer. Deze keer maakte ik met de nieuwste Sweet Stories producten een kaart. I'm back with my weekly post for Studio Light. This time around I decided on making a card using the newest Sweet Stories products.
Zoals altijd maakte ik eerst de achtergrond, op een stuk wit papier inktblende ik de kleuren Dried Marigold, Picked Raspberry, Seedles Preserve, Villanious Potion en Black Soot Distress Oxide ink. Spetterde water en wat Liquid Stardust. Beinkte daarna de wolken met een mask en unicorn White inkt.

As usual I started with my background. On to a piece of white paper I inkblended some Dried Marigold, Picked Raspberry, Seedless Preserves, Villainous Potion and Black Soot Distress Oxide inks. Splattered some water and Liqued Stardust. Inked up some clouds using a mask and Unicorn White ink.
Stanste de onderdelen van he thuis uit verschillende kleuren cardstock en bewerkte het licht grijze cardstock met een mask en Hickory Smoke Distress inkt. Spetterde daarna met zwarte verf en plakte het geheel in elkaar.

Die cut all the elements of the house using different colors of cardstock. On the light gray cardstock I inked up some stones using Hickory Smoke Distress ink and splattered some black paint. Adhered the house and elements together.
Stanste het gras uit groen cardstock en beinkte het met Mowed Lawn. Stempelde de tekst op het gras op de kaart en daarover heen ging het huis en de grafstenen. Stanste de spookjes uit het Glow in the Dark Foil en plakte deze op de kaart. Die cut the grass using green cardstock and inked it up using Mowed Lawn. Stamped the sentiment on the grass and adhered it onto the card. Added the gravestones and the house. Die cut the ghosts using the Glow in the Dark Foil.

Heb een heerlijke dag!
Groet, Marieke

Stempels: SL-SS-STAMP272
Stansen: SL-SS-CD512, SL-SS-CD724, SL-SS-CD684
Papier: Smooth White, Cement Gray, Black Soot, Kraft, Lemon Drop, Gravel Gray
Extra: SL-SS-MASK127, SL-ES-MASK152, SL-ES-GDF01, Liquid Stardust

dinsdag 26 september 2023

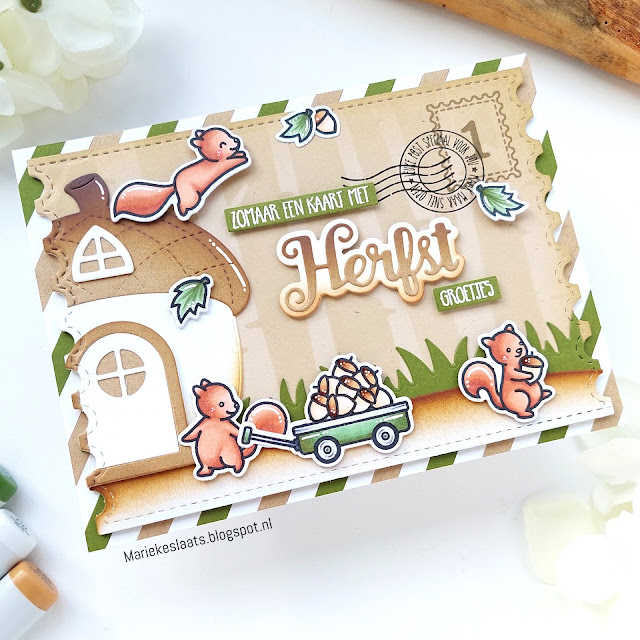
Zomaar een kaart met Herfst groetjes

Hallo allemaal,

Vandaag een kaart die ik maakte voor drie challenge's, bij zowel Carlijn Design en Lawn Fawn hebben ze het thema herfst en bij Time Out Challenge is een inspiratie photo. Ik combineerde alle drie en maakte er deze kaart mee.
Today a card that I created for three different challenge's. Over by Carlijn Design and Lawn Fawn the theme is Fall and over at Time Out Challenge there is a inspiration photo challenge. 
Op een stuk Naturel cardstock beinkte ik de bomen met Naturel inkt. Stanste het daarna uit en stempelde de stempels in de linkerbovenhoek. Sneed strookjes van 1/4 inch en plakte deze om en om op een witte basiskaart. Stanste het gras en een strook wit papier. Beinkte het witte papier en plakte het daarna op elkaar en op de kaart.

On to a piece of Naturel cardstock I inked up the trees using Naturel ink. Die cut the rectangle and stamped the images in the left cornor. Die cut 1/4 inch strips and adhered them on a white topfold base card. Die cut the gras and a piece of white paper. Inked up the white piece so it would turn into sand and adhered everything on the base.
Stanste alle onderdelen van de eikel, beinkte het met Distress inkten en plakte het op elkaar. Heat emboste twee teksten op groen cardstock en stanste ze daarna uit. Stanste de outline en herfst en bewerkte beide met Distress inkten. Plakte het op elkaar en de teksten op de kaart.

Die cut all the elements of the Acorn House, inked it up and adhered them together. Heat set the two sentiments on some green cardstock and cut them using a banner die. Die cut the outline and Fall sentiment, inked both up and adhered them together. 
Stempelde alle afbeeldingen, kleurde ze in met mijn Copic markers en stanste ze uit met de bijpassende stansen. Plakte alles op de kaart en werkte het geheel af met een witte gelpen. Stamped all the images, colored them up using my Copic markers and cut them using the matching dies. Adhered everything on the card and finished the card of adding some white gel pen details.

Gebruikte Copic Kleuren:
Eekhoorns - E17, E15, E13, E11 / R22
Groen - G99, G85, G21
Wit / Grijs - C5, C3, C1
Eikels - E59, E57, E55, E53, E51, E50

Heb een heerlijke dag!
Groet, Marieke

Stempels: Let's Go Nuts (Lawn Fawn), Pasen, Leuke Post, Knuffel (Carlijn Design).
Stansen: Let's Go Nuts, Acorn House (Lawn Fawn), Grassy Fields Die-Namics, Stitched Snow Drifts Die-Namics, Itty Bitty Strips Die-Namics (My Favorite Things) Herfst (Carlijn Design), SL-SS-CD459 (Studio Light)
Inkt: Memento Tuxedo BlackVersafine Onyx Black, Versafine Vintage Sepia, Versamark Watermark ink, Gathered Twigs, Vintage Photo, Walnut Stain Distress inks. Naturel, Kraft (MFT dye inks)
Papier: Smooth White, Naturel, Kraft, Jellybean Green (MFT)

zondag 24 september 2023

Have a Sweet Birthday

Hallo allemaal,

Over twee dagen is ons nichtje jarig en ze vierde dit vandaag. Inmiddels heeft ze de leeftijd bereikt dat geld leuker is om te krijgen dan cadeau's dus ik maakte voor haar een geldkaart. In two days our niece celebrates her 15th birthday. At that age is more fun to get money than a present, I made her a money card for her birthday.
Stanste de Money Card Die-Namics woodnerf cardstock en 2x uit wit cardstock. Sneed de woodnerf door de midden en plakte hier een strook wit cardstock op. Stanste dit met een doom stans zodat het op een groot muizenhuis leek. Sneed het woodnerf stuk in stroken en beinkte deze met Distress inkt. Maskeerde de onderzijde van één van de witte money cards en beinkte dit.

Die cut the Money Card Die-Namics out of woodgrain and twice out of white cardstock. Cut the woodgrain in half en added a larger white rectangle on the bottom of it. Die cut it using a dome die so it would look like a "mouse house". Cut the woodgrain cardstock in strokes and added some ink. Masked the bottom of the card and inked blended it using two gray inks.
Maskeerde de onderzijde op 0,5 boven de "ondergrond" en beinkte het met een stencil en inkt. Stanste uit de ondezijde de Lipbalm stans en trok het gat over op de andere witte money card. Stanste hier het kleine strookje uit waar het geld doorheen kan. Plakte een pouch aan de voorkant vast en daarna alle losse onderdelen. Voor ik het geheel in elkaar plakte stempelde ik de tekst en vulde de pouch met het geld.

Masked off the bottom inked part 0,5 cm higher and inked it up using Lost Shadows and a stencil. Die cut the Lipbalm die and traced it onto the other white money card. Die cut the small strip die so the money could peek true. Adhered the pouch to the front of the card and adhered all the seperate elements. Before adding the elements, I stamped the sentiment and filled the pouch with the money.
Stempelde alle afbeeldingen, kleurde ze in met Copic markers en stanste of knipte ze uit. Stempelde de tekst op een stuk Kraft cardstock en maakte er een "bordje" van. Stanste uit verschillende kleuren cardstock haar naam en plakte daarna alle onderdelen op de kaart. Stamped all the images, colored them up using my Copic markers and cut them using the dies or my scicors. Stamped the sentiment on a piece of kraft cardstock and turned it into a "sign" Die cut the name of my niece out of different colors of cardstock and adhered all the elements on the card.

Gebruikte Copic Kleuren:
Muisjes - W6, W4, W2, W00, 0 / R22, R20, R00
Wit - C5, C3, C1, C00, 0
Grijs - C6, C4, C2
Teal - BG15, BG13, BG11, BG10
Blue - B16, B14, B52, B41
Yellow - Y17, Y15, Y13
Eggs - E53, E51, E50
Flour - YR31, YR30 , 0
Wood - E37, E35, E33, E31
Jam - R24, R22, R20, R00 / E44, E43, E41
Light blue - B02, B00, B000, B0000, 0

Heb een heerlijke dag!
Groet, Marieke

Stempels: Baked with Love, Merry Mice, Berry Special, A Creature was Stirring (Lawn Fawn), BB Cool Cat (MFT)
Stansen: A Creature was Stirring (Lawn Fawn), Money Card Die-Namics, Itty Bitty Strips Die-Namics, Stitched Doom STAX Die-Namics, Bitty Banner Alphabet Die-Namics (MFT)
Inkt: Memento Tuxedo BlackVersafine Onyx Black, Hickory Smoke, Lost Shadow, Walnut Stain Distress Ink
Papier: Smooth White, Kraft, Cotton Candy, Poppin' Pink, Orange Zest, Lemon Drop, Sno Cone, Cement Gray, Summer Splash (MFT), Woodgrain Light Brown,  (Lawn Fawn)
Extra: White gelpen, Lipbalm Pouch (MFT), Herringbone Stencil (MFT)

vrijdag 22 september 2023

Studio Light - Videotutorial

Hallo Allemaal,

Hier is mijn wekelijkse post voor Studio Light weer. Deze keer maakte ik een kaart met de nieuwste Sweet Stories stempels, die vanaf vandaag te koop zijn! I'm back with my weekly post for Studio Light. This time around I decided card using the newest Sweet Stories products, they are for sale as we speak!
Deze kaart maakte ik voor de nieuwste tutorial van Studio Light. Onderaan het blog bericht kun je een (Engels talige) tutorial vinden hoe je deze kaart kunt maken. Veel kijk plezier!

This card I made especially for my tutorial for Studio Light. At the end of the blogpost there will be a (English) spoken tutorial on how to make this card. Have fun watching!
Gebruikte Copic Kleuren:
Bears - E55, E53, E51, E50 / N6, N4 / R22, R20, R00
Pumkins - YR09, YR07, YR04, YR02 / YG67, YG63, YG03
Leaves - YR04, YR02, Y38, Y35
Handcart - E37, E35, E33, E31, E30 / N8, N6, N4 / C6, C4, C2


Heb een heerlijke dag!
Groet, Marieke

Inkt: Memento Tuxedo Black, Salvaged Patina and Peacock Feathers Distress Oxide ink, Orange Zest (MFT), Versafine Onyx Black
Papier: Smooth White, SL-ES-PP98
Extra: White Paint Maker, SL-SS-MASK243

donderdag 21 september 2023

It's Your Birthday

 Hallo allemaal,

Nog een paar dagen en dan zit mijn vakantie er weer op. Tot die tijd maak ik nog lekker wat kaarten. Deze keer maakte ik voor de lopende Cloud9store challenge een verjaardagskaart. With a few more days to go before my holiday comes to an end. But until then I will make a few more cards. This time around I created a birthday card for the running Cloud9store challenge. 
Als eerste maakte ik de achtergrond. Ik tekende de weg uit en maskeerde deze. Met Distress inkten blende ik de weg en plakte het daarna weer af met maskeertape zodat ik de weilanden kon maken. Deze maakte ik ook met Distress inkten. Stanste daarna de bovenzijde met een gras stans. Beinkte een strook wit met blauwe Distress inkten en plakte beide op de kaart.

First off I created the background. Draw out the road and masked it off. Using Distress inks I inkblended the road, removed the masking tape and changed it so I could inkblend the grazing lands. Die cut the top of the piece using a grass die. Inked up a piece of white with blue inks for the sky and adhered both on to the card.
Stempelde de tekst op de achtergrond en stempelde daarna alle afbeeldingen, kleurde ze in met mijn Copic markers en knipte of stanste ze daarna uit. Voor het hekwerk gebruikte ik de bovenzijde van de kar. Stempelde de maisplanten met een groene inkt en bewerkte het daarna nog met Copics. 

Stamped the sentiment on to the background. Stamped all the images, colored them up using my Copic markers and cut the by hand or with the matching dies. For the fence I used the top part of the cart. Stamped the maisplants using a green ink and added some details with my Copic markers.
Plakte alle onderdelen op de kaart, stempelde de tekst op de kentekenplaat en bracht op de lampen en richtingaanwijzers wat Glossy Accent aan. Glued all the elements on the card, stamped the sentiment on to the licenceplate and added a layer of Glossy Accent to the lights.

Gebruikte Copic Kleuren:
Muizen - W6, W4,W2, W1, W0 / R22, R20, R00
Licht Groen - G28, G43, G40
Donker Groen - YG67, YG63, YG03, YG01
Rood - R39, R29, R27, R24
Hooi - E17, Y17, Y15, Y13
Mais - Y17, Y15, Y13 / G28, G43, G40
Hout - E37, E35, E33, E31
Zwart - T8, T6, T4
Grijs / zilver - C6, C4, C2
Donkerblauw - B97, B95, B93, B91
Lichtblauw - B02, B00, B000, B0000, 0
Varkens - R32, R11, R30
Zonnenbloemen - Y17, Y15, Y13, Y11 / E49, E47, E44, E43
Wit - C5, C3, C1, C00, 0
Beren - E57, E55, E53, E51

Heb een heerlijke dag!
Groet, Marieke

Stansen: Scootin' By (Lawn Fawn), Grassy Fields Die-Namics (MFT)
Inkt: Memento Tuxedo Black, Versafine Onyx Black Scattered StrawWild HoneyVintage Photo/ Gathered Twigs/ Ground Espresso/ Mowed Lawn/ Crushed Olive/ Salty Ocean/ Tumbled Glass Distress inks
Papier: Smooth White (MFT)
Extra: White Gelpen, Glossy Accent

maandag 18 september 2023

Happy Howl-idays

Hallo allemaal,

Met nog een weekje vakantie en geen DT verplichtingen maakte ik nog wat kaarten voor mijzelf. Dit keer maakte ik een kaart met de leuke wolven van Lawn Fawn. Weer een interactieve kaart want die vind ik leuk om te maken. With one more holiday week to go and no DT obligations I had some more time to create cards just for me. This time around I created a card with the wolves by Lawn Fawn. Yet another interactive card just because I like to create those.
Als eerste maakte ik het mechanisme. Ik stempel de beide verschillende wolven op Copic papier en maskeerde deze. Maakte de achtergronden met Distress Inkten, spetterde water en daarna witte en zwarte verf. Verwijderde de masking tape en kleurde de afbeeldingen in, waarna ik ze stanste met de Magic Picture Changer. First of I made the mechanisme. I stamped both of the wolfs on some Copic paper and masked them. Inked up the background using Distress inks, splattered some water and some black and white paint afterwards. Removed the masking tape and colored up the images. Die cut both parts using the Magice Picture Changer.
Op een stuk aquarel papier inkten ik grijze Distress inkten, spetterde dit met witte en zwarte verf. Stanste het stuk met de Magic Picture Changer Add-on en plakte het mechanisme in elkaar. Beinkte de achtergrond met Twisted Citron, Peacock Feathers en Black Soot. Spetterde water en witte verf en plakte het op een witte topfold kaart. On a piece of watercolor paper I inked up some gray Distress inks, splattered it with water, white and black paint and die cut it using the Magic Picture Changer Add-on. Assembled the mechanisme and started on the base of the card. Inked up some Twisted Citron, Peacock Feathers and Black Soot. Splattered some water and white paint and adhered it on a white topfold base card.
Stanste uit een stuk grijs cardstock de Stitched Dens en plakte dit op de voorzijde van het mechanisme. Van een stuk wit cardstock maakte ik het sneeuw, stanste dit aan de bovenzijde en opnieuw met de Stiched Dens. Stanste ook een strook "sneeuw" en beinkte beide met Speckled Egg en Salvaged Patina. Plakte daarna alles op de kaart. Die cut a piece of gray cardstock using the Stitched Dens en adhered it on the front of the mechanisme. Out of white cardstock I created the snow, die cut the top and again used the Stitched Dens for the middle part. Die cut another piece of "snow" and inked both parts up using Speckled Egg and Salvaged Patina. Adhered the pieces on the card.
Stempelde alle afbeeldingen, kleurde ze in met mijn Copic markers en knipte ze uit. Plakte alles op de kaart en stempelde de teksten op wit cardstock. Stansten "Howl" en de banners uit. Werkte de kaart af door wat witte gelpen details toe te voegen. Stamped all the images, colored them up using my Copic markers and cut them with my siccors. Adhered all the elements on the card. Stamped the sentiments on some white cardstock and die cut the "Howl". Die cut the sentiments using a banner die and adhered everything on the card. Finished off by adding some white gelpen details.

Gebruikte Copic Kleuren:
Wolven - W6, W4, W2 / W3, W1, W00, 0 / R22, R20, R00
Bomen - YG67, YG63, YG03, YG01 / E37, E35, E33
Steen - C6, C4, C2

Heb een heerlijke dag!
Groet, Marieke

Stempels: Merry Messages, Wolf Before 'n Afters, Wild Wolves, Yeti or Not, Merry Mice (Lawn Fawn)
Stansen: Stitched Dens, Magic Picture Changer, Magic Picture Changer Add-On (Lawn Fawn), In Stitched Alphabet Die-Namics, Bitty Strips Die-Namics (MFT)
Inkt: Memento Tuxedo Black, Versafine Onyx Black, Twisted Citron, Peacock Feathers, Black Soot, Hickory Smoke, Speckled Egg en Salvaged Patina Distress inkt.
Papier: Smooth White, Gravel Gray (MFT), Peacock (Lawn Fawn)
Extra: White gelpen, White and Black Paint marker.

vrijdag 15 september 2023

Studio Light - Happy Halloween

Hallo Allemaal,

Hier is mijn wekelijkse post voor Studio Light weer. Deze keer maakte ik met de nieuwste Sweet Stories producten een Halloween shaker kaart. I'm back with my weekly post for Studio Light. This time around I decided on making a Halloween shakercard using the newest Sweet Stories products.
Maakte eerst de stenen muur. Op zwart cardstock maskeerde ik eerst de onderkant. Inktblende ik de stenen met witte inkt en een mask. Spetterde witte verf en sneed een strookje wit. Beinkte de strook met licht grijze inkt en plakte het op het zwarte cardstock.

First off I made the stone background. On some black cardstock I masked the bottom and inkblended the stones using a mask and white ink. Splattered some white paint and trimmed a piece of white cardstock. Inked it up using a light gray ink and adhered it onto the black cardstock.
Sneed 1/4 inch stroken groen en wit cardstock en een slag kleiner het paarse glitterpapier. Maakte mijn eigen achtergrond. Stanste het uit en plakte aan de achterzijde eenzelfde rechthoek van wit cardstock. Stanste uit de zwarte achtergrond de cirkel en maakte er de shaker mee.

Cut 1/4 inch strips of green and white cardstock, cut a tat smaller the glitter cardstock. Made my own background and die cut it. Die cut the same background out of white cardstock and adhered it together. Die cut the cirkel out of the wall paper and turned it into a shaker.
Stempelde alle afbeeldingen, kleurde ze in met mijn Copic markers en stanste ze uit. Plakte alles op de kaart. Heat emboste en stempelde de teksten, knipte of stanste ze uit en plakte het daarna op de kaart. Stamped all the images, colored them up using my Copic markers and die cut them using the matching dies. Adhered everything on the card. Heat set and stamped the sentiments, cut or die cut them and adhered them on to the card.

Gebruikte Copic Kleuren:
Zwart - T8, T6, T4, T3, T2
Groen - YG25, YG23, YG01
Paars - V06, V05, V04, V01
Hout - E37, E35, E33, E31
Goud - E17, Y26, Y15, Y13
Bezem en doppen - E44, E43, E41
Blauw - B02, B00, B000, B0000, 0
Linker kat - E55, E53, E51, E50, 0 / R20, R00
Rechter Kat - C4, C2, C0, C00

Heb een heerlijke dag!
Groet, Marieke

Stempels: SL-SS-SCD72, SL-SS-STAMP328
Stansen: SL-SS-SCD72,SL-ES-CD453, SL-SS-CD460
Papier: Smooth White, Black Licorice, Boysenberry, SL-ES-PP49, SL-ES-PP54

dinsdag 12 september 2023

We Wish You Fairy Happy Holidays

Hallo allemaal,

Naast koffie ben ik helemaal weg van wreaths, toen ik de Lawn Fawn Wreath Add-on zag moest ik deze hebben. Ik maakte er deze kaart mee met de Fairy Friends.
Beside coffee i'm a total nerd for wreaths, so when I saw the Wreath Add-on by Lawn Fawn I had to get it. I created this card with it using also Fairy Friends.
Begon met de achtergrond, inktblende de achtergrond met Stormy Sky en Black Soot. Spetterde water en stempelde de achtergrond met zwarte inkt. Stanste het geheel daarna uit.

First made the background, inkblended it usign Stormy Sky and Black Soot. Splattered some water and stamped the lined background using a black ink. Die cut everything using the add-on die.
.Stanste de wreath die drie keer uit verschillende kleuren teal cardstock. Plakte deze op elkaar, stanste de besjes uit wit cardstock en plakte deze op waarna ik ze bewerkte met glitterlijm. 

Die cut the wreath three times out of different colors of teal cardstock and adherd them onto each other. Die cut the berries out of white cardstock, adhered them and added some glitter.
Stanste alle onderdelen uit voor de Magic Iris mechanisme en maakte de slider. Stempelde de tekst op een witte topfold basiskaart en plakte daar het mechanisme, de achtergrond en wreath op. Emboste de tekst op Tropical Teal cardstock en stempelde de andere met dezelfde kleur inkt. Stanste of knipte de teksten uit en plakte ze op de kaart.

Die cut all the elements of the Magic Iris mechanisme and made the slider. Stamped the sentiment on a topfold white base card. Adhered the mechanisme, de background and the wreath on to the base card. Heat set the sentiment on some Tropical Teal cardstock, stamped the other sentiment using the same color ink and cut it by hand or with a die cut.
 Stempelde de afbeeldingen, kleurde ze in met mijn Copic markers en stanste ze uit met de bijpassende stansen. Plakte alles op de kaart en bewerkte de vleugels met glitter. Stamped all the images, colored them up using my Copic markers and cut them using the matching dies. Adhered everything on to the card and added some glitters to the wings.

Gebruikte Copic Kleuren:
Huid - E000, E00, E04, E11, E21
Haar - E44, E43, E42
Wit - W5, W3, W1
Jurken/ haarband - BG15, BG13, BG11, BG10
Sjaals - BG75, BG72, BG70
Vleugels - B02, B00, B000, B0000, 0

Heb een heerlijke dag!
Groet, Marieke

Stempels: Fairy Friends, Magic Holiday Wishes (Lawn Fawn), All Lined Up Diagonally Background (My Favorite Things)
Inkt: Memento Tuxedo Black, Stormy Sky and Black Soot Distress inks, Versafine Onyx Black, Tropical Teal, Berrylisicous (My Favorite Things), Versamark Watermark Ink
Papier: Smooth White, Tropical Teal, Berrylicious, Sno Cone (My Favorite Things)
Extra: White embossing powder, White paint Marker, Stickles - Crystal

zondag 10 september 2023

Papa & Mama zeggen eindelijk, Ja!

Hallo allemaal,

Vandaag laat ik de een kaart zien die ik maakte in opdracht van mijn collega. Ik maakte een kaart in Assepoester stijl (was mijn intentie) en de muisjes en kleding staan symbool voor de drie kinderen, twee meisjes en één jongen. Today I show you a card I made on commision. Today i'm showing you the card I made for the childeren. I made a card cinderella style (atleast I tried to) and the little mouse and clothing represent the three childeren, two girls and one boy. 
Het is een grote dubbele kaart geworden, 14 x 18,5. Op een stuk aquarel papier van dezelfde grote maskeerde ik het hart en inktblende de kleuren Peacock Feathers, Blueprint Sketch, Seedles Preserves en Black Soot Distress Oxide inkt. Spetterde water en witte verf en verwijdere de mask. Inktblende de maan met Cracked Pistashio en stempelde met Peacock Feathers en de Distressed Pattern stempel van My Favorite Things de spikkels.

It´s a big card, 14 x 18,5 topfold white card. On a piece of watercolor paper the same seize, I masked the heart. Inkblended some Peacock Feathers, Blueprint Sketch, Seedles Preserves and Black Soot. Splattered some water and white paint and removed the mask. Inkblended the moon using Cracked Pistashio and stamped some Peacock Feathers using the Distressed Pattern stamp by My Favorite Things.
Stempelde de teksten van Carlijn Design op het hart en plakte de achtergrond op de basis. Stansten alle onderdelen om het "bos" te maken uit verschillende kleuren cardstock en stansen van My Favorite Things. Bewerkte het met Peeled Paint en Walnut Stain Distress inkt. Plakte het daarna op de kaart en werkte het af met een witte gelpen. Stamped the sentiments by Carlijn Design on the heart and adhered the background panel on the base card. Die cut all the elements of the "forest" using different colors of cardstock and dies by My Favorite Things. Added some details using Peeled Paint and Walnut Stain Distress ink. Adhered them on the card and added some white gelpen details.

Stempelde alle afbeeldingen van Lawn Fawn, kleurde ze in met mijn Copic markers en stanste of knipte ze uit. Heat emboste de "trails" op vellum en stanste ook deze uit. Stamped all the images, colored them up using my Copic markers and cut them using the dies or sciccors. Heat set the "trai;s" on vellum and cut them using the matching dies.
Stanste het pak en de jurk van My Favorite Things uit cardstock en vellum. Kleurde de strik en pochet met Copic markers en plakte het in elkaar. Onder de jurk plakte ik aan de boven en onderzijde een gedeelte van de Lawn Fawn paspop. Plakte daarna alles op de kaart. Die cut the suite and the dress out of cardstock and vellum using dies by My Favorite Things. Colored up the bow and pocket square and adhered eveything together. For the dress on the top and bottom I adhered some parts of the Lawn Fawn mannequin. Assembled the card by adding all the elements on the card using foam tape or glue.

Gebruikte Copic Kleuren:
Licht Blauw - B02, B01, B00, B000, B0000, 0
Krukjes - E37, E35, E33, E31
Klosjes + lintdoosje - E44, E43, E42
Zwart - N8, N6, N4, N3
Wit - C5, C3, C1, 0
Muisjes - W6, W4, W2, W1 / R20, R00
Vogeltjes - B16, B14, B12, B41 / YR04, YR02

Heb een heerlijke dag!
Groet, Marieke

Stempels: Distress Pattern (My Favorite Things), Just Plane Awesome, Sew Very Mice, Merry Mice, Bicycle Built for You, Little Bundle (Lawn Fawn), Geboorte, Huwelijk, Pensioen (Carlijn Design)
Stansen: Slimline Grassy Hills, Stitched Slimline Snow Drifts, Let's Say "I Do", Winter Trees (My Favorite Things), Just Plane Awesome, Sew Very Mice, Bicycle Built for You (Lawn Fawn), SL-ES-CD450 (Studio Light, for the masked heart)
Papier: Smooth White, Jalepeno Popper, Sour Apple, Kraft, Black Soot (My Favorite Things), Vellum