donderdag 6 april 2023

My Favorite Things April Release Countdown Day 5

 Hello all,

It’s time for the My FavoriteThings April release countdown! During the countdown, the MFT Design Team is sharing lots of projects featuring all of the new products. The new release will officially be available on April 11th at 10:00 am EST (= Europe: April 11th at 4:00 pm CET). Het is tijd voor de My Favorite Things april release countdown! Nog 5 dagen en dan is de nieuwe release verkrijgbaar. Tijdens de countdown, laat het MFT Design Team verschillende projecten zien met alle nieuwe producten. De release zal verkrijgbaar zijn op 11 april om 10:00 am EST (in Nederland op 11 april om 16:00).
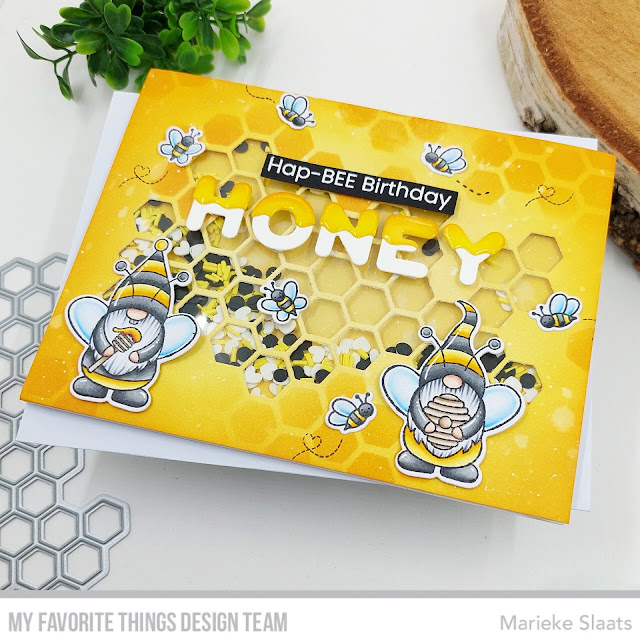
Today we are kicking of with a few really fun and versatile products! I decided to create a shaker card using the Buzzing with Happiness together with the Peek-a-Poo Honeycomb Die-Namics.
Vandaag starten we met een aantal hele leuke diverse bruikbare producten. Ik besloot om een shaker kaart te maken met de Buzzing with Happiness samen met de Peek-a-Boo Honeycomb Die-Namics.
First off I made the background using Scattered Straw, Mustard Seed and Wild Honey Distress inkt. Splattered some water and white paint and die cut the Peek-a-Boo Honeycomb Die-Namics. Cut the die another time out of white cardstock and used it as a mask to create the honeycomb pattern on my front. Adhered a piece of acetate behind it.

Cut a Smooth white topfold basecard and inked up another rectangle using the same colors of Distress ink. Adhered the panel onto the base card and filled up the shaker. Closed it using my inked panel.

Eerst maakte ik de achtergrond met de Scattered Straw, Mustard Seed and Wild Honey Distress inkt.
Spetterde water en witte verf en stanste het Peek-a-Boo Honeycomb Die-Namics uit de rechthoek. Stanste de stans nogmaals uit wit cardstock en gebruikte hem als een stencil om de hexagons op de kaart aan te brengen. Plakte een stuk acetate achter de rechthoek.

Sneed een topfold Smooth White basiskaart, sneed een rechthoek en beinkte dit met dezelfde kleuren Distress inkt. Plakte dit op de basiskaart en vulde hem met shakermateriaal. Plakte de geinkte voorkant hierop met foamtape.
Stamped the images, colored them up and cut the using the Buzzing with Happiness Die-Namics. Die cut the Frosted Alphabet Die-Namcics out Smooth White cardstock, inked up the top part using the Distress ink and adhered them on top. Adhered them on the base and added a layer of glossy accent. Heat set the sentiment cut it and adhered it onto the base. Stempelde de afbeeldingen, kleurde ze in en stanste ze uit met de Buzzing with Happiness Die-Namics. Stanste het Frosted Alphabet Die-Namics uit Smooth White cardstock, inkted de bovenzijde met Distress inkt en plakte ze op elkaar. Plakte het op de basis en voegde een laagje Glossy Accent toe. Heat emboste de tekst en plakte op de bovenzijde van de kaart.

Used Copic Colors:
Black - N8, N6, N4, N3
Yellow - Y17, Y15, Y13, Y11
Blue - B02, B00, B000, B0000
Honey - E09, YR24, Y15, Y11
Bruin - E44, E42, E41
Skin - E000, E00, E04, E11, E21

If you need to be even more inspired after this post make sure to have a look over at My Favorite Things Youtube ChannelWanneer je na deze post nog wat meer ideeën nodig heb neem dan even een kijkje op het Youtube kanaal van My Favorite Things.

Have a wonderful day!
Greets, Marieke

woensdag 5 april 2023

Studio Light - Handgemaakt voor jou

Hallo Allemaal,

Hier is mijn wekelijkse post voor Studio Light weer. Deze keer maakte ik met de Sweet Stories producten een post kaart. I'm back with my weekly post for Studio Light. This time around I decided on making a mail card using a few of the Sweet Stories products.

Stanste de achtergrond uit naturel cardstock en stempelde de achtergrond in naturel inkt. Stanste een strook grijs cardstock en zette hier witte lijnen op zodat het op een weg lijkt en plakte dit op de basis. Sneed een topfold basiskaart en plakte hier rood, wit en blauwe stroken cardstock op en sneed het resterende af.

Die cut the background out of Naturel cardstock, stamped the background using the same inkcolor. Die cut a gray strip of cardstock and added some white lines. Adhered this on the base. Cut a topfold white basecard and adherd some red, blue and white strips of cardstock. Trimmed off the excess.
Stempelde de postzegel en stempels in de linkerhoek en stanste alle onderdelen van het "postkantoor" en de brievenbus. Stempelde de achtergrond nogmaals, dit keer op Copic papier en kleurde de harten in met Copics. Plakte dit achter het huis en beide plakte ik op de kaart.

Stamped the poststamp and the other stamps in the top left corner and die cut all the elements of the "postoffice" and mailbox. Stamped the background stamp another time, this time on Copic paper, colored the hearts using my Copic markers. Adhered the background behind the house and the house and mailbox onto the card.
Stempelde de afbeeldingen, kleurde ze in met mijn Copic markers en stanste ze uit met de bijpassende stansen. Heat emboste en stempelde de teksten op rood en blauw cardstock en knipte of stanste dit uit. Stamped all the images, colored them up using my Copic markers and die cut them using the matching dies. Heat set and stamped the sentiments on red and blue cardstock. Cut them with my sciccors or dies and adhered them onto the card.

Gebruikte Copic Kleuren:
Apen - E59, E57, E55, E53, E51, E50 / R22, R20, R000
Wit - C5, C3, C1, C00, 0
Blauw - B39, B37, B34
Rood - R59, R29, R24
Zwart - N8, N6, N4

Heb een heerlijke dag!
Groet, Marieke

Papier: Smooth White, Naturel, Red Hot, Blue Beyond, Gravel Gray, White Woodgrain Cardstock
Extra: Witte gelpen.

vrijdag 31 maart 2023

Studio Light - Have a Bunny Sweet Birthday

Hallo Allemaal,

Hier is mijn wekelijkse post voor Studio Light weer. Deze keer maakte ik met de Sweet Stories producten een verjaardag kaart. I'm back with my weekly post for Studio Light. This time around I decided on making a birthday card using a few of the Sweet Stories products.
Zoals altijd maakte ik eerst de achtergrond. Inktblende de wolken / lucht met Kitsch Flamingo en een mask. Inktblende daarna het gras en de grond met Gathered Twigs, Twisted Citron en Mowed Lawn. Stanste het daarna uit en plakte het op de basis.

As usual I started with the background. Inkblended the clouds and sky using Kitsch Flamingo and a mask. Inkblended the gras and ground afterwards using Gathered Twigs, Mowed Lawn and Twisted Citron. Die cut the border and adhered it onto the base.
Uit oranje cardstock stanste ik de sneeuwdome en sneed de bovenkant zo af dat het op een wortel lijkt, intkblende het en bracht wat oranje strepen aan. Stanste het water van het zwembad twee keer, knipte het doormidden en maakte hier de bladeren van. Inkte ook deze en bracht wat strepen aan. Out of orange cardstock I cut the snowdome and cut of the top part until I thought it would look like a carrot. Inkblended some oranje and added some stripes. Die cut the water from the swimmingpool twice and cut them in half and they turned into leaves. Inked them up added some stripes and adhered them behind the carrot.

Stanste daarna de deur, brievenbus en raam van het basishuis en plakte dit op de wortel. Stempelde alle afbeeldingen, kleurde ze in en stanste ze uit met de bijpassende stansen. Die cut the door, window and mailbox out of the basic house dies, adhered them together and glued them onto the card. Stamped all the images, colored them up and die cut them using the matching dies.
Plakte alles op de kaart en stempelde de zwarte teksten rechtstreeks op de kaart. Stempelde de tekst bunny met gele inkt op wit cardstock en knipte uit. Bewerkte daarna nog een aantal onderdelen met een witte gelpen. Adhered everything onto the card and die cut the sentiments directly onto the card using a black ink. Finished the card off adding some white gelpen details.

Gebruikte Copic Kleuren:
Konijnen - C3, C1, C00, 0 / R22, R20, R000
Wortels - YR07, YR04, YR02 / YG67, YG63, YG03
Blad - G07, G05, G03, G00
Bloemen - R85, R83, R81 / Y17, Y13
Geel - Y17, Y15, Y13, Y11
Wit - C5, C3, C1, C00, 0
Bruin - E44, E42

Heb een heerlijke dag!
Groet, Marieke

woensdag 29 maart 2023

Studio Light - Tea Party

 Hallo Allemaal,

Hier weer een post voor Studio Light. Deze keer maakte ik met de Sweet Stories producten een kaart die helemaal anders is dan anders. Ik veranderde de stempels van Sweet Stories in een Alice in Wonderland scene. I'm back with a post for Studio Light. This time around I decided on making something totally different using different Sweet Stories products together. I modified the cute Sweet Stories images so they would be Alice in Wonderland Characters.
Het was even nadenken hoe ik deze kaart aan ging vliegen. Ik besloot de SL-SS-CD398 als basis te gebruiken voor mijn achtergrond. Ik stanste hem uit en beinkte de bovenkant met Spun Sugar, Picked Raspberry, Wilted Violet en Vilanious Potion. Bewerkte het daarna met een mask en dezelfde kleuren paarse inkt.

I had to think really out side the box how to create this card. I decided to use SL-SS-CD398 as a base for my background. Die cut it and inked up the top using Spun Sugar, Picked Raspberry, Wilted Violet and Vilanious Potion. Added the leaves using a mask and the same colors of purple ink.
Voor de grond gebruikte ik de kleuren Salvaged Platina, Evergreen Bough en Black Soot en hetzelfde stencil om te gronden. Plakte alles op elkaar en stanste de deur uit de achtergrond. Stanste daarna de deur uit woodgrain cardstock en maakte het tot een geheel.

The ground is made using Salvaged Platina, Evergreen Bough and Black Soot. I used the same mask for the grass. Adhered the panel into one and die cut the door out of the background. For the door itself I used woodgrain cardstock and made it into a whimsical door.
Stempelde alle afbeeldingen, kleurde ze in en stanste ze uit met de bijpassende stansen. Voor de kaarten gebruikte ik de envelop uit SL-SS-SCD18. Het klokje maakte ik met de bril van SL-SS-SCD53. Het vosje veranderde ik in de Cheshire Cat en maakte het mondje zelf. Het bord kleurde ik eerst in en heat emboste het daarna met wit embossingpoeder. Stamped all the images, colored them up and cut them using the matching dies. For the playing cards I used the envelopes out of SL-SS-SCD18. For the pocketwatch I used the glasses of SL-SS-CD53. I turned the fox into the Cheshire Cat but made the theeth myself. Colored up the sign before heat setting the sentiment using white embossingpowder.

Gebruikte Copic Kleuren:
Cheshire Cat - RV19, RV17, RV14, RV13/ RV34, RV52, RV00, RV000
Rups - B02, B00 / B97, B95, B93
Paars - V09, V06, V04
Hout - E37, E35, E33, E31, E30
Grass / Stelen - YG67, YG63, YG03
Mos - BG75, G94, G21
Paddenstoelen - R59, R39, R29, R27, R24/ W5, W3, W1, W00/ 0
Konijn - C4, C2, C0, C00/ R59, R39, R29, R24/ B95, B93, B91/ Y35, Y23, Y21 / V09, V06, V04
Bloemen - RV19, RV17, RV13/ Y17, Y15, Y13, Y11 
Klok - E27, Y26, Y15, Y11
Kopjes - Y35, Y23, Y21/ B24, B23, B21/ R85, R83, R81/ BV02, BV00, BV000

zondag 26 maart 2023

Studio Light - Some Bunny Loves You

 Hallo Allemaal,

Hier weer een post voor Studio Light. Deze keer maakte ik met de Sweet Stories producten een lente liefdes kaart en combineerde het met de Magic Picture Changer van Lawn Fawn. I'm back with a post for Studio Light. This time around I decided on making a spring love card using a few of the Sweet Stories products together with the Magic Picture Changer by Lawn Fawn.
Deze keer startte ik met het mechanisme. Ik tekende de lijnen van het vierkant over op Copic papier, stempelde en maskeerde de afbeeldingen. Daarna ging ik aan de slag met de achtergrond. Deze maakte ik met stencils en Distress inkten. Stanste de Magic Picture Changer Add-on en beinkte deze. Dit laatste onderdeel werd mijn richtlijn voor de wolken en het gras voor de afbeeldingen.

This time I started on creating the mechanisme. Traced the squares on some Copic paper, stamped and masked the images. Then I made the background using masks and Distress Inks. Die cut the Magic Picture Addon and Inked this up also. This would then be my guideline for the clouds and grass for the images.
Maakte van alle losse onderdelen van de Magic Picture Changer een geheel. Stanste de "pull" tab uit groen en wit cardstock en plakte dit op, deze werkt ook als stopper. Stempelde de teksten op de achtergrond, heat emboste bunny en knipte deze uit. 

Created the mechanisme using all the seperate parts of the Magic Picture Changer. Die cut the "pull" tab out of green and white cardstock and adhered this, this makes sure the mechanisme stops on time. Stamped the sentiments, heat set bunny and cut it using my sciccors.
Stempelde alle afbeeldingen, kleurde ze in en stanste ze uit met de bijpassende stansen. Plakte alles op de kaart en het geheel ging op een witte topfold basiskaart. Stamped all the images, colored them up and cut them using the matching dies. Adhered everything onto the panel and add it to a white topfold base card.

Gebruikte Copic Kleuren:
Konijnen - E55, E53, E51, E50 / R22, R20, R00
Groen - YG67, YG63, YG03
Oranje - YR07, YR04, YR02
Wit / Grijs - C5, C3, C1, C00, 0
Geel - Y17, Y15, Y13, Y11
Roze - R85, R83, R81 / R22, R20, R00
Bruin - E77, E74, E71
Blauw - B02, B00, B0000


Heb een heerlijke dag!
Groet, Marieke

Stansen: SL-SS-SCD55, SL-SS-SCD52, SL-SS-SCD37, Magic Picture Changer + Add-on (Lawn Fawn)
Inkt: Memento Tuxedo Black, Tsukineko Versamark, Twisted Citron/ Mowed Lawn/ Spun Sugar/ Kitsch Flamingo Distress ink
Papier: Smooth White, Limelight
Extra: Wit embossingpoeder, Witte gelpen, Zwarte Fineliner, SL-SS-MASK119, SL-SS-MASK120

vrijdag 24 maart 2023

Studio Light - Happy Birthday

Hallo Allemaal,

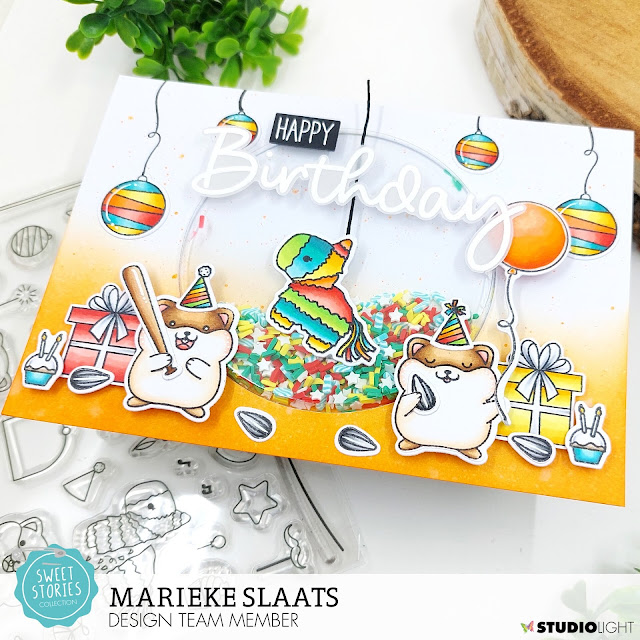
Hier is mijn wekelijkse post voor Studio Light weer. Deze keer maakte ik met de Sweet Stories producten een verjaardag kaart. I'm back with my weekly post for Studio Light. This time around I decided on making a birthday card using a few of the Sweet Stories products.
Zoals altijd inktblende ik eerst de achtergrond met Carved Pumpkin, spetterde water en Carved Pumpkin met water. Stanste de cirkel uit, legde het frame op de basiskaart en plakte de uitgestanste cirkel op de basiskaart. Plakte de blister op de achterzijde van het frame. Vulde de shaker en plakte deze dicht.

As usual I inkblended the background first, this time with Carved Pumpkin, splattered some water and Carved Pumpkin mixed with water. Die cut the circle out, placed the panel on a base card and adhered the circle onto it. Adhered the blister behind the frame, filled up the shaker and closed it.
Stempelde alle afbeeldingen, kleurde ze in met mijn Copic markers en stanste ze uit met de bijpassende stansen. Bewerkte een aantal afbeeldingen met een witte gelpen en zwarte fineliner.

Stamped all the images, colored them up using my Copic markers and die cut them using the matching dies. Added some white gelpen and black fineliner details to some off the images.
Stempelde de draden van de lampionen aan de bovenzijde en plakte de lampionen op. Heat emboste beide teksten, de een op zwart cardstock en de ander op vellum. Knipte en stanste de teksten uit en plakte ze op de kaart.

Stamped the twine on to the card were the laterns are going to be and adhered the laterns afterwards. Heat set both of the sentiments. One onto black cardstock and one onto vellum. Die cut one, cut the other one by hand and adhered them onto the base.
Plakte een stuk zwarte twine achter de pinata en plakte deze op de shaker. Plakte als laatste alle afbeeldingen op de kaart. Adhered a piece of black twine behind the pinata and adhered it onto the shaker. After that I added all of the images onto the card.

Gebruikte Copic Kleuren:
Teal - BG18, BG15, BG13, BG11
Geel - Y17, Y15, Y13, Y11
Oranje - YR09, YR07, YR04, YR02, YR00
Rood - R27, R24, R22, R20
Groen - YG07, YG05, YG03, YG01
Wit - C5, C3, C1, C00, 0
Zonnenbloemzaden - N7, N5, N3, N0
Bruin - E44, E42
Hamsters - E57, E55, E53, E51, E50, 0 / R24, R22, R20
Knuppel - E37, E35, E33

Heb een heerlijke dag!
Groet, Marieke

Papier: Smooth White, Black Licorice, Vellum
Extra: Wit embossingpoeder, SL-ES-SHAKE01, SL-ES-SHAKE06, Zwarte fineliner, witte gelpen.

vrijdag 17 maart 2023

Studio Light - Swing into Spring

Hallo Allemaal,

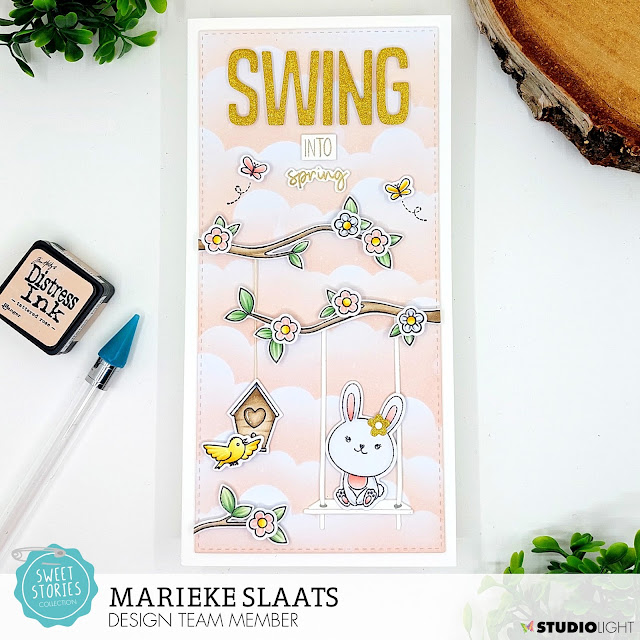
Hier is mijn wekelijkse post voor Studio Light weer. Deze keer maakte ik met de Sweet Stories producten een lente slimline kaart. I'm back with my weekly post for Studio Light. This time around I decided on making a Spring slimline card using a few of the Sweet Stories products.
Ik maakte als eerste weer de achtergrond. Stanste een rechthoek en met Tattered Rose en de mask maakte ik de wolken. Spetterde water en plakte het geheel op een witte sidefold basiskaart.

First off I made the background. Die cut the rectangle using Tattered Rose and the mask I inked the clouds. Splattered some water and added the rectangle onto a white sidefold basecard.
Stanste alle onderdelen van de schommel en plakte het geheel in elkaar. Stanste het woord "swing" uit goud glitter papier en heat emboste de andere twee teksten op wit cardstock met goud embossing poeder.

Die cut all the element of the swing and adhered it together. Die cut the word "swing" out of gold glitter paper and heat set the other sentiment using gold embossingpowder onto white cardstock.
Stempelde alle afbeeldingen, kleurde ze in met mijn Copic markers en stanste ze uit met de bijpassende stansen. Stempelde als laatste de stippellijnen op de kaart. Stamped all the images, colored them up using my Copic markers en die cut them using the matching dies. Stamped the black dotted lines to finish of the card.

Gebruikte Copic Kleuren;
Hout - E44, E43, E42, E41
Roze bloemen - R20, R01, R00
Roze vlider / konijn - R22, R20, R00
Geel - Y17, Y5, Y13, Y11, Y00
Wit - C5, C3, C1, C00, 0
Groen - G46, G43, G40, G12


Heb een heerlijke dag!
Groet, Marieke


Papier: Smooth White, Cement Gray, SL-ES-PP50
Extra: Goud Embossingpoeder, SL-SS-MASK120