vrijdag 24 november 2023

Studio Light - Christmas Wishes

Hallo Allemaal,
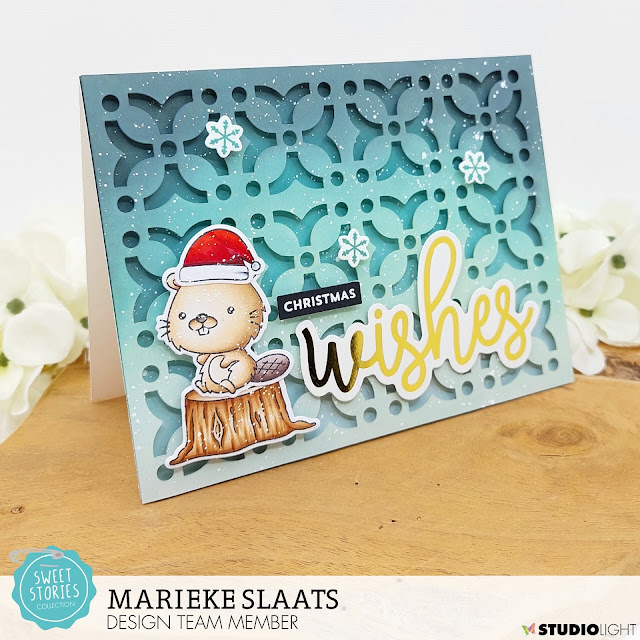
Vandaag ben ik er weer met een post voor Studio Light, deze keer combineerde ik de Sweet Stories producten met een aantal Essentials van Studio Light en maakte er een kerstkaart mee
. Today I'm back with a Christmas card using Sweet Stories together with some Essential items.
De basis is een topfold witte kaart, op een stuk aquarel papier inktblende ik de kleuren Speckled Egg, Evergreen Bough en Black Soot. Ik beinkte een achtergrond in dezelfde kleuren. Legde ze op elkaar en spetterde witte verf. Plakte de achtergond op de basis kaart en met foamtape plakte ik daar de achtergrond weer op.

The base of the card is a white tolfold card, on a piece of waterolor paper I inkblended Speckled Egg, Evergreen Bough and Black Soot Distress Oxide ink. Inked up the background in the same colors placed them on top of eachother and splattered white paint. Adhered the inked panel on the basecard and the background on the card using foamtape.
Stempelde de afbeeldingen, kleurde ze in met mijn Copic markers en stanste ze uit met de bijpassende stansen. Plakte ze op elkaar en spetterde ook hier met witte verf. Plakte de afbeeldig op de kaart met foam tape.

Stamped the images, colored them up using my Copic markers and cut them using the matching dies. Adhered them together and splattered some white paint. Adhered all the images on the card using foam tape.
Heat emboste de kleine tekst op zwart cardstock en stanste het tot een banner. Stempelde de sneeuwvlokken met Evergreen Bough en stanste uit. Plakte daarna alles op de kaart met foamtape. Heat set the small sentiment on black cardstock and die cut it to a banner. Stamped the snowflakes using Evergreen Bough and die cut them usng the matching dies. Adhered all the elements on the card using different height of foamtape.

Gebruikte Copic Kleuren:
Bever - E57, E55, E53, E51, E50 / E79, E77, E74, E71
Hout - E37, E35, E33, E31
Muts - R59, R39, R37, R29, R27, R24 / C5, C3, C1, C00, 0

Heb een heerlijke dag!
Groet, Marieke

Papier: Black Licorice, Smooth White

zaterdag 18 november 2023

My Favorite Things November Release Spotlight Day 4

 Hello all,

Welcome to day four of the November release spotlight post by My Favorite Things! So hop along for more beautiful inspiration by the team. Welkom bij dag vier van de november release spotlight dag van My Favorite Things. Hop gezellig mee langs alle design team leden voor meer inspiratie.
For the last day I created a more Clean and Simple card using the Merry Moose together with the Drifts & Hills Stencil.

Voor mijn kaart van vandaag maakte ik een Clean en Simpel kaart met de Merry Moose en het Drifts & Hills Stencil.
Cut a topfold Smooth White Cardbase, added some snow using Peacock Feathers Distress ink and a stencil. Splattered some ink and let it dry. Heat embost the sentiment and cut it.

Sneed een topfold Smooth White basiskaart, maakte sneeuw met Peacock Feathers Distress inkt en een stencil. Spetterde wat inkt op de kaart en heat emboste de tekst op een stuk kraft.
Stamped the images, colored them up using my Copic markers and cut them using the matching Merry Moose Die-Namics. Added them to the card and gave the noses of the reindeer some detail. Stempelde de afbeeldingen, kleurde ze in met Copic markers en stanste ze uit met de bijpassende Merry Moose Die-Namics. Voegde wat detail toe aan de neuzen van de herten en plakte alles op de kaart.

Used Copic Colors:
Red - R59, R29. R27, R24
Pink - R85, R83, R81
Blue - B04, B02, B00, B000
Light Green - YG05, YG03, YG01
Dark Green - YG67, YG63, YG03
Blue Green - BG15, BG13, BG11
Black - N9, N7, N6, N4
Yellow - Y17, Y15, Y13
Grey / White - C5, C3, C1, C00, 0
Moose - E59, E57,E55 / E47, E44, E43, E42
Wood - E35, E33, E31

If you need to be even more inspired after this post make sure to have a look over at My Favorite Things Youtube ChannelWanneer je na deze post nog wat meer ideeën nodig heb neem dan even een kijkje op het Youtube kanaal van My Favorite Things.

Have a wonderful day!
Greets, Marieke

vrijdag 17 november 2023

My Favorite Things November Release Spotlight Day 3

 Hello all,

Welcome to day three of the November release spotlight post by My Favorite Things! So hop along for more beautiful inspiration by the team. Welkom bij dag drie van de november release spotlight dag van My Favorite Things. Hop gezellig mee langs alle design team leden voor meer inspiratie
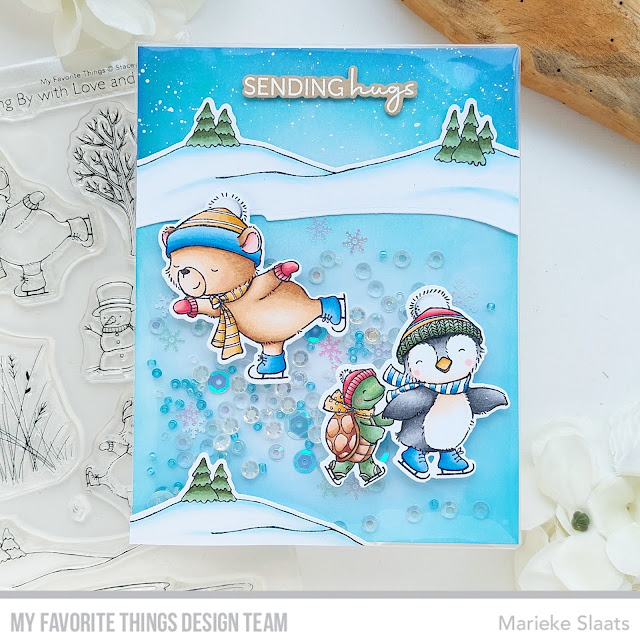
Today the designteam is showcasing the new stamps by artist Stacey Yacula. For my card I decided to create a shaker card using the Warm Winter Hugs together with the Something for Everything (love that the sentiments have two fonts!).

Vandaag laat het designteam die nieuwste stempels van Stacey Yacula zien. Voor mijn kaart maakte ik een shaker kaart met de Warm Winter Hugs en de Something for Everything (ik vind het geweldig dat er twee fonts in één zin zit!).
Inkblended a piece of watercolor paper using Tumbled Glass, Peacock Feathers and Blueprint Sketch. Splattered the whole panel with water and only the top part with white paint. Put the panel into an Avery Elle pocket and adhered the top part on the inked panel. Filled the rest with shaker material and closed the pocket before adhering it to a white topfold base card.

Inktblende op aquarelpapier de achtergrond met Tumbled Glass, Peacock Feathers en Blueprint Sketch. Spetterde water op de hele achtergrond en alleen witte verf op de bovenzijde. Stopte het geheel in een Avery Elle pocket en plakte de bovenkant vast aan de pocket. Vulde de onderkant van de shaker met shakermateriaal en sloot de pocket voordat ik het geheel op een witte topfold basiskaart plakte.
Stamped the images, colored them up using Copic markers and cut them using the matching Warm Winter Hugs Die-Namics. Heat set the sentiment using white embossinpowder on to Kraft cardstock and cut it using the matching Something for Everything Die-Namics. Stempelde de afbeeldingen, kleurde ze in met mijn Copic markers en stanste ze met de bijpassende Warm Winter Hugs Die-Namics. Heat emboste de tekst met wit embossingpoeder op Kraft cardstock en stanste het uit met de bijpassende Something for Everything Die-Namics.

Used Copic Colors:
Bear - E57, E55, E53, E51, E50 / R22, R20, R00
Turtle - G94, YG63, G21 / E18, E35, E33, E53, E11
Penguin - N6, N4, N2 / E53, E51, E50, 0 / YR24, YR23, YR21
Red - R37, R35, R32
Blue - B26, B24, B23, B21
Yellow - YR24, YR23, YR21
White - C5, C3, C1, C00, 0

If you need to be even more inspired after this post make sure to have a look over at My Favorite Things Youtube ChannelWanneer je na deze post nog wat meer ideeën nodig heb neem dan even een kijkje op het Youtube kanaal van My Favorite Things.

Have a wonderful day!
Greets, Marieke

Studio Light - Videotutorial

Hallo Allemaal,

Hier is mijn wekelijkse post voor Studio Light weer. Deze keer maakte ik een kaart met de nieuwste By Laurens stempels, die vanaf vorige week te koop zijn! I'm back with my weekly post for Studio Light. This time around I decided card using the newest By Laurens stamps, they are for sale as we speak!
Deze kaart maakte ik voor de nieuwste tutorial van Studio Light. Onderaan het blog bericht kun je een (Engels talige) tutorial vinden hoe je deze kaart kunt maken. Veel kijk plezier!

This card I made especially for my tutorial for Studio Light. At the end of the blogpost there will be a (English) spoken tutorial on how to make this card. Have fun watching!
Gebruikte Copic Kleuren:
Giraffe - E44, E43, E42, E41 / E35, E33, E31 / N6, N4


Heb een heerlijke dag!
Groet, Marieke

donderdag 16 november 2023

My Favorite Things November Release Spotlight Day 2

 Hello all,

Day two of November release spotlight day by My Favorite ThingsDag twee van de My Favorite Things november release spotlight dag is hier! 
Today the spotlight is on the newest stamp by artist Yan and it's so cute! For my card I used; North Pole Pals, the Heavy Snowfall Stencil together with some older products to create a mail card.

Vandaag staat de spotlight op de nieuwste stempel van artiest Yan en hij is zo schattig! Voor mijn kaart gebruikte ik de North Pole Pals, het Heavy Snowfall Stencil samen met wat oudere producten om een post kaart te maken.
On a white topfold base card I adhered some 1/4 inch strips of red and white cardstock. Out of Cement Gray I cut a rectangle and die cut the sides using Notebook Edge Die-Namics. With a white ink I inkblended the sides and the snowfall. Cut a strip of snow and cut the sides with the same die as the panel. Plakte op een witte topfold kaart rode en witte stroken papier van 1/4 inch. Sneed een rechthoek van Cement Gray en stanste de zijkanten met de Notebook Edge Die-Namics. Met een witte inkt beinkte ik de zijkanten en de sneeuwval. Stanste een strook sneeuw en ook de zijkanten met dezelfde stans als de grijze rechthoek.

Out of white cardstock I die cut the smallest die out of Postage Stamp STAX Die-Namics. Stamped the number out of Price Tag with Wild Cherry. Stamped the snowflakes using Cement Gray and adhered it on to the panel. Stamped the stamps out of First Class Friend on to the post stamp. Uit with cardstock stanste ik de kleinste maat postzegel van de Postage Stamp STAX Die-Namics. Stempelde het nummer van de Price Tag met Wild Cherry. Stempelde de sneeuwvlokken met Cement Gray en plakte het op de kaart. Stempelde over de postzegel de teksten van de First Class Friend.
Stamped the images, colored them up using my Copic markers and cut them using the matching North Pole Pals Die-Namics. Heat set the top sentence on some red cardstock and the other sentences directly on the base card. Stempelde de afbeeldigen, kleurde ze in met mijn Copic markers en stanste ze uit met de bijpassende North Pole Pals Die-Namics. Heat emboste de bovenste zin op rood cardstock en de andere heat emboste ik rechtstreeks op de grijze rechthoek.

Used Copic Colors:
Polar Bear - E53, E51, E50, 0 / R20, R00
Penguin - E53, E51, E50, 0 / YR02, YR00 / N6, N4, N3, N2
Red - R59, R37, R27, R24
White - C5, C3, C1, C00, 0
Black - N6, N4, N3, N2
Gold - E18, Y26, Y17, Y13

If you need to be even more inspired after this post make sure to have a look over at My Favorite Things Youtube ChannelWanneer je na deze post nog wat meer ideeën nodig heb neem dan even een kijkje op het Youtube kanaal van My Favorite Things.

Have a wonderful day!
Greets, Marieke

woensdag 15 november 2023

My Favorite Things November Release Spotlight Day 1

 Hello all,

Today is day one for the My Favorite Things spotlight posts! The upcomming four days the Designteam will show you projects using all of the new goodies that where release last tuesday! Vandaag is dag één van de My Favorite Things spotlight posts! De aankomende vier dagen zal het designteam verschillende projecten laten zien met de nieuwe release producten die sinds dinsdag verkrijgbaar zijn!
For today's project I created a card using the other stamp by artist Jenoblade called Yeti or Not. For my card I combined it with the Cáfe all Day, Stylish Snowflake and the Tree Lines Die-Namics.

Voor mijn kaart van vandaag gebruikte ik de andere stempel van artiest Jenoblade genaamd Yeti or Not. Ik combineerde de stempel met de Cáfe all Day, Stylish Snowflake en de Tree Lines Die-Namics.
The base is a white topfold card, inkblende a piece of watercolor paper with scattered Straw, Milled Lavender, Seedles Preserves and Wilted Violet. Splattered water and white paint and adhered it to the card. Cut the Tree Lines Die-Namics out of Kraft, white and copic paper. Colored the trees using copics and the snow I inkblended using Lost Shadow, Shaded Lilac and Wilted Violet. Adhered them together and on the card. De basis van de kaart is een witte topfold kaart. Inktblende een stuk aquarel papier met Scattered Straw, Milled Lavender, Seedles Preserves en Wilted violet en plakte het op de kaart. Stanste de Tree Lines Die-Namics uit Kraft, wit en Copic papier. Kleurde de bomen in met mijn Copic markers en het sneeuw bewerkte ik met Lost Shadow, Shaded Lilac en Wilted Violet. Plakte ze daarna op elkaar en op de kaart.

Die cut all the elements of the Cáfe all Day Die-Namics, colored the tag and the wiped cream using my Copic markers. Die cut the snowflakes and adhered everything together. Stanste alle onderdelen van de Cáfe all Day Die-Namics, kleurde het label en de slagroom met Copic markers. Stanste de sneeuwvlokken en plakte alles op elkaar.
Stamped the images, colored them up using my Copic markers and cut them using the matching Yeti or Not Die-Namics. For the coffee cup and trees I used Sweater Weather in the Woods and Beast Friends. Adhered everything on the card, stamped the sentiment and finished the card off by adding some white gelpen details. Stempelde de afbeeldingen, kleurde ze in met mijn Copic markers en stanste ze uit met de bijpassende Yeti or Not Die-Namics. Voor de koffiebeker en de bomen gebruikte ik de Sweater Weather in the Woods en Beast Friends. Plakte alles op de kaart, stempelde de tekst en bewerkte als laatste de afbeeldingen met een witte gelpen.

Used Copic Colors:
Purple - V17, V15, V12, V01
Yeti's - E000, E00, E11, E21 / R20 / E53, E51, E50, 0
White - C5, C3, C1, C00, 0

If you need to be even more inspired after this post make sure to have a look over at My Favorite Things Youtube ChannelWanneer je na deze post nog wat meer ideeën nodig heb neem dan even een kijkje op het Youtube kanaal van My Favorite Things.

Have a wonderful day!
Greets, Marieke

dinsdag 14 november 2023

My Favorite Things - November Release Day!

 Hello all,

It’s time for the My Favorite Things November release! All new products are available right now! The MFT design team is sharing projects created with the new stuff. You can find loads of inspiration! Het is tijd voor de My Favorite Things november product lancering. Alle nieuwe producten zijn vanaf nu verkrijgbaar! Het MFT design team deelt ook vandaag weer een lading aan inspiratie.
Yay the new release is avaible as we speak! For today I created a more clean and simple winter card using the Snow Happy.

Ja de nieuwe release is verkrijgbaar vanaf nu! Ik maakte een wat meer clean en simpel winterse kaart met de Snow Happy.
The base is a topfold white card, cut another 4 1/4 x 5 1/2 inch white rectangle and cut the shape using Inside & Out Stitched Arch STAX Die-namics. Inkblended a piece of watercolor paper using Tumbled Glass, Peacock Feathers and Faded Jeans. De basis is een topfold witte kaart, sneed een rechthoek 4 1/4 x 5 1/2 inch en en stanste hier de Inside & Out Stitched Arch STAX Die-Namics uit. Inktblende een stuk aquarel papier met Tumbled Glass, Peacock Feathers en Faded Jeans.

Die cut the Birch Tree Forest Cover-up Die-Namics out of Kraft cardstock. Inkblended the trees using Vintage Photo and Walnut stain. Splattered some water and white paint on the trees and the background. Adhered both on the base of the card. Stanste de Birch Tree Forest Cover-up Die-Namics uit Kraft cardstock. Inktblende het met Vintage Photo en Walnut Stain. Spetterde daarna water en witte verf op de bomen en achtergrond, plakte beide op de kaart.
Die cut a strip of snow using the Stitched Snow Drifts Die-Namics. Inkblended it with Tumbled Glass and Peacock Feathers. Stamped the sentiment and adhered the snow behind the panel and the panel on the card. Stamped the images, colored them up and cut them using the matching Snow Happy Die-Namics. Stanste een strip sneeuw met de Stitched Snow Drifts Die-namics. Inktblende de sneeuw met Tumbled Glass en Peacock Feather. Stempelde de tekst en plakte het achter het paneel en op de kaart. Stempelde de afbeeldingen, kleurde ze met mijn Copic markers en stanste ze beide uit met de bijpassende Snow Happy Die-Namics.

Used Copic Colors:
Snowman - W3, W1, W0, W00, 0 / YR24, YR23, YR21 / R59, R39, R37, R35 / C5, C3, C1, C00 / N8, N6, N4, N2 / R20
Fox - E09, E07, YR24, YR23, YR21 / W5, W3, W1, W00 / R22 / G99, G94, G21 / C5, C3, C1, C00

If you need to be even more inspired after this post make sure to have a look over at My Favorite Things Youtube ChannelWanneer je na deze post nog wat meer ideeën nodig heb neem dan even een kijkje op het Youtube kanaal van My Favorite Things.

Have a wonderful day!
Greets, Marieke

maandag 13 november 2023

My Favorite Things November Release Preview Day

Hello all,

It’s time for the My FavoriteThings November release! During the release week, the MFT Design Team is sharing lots of projects featuring all of the new products. The new release will officially be available tommorow November 14th ! Het is tijd voor de My Favorite Things november release week! Tijdens de release week, laat het MFT Design Team verschillende projecten zien met alle nieuwe producten. De release zal verkrijgbaar zijn morgen 14 november!
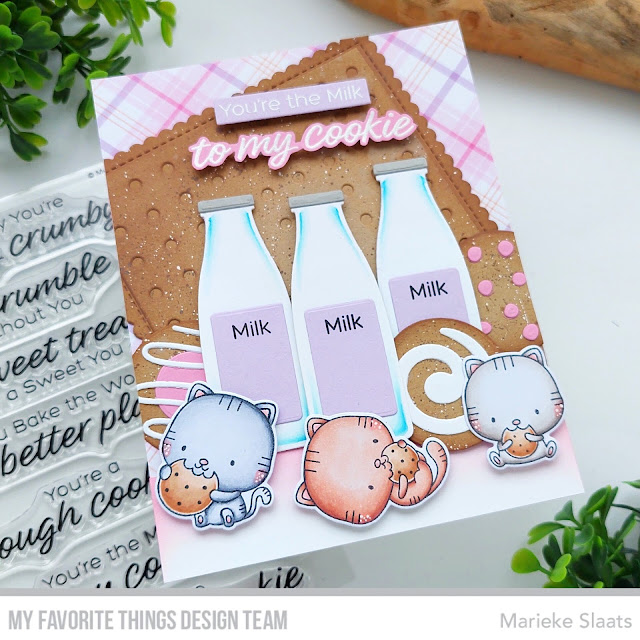
When I saw the Milk and Cookies Die-Namics I immendently knew I wanted to create a card matching the freshly released Chip, Chip Hooray. And to go with the Milk and Cookies Die-Namics there is a matching stamp set Cookie Crumbs.

Toen ik de Milk and Cookies Die-Namics zag wist ik meteen dat ik er een kaart mee wilde maken met de nieuwere Chip, Chip Hooray. Om de Milk and Cookies Die-Namics te complimenteren is er ook een bijpassende stempel Cookie Crumbs.
The base is a A2 topfold white card, on the front of the card I adhered a piece of pattern paper out of the Orange Sherbet Paper Pad. Cut the Milk and Cookies Die-Namics using White, Cotton Candy, Kraft, Cement Gray and Grapsicle cardstock. Inkblended the cookies using Vintage Photo and Walnut Stain, splattered water and white paint and assembled them. De basis is een topfold witte kaart, op de voorkant plakte ik een stuk designpapier uit het Orange Sherbet Paper Pad. Stanste de Milk en Cookies Die-Namics uit Wit, Cotton Candy, Kraft, Cement Gray en Grapsicle cardstock. Inktblende de koekjes met Vintage Photo en Walnut Stain. Spetterde water en witte verf en plakte het tot een geheel.

Stamped the milk on the labels and colored up the milk bottles using my Copic markers. For the large cookie in the back I used the Blueprints 27 Die-Namics together with the Pegboard Cover-up Die-Namics. Inkblended and splattered with the same colors as for the small cookies. Cut a strip of white cardstock for the grounding and blended some Spun Sugar and Kitsch Flamingo. Stempelde de tekst "melk" op de labels en kleurde de flessen met mijn Copic markers. Voor het grote koekje gebruikte ik Blueprints 27 Die-Namics samen met de Pegboard Cover-up Die-Namics. Bewerkte het koekje op dezelfde manier als de kleine koekjes hierboven beschreven.
Stamped the tree images out of Chip, Chip Hooray and colored them up using my Copic markers. Cut them using the matching Chip, Chip Hooray Die-Namics and added them to the card. Heat set the sentiment from Cookie Crumbs on Cotton Candy and Grapsicle and cut them into seperate sentiments before adding them on the card. Stempelde de drie afbeeldingen uit de Chip, Chip Hooray en kleurde ze in met mijn Copic markers. Stanste ze daarna uit met de bijpassende Chip, Chip Hooray Die-Namics en plakte ze op de kaart. Heat emboste de teksten uit Cookie Crumbs op Cotton Candy en Grapsicle and maakte er twee losse teksten van voordat ik ze op de kaart plakte.

Used Copic Colors:
Left Cat - C6, C4, C2, C1, C0, C00
Middle Cat - E17, E15, E13, E11
Right Cat - W6, W4, W2, W1, W0, W00
Pink - R20, R00
Cookies - E35, E33, E31, E30
Milk Bottles - B02, B00, B000, B0000, 0

If you need to be even more inspired after this post make sure to have a look over at My Favorite Things Youtube ChannelWanneer je na deze post nog wat meer ideeën nodig heb neem dan even een kijkje op het Youtube kanaal van My Favorite Things.

Have a wonderful day!
Greets, Marieke

woensdag 8 november 2023

My Favorite Things - Vault Release Spotlight

 Hello all,

Today is the Vault Release Spotlight Day of My Favorite Things! The Designteam will show you projects using all of the new goodies that where released yesterday! Vandaag is het de Vault Release Spotlight dag My Favorite Things! Het designteam zal verschillende projecten laten zien met de nieuwe release producten die sinds gisteren verkrijgbaar zijn!
For my card I thought it would be fun to combine the Rosette Die-Namics together with the Toasted Marshmallows Die-Namics. For the background I used the Whimsical Woodgrain Background and topped it of with a sentiment out of the Get Toasty stamp.

Voor mijn kaart dacht ik dat het leuk zou zijn om de Rosette Die-Namics te combineren met de Toasted Marshmallows Die-Namics. Voor de achtergrond gebruikte ik de Whimsical Woodgrain achtergrond stempel en werkte het geheel af met een tekst uit de Get Toasty stempel.
So cut a a2 Kraft rectangle and stamped the Whimsical Woodgrain Background on to it. Added some white ink to the sides and splattered some white paint. Stamped the sentiment on the bottom using Milk Chocolate ink. Sneed een A2 Kraft rechthoek en stempelde hier de Whimsical Woodgrain Background op. Bewerkte de zijkanten met witte inkt, spetterde daarna met witte verf. Stempelde de tekst op de onderzijde met Milk Chocolate inkt.

Die cut the Rosette Die-Namics four times out of Cotton Candy. Folded the diecuts and adhered them together. Die cut two circles using the Wonky Stsiched Circle Stax Die-Namics twice. Adhered one to the bottom and one I inkblended some Kitsch Flamingo on to. Splattered some water, white paint and stamped some snowflakes with Picked Raspberry. Stanste de Rosette Die-Namics vier keer uit Cotton Candy. Vouwde de die cuts en plakte ze aan elkaar. Stanste twee cirkels met de Wonky Stitched Circle STAX Die-Namics. Plakte er één aan de onderzijde en de ander beinkte ik met Kitsch Flamingo. Spetterde daarna water en witte verf om vervolgens sneeuwvlokken met Picked Raspberry te stempelen.
Adhered the circle to the front of the rosette and on to the card. Die cut the elements of the marshmallows using Kraft and white cardstock. Inkblended the sticks using Walnut Stain and the marshmallows using Kitsch Flamingo and Vintage Photo. Adhered all the elements on the card and finished of using some transparant sequins. Plakte de geinkte cirkel op de rosette en daarna het geheel op de kaart. Stanste alle onderdelen van de marshmallows uit Kraft en wit cardstock. Inktblende de stokken met Walnut Stain en de marshmallows met Kitsch Flamingo en Vintage Photo. Plakte alles op de kaart en werkte het geheel af met transparante sequins.

If you need to be even more inspired after this post make sure to have a look over at My Favorite Things Youtube ChannelWanneer je na deze post nog wat meer ideeën nodig heb neem dan even een kijkje op het Youtube kanaal van My Favorite Things.

Have a wonderful day!
Greets, Marieke

dinsdag 7 november 2023

My Favorite Things - Vault Release

 Hello all,

Today is the Vault Release Day over at My Favorite Things! The Designteam will show you projects using all of the new goodies that are being released today! Vandaag is het de Vault Release dag van My Favorite Things! Het designteam laat verschillende projecten zien met de nieuwe vault release producten die sinds vandaag verkrijgbaar zijn!
There is so many fun products being released it was hard to pick what to use. For my card today I decided to combine "old" with new to create a more Clean and Simple card. I used Feel Better together with Squeeze the Day and the versatile Distress Patterns stamp.

Er zijn zoveel leuke nieuwe producten uit gekomen dat het moeilijk kiezen was wat ik wilde gebruiken. Voor mijn kaart besloot ik "oud" met nieuw te combineren en maakte een meer Clean en Simple kaart. Ik gebruikte de Feel Better samen met Squeeze the Day en het veelzijdige Distress Patterns stempel.
Cut a white 4 1/4 x 5 rectangle and stamped some "splatters" on the bottom using Lemon Drop. Stamped the sentiment and adhered a small strip of Black Licorice on the bottom. Cut a A2 cardbase and adhered a strip of the Diagonal Gingham Pattern Paper. Adhered the other rectangle on to it using foam tape.

Sneed een 4 1/4 x 5 inch witte rechthoek en stempelde hier met Lemon Drop de "spetters" op. Stanste de tekst en plakte onder de rechthoek een strookje Black Licorice. Sneed een A2 witte rechthoek en plakte hier een strook designpapier op uit het Diagonal Gingham Paper Pad. Plakte de andere rechthoek er boven met foam tape.
Stamped all the images, colored them up using my Copic markers and cut them using the Feel Better and Squeeze the Day Die-Namics. Adhered the images on the card and finished the card of by adding some Glossy Accent to the hearts. Stempelde de afbeeldingen, kleurde ze in met mijn Copic markers en stanste ze uit met de Feel Better en Squeeze the Day Die-Namics. Plakte de afbeeldingen op de kaart en bewerkte de harten met Glossy Accent.

Used Copic Colors:
Yellow - Y17, Y15, Y13, Y11
Black - T8, T6, T4
Blue/ white - B02, B00, B000, B0000, 0
Grey / White - C5, C3, C1, C00, 0
Wood - E37, E35, E33, E31
Bunny - E55, E53, E51, E50 / R22, R20

If you need to be even more inspired after this post make sure to have a look over at My Favorite Things Youtube ChannelWanneer je na deze post nog wat meer ideeën nodig heb neem dan even een kijkje op het Youtube kanaal van My Favorite Things.

Have a wonderful day!
Greets, Marieke