Vandaag is het mijn beurt om op het Catch the bug blog een tutorial te laten zien, en daar moest ik echt wel even over nadenken! Maar uiteindelijk gekozen om te laten zien hoe je een digitale stempel inkleurt met de no line techniek. Uiteraard kun je hem ook toepassen op een rubber of clear stempel.
Today it is my turn over at the Catch the bug blog to show you guys a tutorial. I had to think about what i wanted to show you guys but i figured it out! I'm going to show you a tutorial on how to colour a digital stamp with the no lines colouring techniek.
Als eerste heb je een verwerkingsprogramma nodig ik gebruik in dit geval gewoon Words. Ik voeg de normale afbeelding in en dan krijg je een verwerkingsbalk. Op deze balk heb je de optie je contrast te verlagen, klik hier op en verlaag je contrast met 95%. Dan is je afbeelding bijna niet meer te zien maar genoeg om het nog in te kunnen kleuren. Nu print je de afbeelding uit.
First of all you need a computer program like photoshop, i use Words in this case. I add the digital stamp normally and then i get a extra bar wich give me the option to lower the contrast. I lower the contrast with 95% and then you barely can see the picture but enough for you to colour it. You can print it now.
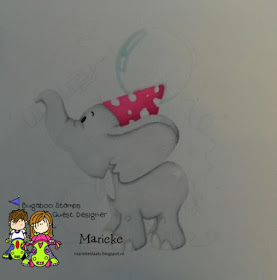
Als je goed kijkt zie je nu de digitale stempel zoals hij geprint is.
If you look closely this is what the digital stamp looks like printed.
Als eerst kleur je een gedeelte in met de lichtste kleur die je hebt. In dit geval heb ik C00 gebruikt,
First off all colour a part of the image with the lightest colour you have in my case it's C00.
Vervolgens gebruik je de donkerste kleur in mijn geval C3 en kleur je de "schaduwen" in.
Next up you use youre darkest colour in my case C3 and you colour the shades.
Een kleur lichter is C1 daarmee vervaag je de C3 en verleng je de lijnen.
With C1 you blend out youre C3 also make you strokes a bit longer.
Herhaal deze stap met je C0.
Repeat this this step with your C0.
Vervolgens pak je, je C00 weer en kleur je alles nogmaals in om het gelijkmatig te houden.
Next up take your C00 again and colour everything to blend out everything well again.
Ik gebruik de W9 om de ogen en de wenkbrauwen te accentueren.
I used the W9 to draw in the eyes and eyebrows.


Herhaal deze methode bij alle losse onderdelen van de digitale stempel totdat het geheel klaar is.
Repeat this method with every single element on the digital stamp until you finished your project.
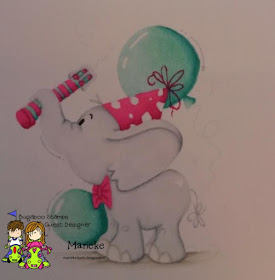
Nu is de digitale stempel klaar en kun je hem gaan verwerken op een kaart. In dit geval heb ik gebruik gemaakt van Birthday Elephant.
Now your digital stamp is ready for you to finish up your project. In this case i used Birthday Elephant.
Fijne dag allemaal!
Liefs,
Marieke


Wat een werk hé zo'n tutorial?! Heel duidelijk uitgelegd en ik vind de keuze voor deze tutorial ook heel leuk Marieke :) Ik denk dat een hoop mensen hier heel veel aan zullen hebben!
BeantwoordenVerwijderenLiefs Chantal
Thank you, Marieke! I never thought of changing the opacity! THANKS SO MUCH! hugs, de {Creative Smiles} my blog
BeantwoordenVerwijderenDat is leuk uitgelegd Marieke. Bedankt voor de tutorial.
BeantwoordenVerwijderengroetjes,
Karin.
Bedankt voor de superduidelijke uitleg Marieke!
BeantwoordenVerwijderenxxx Margreet
Dat is een geweldig leuke tutorial Marieke....wat een duidelijke uitleg....
BeantwoordenVerwijderenbedankt ervoor...
groetjes Rosina
Very Lovely, Marieke! Beautiful card and coloring! Thanks for sharing such a fabulous tutorial!
BeantwoordenVerwijderenJudi
Kon dus echt niks meer zien, zelfs niet met mijn brilletje op maar wow Marieke wat een gave tuut.......ik zie beeld voor beeld iets beeldigs ontstaan, echt super!!
BeantwoordenVerwijderenxx Irene
Oh my goodness, not only do I LOVE this image and what you did with it, but this tutorial is simply FABULOUS!!!
BeantwoordenVerwijderenSo glad to have you joining our bugaboo team as a guest designer - you are a wonderful addition to the team!
Hugs & Happy Days
Min
PS - Can't WAIT to give this a try - I'm off to do that right now!! :)
BeantwoordenVerwijderenThanks for the great tutorial, Marieke. I would not have thought to adjust the contrast before printing for this technique. Glad to have you joining the Bugaboo Team as Guest Designer.
wow lijkt me leuk een eer te gaan proberen.. dank je wel voor je uitleg,. groeten miranda k
BeantwoordenVerwijderenGave tutorial Marieke, bedankt voor je uitleg!
BeantwoordenVerwijderenGa het zeker onthouden.
Lieve groetjes, Marleen
I saw this card on the Catch the Bug blog and had to get a better look. I just love it. Great color choices. Have a great day!
BeantwoordenVerwijderen